
26.1. Occasionally Connected Applications
An occasionally connected application is one that can continue to operate regardless of connectivity status. There are a number of different ways to access data when the application is offline. Passive systems simply cache data that is accessed from the server, so that when the connection is lost at least a subset of the information is available. Unfortunately, this strategy means that a very limited set of data is available and is really only suitable for scenarios where there is an unstable or unreliable connection, rather than completely disconnected applications. In the latter case, an active system that synchronizes data to the local system is required. The Microsoft Synchronization Services for ADO.NET (Sync Services) is a synchronization framework that dramatically simplifies the problem of synchronizing data from any server to the local system.
26.1.1. Server Direct
To get familiar with the Sync Services, we will use a simple database that consists of a single table that tracks customers. You can create this using the Server Explorer within Visual Studio 2008. Right-click the Data Connections node and select Create New SQL Server Database from the shortcut menu. Figure 26-1 shows the Create New SQL Server Database dialog in which you can specify a server and a name for the new database.
Figure 26.1. Figure 26-1

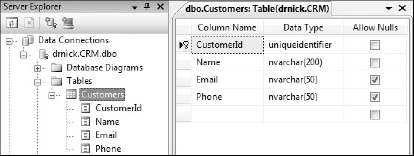
When you click "OK", a database with the name CRM will be added to the local host SQL Server instance and a data connection added to the Data Connections node in the Server Explorer. From the Tables node, under the newly created data connection, select Add New Table from the right-click shortcut menu and create columns for CustomerId (primary key), Name, Email and Phone so that the table matches what is shown in Figure 26-2.
Figure 26.2. Figure 26-2
Now that you have a simple database to work with, it's time to create a new Visual Basic Windows Forms Application. In this case the application is titled QuickCRM, and in the Solution Explorer tool window of Figure 26-3 you can see that we have renamed Form1 to MainForm and added two additional forms, ServerForm and LocalForm.
Figure 26.3. Figure 26-3
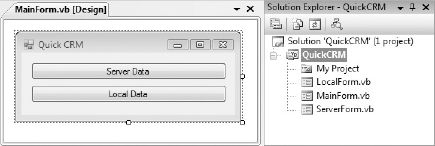
MainForm has two buttons, as shown in the editor area of Figure 26-3, and has the following code in order to launch the appropriate forms:
Public Class MainForm
    Private Sub btnServer_Click(ByVal sender As Object, _
                                 ByVal e As EventArgs) Handles btnServer.Click
        My.Forms.ServerForm.Show()
    End Sub
    Private Sub btnLocal_Click(ByVal sender As Object, _
                                 ByVal e As EventArgs) Handles btnLocal.Click
        My.Forms.LocalForm.Show()
    End Sub
End Class
Before we look at how you can use Sync Services to work with local data, let's see how you might have built an always-connected, or server-bound, version. From the Data menu select Add New Data Source and step through the Data Source Configuration Wizard, selecting the CRM database created earlier, saving the connection string to the application configuration file, and adding the Customers table to the CRMDataSet.
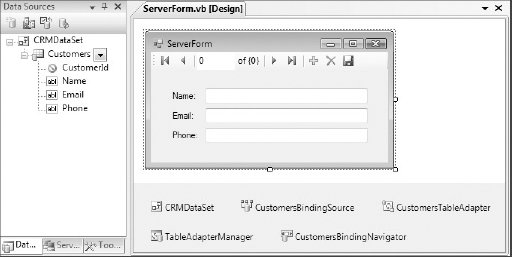
Open the ServerForm designer by double-clicking it in the Solution Explorer tool window. If the Data Sources tool window is not already visible, then select Show Data Sources from the Data menu. Using the drop-down on the Customers node, select Details and then select None from the CustomerId node. Dragging the Customers node across onto the design surface of the ServerForm will add the appropriate controls so that you can locate, edit, and save records to the Customers table of the CRM database, as shown in Figure 26-4.
Figure 26.4. Figure 26-4
You will recall from our table definition that the CustomerId can't be null, so we need to ensure that any new records are created with a new ID. To do this we tap into the CurrentChanged event on the CustomersBindingSource object. You can access this either directly in the code-behind of the ServerForm or by selecting CustomersBindingSource and finding the appropriate event in the Properties tool window.
Private Sub CustomersBindingSource_CurrentChanged _
                     (ByVal sender As System.Object, ByVal e As System.EventArgs) _
                                      Handles CustomersBindingSource.CurrentChanged
    Dim c As CRMDataSet.CustomersRow = _
    CType(CType(Me.CustomersBindingSource.CurrencyManager.Current, _
                                DataRowView).Row, _
                         CRMDataSet.CustomersRow)
    If c.RowState = DataRowState.Detached Then
        c.CustomerId = Guid.NewGuid
    End If
End Sub
This completes the part of the application that connects directly to the database to access the data. You can run the application and verify that you can access data while the database is online. If the database goes offline or the connection is lost, an exception will be raised by the application when you attempt to retrieve from the database or save new changes.
26.1.2. Getting Started with Synchronization Services
To get started with Sync Services you need to add a Local Database Cache item to your project via the Add New Item dialog. Following the CRM theme, we will name this CRMDataCache.Sync. As the name implies, this item is going to define the attributes of the cache in which the local data will be stored, as well as some of the synchronization properties. As the cache item is added to the project, this launches the Configure Data Synchronization dialog, shown in Figure 26-5.
Figure 26.5. Figure 26-5
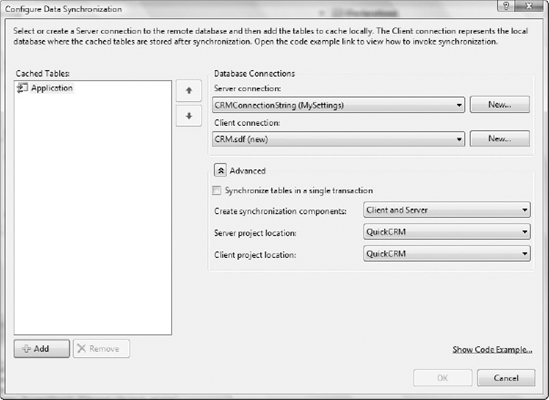
Unlike most dialogs, which generally work from left to right, this dialog starts in the middle with the definition of the database connections. The server connection drop-down should already include the connection string to the database that was created earlier. Once a server connection has been selected, a local database will be automatically created for the client connection if there are no SQL Server Compact 3.5 (SSCE) database files (.sdf) in the project. In Figure 26-5, the word "new" in parentheses after the client connection name indicates that the CRM.sdf has been newly created either automatically or via the "New" button within this dialog.
The next thing that needs to be decided is which of the server tables should be synchronized, or cached, in the client database. To begin with, the area at the left of Figure 26-5, entitled Cached Tables, is empty except for the Application node. You can add tables from the server with the "Add" button. This will launch the dialog shown in Figure 26-6.
Figure 26.6. Figure 26-6

Before we look at the different fields in this dialog, you need to understand how most synchronization is coordinated. In most cases, an initial snapshot is taken of the data on the server and sent to the client. The next time the client synchronizes, the synchronization engine has to work out what has changed on both the client and the server since the last synchronization. Different technologies use different markers to track when things change and what changes need to be synchronized as a result. Sync Services takes quite a generic approach, one assuming that each table has a column that tracks when updates are made and when records are created. It also uses an additional backing table to track items that have been deleted. As you can imagine, if you have a large database, adding these additional columns and tables makes for significant overhead to support synchronization.
On the left of the Configure Tables for Offline Use dialog in Figure 26-6, you can see a list of all the tables that are available for synchronization. This list will include only tables that belong to the user's default schema (in this case dbo), have a primary key, and don't contain data types not supported by SSCE. Note that some of these limitations are imposed by the designer, not necessarily the synchronization framework itself. For example, you can manually configure Sync Services to synchronize tables from other schemas.
Selecting a table for synchronization will enable you to define the synchronization attributes for that table. In Figure 26-6, we have selected "New and incremental changes after first synchronization" to reduce network bandwidth. The trade-off is that more work is involved in tracking changes between synchronizations, which requires changes to the server database schema to track modifications. As the Customers table that we created earlier doesn't have columns for tracking when changes are made, the dialog has suggested that we create a LastEditDate, a CreationDate, and a new table, Customers_Tombstone. By default, the additional columns are dates, but you can change these to be time stamps by clicking the "New" button and changing the data type.
In the lower area of Figure 26-6 are checkboxes with which you can control how the dialog behaves when you click "OK". If you're working on a database shared by others, you may want to review the generated scripts before allowing them to execute. In our case we will leave both checkboxes checked, which will create the database scripts (including undo scripts) and add them to our project, as well as execute them on the server database, to give us the additional change-tracking columns. The scripts will also add appropriate triggers to the Customers table to ensure the change-tracking columns are updated and to add deleted items to the Tombstone table. Clicking "OK" on this dialog will add the Customers node to the Configure Data Synchronization dialog so that it appears as in Figure 26-7.
Figure 26.7. Figure 26-7

Selecting the Customers node enables you to change the options you just set, as well as use an additional Creation option. You can use this option to tailor how the synchronization framework will behave during the initial synchronization of data. For this example we will continue with the default value of DropExistingOrCreateNewTable. Clicking "OK" will both persist this configuration in the form of synchronization classes and invoke a synchronization between the server and the local data file, as shown in Figure 26-8.
Figure 26.8. Figure 26-8
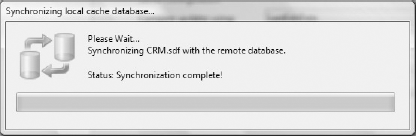
Forcing synchronization at this point means that the newly created SSCE database file is populated with the correct schema and any data available on the server. Once completed, the new database file is then added to the project. This in turn triggers the Dataset Configuration wizard. Step through this wizard, naming the new dataset LocalCRMDataSet, and include the Customers table.
If you now look at the Data Sources tool window, you will see that there is a LocalCRMDataSet node that contains a Customers node. As we did previously, set the Customers node to Details and the CustomerId, LastEditDate, and CreationDate nodes to None. Then drag the Customers node across onto the designer surface of the LocalForm. The result should be a form similar to the one shown in Figure 26-9.
Figure 26.9. Figure 26-9

Adding these components brings the same components to the design surface and the same code to the form as when we were connecting directly to the server. The difference here is that a CustomersTableAdapter will connect to the local database instead of the server. As we did before, we need to add the code to specify the CustomerId for new records.
Private Sub CustomersBindingSource_CurrentChanged _
                     (ByVal sender As System.Object, ByVal e As System.EventArgs) _
                                      Handles CustomersBindingSource.CurrentChanged
    Dim c As LocalCRMDataSet.CustomersRow = _
    CType(CType(Me.CustomersBindingSource.CurrencyManager.Current, _
                                DataRowView).Row, _
                         LocalCRMDataSet.CustomersRow)
    If c.RowState = DataRowState.Detached Then
        c.CustomerId = Guid.NewGuid
    End If
End Sub
The last thing we need to add to this part of the project is a mechanism to invoke the synchronization process. Simply add a button, btnSynchronize, to the bottom of the LocalForm and double-click it to generate the click-event handler. Instead of our having to remember the syntax for working with the synchronization API, the team has given us a useful code snippet that we can drop into this event handler. Back in Figure 26-7, there was a link toward the lower right corner, just above the "OK" and "Cancel" buttons, titled "Show Code Example . . ." Clicking this will show a dialog that contains a code snippet you can copy and then paste into the click-event handler.
Private Sub btnSynchronize_Click(ByVal sender As System.Object, _
                          ByVal e As System.EventArgs) Handles btnSynchronize.Click
    ' Call SyncAgent.Synchronize() to initiate the synchronization process.
    ' Synchronization only updates the local database,
    ' not your project's data source.
    Dim syncAgent As CRMDataCacheSyncAgent = New CRMDataCacheSyncAgent()
    Dim syncStats As Microsoft.Synchronization.Data.SyncStatistics = _
    syncAgent.Synchronize()

    ' TODO: Reload your project data source from the local database
    '(for example, call the TableAdapter.Fill method).
    Me.CustomersTableAdapter.Fill(Me.LocalCRMDataSet.Customers)
End Sub
Pay particular attention to the next-to-last line of this snippet, in which we use the CustomersTableAdapter to fill the Customers table. This is important: Without this line the user interface will not reflect changes in the SSCE database that have been made by the synchronization process.
26.1.3. Synchronization Services over N-Tiers
So far, the entire synchronization process is conducted within the client application with a direct connection to the server. One of the objectives of an occasionally connected application is to be able to synchronize data over any connection, regardless of whether it is a corporate intranet or the public Internet. Unfortunately, with the current application you need to expose your SQL Server so that the application can connect to it. This is clearly a security violation, which you can solve by taking a more distributed approach. Sync Services has been designed with this in mind, allowing the server components to be isolated into a service that can be called during synchronization.
In this walkthrough we will create a new Local Database Cache that uses a WCF service to perform the server side of the synchronization process. To begin with, you need to add a new Visual Basic WCF Service Library project (under the WCF node of the Add New Project dialog) to your solution. We will call this project CRMServices. As we are going to use the Configure Data Synchronization dialog to create the service contract and implementation, you can remove the IService1.vb and Service1.vb files that are created by default.
You may have noticed in Figure 26-5 that there are options regarding which components will be created by the Configure Data Synchronization dialog. Previously, we wanted both client and server components to be located within the client application. However, we now want to create a new Local Database Cache object that places the server components into the CRMServices service library. As you did previously, add a new Local Database Cache object to the QuickCRM project, call it ServiceCRMDataCache.sync, and configure it to synchronize the Customers table. You will notice that when you go to select which tables you want to synchronize, the newly created Customers_Tombstone table is listed, and the columns for tracking when updates and inserts occur on the Customers table are not marked with the word "new." All you need to do is check the box next to the Customers node. As there are no changes to be made to the database schema, you can also uncheck both script-generation boxes. The main difference with the newly created cache object is that the location of the server components is the CRMServices service library, as indicated by the "Server project location" selection in Figure 26-10.
Figure 26.10. Figure 26-10

You will notice that when you click the "OK" button the new cache object, ServiceCRMDataCache.sync, is added to the QuickCRM project. Two items also are added to the CRMServices project: ServiceCRMDataCache.Server.sync and ServiceCRMDataCache.Server.SyncContract.vb. The latter is where the service contract is defined.
<ServiceContractAttribute()>  _
Public Interface IServiceCRMDataCacheSyncContract
    <OperationContract()>  _
    Function ApplyChanges(ByVal groupMetadata As SyncGroupMetadata, _
                           ByVal dataSet As DataSet, _
                           ByVal syncSession As SyncSession) As SyncContext
    <OperationContract()>  _
    Function GetChanges(ByVal groupMetadata As SyncGroupMetadata, _
                         ByVal syncSession As SyncSession) As SyncContext
    <OperationContract()>  _
    Function GetSchema(ByVal tableNames As Collection(Of String), _
                        ByVal syncSession As SyncSession) As SyncSchema
    <OperationContract()>  _
    Function GetServerInfo(ByVal syncSession As SyncSession) As SyncServerInfo
End Interface
This file also declares an implementation for this contract that creates a ServiceCRMDataCacheServerSyncProvider object (defined in ServiceCRMDataCache.Server.sync), into which it forwards each request. Because of this, the WCF service is simply a proxy for the server components. At the top of ServiceCRMDataCache.Server.SyncContract.vb are instructions for adding the relevant service and behavior declarations to the app.config file. In our case we want to remove the service and behavior declarations for Service1 and replace them with these. This should give you a system.serviceModel section within the app.config file similar to the following:
<system.serviceModel>
    <services>
        <service name="CRMServices.ServiceCRMDataCacheSyncService"
behaviorConfiguration="CRMServices.ServiceCRMDataCacheSyncServiceBehavior">
            <host><baseAddresses>
                    <add baseAddress ="http://localhost:8080/
ServiceCRMDataCacheSyncService/"/>
           </baseAddresses></host>
           <endpoint address ="" binding="wsHttpBinding" contract="CRMServices
.IServiceCRMDataCacheSyncContract"/>
           <endpoint address="mex" binding="mexHttpBinding"
contract="IMetadataExchange" />
        </service>
    </services>
    <behaviors>
        <serviceBehaviors>
            <behavior name="CRMServices.ServiceCRMDataCacheSyncServiceBehavior">
                <serviceMetadata httpGetEnabled="True" />
                <serviceDebug includeExceptionDetailInFaults="False" />
            </behavior>
        </serviceBehaviors>
    </behaviors>
</system.serviceModel>
At this stage you should verify that your service declaration is correct by setting the CRMServices project to be your startup project and by launching your solution. Doing this will attempt to invoke the WCF Service Host and may result in the dialog in Figure 26-11 being displayed.
Figure 26.11. Figure 26-11
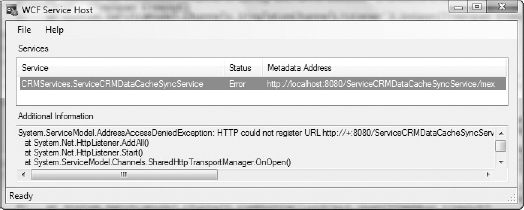
This is a well-documented error (see http://go.microsoft.com/fwlink/?LinkId=70353) that relates to the security involved in reserving portions of the http URL namespace. In Figure 26-11, you can see that it is attempting to register the address http://localhost:8080/ServiceCRMDataCacheSyncService. If you are running Windows Vista, you can overcome this issue using the netsh command (Windows XP or Windows Server 2003 uses the httpcfg.exe command) while running in Administrator mode.
>netsh http add urlacl url=http://+:8080/ServiceCRMDataCacheSyncService
user=MyDomain
ick
After reserving the appropriate URL namespace for when you run the CRMServices project, you should see the WCF Test Client dialog. Unfortunately, none of the service operations that we have defined is supported by the test client, but this dialog does verify that the service has been correctly set up.
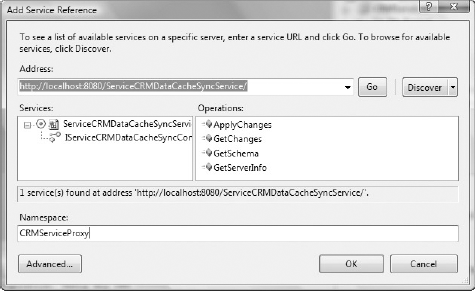
The last thing we need to do is to configure the client application, QuickCRM, so that it knows to use the WCF service we have just defined. To do this, right-click the QuickCRM node on the Solution Explorer and select the Add Service Reference item. Using the Discover drop-down, shown in the upper right corner of Figure 26-12, you can easily find the WCF service in your solution.
There appears to be an issue with the Visual Studio 2008 Add Service Reference functionality. By default, it will attempt to reuse types that are defined in assemblies referenced by the consuming project. However, if you haven't built your project before adding the service reference, you may find that it creates unwanted type definitions. To resolve this you need to remove the service reference, close the solution, and delete the .suo file associated with your solution. (This file has the same name as your solution, except with the .suo extension, and will be located in the same folder as your solution.) Before attempting to add the service reference, ensure you have built all projects within your solution.
Figure 26.12. Figure 26-12
Adding a service reference this way also adds unnecessary security information to the app.config file in the QuickCRM project. In the following snippet you will see an Identity element. This element, not the entire snippet, needs to be removed in order for your project to be able to call the WCF service.
<client>
    <endpoint address="http://localhost:8080/ServiceCRMDataCacheSyncService/"
              binding="wsHttpBinding" bindingConfiguration="WSHttpBinding_
IServiceCRMDataCacheSyncContract"
   contract="CRMServiceProxy.IServiceCRMDataCacheSyncContract"
   name="WSHttpBinding_IServiceCRMDataCacheSyncContract">
        <identity>
            <userPrincipalName value="drnick
ick" />
        </identity>
    </endpoint>
</client>
Now that the application has a reference to the WCF service, you need to tell Sync Services to use the service as a proxy for the server side of the synchronization process. This involves overriding the default behavior of the ServiceCRMDataCacheSyncAgent that was created by the Local Database Cache object created earlier. To open the code window, right-click the ServiceCRMDataCache.sync item in Solution Explorer and select View Code.
Partial Public Class ServiceCRMDataCacheSyncAgent
    Private Sub OnInitialized()
        Dim proxy As New CRMServiceProxy.ServiceCRMDataCacheSyncContractClient
        Me.RemoteProvider = _
                  New Microsoft.Synchronization.Data.ServerSyncProviderProxy(proxy)
    End Sub
End Class
The two lines that make up the OnInitialized method create an instance of the WCF service proxy and then declare this as a proxy for the SyncAgent to use to perform the server components of the synchronization process.
This completes the steps necessary for setting up Sync Services to use a WCF service as a proxy for the server components. What remains is to add a "Synchronize Via Service" button to the LocalForm and then add the following code to the click-event handler in order to invoke the synchronization:
Private Sub btnSynchronizeViaService_Click(ByVal sender As System.Object, _
                                            ByVal e As System.EventArgs) _
                                             Handles btnSynchronizeViaService.Click
    ' Call SyncAgent.Synchronize() to initiate the synchronization process.
    ' Synchronization only updates the local database,
    ' not your project's data source.
    Dim syncAgent As ServiceCRMDataCacheSyncAgent = _
                                                 New ServiceCRMDataCacheSyncAgent()
    Dim syncStats As Microsoft.Synchronization.Data.SyncStatistics = _
                                                            syncAgent.Synchronize()

    ' TODO: Reload your project data source from the local database
    ' (for example, call the TableAdapter.Fill method).
    Me.CustomersTableAdapter.Fill(Me.LocalCRMDataSet.Customers)
End Sub
You will notice that this is the same code we used when synchronizing directly with the server. In fact, your application can monitor network connectivity, and depending on whether you can connect directly to the server, you can elect to use either of the two Sync Service implementations you have created in this walkthrough.
26.1.4. Background Synchronization
You will have noticed that when you click either of the synchronize buttons, the user interface appears to hang until the synchronization completes. Clearly this wouldn't be acceptable in a real-world application, so you need to synchronize the data in the background, thereby allowing the user to continue working. By adding a BackgroundWorker component (in the Components group in the Toolbox) to the LocalForm, we can do this with only minimal changes to our application. The following code illustrates how you can wire up the events of the BackgroundWorker, which has been named bgWorker, to use either of the Sync Service implementations:
Private Sub btnSynchronize_Click(ByVal sender As Object, ByVal e As EventArgs) _
    Handles btnSynchronize.Click
    Me.btnSynchronize.Enabled = False
    Me.btnSynchronizeViaService.Enabled = False

    Me.bgWorker.RunWorkerAsync(New CRMDataCacheSyncAgent())
End Sub

Private Sub btnSynchronizeViaService_Click(ByVal sender As System.Object, _
                                            ByVal e As System.EventArgs) _
                                             Handles btnSynchronizeViaService.Click
    Me.btnSynchronize.Enabled = False
    Me.btnSynchronizeViaService.Enabled = False

    Me.bgWorker.RunWorkerAsync(New ServiceCRMDataCacheSyncAgent())
End Sub

Private Sub bgWorker_DoWork(ByVal sender As System.Object, _
                             ByVal e As System.ComponentModel.DoWorkEventArgs) _
                                                            Handles bgWorker.DoWork
    Dim syncAgent As Microsoft.Synchronization.SyncAgent = _
                           TryCast(e.Argument, Microsoft.Synchronization.SyncAgent)
    If syncAgent Is Nothing Then Return
    syncAgent.Synchronize()
End Sub

Private Sub bgWorker_RunWorkerCompleted(ByVal sender As System.Object, _
                    ByVal e As System.ComponentModel.RunWorkerCompletedEventArgs) _
                                                Handles bgWorker.RunWorkerCompleted
    Me.CustomersTableAdapter.Fill(Me.LocalCRMDataSet.Customers)

    Me.btnSynchronize.Enabled = True
    Me.btnSynchronizeViaService.Enabled = True
End Sub
In this snippet we are not reporting any progress, but Sync Services does support quite a rich event model that you can hook into in order to report on progress. If you want to report progress via the BackgroundWorker component, you need to enable its WorkerReportsProgress property. The following code illustrates you how can hook into the ApplyChanges event on the client component of Sync Services in order to report progress (in this case to a label called "lblSyncProgress" added to the form). There are other events that correspond to different points in the synchronization process.
Private Sub bgWorker_DoWork(ByVal sender As System.Object, _
                             ByVal e As System.ComponentModel.DoWorkEventArgs) _
    Handles bgWorker.DoWork
    Dim syncAgent As Microsoft.Synchronization.SyncAgent = _
                           TryCast(e.Argument, Microsoft.Synchronization.SyncAgent)
    If syncAgent Is Nothing Then Return
Dim clientProvider As _
Microsoft.Synchronization.Data.SqlServerCe.SqlCeClientSyncProvider = _
CType(syncAgent.LocalProvider, _
Microsoft.Synchronization.Data.SqlServerCe.SqlCeClientSyncProvider)
AddHandler clientProvider.ApplyingChanges, AddressOf ApplyingChanges
syncAgent.Synchronize()
End Sub
Private Sub ApplyingChanges(ByVal sender As Object, _
ByVal e As Microsoft.Synchronization.Data.ApplyingChangesEventArgs)
Me.bgWorker.ReportProgress(25, "Applying Changes")
End Sub
Private Sub bgWorker_ProgressChanged(ByVal sender As Object, _
ByVal e As System.ComponentModel.ProgressChangedEventArgs) _
Handles bgWorker.ProgressChanged
Me.lblSyncProgress.Text = e.UserState.ToString
End Sub26.1.5. Client Changes
Working through the example so far, you may have been wondering why none of the changes you have made on the client is being synchronized to the server. If you go back to Figure 26-6, you will recall that we selected "New and incremental changes after first synchronization" from the top drop-down, which might lead you to believe that changes from both the client and server will be synchronized. This is not the case and it is the wording above this control that gives it away. For whatever reason, this control only enables you to select options pertaining to "Data to download." In order to get changes to propagate in both directions, you have to override the default behavior for each table that is going to be synchronized. Again, right-click the CRMDataCache object in the Solution Explorer and select View Code. In the following code, we have set the SyncDirection property of the CustomersSyncTable to be bidirectional. You may also want to do this for the ServerCRMDataCache item so that both synchronization mechanisms will allow changes to propagate between client and server.
Partial Public Class CRMDataCacheSyncAgent
    Partial Class CustomersSyncTable
        Private Sub OnInitialized()
            Me.SyncDirection =  _
                         Microsoft.Synchronization.Data.SyncDirection.Bidirectional
        End Sub
    End Class
End Class
If you were synchronizing other tables, you would need to set SyncDirection on each of the corresponding SyncTables. An alternative implementation would be to place this code in the OnInitialized method of the SyncAgent itself. Whichever way you choose, you still need to apply the Bidirectional value to all tables you want to synchronize in both directions.
Partial Public Class CRMDataCacheSyncAgent
    Private Sub OnInitialized()
        Me.Customers.SyncDirection = _
                         Microsoft.Synchronization.Data.SyncDirection.Bidirectional
    End Sub
End Class