
33.3. Creating an Application Add-In
This section walks through the creation of an add-in to Microsoft Outlook 2007. This will demonstrate how to create an application-level add-in that includes a custom Outlook form region for a Contact item.
Never develop Outlook add-ins using your production e-mail account! There's too much risk that you will accidently do something that you will regret later, such as accidently deleting all of the e-mail in your Inbox. With Outlook you can create a separate mail profile; one for your normal mailbox, and one for your test mailbox.
33.3.1. Some Outlook Concepts
Before creating an Outlook add-in, it is worth understanding some basic concepts that are specific to Outlook development. Though there is a reasonable degree of overlap, Outlook has always had a slightly different programming model from the rest of the products in the Office suite.
The Outlook object model is a heavily collection-based API. The Application class is the highest-level class and represents the Outlook application. This can be directly accessed from code as a property of the add-in; this.Application in C# or Me.Application in Visual Basic. With the Application class you can access classes that represent the Explorer and Inspector windows.
An Explorer window in Outlook is the main window that is displayed when Outlook is first opened and displays the contents of a folder, such as the Inbox or Calendar. Figure 33-7 (left) shows the Calendar in the Explorer window. The Explorer class represents this window, and includes properties, methods, and events that can be used to access the window and respond to actions.
Figure 33.7. Figure 33-7

An Inspector window displays an individual item such as an e-mail message, contact, or appointment. Figure 33-7 right shows an Inspector window displaying an appointment item. The Inspector class includes properties and methods to access the window, and events that can be handled when certain actions occur within the window. Outlook form regions are hosted within Inspector windows.
The Application class also contains a Session object, which represents everything to do with the current Outlook session. This object provides you with access to the available address lists, mail stores, folders, items, and other Outlook objects. A mail folder, such as the Inbox or Calendar, is represented by a MAPIFolder class and contains a collection of items. Within Outlook every item has a message class property that determines how it is presented within the application. For example, an e-mail message has a message class of IPM.Note and an appointment has a message class of IPM.Appointment.
33.3.2. Creating an Outlook Form Region
Now that you understand the basics of the Outlook object model, you can create your first Outlook add-in. In Visual Studio 2008 select File ![]() New
New ![]() Project. Filter the project types by selecting Visual C# followed by Office, and then choose a new Outlook 2007 add-in project.
Project. Filter the project types by selecting Visual C# followed by Office, and then choose a new Outlook 2007 add-in project.
Unlike a document-level customization, an application-level add-in is inherently code-based. In the case of a Word or Excel add-in, there may not even be a document open when the application is first launched. An Outlook add-in follows a similar philosophy; when you first create an Outlook add-in project, it will consist of a single nonvisual class called ThisAddIn.cs (or ThisAddIn.vb). You can add code here that performs some actions during startup or shutdown.
To customize the actual user interface of Outlook you can add an Outlook form region. This is a user control that is hosted in an Outlook Inspector window when an item of a certain message class is displayed.
To add a new Outlook form region, right-click the project in the Solution Explorer, then select Add ![]() New Item. From the list of available items select Outlook Form Region, provide it with a meaningful name, and click Add. Visual Studio will then open the New Outlook Form Region Wizard that will obtain some basic properties needed to create the new item.
New Item. From the list of available items select Outlook Form Region, provide it with a meaningful name, and click Add. Visual Studio will then open the New Outlook Form Region Wizard that will obtain some basic properties needed to create the new item.
The first step of the wizard asks you to either design a new form, or import an Outlook Form Storage (.ofs) file, which is a form designed in Outlook. Select "Design a new form region" and click Next.
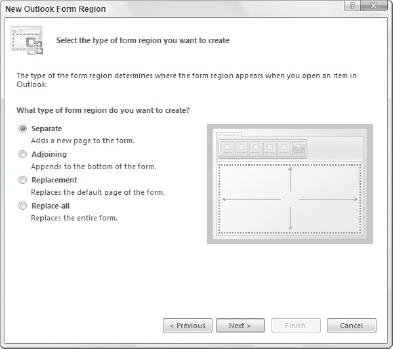
The second step in the wizard allows you to select what type of form region to create. The wizard provides a handy visual representation of each type of form region, as shown in Figure 33-8. Select the Separate option and click Next.
Figure 33.8. Figure 33-8
The next step in the wizard allows you to enter a friendly name for the form region, and, depending on the type of form region you've chosen, a title and description. This step also allows you to choose the display mode for the form region. Compose mode is displayed when an item is first being created, such as when you create a new e-mail message. Read mode is displayed when you subsequently open an e-mail message that has already been sent or received. Ensure that both of these checkboxes are ticked, enter "Custom Details" as the name, and click Next.
The final step in the wizard allows you to choose what message classes will display the form region. You can select from any of the standard message classes, such as mail message or appointment, or specify a custom message class. Select the Contact message class as shown in Figure 33-9 and click Finish to close the wizard.
Figure 33.9. Figure 33-9

Once the wizard exits, the new form region will be created and opened in the designer. As mentioned earlier, an Outlook form region, like an Actions Pane and a Task Pane, is simply a user control. However, unlike an Actions Pane, it contains an embedded manifest that defines how the form region appears in Outlook. To access the manifest, ensure that the form is selected in the designer and open the Properties window. This will show a property called Manifest, under which you can set various properties to how it appears. This property can also be accessed through code at runtime.
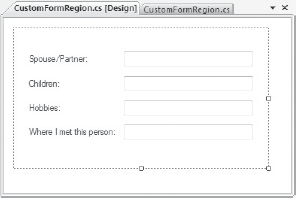
In this scenario we will use the Outlook form region to display some additional useful information about a Contact. The layout of an Outlook form region is created in the same way as any other user control. Drag four Label controls and four textbox controls onto the design surface and align them as shown in Figure 33-10. Rename the textbox controls txtPartner, txtChildren, txtHobbies, and txtMet, and change the text on the labels to match these fields.
Figure 33.10. Figure 33-10
The ContactItem class contains a surprisingly large number of properties that are not obviously displayed in a standard Contact form in Outlook. In fact, with well over 100 contact-specific fields, there is a high chance that any custom property you want to display for a contact is already defined. In our case, the first three fields displayed on this form (spouse/partner, children, and hobbies) are available as existing properties.
There are also four properties called User1 to User4 that can be used to store custom properties. The "Where I met this person" field on this Outlook form region can be stored in one of those properties. The code behind the form region will already have stubs for the FormRegionShowing and FormRegionClosed event handlers. Add the following code to those properties to access the current Contact item and retrieve and save these custom properties:
private void CustomFormRegion_FormRegionShowing(object sender, System.EventArgs e)
{
    Outlook.ContactItem myContact = (Outlook.ContactItem)this.OutlookItem;
    this.txtPartner.Text = myContact.Spouse;
    this.txtChildren.Text = myContact.Children;
    this.txtHobbies.Text = myContact.Hobby;
    this.txtMet.Text = myContact.User1;
}

private void CustomFormRegion_FormRegionClosed(object sender, System.EventArgs e)
{
Outlook.ContactItem myContact = (Outlook.ContactItem)this.OutlookItem;
myContact.Spouse = this.txtPartner.Text;
myContact.Children = this.txtChildren.Text;
myContact.Hobby = this.txtHobbies.Text;
myContact.User1 = this.txtMet.Text;
}Press F5 to build and run the add-in in debug mode. If the solution compiled correctly, Outlook will open with your add-in registered. Open the Contacts folder and create a new Contact item. To view your custom Outlook form region, click the Custom Details button in the Show tab group of the Office Ribbon. Figure 33-11 shows how the Outlook form region should appear in the Contact Inspector window.
Figure 33.11. Figure 33-11
