
36.2. Windows Workflow Foundation
Over time, organizations try to keep improving their internal processes for menial tasks such as expense reporting and timesheeting. This results in their defining a series of steps, or activities, that make up a process, or workflow. The Windows Workflow Foundation (WF) builds on this concept to allow the rapid development of such workflows. Although it has been built as an engine on which developers can build their own applications, there are already commercial products, such as Sharepoint, that make use of this engine to allow non-developers to build business workflows.
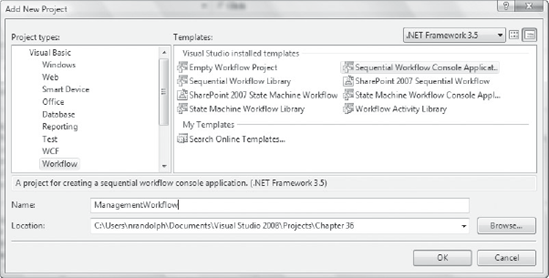
Again, we will not go into much detail about WF itself, instead providing a walkthrough of how you can get started with building a workflow application using Visual Studio 2008 and linking it with the WCF service you have just created. In this example, we will start by adding a new project based on the Sequential Workflow Console Application. As you can see in Figure 36-9, you have a number of different WF project types to choose from depending on whether you want a sequential or a state machine workflow, and whether you want a console application or workflow library. In this case we want a sequential workflow because we want a workflow that has a start, goes through a series of activities, and then ends, and we want a console application so that we don't have to worry about hosting the workflow. The console application template contains the necessary code to host the workflow, so we can focus on building the workflow itself.
Figure 36.9. Figure 36-9
You will notice that once you have created the Workflow project the workflow designer appears in the main editor space. As you can see from Figure 36-10, the sequential workflow has a start (the green circle with a down arrow), an end (the red square with a white octagon), and a space in the middle where you can drop activities in order to form a workflow sequence.
Figure 36.10. Figure 36-10
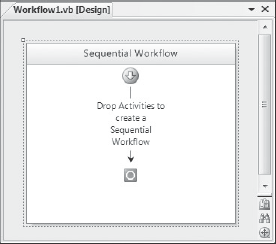
As you can see from Figure 36-10, the WF team has done a lot of work to support the design-time experience of building workflows — so much so that you can actually host the WF designer within your application. This means that WF can be used not only for building predefined workflows for your application, but also to allow the users of your application to build workflows of their own, perhaps based on a subset of the WF activities that are specific to your application.
The metaphor for building workflows is very similar to that for building Windows or web applications using Visual Studio 2008. In the Toolbox are a series of activities, which you can drag across onto your workflow. At the top of the Toolbox is a tab (in Figure 36-11 this is the CustomerManagement tab) in which any activities that you have created, either from scratch or to override one of the default activities, will appear. The next tab shows the Windows Workflow v3.0 activities, which form the bulk of the standard activities and include many more that are not visible in Figure 36-11. Lastly are two tasks that have been included in Windows Workflow v3.5 and are the output of a project entitled Silver, which was created to make the integration between WF and WCF much simpler.
Figure 36.11. Figure 36-11

In our example, you are going to make use of one of the new WF v3.5 activities, sendActivity1, in order to call out to the WCF service you created earlier in the chapter. Once you have dragged this item from the Toolbox into the center of the workflow designer, you will see that it has appeared in the workflow as a new rounded rectangle, as shown in Figure 36-12. Although you can't see the colors here, in the top right-hand corner of this rectangle is a red circle with a white exclamation mark — this is a smart tag that, when you expand it, will indicate what you need to do in order to fix the validation error on the activity. In the case of the activity you just added in this example, it has failed to validate because you haven't defined a WCF service to call. If you click on the warning it will take you to the relevant property, in this case ServiceOperationInfo, in the Properties tool window for the sendActivity1 activity.
Figure 36.12. Figure 36-12

Before you can specify the WCF service created earlier, you must add a reference to the WCF service to this project. You can do this by selecting Add Service Reference from the Solution Explorer right-click shortcut menu. This will open the Add Service Reference window that you used earlier in this chapter to add the WCF service reference to the Windows Forms application. Again, you want to select Discover to locate the service in the current solution, then select the ICustomerService service and update the namespace to CustomerServices.
Now that you have a reference to the WCF service, you can use the Choose Operation dialog to select the WCF service for the sendActivity1 activity. You can open this dialog by selecting the ServiceOperationInfo property in the Properties tool window and then clicking the ellipsis button. Initially, the Choose Operation dialog will be empty, so you will have to click "Import" and then select the ICustomerService service from under the <Current Project> element in the Type tab. Once selected, this will populate the ServiceOperationInfo property in the Properties tool window, as you can see in Figure 36-13.
Figure 36.13. Figure 36-13
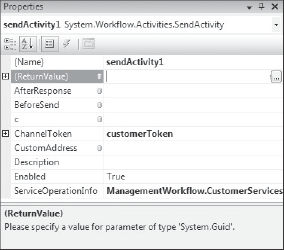
Having specified the ServiceOperationInfo property, you will notice that the validation error has not gone away. Instead, it is highlighting that you haven't specified a ChannelToken. In Figure 36-13 you can see that a channel token called customerToken has been defined. The name is irrelevant; what is important is the EndpointName. This name has to match the endpoint that was added to the app.config file when you added the reference to the WCF service to your workflow application. If you open this file you will see that there is an endpoint element (at system.serviceModel/client/endpoint) that contains a name attribute, most likely WSHttpBinding_ICustomerService. The EndpointName of the ChannelToken has to exactly match the name attribute so that the WCF service can be called by the workflow.
Now that we have fixed the validation errors, we can run this workflow. However, in order to make it useful we need a way of defining the customer to be set to the WCF service and a way of reporting on the return value, which in this case is the ID of the new customer. In Figure 36-13 you can see that there are properties for (ReturnValue) and for c, which is the input to the ICustomerService service. At this stage neither of these is bound to anything, which makes it hard for any other activity in the workflow to work with them. You will also notice that next to each property is a little icon indicating that it is capable of being bound. Using a concept called dependency properties, these properties can effectively be bound fields or properties of the workflow itself, making them accessible from any activity in the workflow. Start by double-clicking the binding icon next to the c property. This will open the dialog shown in Figure 36-14.
Figure 36.14. Figure 36-14

Although you can bind to an existing member, in this case we are going to define new properties for both the argument, c, and the return value. In Figure 36-14 you can see that we are defining a property called NewCustomer, which will be passed into the WCF service call. Similarly, we will also define a property called NewCustomerId as the return value from the call.
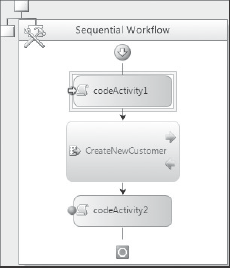
Now that we have these properties, which can be used by other activities in the workflow, we need additional activities that will be used to define the new customer and report the new customer ID. In our case we will use two instances of the codeActivity activity, but you could use any of the predefined activities or your own. Dragging these from the Toolbox and placing one on either side of the WCF service call activity will create a workflow similar to the one shown in Figure 36-15.
Figure 36.15. Figure 36-15

Again you will notice that there is a validation error on codeActivity2. This time we can simply double-click the activity, and it will fix the validation error by creating the necessary event handler for the ExecuteCode event. In the following code, we are creating a new customer in codeActivity1 that will be passed into the WCF service. Then, in codeActivity2, we are simply writing the return value out to the console.
Private Sub codeActivity1_ExecuteCode(ByVal sender As System.Object, _
                                       ByVal e As System.EventArgs)
    newCustomer = New CustomerServices.Customer
    newCustomer.FirstName = "Bob"
    newCustomer.LastName = "Jones"
    newCustomer.Email = "[email protected]"
    newCustomer.Phone = "+61 011 011 100"
End Sub

Private Sub codeActivity2_ExecuteCode(ByVal sender As System.Object, _
                                       ByVal e As System.EventArgs)
    Console.WriteLine("Customer created with Id '" & NewCustomerId.ToString & "'")
End Sub
Before you go ahead and debug this application, you will want to make sure that both the WCF Service Library and the WF console application are launched, in that order. Do this by selecting Properties from the right-click shortcut menu on the Solution node in the Solution Explorer. On the Startup Project node select "Multiple startup projects" and set the Action on the WCF Service Library and WF Console application to Start. Also make sure that the WCF Service Library is higher on the list to ensure that it starts before the workflow application.
In addition to having a rich designer support for building workflows, WF also includes debugging capabilities. Figure 36-16 shows how you can define a breakpoint (set on both the code activities) and how the activity is highlighted when it is the current execution item. To define a breakpoint, simply select the activity and press F9, or select Insert Breakpoint from the right-click shortcut menu.
Figure 36.16. Figure 36-16
As in a normal debugging session, in a workflow you step through code using shortcut keys. Pressing F10 will step through the workflow, while F11 will step into the current activity. For example, in Figure 36-16 pressing F11 will drop in the code for the ExecuteCode event handler.