
37.1. Silverlight
The first version of Silverlight focused on delivering the fundamentals needed to build Rich Internet Applications (RIAs). This included support for the rendering of raster and vector graphics, text, and animation, tracking and handling input, and streaming media (both audio and video). In a Silverlight 1.0 application, the user interface is defined using the XAML markup language and JavaScript is used to initialize the Silverlight plug-in instance.
Silverlight exposes a DOM API to the browser, which allows JavaScript code to manipulate the Silverlight UI and respond to events. This provides an easy way for those familiar with JavaScript to build Silverlight applications. However, at the same time, you are limited to the interactions and functions that you can build with JavaScript.
Silverlight 2 is a significant upgrade to version 1.0 and enables you to build Silverlight applications, including the code that drives their UI, using managed code that runs under the CLR. It does not require end users to have a full version of the .NET Framework installed on their computers; in fact even if you have a full version of .NET installed it won't be used by Silverlight. Instead, when you install the Silverlight 2 runtime, it will install a lightweight version of the .NET Framework and base classes. Lightweight means that not every class that is available in the full version is included; however, a surprising number of classes are available given the small 4.3MB size of the runtime.
You can use any .NET language to build Silverlight 2 applications, including Visual Basic and C#. This provides cross-browser, cross-platform development of RIAs that leverages all the power of the .NET Framework.
37.1.1. Getting Started with Silverlight 2
To develop Silverlight applications using Visual Studio you will first need to install the Microsoft Silverlight Tools for Visual Studio 2008. You will find a link to this free download off the Silverlight community site at http://silverlight.net/GetStarted/. The download includes everything you need to build Silverlight applications, including project templates for Visual Basic and C#, IntelliSense and debugger support, and an SDK.
The Silverlight Tools for Visual Studio 2008 and the Silverlight 2 SDK were at Beta 1 release at the time of writing. At the start of this chapter are instructions on how you can obtain an updated version of this chapter once the final version of Silverlight 2 has been released.
The Silverlight Tools for Visual Studio download consists of an executable setup program called silverlight_chainer.exe. After you have downloaded and installed it, you will be able to create your first Silverlight application. Open Visual Studio and select File ![]() New
New ![]() Project to open the New Project dialog box. Under both Visual Basic and Visual C# in the project types, there will be a new entry called Silverlight, which is where the new templates can be found. Select the Silverlight Application project template under the C# project types and click OK.
Project to open the New Project dialog box. Under both Visual Basic and Visual C# in the project types, there will be a new entry called Silverlight, which is where the new templates can be found. Select the Silverlight Application project template under the C# project types and click OK.
Before the new project is created, Visual Studio will prompt you to create an HTML page to host the Silverlight application for testing. You can generate a new web site or web application project, or simply add a static HTML page to the Silverlight project. If you are adding the project to an existing solution that already contains a web project, you can choose to add an HTML page to that and have Visual Studio configure the necessary project references. For now, instruct Visual Studio to generate an HTML test page in this project as shown in Figure 37-1. Later in this chapter we look at how your Silverlight applications can be added to an existing ASP.NET Web Form.
Figure 37.1. Figure 37-1

Once you click OK, Visual Studio will create the project and open the designer. If you've already read Chapter 35, then you'll immediately notice how similar Silverlight applications are to Windows Presentation Foundation applications. In fact the initial codename for Silverlight was WPF/E, which should give you some idea as to how closely they are related. Silverlight implements the same programming model as WPF, and shares many of the same UI controls.
When you first create a Silverlight application, the project will contain two XAML files, App.xaml and Page.xaml. These are files containing XML that describe the layout and design of the UI in the same way that HTML describes a web page. Associated with these XAML files are two code-behind files that contain the source code to perform actions and respond to UI events.
The code behind the App.xaml file provides event handlers for application-level events, such as Application_Startup, Application_Exit, and Application_UnhandledException. You can add your own custom code to perform actions in the event handlers. Application-wide resources and styles are also declared in the XAML of the App.xaml file, although there is no designer support for this.
The Page.xaml file defines the UI that is shown when the application is loaded. This is where you will design your Silverlight application by adding controls to the form and handling events in the code-behind.
37.1.1.1. The Silverlight Controls
Silverlight 2 ships with a range of useful controls for constructing rich user interfaces. These include the Canvas, Grid, and StackPanel layout controls, as well as the usual standard UI controls such as Button, TextBox, ListBox, and RadioButton. In addition, there are a range of more functional user controls including Calendar, DataGrid, and MediaElement, which can be used to build even richer user interfaces.
In Beta 1 of the Silverlight Tools for Visual Studio you can only drag-and-drop a control onto the XAML. Dragging a control onto the design surface of a Silverlight application is not supported. However, this will likely be fixed in a subsequent release.
To begin designing your Silverlight application you should first create some rows for the default Grid control that was added to the page. Add three rows to the grid with varying heights, as shown in the following XAML listing:
<UserControl x:Class="SampleSilverlightApp.Page"
    xmlns="http://schemas.microsoft.com/client/2007"
    xmlns:x="http://schemas.microsoft.com/winfx/2006/xaml"
    Width="400" Height="300">
    <Grid x:Name="LayoutRoot" Background="White">
        <Grid.RowDefinitions>
            <RowDefinition Height="30"/>
            <RowDefinition Height="40"/>
            <RowDefinition Height="*"/>
        </Grid.RowDefinitions>
    </Grid>
</UserControl>
In the third row we have specified an asterisk (*) for the height. This means that the last row should use all the remaining space.
Next you can begin to add controls to build up the layout of the application. Add a TextBlock control, followed by a DatePicker control and then another TextBlock control. Position the first TextBlock control into the first row by adding the attribute Grid.Row="0" to it. In the same way position the DataPicker in the second row, and the other TextBlock control into the third row.
Finally, add the text Enter your date of birth: to the first TextBlock so the user has some instructions when this application is run. Once you have finished, your application should look similar to Figure 37-2.
Figure 37.2. Figure 37-2

37.1.1.2. Handling Events
Before you add any event handler code it is a good idea to specify a name for any of the controls that you're going to need to access from code. You can specify a name by adding an x:Name attribute to the control (the "x" simply refers to one of the namespaces that is added to the XAML by default). Give the DatePicker a name of x:Name="dpDOB", and the bottom TextBlock a name of x:Name="tbResults".
All controls support a range of standard events that you can register event handlers for. The source code for an event handler is stored in the code-behind file — in this case Page.xaml.cs. However, you must also wire up the event handler to the control. This is done from within the XAML by typing the name of the event and letting IntelliSense generate the stub for the handler. Add a new handler to the dbDOB control for the DateSelected event, as shown in Figure 37-3.
Figure 37.3. Figure 37-3

This event will fire whenever a date is selected from the picker, or when one is manually entered and the user presses Enter. Add the following code to the dpDOB_DateSelected function in the Page.xaml.cs file:
private void dpDOB_DateSelected(object sender, DatePickerDateChangedEventArgs e)
{
if (dpDOB.SelectedDate.HasValue)
{
DateTime dob = dpDOB.SelectedDate.Value;
int age = CalculateAge(dob);
System.Text.StringBuilder results = new System.Text.StringBuilder();
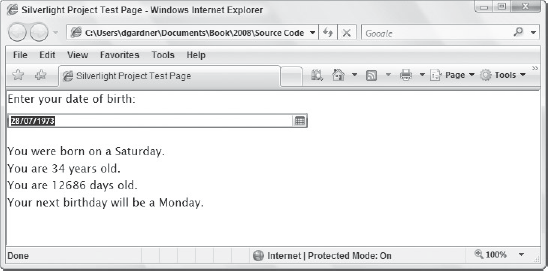
results.AppendFormat("You were born on a {0}.
", dob.DayOfWeek.ToString());
results.AppendFormat("You are {0} years old.
", age);
results.AppendFormat("You are {0} days old.
",
DateTime.Now.Subtract(dob).Days);
results.AppendFormat("Your next birthday will be a {0}.
",
dob.AddYears(age + 1).DayOfWeek.ToString());
tbResults.Text = results.ToString();
}
}
private int CalculateAge(DateTime dob)
{
if (DateTime.Now.Month < dob.Month ||
(DateTime.Now.Month == dob.Month && DateTime.Now.Day < dob.Day))
{
return (DateTime.Now.Year - dob.Year) - 1;
}
else
{
return DateTime.Now.Year - dob.Year;
}
}This code will take the date that was entered into the dpDOB DatePicker control, and calculate the age in years and days, the day of birth, and the day of the next birthday.
You can now run this solution by pressing F5. Visual Studio will generate an HTML test page to host the Silverlight application, and open this in Internet Explorer as shown in Figure 37-4. Within Visual Studio you can perform the usual debugging tasks such as setting breakpoints and viewing object properties. Chapter 44 contains more information on Silverlight debugging.
Silverlight 2 applications compile into a single file with a .xap extension (pronounced "zap"). This is a compressed archive that contains the application assembly, a manifest, any dependant assemblies, and embedded resources. You can even rename this file to have a .zip extension and open it to view the files inside. A basic "Hello World" Silverlight application is only 4 kB in size. As long as you stick with the standard Silverlight controls and don't require any embedded resources, more complex applications will still only be in the order of 6–8 kB.
Figure 37.4. Figure 37-4
37.1.2. Interacting with Your Web Page
Though there are some scenarios where Silverlight can be used for an entire web application, it generally works best when it is used to meet a specific function on a web page. This ensures you don't lose any of the benefits of traditional web pages, such as addressable URLs and accessibility support, while at the same time making important parts of your web page visually richer and more functional.
Silverlight 2 allows you to interact with the web page on which a Silverlight control is hosted in a number of ways. You can access the HTML DOM elements and call JavaScript code on a web page from managed code in the Silverlight application. Additionally, you can invoke an access method or property that is in a Silverlight application from JavaScript.
To access the web page that is hosting a Silverlight control you should first add an import to the System.Windows.Browser namespace. You can then obtain a reference to an HtmlDocument class that represents the current page from the HtmlPage.Document property. For example, suppose you have a web page that contains a standard HTML textbox:
<input type="text" id="txtExample" name="txtExample" value="" />
You can add a using statement for System.Windows.Browser to the App.xaml.cs file, and add the following code to the Application_Startup method. When the Silverlight application is loaded with the page, it will find the textbox and set its value to "Hello from Silverlight".
private void Application_Startup(object sender, StartupEventArgs e)
{
  // Load the main control
  this.RootVisual = new Page();

  HtmlDocument doc = HtmlPage.Document;
  HtmlElement elem = doc.GetElementById("txtExample");
  if (elem != null)
  {
    elem.SetAttribute("value", "Hello from Silverlight");
  }
}
Invoking a managed code method or property in a Silverlight application from JavaScript is a little more involved. First add a new class called SilverlightCallableClass.cs to the Silverlight application. As the name suggests, this will contain our functions that can be invoked from JavaScript. Within this class add the following method:
[System.Windows.Browser.ScriptableMember()]
public string HelloWorld(string sName)
{
    return string.Format("HELLO {0}!", sName.ToUpper());
}
The ScriptableMember attribute must be explicitly added to any properties or methods that you wish to access from the web page.
Next you must register this class as a scriptable object by making a call to BrowserRegisterScriptableObject from the Application_Startup method in App.xaml.cs:
SilverlightCallableClass scc = new SilverlightCallableClass();
HtmlPage.RegisterScriptableObject("myScc", scc);
You can now call this method from JavaScript by obtaining a reference to the Silverlight object on the web page and calling the method off the Content property. For example, the snippet of HTML will invoke the HelloWorld method and display a message box with "HELLO DAVE!" when you click on the button:
<object id="myApp" data="data:application/x-silverlight,"
        type="application/x-silverlight-2-b1" Width="400" Height="300">
        <param name="source" value="ClientBin/SampleSilverlightApp.xap"/>
</object>
<input id="Button1" type="button" value="Hello" onclick="callHelloWorld()" />
<script type="text/javascript">
    function callHelloWorld(){
        var slCtl = document.getElementById("myApp");
        alert(slCtl.Content.myScc.HelloWorld("dave"));
    }
</script>
One important point to note in the preceding code is that you must add an id attribute to the Silverlight object element. When you use Visual Studio to automatically generate an HTML test page, as shown in the next section, it will not include this attribute.
The preceding code will only work with Beta 1 of Silverlight 2. If you are running a newer beta or the final release, you will need to update the type="application/x-silverlight-2-b1" attribute of the Silverlight object element to match your current version.
37.1.3. Hosting Silverlight Applications
Silverlight applications can be hosted on a web page in a number of ways. You can simply use the HTML object tag to embed the Silverlight control on a page, or you can use the ASP.NET Silverlight web controls to add it to an ASP.NET Web Form.
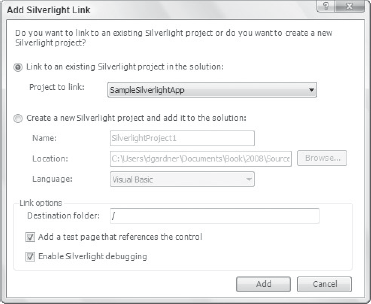
Begin by adding a new ASP.NET Web Site project to your solution. Then right-click the new Web Site project in the Solution Explorer and select Add Silverlight Link. This will display the dialog box shown in Figure 37-5. Select the defaults on this dialog box and click Add.
Figure 37.5. Figure 37-5
This will create a reference to the Silverlight application and generate two files: a static HTML page and an ASP.NET Web Form. Open the static HTML page and view the markup. You will see that an HTML object element has been added to the page that references your Silverlight control. Visual Studio also adds some basic error-handling script and a link to download and install Silverlight if the page is accessed from a browser that does not have it. You can copy this object element, with or without the error-handling script, to any other web page.
The advantage of hosting a Silverlight control using the object tag is that it is loaded purely on the client side, and therefore has no dependency on the web server platform that is used. For example, your Silverlight control could be hosted on a PHP web page that is being served from an Apache web server on Linux.
The second approach for hosting a Silverlight application is to use the new Silverlight ASP.NET server controls, called MediaPlayer and Silverlight. These controls allow you to use the familiar server control programming model to host Silverlight applications on an ASP.NET web page.
When you installed the Silverlight Tools for Visual Studio, it also registered these new controls. The Silverlight control allows you to embed a Silverlight application on a web page, similar to hosting via the object tag. However, it also allows you to specify the source of the Silverlight application and various properties and methods that control how it is rendered at runtime from code. You also have access to various events such as Init, Load, and PreRender, which you can handle on the server.
The MediaPlayer control inherits from the Silverlight control, and displays a Silverlight application skinned with media controls (play, pause, stop, and so on). This allows you to integrate streaming media including audio (WMA) and video (WMV) through a web page without needing to code an XAML or JavaScript.
Any web page that uses the Silverlight or MediaPlayer controls must also include the ASP.NET AJAX ScriptManager control.
When you added the Silverlight link to the web site earlier, it also generated a sample ASPX page. This page uses a Silverlight control to host the Silverlight application, and provides a quick way for you to test it out. Right-click the Web Site project and select Set as Default Project, and then right-click the ASPX page and select Set as Start Page, and then press F5 to run the page.