
57.2. Offline Database Schema
There's another type of Database Project and it's inside the Microsoft SQL Server node as shown in Figure 57-1. As you can see, you have four options, but it's basically the same project type; the difference between them is the use of a wizard and the SQL Server version being targeted. Some options are available only from the creation of the project using the wizard, so I suggest you start using that. These projects will let you have an offline representation of your DB schema, so that you can version it along with your code. It will create a file for each schema object and deploy the changes to a database.
Figure 57.1. Figure 57-1

If you run the wizard for SQL Server 2005, the first option will let you choose whether to organize the files by schema or object type (tables, views, stored procedures, and so on). This is important because you can't change this option once the project is created, although you will find yourself working on the Schema View most of the time instead of doing it directly on the files—from that window you can select or deselect the filter by Schema View. However, if you select "No" to organizing by schema inside the types, you can still distinguish the schema because of the prefix added to each filename. On the other hand, if you select to organize by schema, inside of each you will have folders for each type. Figure 57-2 shows at the left the Schema View filtered by schema. You could change this option to organize all the objects by type. The Solution Explorer (at the right) shows two different projects where files are physically organized differently.
Figure 57.2. Figure 57-2

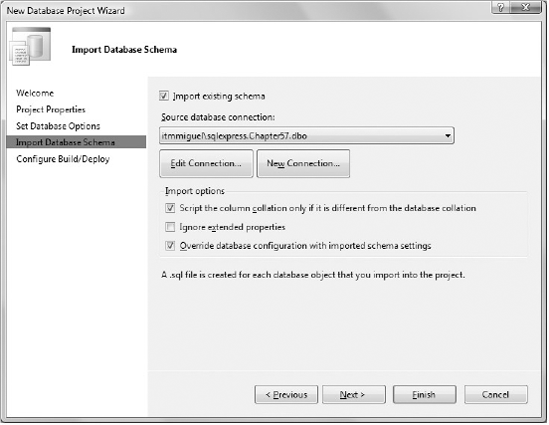
The database options are the next step of the wizard; if you don't know your defaults now, don't be afraid to choose something and change it once you get this information from either your DBA or your production DB. You can select to import this configuration directly from a DB. If you can connect to your production DB it's a good idea to import them at this moment. To do this, simply go to the next step in the wizard and mark the needed checkboxes as shown in Figure 57-3.
The last step is to configure the build and deployment options. You will need more deployment configurations, so here you will only select your development database. Keep in mind this doesn't have to be the same as in the previous step — here you are configuring your development database and in the previous step, if available, you would import existing objects and configuration from a production DB. You will see the three configurations needed in more detail later, so for now you can go with the default options. The final step will take awhile, especially if you have many objects to import.
Figure 57.3. Figure 57-3
Once the wizard finishes, you can add, edit, or delete schema objects right from the Solution Explorer or the Schema View (View ![]() Schema View)—these will be represented as files. When you build the project, a .sql file containing all the DML necessary to re-create your schema will be generated and evaluated. The script can then be deployed to SQL Server. You could also choose to deploy on every build, so your DB will always get your last changes.
Schema View)—these will be represented as files. When you build the project, a .sql file containing all the DML necessary to re-create your schema will be generated and evaluated. The script can then be deployed to SQL Server. You could also choose to deploy on every build, so your DB will always get your last changes.
When working with Source Control this type of project becomes really useful. The scenario would be that each developer works on his own server instance. One of them has made changes to the schema and his .NET code and deployed them to his instance. He then tests the .NET application and it works fine with the new database changes. Then he checks in all of his changes to the server and another developer retrieves the changes. When the second developer deploys his database instance it is also updated with the latest changes, and he will be running the new code changes along with the new schema changes applied to his SQL Server instance.