
10.2. Extending Templates
Building templates based on existing items and projects limits what you can do because it assumes that every project or scenario will require exactly the same items. Instead of creating multiple templates for each different scenario (for example, one that has a main form with a black background and another that has a main form with a white background), with a bit of user interaction you can accommodate multiple scenarios from a single template. Therefore, this section takes the project template created earlier and tweaks it so users can specify the background color for the main form. In addition, you'll build an installer for both the template and the wizard that you will create for the user interaction.
To add user interaction to a template, you need to implement the IWizard interface in a class library that is then signed and placed in the Global Assembly Cache (GAC) on the machine on which the template will be executed. For this reason, to deploy a template that uses a wizard you also need rights to deploy the wizard assembly to the GAC.
10.2.1. Template Project Setup
Before plunging in and implementing the IWizard interface, follow these steps to set up your solution so you have all the bits and pieces in the same location, which will make it easy to make changes, perform a build, and then run the installer:
Begin with the StarterProject solution that you created for the project template earlier in the chapter. Make sure that this solution builds and runs successfully before proceeding. Any issues with this solution will be harder to detect later, as the error messages that appear when a template is used are somewhat cryptic.
Finally, you will also need to add a Setup project to the solution. To do this, select File
 Add
Add  New Project, expand the Other Project Types category, and then highlight Setup and Deployment. Select the Setup Wizard template and follow the prompts to include the Primary Output from WizardClassLibrary and Content Files from WizardClassLibrary.
This should result in a solution that looks similar to what is shown in Figure 10-9.
Figure 10.9. Figure 10-9

As shown in Figure 10-9, when you include the primary output and content files from the Class Library project to the installer it also adds a number of dependencies. Since the template will only be used on a machine with Visual Studio 2008, you don't need any of these dependencies. Exclude them by clicking the Exclude menu item on the right-click context menu. Then perform the following steps to complete the configuration of the Installer project.
By default, when you add project outputs to the installer, they are added to the Application folder. In this case, add the primary output of the class library to the GAC, and place the content files for the class library into the user's Visual Studio Templates folder. Before you can move these files, right-click the Installer project and select View
 File System from the context menu to open the File System view.
By default, the File System view contains the Application folder (which can't be deleted), the User's Desktop folder, and the User's Programs Menu folder. Remove the two user folders by selecting Delete from the right-click context menu.
Into the User's Personal Data folder, add a Visual Studio 2008 folder, followed by a Templates folder, followed by a ProjectTemplates folder. The result should look like what is shown in Figure 10-10.
Figure 10.10. Figure 10-10

To complete the installer, move the primary output from the Application folder into the Global Assembly Cache folder, and then move the content files from the Application folder to the ProjectTemplates folder. (Simply drag the files between folders in the File System view.)
10.2.2. IWizard
Now that you've completed the installer, you can work back to the wizard class library. As shown in Figure 10-9, you have a form, ColorPickerForm, and a class, MyWizard. The former is a simple form that can be used to specify the color of the background of the main form. To this form you will need to add a Color Dialog control, called ColorDialog1, a Panel called PnlColor, a Button called BtnPickColor with the label 'Pick Color', and a Button called BtnAcceptColor with the label 'Accept Color'.
Rather than use the default icon that Visual Studio uses on the form, you can select a more appropriate icon from the Visual Studio 2008 Image Library. The Visual Studio 2008 Image Library is a collection of standard icons, images, and animations that are used in Windows, Office, and other Microsoft software. You can use any of these images royalty-free to ensure that your applications are visually consistent with Microsoft software.
The image library is installed with Visual Studio as a compressed file called VS2008ImageLibrary.zip. By default, you can find this under <Program Files Path>Microsoft Visual Studio 9Common7VS2008ImageLibrary. Extract the contents of this zip file to a more convenient location, such as a directory under your profile.
To replace the icon on the form, first go to the Properties window and the select the Form in the drop-down list at the top. On the Icon property click the ellipsis (...) to load the file selection dialog. Select the icon file you wish to use and click OK (for this example we've chosen VS2008ImageLibraryObjectsico_formatWinVistaSettings.ico).
Once completed, the ColorPickerForm should look similar to the one shown in Figure 10-11.
Figure 10.11. Figure 10-11

The following code listing can be added to this form. The main logic of this form is in the event handler for the 'Pick Color' button, which opens the ColorDialog that is used to select a color.
Public Class ColorPickerForm
    Private Sub BtnPickColor_Click(ByVal sender As System.Object, _
                            ByVal e As System.EventArgs) Handles BtnPickColor.Click
        Me.ColorDialog1.Color = Me.PnlColor.BackColor
        If Me.ColorDialog1.ShowDialog() = Windows.Forms.DialogResult.OK Then
            Me.PnlColor.BackColor = Me.ColorDialog1.Color
        End If
    End Sub

    Public ReadOnly Property SelectedColor() As Drawing.Color
        Get
            Return Me.PnlColor.BackColor
        End Get
    End Property

    Private Sub BtnAcceptColor_Click(ByVal sender As System.Object, _
                          ByVal e As System.EventArgs) Handles BtnAcceptColor.Click
        Me.DialogResult = Windows.Forms.DialogResult.OK
        Me.Close()
    End Sub
End Class
The MyWizard class implements the IWizard interface, which provides a number of opportunities for user interaction throughout the template process. In this case, add code to the RunStarted method, which will be called just after the project-creation process is started. This provides the perfect opportunity to select and apply a new background color for the main form:
Imports Microsoft.VisualStudio.TemplateWizard
Imports System.Collections.Generic
Imports System.Windows.Forms

Public Class MyWizard
    Implements IWizard

    Public Sub BeforeOpeningFile(ByVal projectItem As EnvDTE.ProjectItem) _
                                               Implements IWizard.BeforeOpeningFile
    End Sub

    Public Sub ProjectFinishedGenerating(ByVal project As EnvDTE.Project) _
                                       Implements IWizard.ProjectFinishedGenerating
    End Sub

    Public Sub ProjectItemFinishedGenerating _
                                   (ByVal projectItem As EnvDTE.ProjectItem) _
                                   Implements IWizard.ProjectItemFinishedGenerating
    End Sub

    Public Sub RunFinished() Implements IWizard.RunFinished

    End Sub

    Public Sub RunStarted(ByVal automationObject As Object, _
                          ByVal replacementsDictionary As  _
    Dictionary(Of String, String), _
                          ByVal runKind As WizardRunKind, _
                          ByVal customParams() As Object) _
    Implements IWizard.RunStarted
        Dim selector As New ColorPickerForm
        If selector.ShowDialog = DialogResult.OK Then
            Dim c As Drawing.Color = selector.SelectedColor
            Dim colorString As String = "System.Drawing.Color.FromArgb(" & _
    c.R.ToString & "," & _
    c.G.ToString & "," & _
    c.B.ToString & ")"
            replacementsDictionary.Add _
                                  ("Me.BackColor = System.Drawing.Color.Silver", _
                                   "Me.BackColor = " & colorString)
        End If
    End Sub

    Public Function ShouldAddProjectItem(ByVal filePath As String) As Boolean _
                                            Implements IWizard.ShouldAddProjectItem
        Return True
    End Function
End Class
In the RunStarted method, you prompt the user to select a new color and then use that response to add a new entry into the replacements dictionary. In this case, you are replacing "Me.BackColor = System.Drawing.Color.Silver" with a concatenated string made up of the RGB values of the color specified by the user. The replacements dictionary is used when the files are created for the new project, as they will be searched for the replacement keys. Upon any instances of these keys being found, they will be replaced by the appropriate replacement values. In this case, you're looking for the line specifying that the BackColor is Silver, and replacing it with the new color supplied by the user.
The class library containing the implementation of the IWizard interface must contain a strongly named assembly capable of being placed into the GAC. To ensure this, use the Signing tab of the Project Properties dialog to generate a new signing key, as shown in Figure 10-12.
Figure 10.12. Figure 10-12

After you check the "Sign the assembly" checkbox, there will be no default value for the key file. To create a new key, select <New...> from the drop-down list. Alternatively, you can use an existing key file using the <Browse...> item in the drop-down list.
10.2.3. Starter Template
You're basing the template for this example on the StarterProject, and you need only make minor changes in order for the wizard you just built to work correctly. In the previous section you added an entry in the replacements dictionary, which searches for instances where the BackColor is set to Silver. If you want the MainForm to have the BackColor specified while using the wizard, you need to ensure that the replacement value is found. To do this, simply set the BackColor property of the MainForm to Silver. This will add the line "Me.BackColor = System.Drawing.Color.Silver" to the MainForm.Designer.vb file so that it is found during the replacement phase.
Instead of exporting the StarterProject as a new template each time and manually adding a reference to the wizard, use a command-line zip utility (in this case 7-zip, available at www.7-zip.org, was used, but any command-line zip utility will work) to build the template. This makes the process easier to automate from within Visual Studio 2008. If you were to manually zip the StarterProject folder you would have all the content files for the template, but you would be missing the .vstemplate file and the associated icon file. You can easily fix this by adding the .vstemplate file (created when you exported the project template) to the StarterProject folder. You can also add the icon file to this folder. Make sure that you do not include these files in the StarterProject itself; they should appear as excluded files, as shown in Figure 10-13.
Figure 10.13. Figure 10-13

To have the wizard triggered when you create a project from this template, add some additional lines to the MyTemplate.vstemplate file:
<VSTemplate Version="2.0.0"
xmlns="http://schemas.microsoft.com/developer/vstemplate/2005" Type="Project">
<TemplateData>
...
</TemplateData>
<TemplateContent>
...
</TemplateContent>
<WizardExtension>
<Assembly>WizardClassLibrary, Version=1.0.0.0, Culture=neutral,
PublicKeyToken=022e960e5582ca43, Custom=null</Assembly>
<FullClassName>WizardClassLibrary.MyWizard</FullClassName>
</WizardExtension>
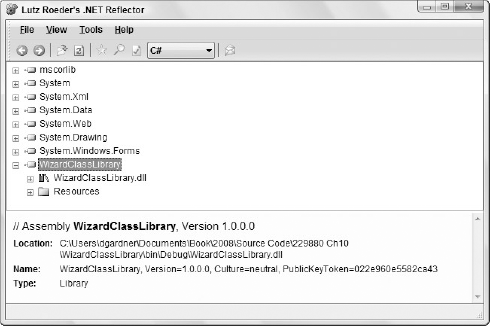
</VSTemplate>The <WizardExtension> node added in the sample indicates the class name of the wizard and the strong-named assembly in which it resides. You have already signed the wizard assembly, so all you need to do is determine the PublicKeyToken by opening the assembly using Lutz Roeder's Reflector for .NET (available at www.aisto.com/roeder/dotnet/). If you haven't already built the WizardLibrary, you will have to build the project so you have an assembly to open with Reflector. Once you have opened the assembly in Reflector, you can see the PublicKeyToken of the assembly by selecting the assembly in the tree, as shown in Figure 10-14. The PublicKeyToken value in the .vstemplate file needs to be replaced with the actual value found using Reflector.
Figure 10.14. Figure 10-14
The last change you need to make to the StarterProject is to add a post-build event command that will zip this project into a project template. In this case, the command to be executed is a call to the 7-zip executable, which will zip the entire contents of the StarterProject folder, recursively, into StarterTemplate.zip, placed in the WizardClassLibrary folder. Note that you may need to supply the full path for your zip utility.
7z.exe a -tzip ......WizardClassLibraryStarterTemplate.zip ....*.* -r
In Figure 10-13, notice that the generated zip file (StarterTemplate.zip) is included in the Class Library project. The Build Action property for this item is set to Content. This aligns with the installer you set up earlier, which will place the Content files from the class library into the Templates folder as part of the installation process.
You have now completed the individual projects required to create the project template (StarterProject), added a user interface wizard (WizardClassLibrary), and built an installer to deploy your template. One last step is to correct the solution dependency list to ensure that the StarterProject is rebuilt (and hence the template zip file recreated) prior to the installer being built. Because there is no direct dependency between the Installer project and the StarterProject, you need to open the solution properties and indicate that there is a dependency, as illustrated in Figure 10-15.
Figure 10.15. Figure 10-15

Your solution is now complete and can be used to install the StarterTemplate and associated IWizard implementation. Once the solution is installed, you can create a new project from the StarterTemplate you have just created.