
Understanding WCF services
Creating a WCF service
Configuring WCF service endpoints
Hosting a WCF service
Consuming a WCF service
Most systems require a means to communicate between their various components — most commonly between the server and the client. Many different technologies enable this sort of communication, but Windows Communication Foundation (WCF) brings a unified architecture to implementing them. This chapter takes you through the architecture of WCF services and how to create, host, and consume WCF services in your system.
Within the .NET Framework there are a variety of ways that you can communicate among applications, including (but not limited to) remoting, web services, and a myriad of networking protocols. This has often frustrated application developers who not only had to pick the appropriate technology to use, but also had to write plumbing code that would allow their applications to use different technologies depending on where or how they would be deployed. For example, when users are connected directly to the intranet it is probably better for them to use a remoting or direct TCP/IP connection for their speed benefits. However, these aren't the ideal solution for communication when the application is outside the corporate firewall, in which case a secured web service would be preferable.
WCF is designed to solve this sort of problem by providing a means to build messaging applications that are technology-agnostic, which can then be configured (in text-based configuration files) to what technologies each service will support and how they will be used. Therefore, you only need to write the one service and it can support all the various communication technologies supported by WCF. WCF is essentially a unified communication layer for .NET applications.
A WCF service can be added to an existing project (such as a web application), or it can be created as a standalone project. For the purposes of this example you will be creating a standalone service so you can easily see how a single service can be configured and hosted in many communication scenarios.
When you open the New Project dialog and click the WCF category (under either the VB or C# languages), you will notice a number of different WCF project types as shown in Figure 31-1.
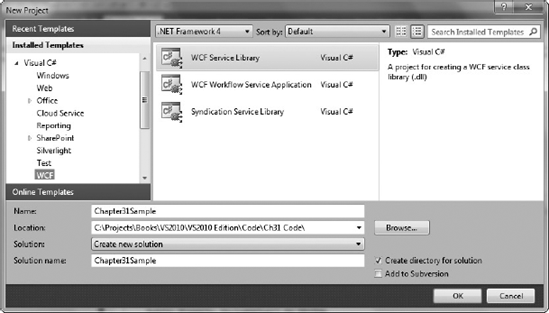
The WCF Workflow Service Application project template provides an easy way to expose a Windows Workflow (WF) publicly, and this is discussed in Chapter 32. The Syndication Service Library project template is used to expose data as an RSS feed. However, the project template you will be using in the example for in this chapter is the WCF Service Library project template.
Note
If you look in the Web category in the New Project dialog, you will see that there is also a WCF Service Application project template, which wasn't under the WCF category. This project template creates a WCF service that is already configured to be hosted within an ASP.NET web application.
By default, a new WCF Service Library will include IService1.vb and Service1.vb (or .cs if you are using C#), which define the contract and the implementation of a basic service, respectively. When you open these files you will see that they already expose some operations and data as an example of how to expose your own operations and data yourself. This can be all cleared out until you simply have an interface with nothing defined (but with the ServiceContract attribute left in place), and a class that simply implements that interface. Or you can delete both files and start anew.
When you want to add additional services to your project you will find a WCF Service item template in the Add New Item dialog that will add both an interface and a class to your project to use for the contract and implementation of the service.
This example project will expose some data from the Entity Framework model that you created in Chapter 29 for the AdventureWorksLT database, and expose some operations that can be performed on that data. The way that you do so is by creating contracts that will define the operations and the structure of the data that will be publicly exposed. Three core types of contracts exist: service contracts, data contracts, and message contracts.
A service contract is a group of operations, essentially detailing the capabilities of the service.
A data contract details the structure of the data being passed between the service and the client.
A message contract details the structure of the messages passed between the service and the client. This is useful when the service must conform to a given message format. This is an advanced topic, and not required for basic services, so we won't cover this type of contract in this chapter.
These contracts are defined by decorating the classes/interfaces in the service with special attributes.
In this chapter you walk through an example of creating a WCF service exposing customer data from the AdventureWorksLT database to client applications. To do this you will expose operations for working with the customer data, which will expose the actual customer data itself in the database.
For the purpose of this example you'll start fresh — so delete IService1 (.vb or .cs) and Service1 (.vb or .cs). Add a new item to the project using the WCF Service item template, called CustomerService. This will add two new files to your project — CustomerService (.vb or .cs) and ICustomerService (.vb or .cs).
Note
There are two primary angles that you can take when designing services. You can take either an implementation-first approach (where you write the code first and then apply attributes to it to create the contract), or you can take a contract-first approach (where you design the schema/WSDL first and generate the code from it). An in-depth discussion of these approaches is beyond the scope of this chapter; however, WCF can support both approaches. The example in this chapter follows the contract-first approach.
Focus on defining the service contract first. The operations you want to expose externally are:
AddCustomerGetCustomerUpdateCustomerDeleteCustomerGetCustomerList
You may recognize the first four operations as standard CRUD (Create, Read, Update, and Delete) operations when you are working with data. The final operation will return a list of all the customers in the database.
Now that you know what operations are required you can define your service contract.
Note
You may have noted from the sample implementation in the WCF project template that all of the service attributes were defined in the interface. However, creating an interface to decorate with the contract attributes is not essential — in fact, you don't need to create an interface at all, and you can decorate the class itself with the attributes instead. However, standard practice (and best practice) dictates that the contract should be defined as (and in) an interface, so you will be following this best practice in the example.
You will define your operations in the ICustomerService interface. However, these operations will expose data using a data class that you haven't defined as yet — in the meantime, create a stub data class and you can flesh it out shortly. Add a new class to the project called CustomerData and leave it as it is to act as your stub. Each of the operations needs to be decorated with the OperationContract attribute:
- VB
<ServiceContract([Namespace]:="http://www.professionalvisualstudio.com")>
Public Interface ICustomerService
    <OperationContract()>
    Function AddCustomer(ByVal customer As CustomerData) As Integer

    <OperationContract()>
    Function GetCustomer(ByVal customerID As Integer) As CustomerData

    <OperationContract()>
    Sub UpdateCustomer(ByVal customer As CustomerData)

    <OperationContract()>
    Sub DeleteCustomer(ByVal customerID As Integer)

    <OperationContract()>
Function GetCustomerList() As List(Of CustomerData) End Interface
- C#
[ServiceContract(Namespace="http://www.professionalvisualstudio.com")]
public interface ICustomerService
{
    [OperationContract]
    int AddCustomer(CustomerData customer);

    [OperationContract]
    CustomerData GetCustomer(int customerID);

    [OperationContract]
    void UpdateCustomer(CustomerData customer);

    [OperationContract]
    void DeleteCustomer(int customerID);

    [OperationContract]
    List<CustomerData> GetCustomerList();
}
Both the ServiceContract and OperationContract attributes have a number of properties that you can apply values to, enabling you to alter their default behavior. For example, both have a name property (enabling you to specify the name of the service/operation as seen externally). Of particular note is the ServiceContract's Namespace property, which you should always explicitly specify (as has been done in the preceding code). If a namespace has not been explicitly set, the schema and WSDL generated for the service will use http://tempuri.org as its namespace. However, to reduce the chance of collisions with other services it's best to use something unique such as your company's URL.
Now that you've defined your contract you need to actually implement these operations. Open the CustomerService class, which implements the ICustomerService interface. VB will implement the methods automatically (you may need to press Enter after the Implements ICustomerService for these to actually be implemented), and in C# you can use the smart tag (Ctrl+.) to have the methods automatically implemented. The service contract is now complete and ready for the operations to be implemented (that is, write the code that performs each operation). However, before you do so you still need to define the properties of the data class, and at the same time you should also define the data contract.
You are returning objects containing data from some of the operations you expose in your service, and accepting objects as parameters. Therefore, you should specify the structure of these data objects being transferred by decorating their classes with data contract attributes.
Note
From the .NET Framework 3.5 SP1 onward it is no longer essential that you explicitly define a contract for your data classes if the classes are public and each has a default constructor (this is referred to as having an inferred data contract instead of a formal data contract). However, it is useful (and recommended) to create a formal contract anyway — especially if you need to conform to a specific message format in your communication, have non-.NET clients access your service, or want to explicitly define what properties in the data class are included in the message. Because explicitly specifying the data contract is generally recommended, this is the approach you will be taking in the example.
This example requires only one data class — the CustomerData class that you already created (although no properties have been defined on it as yet), which you will now decorate with the data contract attributes. Whereas the service contract attributes were found in the System.ServiceModel namespace, data contract attributes are found in the System.Runtime.Serialization namespace, so C# developers will need to start by adding a using statement for this namespace in their classes:
using System.Runtime.Serialization;
Each data class first needs to be decorated with the DataContract attribute, and then you can decorate each property to be serialized with the DataMember attribute:
- VB
<DataContract([Namespace]:="http://www.professionalvisualstudio.com")> Public Class CustomerData <DataMember()> Public Property CustomerID As Integer <DataMember()> Public Property Title As String <DataMember()> Public Property FirstName As String <DataMember()> Public Property MiddleName As String <DataMember()> Public Property LastName As String <DataMember()> Public Property Suffix As String <DataMember()> Public Property CompanyName As String <DataMember()> Public Property EmailAddress As String <DataMember()> Public Property Phone As String End Class- C#
[DataContract(Namespace="http://www.professionalvisualstudio.com")]
public class CustomerData
{
    [DataMember] public int CustomerID { get; set; }
    [DataMember] public string Title { get; set; }
    [DataMember] public string FirstName { get; set; }
    [DataMember] public string MiddleName { get; set; }
    [DataMember] public string LastName { get; set; }
    [DataMember] public string Suffix { get; set; }
    [DataMember] public string CompanyName { get; set; }
    [DataMember] public string EmailAddress { get; set; }
    [DataMember] public string Phone { get; set; }
}
If you don't want a property to be serialized, simply don't apply the DataMember attribute to it. Like the service contract attributes you can also set the value of each of the various properties each attribute has. For example, the DataContract attribute enables you to set properties such as the namespace for the class's data contract (the Namespace property), and an alternative name for the class's data contract (the Name property). The DataMember attribute also has a number of properties that you can set, such as the member's name (the Name property), and whether the member must have a value specified (IsRequired).
Note
When defining your data contract you might ask why you are decorating the data classes directly and aren't defining the contract on an interface as you did with the service contract (which was considered good practice). This is because only concrete types can be serialized — interfaces cannot (and thus cannot be specified as parameter or return types in WCF calls). When an object with only an interface specifying its type is to be deserialized, the serializer would not know which type of concrete object it should create the object as. There is a way around this but it's beyond the scope of this chapter. Note that if you try to create an interface and decorate it with the DataContract attribute, this will generate a compile error.
You must be aware of some caveats when designing your data contracts. If your data class inherits from another class that isn't decorated with the DataContract attribute, you will receive an error when you attempt to run the service. Therefore, you must either also decorate the inherited class with the data contract attributes, or remove the data contract attributes from the data class (although this is not recommended) so the data contract is inferred instead.
If you choose to have inferred data contracts and not decorate the data classes with the data contract attributes, all public properties will be serialized. You can, however, exclude properties from being serialized if you need to by decorating them with the IgnoreDataMember attribute. A caveat of inferred data contracts is that the data classes must have a default constructor (that is, one with no parameters), or have no constructors at all (in which case a default constructor will be created for it by the compiler). If you do not have a default constructor in a data class with an inferred contract, you will receive an error when you attempt to run the service. Note that when an object of that type is passed in as an operation's parameter, the default constructor will be called when the object is created, and any code in that constructor will be executed.
Note
Although it's not strictly required, it's best that you keep your data contract classes separate from your other application classes, and that you use them only for passing data in and out of services (as data transfer objects, aka DTOs). This way you minimize the dependencies between your application and the services that it exposes or calls.
A WCF service has three main components: the Address, the Binding, and the Contract (easily remembered by the mnemonic ABC):
The address specifies the location where the service can be found (the where) in the form of a URL.
The binding specifies the protocol and encoding used for the communication (the how).
The contract details the capabilities and features of the service (the what).
The configurations of each of these components combine to form an endpoint. Each combination of these components forms a separate endpoint, although it may be easier to consider it as each service having multiple endpoints (that is, address/binding combinations). What makes WCF so powerful is that it abstracts these components away from the implementation of the service, enabling them to be configured according to which technologies the service will support.
With this power, however, comes complexity, and the configuration of endpoints can become rather complex. In particular, many different types of bindings are supported, each having a huge number of options. However, WCF 4.0 simplifies this configuration over previous versions by providing default endpoints, standard endpoints, default protocol mappings, default binding configurations, and default behavior configurations — all of which ease the amount of configuration required. Because endpoint configuration can become very complex, this chapter focuses on just the most common requirements.
Endpoints for the service are defined in the App.config file. Though you can open the App.config file and edit it directly, Visual Studio comes with a configuration editor tool to simplify the configuration process. Right-click the App.config file in the Solution Explorer, and select Edit WCF Configuration from the context menu. This opens the Microsoft Service Configuration Editor, as shown in Figure 31-2.

The node you are most interested in is the Services node. Selecting this node displays a summary in the Services pane of all the services that have been configured and their corresponding endpoints. You will find that a service is already listed here, although it is the configuration for the default service that was created by the project template (Service1), which no longer exists. Therefore, you can delete this service from the configuration and start anew (click the service and press Delete).
Note
If you try running the service (detailed in the next section) without properly configuring an endpoint for it (or have an incorrect name for the service in the configuration), you will receive an error stating that the WCF Service Host cannot find any service metadata. If you receive this error, ensure that the service name (including its namespace) in the configuration matches its name in the actual service implementation.
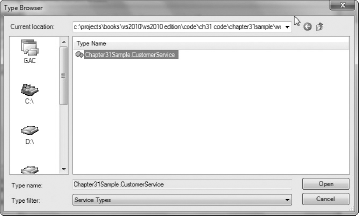
The first step is to define your service in the configuration. From the Tasks pane, click the Create a New Service hyperlink. This starts the New Service Element Wizard. In the service type field you can directly type the qualified name of your service (that is, include its namespace), or click the Browse button to discover the services available (it's best to use the Browse function because this automatically fills in the next step for you). If you use this option you must have compiled your project first, and then you can navigate down into the binDebug folder to find the assembly, and drill through it to display the services within that assembly (as shown in Figure 31-3). Now you have specified the service implementation, but next you need to specify the contract, binding, and address for the endpoint.
If you used the Browse button in the previous step (recommended), this next step (specifying the service contract) will have already been filled in for you (as shown in Figure 31-4). Otherwise, fill this in now.

The next step states that it allows you to either create a new binding configuration, or use an existing binding configuration (as shown in Figure 31-5). However, the first option is probably a bit misleading, because it doesn't create a new binding configuration but instead helps you (via a wizard) choose which of the default binding configurations you want to use for the endpoint. Each binding has a default/standard binding configuration, but additional configurations can be created for a binding (under the Bindings node in the Configuration tree) that enable you to configure exactly how a binding behaves. The custom bindings configuration can become rather complex, with a myriad of options available. However, in many cases you will find that you will just need a default binding (unless you actually have a specific need to change its behavior). In this chapter, assume that the default bindings are satisfactory for your needs.
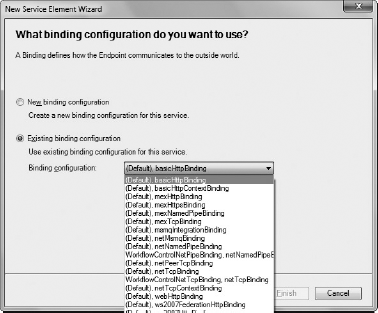
So the actual options you have on this screen (in spite of the text displayed) are to either run another part of the wizard that will help you decide which of the default binding configurations you want (the first option), or to simply choose from a list of the existing binding configurations (that is, both the default and custom binding configurations) if you know which one you want (the second option).
Choosing which binding you should use really depends on your usage scenario for the service. The wizard will help you choose a binding, with a description under each option detailing the purpose for the option. You must remember, however, that not all clients may support the binding you choose — therefore, you must also consider what clients will be using your service and choose the binding accordingly. Of course, you can add additional endpoints with different bindings to support each type of client. The most common bindings are basicHttpBinding and wsHttpBinding — with both communicating over HTTP. The basicHttpBinding binding is used to communicate in the same manner as the ASMX web services (which conform to the WS-I Basic Profile 1.1). The wsHttpBinding binding implements a number of additional specifications other than the basicHttpBinding binding (including reliability and security specifications), and additional capabilities such as supporting transactions. However, older .NET clients (pre-.NET Framework 3.0), non-.NET clients, mobile clients, and Silverlight clients will not be able to access the service using this binding. For this example, choose the wsHttpBinding binding.
The final step is to specify the address for the endpoint. You can specify the entire address to be used by starting the address with a protocol (such as http://), or specify a relative address to the base address (discussed shortly) by just entering a name. In this case, delete the default entry and leave it blank — this endpoint will simply use the base address that you are about to set up. A warning will be displayed when moving on from this step, but it can be safely ignored.
A summary is shown of the endpoint configuration, and you can finish the wizard. This wizard has allowed you to create a single endpoint for the service, but chances are you will need to implement multiple endpoints. You can do this easily by using the New Service Endpoint Element Wizard to create additional endpoints. Underneath the service node that was created will be an Endpoints node. Select this, and then click the Create a New Service Endpoint hyperlink in the Tasks pane. This opens the wizard that will help you to create a new endpoint.
As was mentioned earlier you now need to configure a base address for the endpoint. Because you chose to use the wsHttpBinding binding you will use a standard http URL that you will make the service accessible by. Under the newly created service node is a Host node. Select this, and from the Host pane that appears click the New button to add a new base address to the list (which is currently empty). A dialog appears asking for the base address, and contains a default entry. The address you enter here will largely depend on the binding that was selected earlier. Because you chose one of the HTTP bindings, use http://localhost:8733/Chapter31Sample as the base address (port 8733 was chosen at random) for this example.
Your service is now configured with the endpoints that it will support. There is another topic related to service configuration that is worth touching upon — that of behaviors. In essence, WCF behaviors modify the execution of a service or an endpoint. You will find that a service behavior containing two element extensions has already been configured for the service by the project template. If you expand the Advanced node and select the Service Behaviors node under it, you will find a behavior has been defined containing the serviceMetadata and serviceDebug element extensions. The serviceMetadata behavior element extension enables metadata for the service to be published. Your service must publish metadata in order for it to be discoverable and able to be added as a service reference for a client project (that is, create a proxy). You could set this up as a separate endpoint with the mexHttpBinding binding, but this behavior will merge this binding with the service without requiring it to be explicitly configured on the service itself. This makes it easy to ensure all your services are discoverable. Clicking the serviceMetadata node in the tree will show all its properties — ensure that the HttpGetEnabled and the HttpsGetEnabled properties are set to True. The other behavior element is the serviceDebug behavior extension. When debugging your service it can be useful for a help page to be displayed in the browser when you navigate to it (essentially publishing its WSDL at the HTTP get URL). You can do this by setting both the HttpHelpPageEnabled and HttpsHelpPageEnabled properties to True. Another useful property to set to true while debugging is the IncludeExceptionDetailsInFaults property, enabling you to view a stack trace of what exception occurred in the service from the client. Although this behavior is very useful in debugging, it's recommended that you remove it before deploying your service (for security purposes).
With these changes made you can now build and run the WCF Service Library. Unlike a standard class library, a WCF Service Library can be "run" because Visual Studio 2010 ships with the WCF Service Host utility. This is an application that can be used to host WCF services for the purpose of debugging them. Figure 31-6 shows this utility appearing in the taskbar.
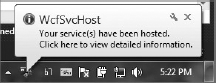
As the balloon in Figure 31-6 indicates, clicking the balloon or the taskbar icon brings up a dialog showing more information about the service that is running. If the service doesn't start correctly, this dialog can help you work out what is going wrong.
Note
If you aren't running under elevated privileges, you may end up with an error from the WCF Service Host relating to the registration of the URL you specified in the configuration file. The issue is a result of security policies on the computer that are preventing the WCF Service Host from registering the URL you have specified. If you receive this error you can resolve it by executing the following command using an elevated permissions command prompt (that is, while running as administrator), replacing the parameters according to the address of the service and your Windows username.
netsh http add urlacl url=http://+:8733/Chapter31Sample
user=<username>
This command will allow the specified user to register URLs that match the URL prefix. Now when you try to run your WCF Service Library again it should start successfully.
In addition to hosting your WCF service, Visual Studio 2010 also launches the WCF Test Client utility as you can see in Figure 31-7. This utility automatically detects the running services, and provides a simple tree representation of the services and their corresponding operations.

When you double-click a service operation you will see the tab on the right-hand side of the dialog change to display the request and response values. Unlike the very basic test page for ASP.NET Web Services, the WCF Test Client can help you simulate calls to WCF services that contain complex types. In Figure 31-7, you can see that in the Request section each parameter is displayed, and the customer object parameter of the AddCustomer operation has been broken down with data entry fields for each of its properties (those that were marked with the DataMember attribute). After setting values for each of these properties you can then invoke the operation by clicking the Invoke button. Figure 31-8 also shows that any return value will be displayed in a similar layout in the Response section of the tab.
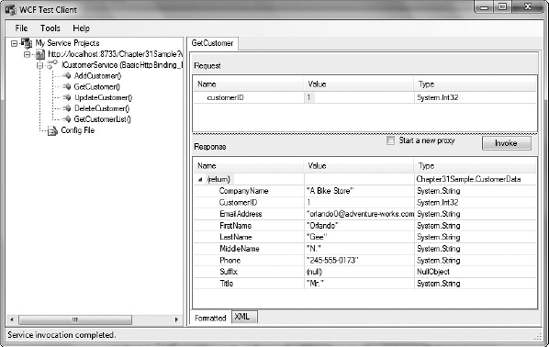
If you are trying to isolate an issue it can be useful to see exactly what information is traveling down the wire for each service request. You can do this using third-party tools such as Fiddler, but for a simple XML representation of what was sent and received you can simply click the XML tab. Figure 31-9 shows the body XML for both the request and the response. You will notice that there is additional XML due to the request and response each being wrapped in a SOAP envelope.

This is fine while you are debugging the service, but in production you will need to properly host your service. You have a lot of ways to host your service, and how you choose to do so really depends on your scenario. If it's a situation where the service is acting as a server (which clients communicate with) and communicates via HTTP, then Internet Information Services (IIS) is probably your best choice. If your service is being used to communicate between two applications, your application itself can be used to host the service. Other options you may wish to consider are hosting the service in a Windows Service, or (if the host machine is running Windows Vista/7 or Windows Server 2008) under Windows Process Activation Services (WAS). We will take a look at the two most common scenarios: hosting your service in IIS, and hosting it in a .NET application (which will be a console application).
The first example shows how to host your WCF service in IIS. The first step is to set up the folder and files required. Create a new folder (under your IIS wwwroot folder, or anywhere you choose) with a name of your own choosing, and create another folder under this called bin. Copy the compiled service assembly (that is, the .dll file) into this folder. Also take the App.config file and copy it into the folder one level higher (that is, the first folder you created), and rename it to web.config.
Now you need to create a simple text file (in the Visual Studio IDE, Notepad, or a text editor of your choice) and call it CustomerService.svc (it can be any name, but it does require the .svc extension). Put this line as the contents of the file:
<%@ServiceHost Service="Chapter31SampleCS.CustomerService"%>
Essentially, this specifies that IIS should host the service called Chapter31SampleCS.CustomerService (which it expects to find in one of the assemblies in the bin folder).
In summary, you should have a CustomerService.svc file and a web.config file in a folder, and the service assembly (dll) in the bin folder below it. Ensure (in the folder permissions) that the IIS process has read access to this folder.
Now you need to configure the service in IIS. Open IIS, and under the default web site add a new application. Give it a name (such as CustomerService), and specify the folder created earlier as its physical path. Also make sure you select to use the ASP.NET v4.0 application pool (so it will use V4 of the .NET Framework), and that should be it!
You can then navigate to the service's URL in a browser to see if it works, and use the WCF Test Client to actually test the operations.
Note
If you create the project using the WCF Service Application project template, the correct structure and required files will already be created for you and ready to host under IIS.
The other example goes through hosting the WCF service in a .NET application (known as a self-hosted service). You can either put the service code (created previously) directly in this project, or reference the service project you created earlier. For this example, just create a simple console application to act as the host, and reference the existing service project. Create a new console application project in Visual Studio called CustomerServiceHost, and add a reference to the service project. You will also need to add a reference to the System.ServiceModel assembly. Copy the App.config file from the service project into this project (so you can use the service configuration previously set up).
Use the following code to host the service:
- VB
Imports System.ServiceModel
Imports Chapter31SampleVB

Module CustomerServiceHost
    Sub Main()
        Using svcHost As New ServiceHost(GetType(CustomerService))
            Try
                'Open the service, and close it again when the user presses a key
                svcHost.Open()

                Console.WriteLine("The service is running...")
                Console.ReadLine()

                'Close the ServiceHost.
                svcHost.Close()

            Catch ex As Exception
                Console.WriteLine(ex.Message)
                Console.ReadLine()
            End Try
End Using End Sub End Module- C#
using System;
using System.ServiceModel;
using Chapter31SampleCS;

namespace CustomerServiceHost
{
    class Program
    {
        static void Main(string[] args)
        {
            using (ServiceHost serviceHost =
                                 new ServiceHost(typeof(CustomerService)))
            {
                try
                {
                    // Open the service, and close it again when the user
                    // presses a key
                    serviceHost.Open();

                    Console.WriteLine("The service is running...");
                    Console.ReadLine();

                    serviceHost.Close();
                }
                catch (Exception ex)
                {
                    Console.WriteLine(ex.Message);
                    Console.ReadLine();
                }
            }
        }
    }
}
In summary, the configuration for the service is being read from the .config file (although it could also be specified programmatically), so you just need to create a service host object (passing in the type of the service to be hosted), and open the host. When you are done you just need to close the host and clean up!
Now you can run the project and access the service using the URL specified in the .config file. As you can see, very little code is required to host a WCF service.
Now that you have successfully created your WCF service it's time to access it within an application. To do so add a Windows Forms project to your solution called CustomerServiceClient.
The next thing is to add a reference to the WCF service to the Windows Forms application. Right-click the project node in the Solution Explorer tool window and select Add Service Reference. This opens the dialog shown in Figure 31-10, in which you can specify the WCF service you want to add a reference to. As you can see, there is a very convenient Discover button that you can use to quickly locate services contained within the current solution.

Select the ICustomerService node in the Services tree, change the namespace to CustomerServices, and click the OK button to complete the process. The next step is to create a form that will display/edit data from the service. Put the code to communicate with the service in the code behind for this form. Start by adding a using/Imports statement to the top of the code for the namespace of the service:
- VB
Imports CustomerServiceClient.CustomerServices
- C#
using CustomerServiceClient.CustomerServices;
Let's say you have a BindingSource control on your form called customerDataBindingSource, whose DataSource property you want to set to the list of customers to be retrieved from the service. All you need to do is create an instance of the service proxy and call the operation, and the data will be returned.
- VB
Dim service As New CustomerService
customerDataBindingSource.DataSource = service.GetCustomerList()
- C#
CustomerService service = new CustomerService();
customerDataBindingSource.DataSource = service.GetCustomerList();
You can now run this application and it will communicate with the WCF service. This example demonstrated communicating with the WCF service synchronously (that is, the UI thread was paused until a response had been received from the server), but this has the disadvantage of making your application unresponsive to the user until the response from the service had been received. Though calling the service synchronously is easy code to write, it doesn't provide for a very nice user experience. Fortunately, you can also call WCF services asynchronously. This allows the client to make a request to a service, and continue on running without waiting for the response. When a response has been received, an event will be raised that can be handled by the application from which it can act upon that response.
To enable the asynchronous methods to be created on the service proxy you must specifically request them by selecting the Generate Asynchronous Operations checkbox in the Configure Service Reference dialog (detailed later in this section). To call the WCF service asynchronously you create an instance of the service, handle the Completed event for the associated operation, and then call the operation method that is suffixed with Async:
- VB
Dim service As New CustomerService AddHandler service.GetCustomerListCompleted, _ AddressOf service_GetCustomerListCompleted service.GetCustomerListAsync()- C#
CustomerService service = new CustomerService();
service.GetCustomerListCompleted += service_GetCustomerListCompleted;
service.GetCustomerListAsync();
The operation call will return immediately, and the event handler specified will be called when the operation is complete. The data that has been returned from the service will be passed into the event handler via e.Results:
- VB
Private Sub service_GetCustomerListCompleted(ByVal sender As Object, _ ByVal e As GetCustomerListCompletedEventArgs) customerDataBindingSource.DataSource = e.Result End Sub- C#
private void service_GetCustomerListCompleted(object sender,
GetCustomerListCompletedEventArgs e)
{
    customerDataBindingSource.DataSource = e.Result;
}
When you add a reference to the WCF service to your rich client application you will notice that an App.config file was added to the project (if it didn't already exist). In either case, if you take a look at this file you'll see that it now contains a system.serviceModel element that contains bindings and client elements. Within the bindings element you can see that there is a wsHttpBinding element (this is the default WCF binding), which defines how to communicate with the WCF service. Here you can see that the subelements override some of the default values. The Client element contains an endpoint element. This element defines the Address (which in this case is a URL), a Binding (which references the customized wsHttpBinding defined in the bindings element), and a Contract (which is the CustomerServices.ICustomerService interface of the WCF service that is to be called). Because this information is all defined in the configuration file, if any of these elements changes (for example, the URL of the endpoint) you can just modify the configuration file instead of having to recompile the entire application.
When you make changes to the service you will need to update the service proxy that was created by Visual Studio when you added the service reference to your project (otherwise it will remain out of date and not show new operations added to it, and so on). You can do this by simply right-clicking the service reference (under the Service References node in your project) and selecting the Update Service Reference item from the context menu.
If you right-click a service reference (under the Service References node in your project) you will also find a Configure Service Reference option. This will bring up the dialog shown in Figure 31-11 (which can also be accessed from the Add Service Reference dialog by clicking the Advanced button).
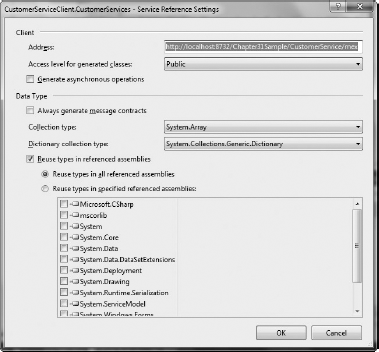
This dialog allows you to configure how the service proxy is generated, with a variety of options available. Of particular interest is the Reuse types in referenced assemblies option. This option (when enabled) means that if the service reference generator finds that a type (that is, class/object) consumed/returned by the service is defined in an assembly referenced by the client, the proxy code generated will return/accept objects of that type instead of creating a proxy class for it. The big benefit of this is where you manage both ends of the system (both server and client) and want to pass objects between them that have associated business logic (such as validation logic, business rules, and so on). The usual process is to (on the client side) copy the property values from a proxy object into a business object (when requesting data), and then copy property values from a business object into a proxy object (to pass data back to the server). However, this option means that you can have both the server and the client reference an assembly that contains the types to be passed between them (with corresponding business logic code for both ends), and simply pass the objects backward and forward between the server and the client without requiring a proxy class as an intermediary (on the client side). This saves you from having to write a lot of property mapping code, which becomes a maintenance burden and has a high potential to contain incorrect mappings.
In this chapter you learned how to create a WCF service, host it, consume it, and configure it for different purposes/uses. However, WCF isn't the end of the story for communication layers — in fact, a number of technologies are built on top of WCF to enhance its capabilities. These include WCF Data Services and WCF RIA Services, with the latter detailed in Chapter 35.