
WHAT'S IN THIS CHAPTER?
Publishing Web Site and Web Application projects
Copying Web Site changes to a remote server
Creating Web Application packages for deployment with the Web Deployment Tool
Managing configuration files for multiple deployment environments
Keeping machines up to date with the Web Platform Installer
Extending the Web Platform Installer to include your own applications
In the previous chapter you saw how to deploy your Windows application using either an installer or ClickOnce. But how do you go about deploying web applications? This chapter walks you through deploying Web Site and Web Application projects. It also covers packaging web applications for remote deployment with the new Web Deployment Tool and integrating with the Web Platform Installer.
One of the most important aspects of building your application is to think about how you will package it so that it can be deployed. Though a large proportion of web applications are only for internal release, where a simple copy script might be sufficient, if you do want to make your web application available for others to purchase and use, you really need to focus on making the deployment process as simple as possible.
Note
After the release of Visual Studio 2005, Microsoft released Web Deployment Projects as a more advanced way of managing the deployment of Web Site and Web Application projects. When Visual Studio 2008 was released, these projects were updated but not included in the final release. At the time of writing, Microsoft has not announced any plans to include Web Deployment Projects in Visual Studio 2010.
Web projects created with Visual Studio 2010 fall into two broad categories: Web Application projects and Web Site projects. This section demonstrates tools that are specifically for deploying and maintaining Web Site projects.
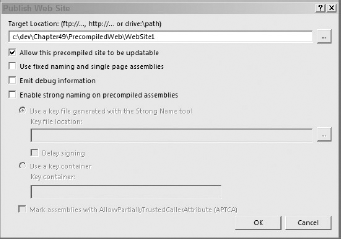
The simplest way to deploy a web site from Visual Studio 2010 is to publish it via the Publish Web Site item on the Build menu. Selecting this option presents you with the dialog shown in Figure 49-1. It has only a few basic options that allow you to publish debugging information, allow in-place updating of your web site, and enforce different naming policies and security requirements.
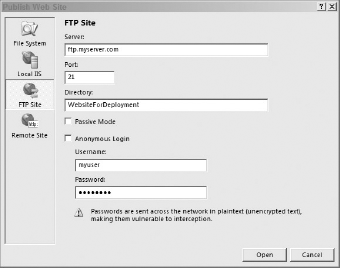
Usually you will simply use the Target Location box to specify the location that you want to publish to. This location can be a local instance of IIS, an FTP site, elsewhere on the file system, or a remote instance of IIS. Clicking the ellipsis button next to the Target Location textbox in Figure 49-1 brings up a dialog to specify the details of where you want to publish to, as shown in Figure 49-2.
Once a web site has been published, it is important that you have some way of updating it. One option is to go through the process of publishing your web site again. However, this will publish the entire web site, even if only a single file needs to be updated. An alternative is to use the Copy Web Site tool, shown in Figure 49-3, to synchronize files between your development project and the web site. You can access this tool from the right-click context menu in the Solution Explorer, or via the web site menu.
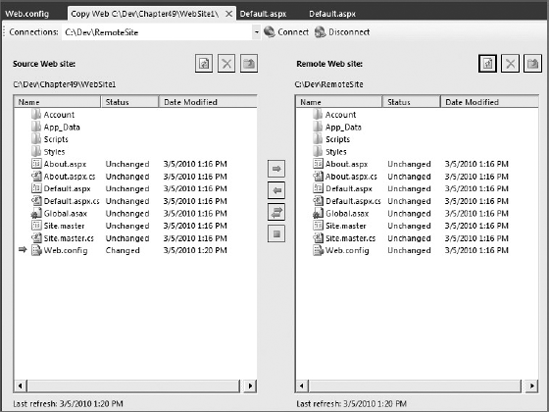
To view the existing files on the remote web site, you need to either select a recent connection from the drop-down list or click the Connect button. This will open a dialog similar to Figure 49-2, where you can specify how to connect to the remote web site. Once you have connected you can see which files are out of sync. You can then use the right and left arrows to move files between your local project and the remote web site.
Web application projects are quite different from Web Site projects and come with a different set of tools for deployment. Visual Studio 2010 introduces the capability to deploy with the new Web Deployment Tool, which is used to easily import and export IIS applications along with their dependencies — such as IIS meta-data and databases — from the command line, IIS 7.0 management console, Powershell cmdlets, or directly from Visual Studio itself. It also provides the ability to manage several versions of configuration data for different environments in a clean manner without duplication.
The quickest way to deploy a Web Application project is to simply publish it directly from Visual Studio. Select the Publish item from the right-click context menu in Solution Explorer to display the Publish Web dialog shown in 49-4. If this is the first time you have run the Publish Web dialog, Publish Profile will be a textbox instead of a drop-down enabling you to give the profile a meaningful name. Each time you do a deployment you do so against a particular profile, which encapsulates the target environment settings. A Web Application project can maintain a collection of profiles, which allows you deploy the one web application to a number of target environments and keep the settings for each separate.
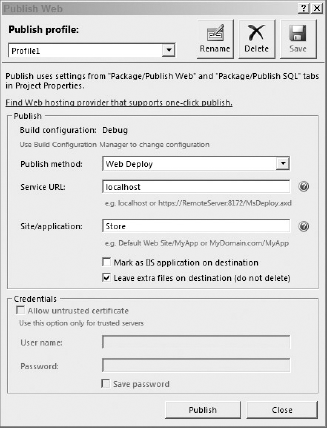
Four options for Publish Method determine what you see in the lower part of the dialog window: Web Deploy FTP, File System, and Front-Page Server Extensions (FPSE). The File System and Front-Page Server Extensions options both allow you to enter the target location for the web application to be published. The FTP option offers the same but also allows you to enter FTP credentials. Each of these provides a cut down version of Figure 49-2 if you click the ellipsis on Target Location. The only other settings for these choices is whether to simply replace any files in the target location or clear all of the files from the target location before deployment.
The final publishing method option is Web Deploy MSDeploy.exe, also known as the Web Deployment Tool, is designed to help administrators and developers more easily package and deploy web application projects. It does this by packaging all of the necessary files for your application along with all of the required meta-data to install and configure it into a single zip file. This zip file can then be installed via the IIS7.0 interface, the command line, Powershell cmdlets, or directly from Visual Studio itself.
To deploy directly to a server that is running MSDeploy, you will need:
A service reference where MSDeploy will be listening
A site and application name used to identify the remote application
A username and password for the remote instance of MSDeploy
All of this information will be provided by your server administrator or hosting provider.
Once you have published your web application successfully at least once, the Web One Click Publish toolbar will become available. This toolbar, shown in Figure 49-5, allows you to select a publishing profile and click the Publish button to instantly publish your web application. If you don't see the toolbar, you can enable it by selecting View
Note
If you start the Publish process from the main menu or from the project right-click context menu, you will get the option to examine the profile properties before the application is deployed. When you use the Web One Click Publish toolbar, however, the deployment starts immediately.
Even if you do not have direct access to the target environment, you can still create packages that can be managed by the Web Deployment Tool. This is as simple as selecting Create Package from the right-click context menu of the Web Application project in the Solution Explorer window.
By default, this generates a zip file along with some support material in the objDebugPackage folder. The support material includes a sample .cmd file along with a parameters file, which can be used to install the package from the command line on the target server.
Note
These packages are precisely what get deployed to a remote server during an MSDeploy Publish.
One important aspect of deploying and packaging web applications is configuring what gets deployed. You can reach the Package/Publish settings tab pictured in Figure 49-6 from the normal project properties pages, or by selecting the Package/Publish Settings item in the right-click context menu of the project in the Solution Explorer window.

The first option to configure is which files to actually deploy. The three options are as follows:
Only files needed to run the application will include only the files that are actually necessary to running the application. This can exclude files with a build action of None. This is the most exclusive option and is the default.
All files in this project will include any file that appears as a part of the project in the Solution Explorer window.
All files in this project folder will include any file that is found in the project folder even if it is not a part of the project. This is the least restrictive option.
You also have options to exclude generated debug files and files in the App_Data folder. To deploy databases you should use the Package/Publish SQL options, which are discussed in the next section.
A Web Deployment Package is also able to copy IIS meta-data, but only if your project is being developed in IIS. To configure this, go to the Web properties page and change the Servers option to Use Local IIS Web Server.
Finally, you can opt to provide a location for the deployment package to be created and a web site/application name to apply to the package when it is deployed to an IIS server.
One common problem when deploying web applications is that they frequently rely on a database server to store data and so the deployment process has to find a way to manage the deployment of a database schema, and potentially data as well. Web Deployment Packages allow you to specify database scripts to set up or update your databases, and the Web Deployment Tool manages the process of running these scripts against a database server during the deployment process.
To add a database to your deployment package, use the Package/Publish SQL property page for the web project shown in Figure 49-7. Use the Add and Remove buttons on the right-hand side to maintain a list of connections that are to be deployed. If you already have a set of connection strings in the web.config file, you can import them directly into this list using the Import from Web.Config button provided. You can also use the checkboxes to decide whether or not to include each connection string in the deployment.

When you have a connection string highlighted in the top section, the bottom section displays deployment details relating to that connection string. The first option allows you to provide a different connection string for the deployment package.
The next option allows you pull a schema and/or data from an existing database while creating the deployment package. To do this, you need to simply provide a connection string and select whether schema, data, or both should be deployed. In addition to these automatically generated database scripts, you can add your own database scripts to the deployment. This can be useful if you are using a tool that produces change scripts for your database.
Note
When you use Visual Studio to extract schema information or data from an existing SQL Server, it generates scripts suitable for deploying a brand new database. To update an existing database, you need to create your own scripts and add them to the package.
One other problem that many projects face is how to maintain different versions of application configuration between different environments. This problem is commonly handled by keeping several copies of the web.config file around — one for each environment — and then remembering to rename the correct version for the target environment every time the application is deployed. Even if you make this a part of your build process, this can be problematic because any change to the web.config file potentially needs to be replicated to each of the other environment-specific configuration files. Visual Studio 2010 introduces a new capability called Web.config Transformation, which allows you to have a single configuration file and then specify only the differences for each environment.
When a web application project is first created it includes a web.config file along with two config transforms, one for each build configuration: Debug and Release. Each transform is associated with a single configuration and appears under the web.config file in the Solution Explorer (see Figure 49-8). To create your own configuration, select Configuration Manager from the Configuration drop-down menu and then select New from the Active solution configuration drop-down. Enter a name for your new configuration and optionally select which previous configuration it should copy its values from.
Once you have a new configuration, you can add a new config transform by selecting Add Config Transforms from the right-click context menu of the web.config file in Solution Explorer. This automatically adds any transforms that were missing from the solution's Configuration collection.
The configuration transform file is a standard configuration file, but it adds a new XML namespace for specifying transformations. This namespace contains two attributes, Transform and Locator, which can be added to any element in the configuration file. Transform is used to specify a change that is to be made to the original configuration file. Locator, on the other hand, is used to identify particular nodes to apply a transformation to. Here a few examples, along with a description of what they do. For more information, see the full reference in the MSDN Library.
<appSettings>
  <add xdt:Transform="Remove"xdt:Locator="Condition(@name='UseMockDatabase')"/>
</appSettings>
This locates an add node under appSettings with the name attribute set to UseMockDatabase and removes it from the output configuration file.
<connectionStrings>
  <add name="AdventureWorks" xdt:Transform="Replace" xdt:Locator="Match(name)"
  connectionString="Data Source=UAT_DB; Initial Catalog=AdventureWorks; ~CA
  Integrated Security=true"/>
</connectionStrings>
This updates the contents the AdventureWorks connection string to point to a UAT database server.
<system.web>
  <compilation xdt:Transform="RemoveAttributes(debug)" />
</system.web>
This removes the debug attribute from the compilation node under system.web.
<authorization>
  <deny users="*" xdt:Transform="Insert"/>
</authorization>
This inserts a new node at the bottom of the authorization element that denies access to all users.
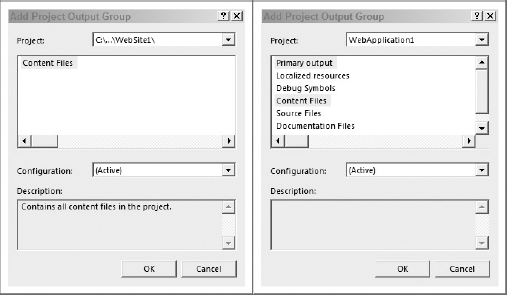
In addition to using the Web Deployment Tool, you can create a standard Windows Installer package to manage a web application or web site deployment. To do this, you will need to create a Web Setup Project from the Other Project Types Setup and Deployment node in the New Project dialog. This is essentially a normal setup project that has been configured with the relevant output folder (see the File System view) and user interface (see the User Interface view) for deploying web applications. Once you have created the setup project, you will need to add the appropriate project outputs. The left image of Figure 49-9 shows the Add Project Output Group dialog for adding a web site to the setup project. Because a web site contains only content files, this is the only option available.
Alternatively, when you are using a Web Application Project, you will want to select the primary output as well as the content files, as shown in the right image of Figure 49-9.
One of the unique features of the Web Setup Project is the screen that is added to the user interface to enable the user to define the web site, virtual directory, and application pool that will be used by the web application being installed. Figure 49-10 illustrates this dialog as part of the installation process.
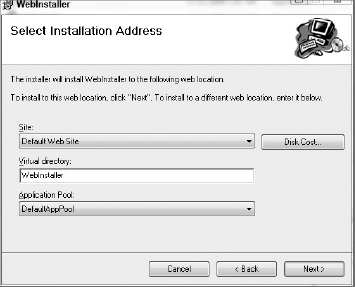
In older versions of Visual Studio, the web site installation wizard would only prompt the user to specify the name of the virtual directory into which the application was to be installed, and this directory would then be created in the default web site. If multiple web sites were hosted on the same server (often the case with products such as SharePoint installed), this could result in the application being installed on the wrong web site. Being able to specify the web site during installation reduces any post-installation administration that would have been required in the past.
Web applications tend to rely on a large number of technologies and tools to function correctly both during development and in production. Even once your environment is correctly set up for a single application, relationships and dependencies between applications need to be understood and managed. Finally, there are always new tools, libraries, and applications being made available on the Internet, which you can build on when creating your own projects. As your environment becomes more complex it can be quite a challenge to keep everything working correctly and up to date.
The Microsoft Web Platform Installer, shown in Figure 49-11, is a simple tool designed to manage the software that you have installed on your web servers and development machine.
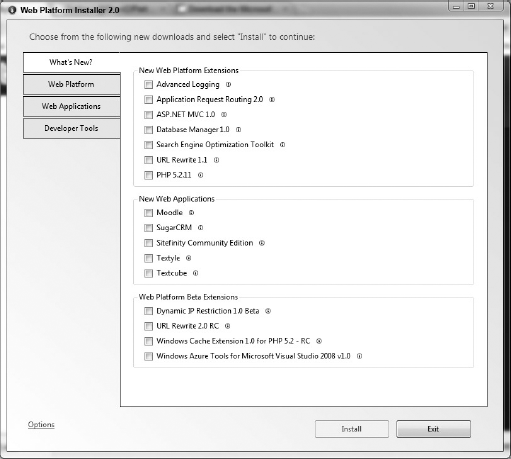
Once you have downloaded the Web Platform Installer from http://www.microsoft.com/web, you can run it as many times as you like. It is able to detect which components you already have on your machine and you can check and uncheck components to add and remove them, respectively. It is even able to take care of dependencies between components and install everything you need.
The Web Platform Installer is able to manage components beyond just the Web Platform itself. Also available is a collection of applications from the Microsoft Web Application Gallery found at http://www.microsoft.com/web/gallery. These applications are filed under various categories under the Web Applications tab. Just like the components in the Web Platform, these applications can have their own prerequisites and the Web Platform Installer takes care of ensuring they are installed.
If you are already packaging your web application for deployment with MSDeploy, it is ready to be distributed using the Web Platform Installer. You can get your application added to the Web Application Gallery by filling in a simple form on the Microsoft Web portal. Once your application is approved, it will show up ready to be installed on any machine with the Web Platform Installer on it.
As mentioned in the previous section, it is quite easy to have your application included in the Web Application Gallery to make it available to a large audience. There are some scenarios in which you would like to take advantage of the Web Platform Installer but do not want to make your application publicly available. This might be because your application is being used privately within your company or it might be because your application is not yet ready for release and you want to test the deployment procedure.
The Web Platform Installer relies on atom feeds to ensure that the list of components and products that it installs are always kept up to date. Each entry in these feeds corresponds to an application or component in the user interface of the Web Platform Installer. The Web Platform and Web Application tabs each come from different feeds at http://www.microsoft.com/web/webpi/2.0/WebProductList.xml and http://www.microsoft.com/web/webpi/2.0/WebApplicationList.xml, respectively. In addition to these two feeds, each installation of the Web Platform Installer can specify additional feeds that reference more components.
Here is a sample feed for a simple timesheets web application:
<?xml version="1.0" encoding="utf-8"?>
<feed xmlns="http://www.w3.org/2005/Atom">
  <version>1.0.0</version>
  <title>AdventureWorks Product WebPI Feed</title>
  <link href="http://www.professionalvisualstudio.com/SampleProductFeed.xml" />
  <updated>2009-11-01T16:30:00Z</updated>
  <author>
    <name>Adventure Works</name>
    <uri>http://www.professionalvisualstudio.com</uri>
 </author>
 <id>http://www.professionalvisualstudio.com/SampleProductFeed.xml</id>

 <entry>
<productId>TimeSheets</productId>
<title>Adventure Works Timesheets</title>
<summary>The Adventure Works corporate Timesheeting system</summary>
<longSummary>The Adventure Works corporate Timesheeting system</longSummary>
<productFamily>Human Resources</productFamily>
<version>1.0.0</version>
<images>
<icon>c:AdventureWorksIcon.png</icon>
</images>
<author>
<name>Adventure Works IT</name>
<uri>http://www.professionalvisualstudio.com</uri>
</author>
<published>2009-11-01T12:30:00Z</published>
<discoveryHint>
<or>
<discoveryHint>
<registry>
<keyPath>HKEY_LOCAL_MACHINESOFTWAREAdventureWorksTimesheets</keyPath>
<valueName>Version</valueName>
<valueValue>1.0.0</valueValue>
</registry>
</discoveryHint>
<discoveryHint>
<file>
<filePath>%ProgramFiles%AdventureWorksTimesheets.exe</filePath>
</file>
</discoveryHint>
</or>
</discoveryHint>
<dependency>
<productId>IISManagementConsole</productId>
</dependency>
<installers>
<installer>
<id>1</id>
<languageId>en</languageId>
<architectures>
<x86 />
</architectures>
<osList>
<os>
<!-- the product is supported on Vista/Windows Server SP1 + -->
<minimumVersion>
<osMajorVersion>6</osMajorVersion>
<osMinorVersion>0</osMinorVersion>
<spMajorVersion>0</spMajorVersion>
</minimumVersion>
<osTypes><Server />
<HomePremium />
<Ultimate />
<Enterprise />
<Business />
</osTypes>
</os>
</osList>
<eulaURL>http://www.professionalvisualstudio.com/eula.html</eulaURL>
<installerFile>
<!-- size in KBs -->
<fileSize>1024</fileSize>
<installerURL>http://www.professionalvisualstudio.com/Timesheets_x86.msi
</installerURL>
<sha1>111222FFF000BBB444555EEEAAA777888999DDDD</sha1>
</installerFile>
<installCommands>
<msiInstall>
<msi>%InstallerFile%</msi>
</msiInstall>
</installCommands>
</installer>
</installers>
</entry>
<tabs>
<tab>
<groupTab>
<id>AdventureWorksHRTab</id>
<name>Adventure Works Human Resources</name>
<description>Adventure Works HR Apps</description>
<groupingId>HRProductFamilyGrouping</groupingId>
</groupTab>
</tab>
</tabs>
<groupings>
<grouping>
<id>HRProductFamilyGrouping</id>
<attribute>productFamily</attribute>
<include>
<item>Human Resources</item>
</include>
</grouping>
</groupings>
</feed>The first part specifies some standard information about the feed itself, including the date it was last updated and author information. This is all useful if the feed is consumed using a normal feed reader. Following this is a single entry node containing information about the application itself. The Web Platform Installer is able to use the value of productId to refer to the application in other places, including being listed as a dependency for other components.
The discoveryHint node is used to determine if this application is already installed. The sample application can be detected by looking for a specific registry key value or by looking for a specific application by name. If either one of these items is found, the Web Platform Installer considers this application to be already installed. In addition to these two kinds of hints, you can use an msiProductCode hint to detect applications that are installed via MSI.
The sample timesheets application has a dependency on the IIS Management Console. Each component that your application relies upon can be specified by its productId. If it is not already installed on the target machine, the Web Platform Installer will install it for you. In addition to dependencies, you can specify incompatibilities for your application, which will prevent both applications from being installed at once.
The last component of the application entry is the installers element. There should be one installer element for each installer that you want to make available and they should all have different identifiers. Each installer can be targeted at a specific range of languages, operating systems, and CPU architectures. If the target environment doesn't fall into this range, the installer will not be shown. Each installer should specify an installer file, which will be downloaded to a local cache before the specified installCommands are executed against it.
Note
An installer file requires a size and a SHA1 hash so that the Web Platform Installer can verify that the file has been downloaded correctly. Microsoft provides a tool called File Checksum Integrity Verifier (fciv.exe), which can be used to generate the hash. You can download this tool from http://download.microsoft.com.
The final two elements relate to what is displayed in the Web Platform Installer user interface. Each tab element adds to the list of tabs on the left. In the example, we are adding a tab based on a grouping of products, which is defined below in the groupings element based on the productFamily attribute.
To add this feed to a Web Platform Installer instance, click the Options link in the lower left-hand corner to bring up the Options page. Enter the URL to the atom feed into the textbox and click the Add Feed button. When you click OK the Web Platform Installer refreshes all of the feeds and reloads all of the applications including the new Adventure Works timesheets application shown in Figure 49-12.

This chapter showed you how to use a number of the features of Visual Studio 2010 to package your web applications and get them ready for deployment. The new Web Deployment Tool makes deployment to a number of environments and machines quick and painless, and the One Click Publish toolbar makes it easy to manage the different publishing profiles. Finally, the Web Platform Installer provides you with an easy way to reach a large number of potential customers or to manage your own suite of enterprise applications.