
16.1. IntelliSense Explained
IntelliSense is the general term for automated help and actions in a Microsoft application. The most commonly encountered aspect of IntelliSense is those wavy lines you see under words that are not spelled correctly in Microsoft Word, or the small visual indicators in a Microsoft Excel spreadsheet that inform you that the contents of the particular cell do not conform to what was expected.
Even these basic indicators enable you to quickly perform related actions. Right-clicking a word with red wavy underlining in Word will display a list of suggested alternatives. Other applications have similar features.
The good news is that Visual Studio has had similar functionality for a long time. In fact, the simplest IntelliSense features go back to tools such as Visual Basic 6. The even better news is that Visual Studio 2008 has IntelliSense on overdrive, with many different features grouped under the IntelliSense banner. From visual feedback for bad code and smart tags for designing forms to shortcuts that insert whole slabs of code, IntelliSense in Visual Studio 2008 provides greatly enhanced opportunities to improve your efficiency while creating applications.
16.1.1. General IntelliSense
The simplest feature of IntelliSense gives you immediate feedback about bad code in your module listings. Figure 16-1 shows one such example, in which an unknown data type is used to instantiate an object and then a second line of code tries to set a property. Because the data type is unknown in the context in which this code appears, Visual Studio draws a blue wavy line underneath it to indicate a problem.
The formatting of this color feedback can be adjusted in the Fonts and Colors group of Options.
Hovering the mouse pointer over the offending piece of code displays a tooltip to explain the problem. In this example the cursor was placed over the data type, with the resulting tooltip "Type 'Customer' is not defined."
Figure 16.1. Figure 16-1

Visual Studio is able to look for this kind of error by continually precompiling the code you write in the background, and looking for anything that will produce a compilation error. If you were to add a reference to the class containing the Customer definition, Visual Studio would automatically process this and remove the IntelliSense marker.
Figure 16-1 also displays a smart tag associated with the error. This applies only to errors for which Visual Studio 2008 can offer you corrective actions. At the end of the problem code, a small yellow marker is displayed. Placing the mouse pointer over this marker will display the smart tag action menu associated with the type of error — in this case, it's an Error Correction Options list, which when activated will provide a list of data types that you may have meant to use.
The smart tag technology found in Visual Studio is not solely reserved for the code window. In fact, Visual Studio 2008 also includes smart tags on visual components when you're editing a form or user control in Design view (see Figure 16-2).
Figure 16.2. Figure 16-2

When you select a control that has a smart tag, a small triangle will appear at the top right corner of the control itself. Click this button to open the smart tag Tasks list — Figure 16-2 shows the Tasks list for a standard TextBox control.
16.1.2. Completing Words and Phrases
The power of IntelliSense in Visual Studio 2008 becomes apparent as soon as you start writing code. As you type, various drop-down lists are displayed to help you choose valid members, functions, and parameter types, thus reducing the number of potential compilation errors before you even finish writing your code. Once you become familiar with the IntelliSense behavior, you'll notice that it can greatly reduce the amount of code you actually have to write. This is a significant savings to developers using more verbose languages such as VB.NET.
16.1.2.1. In Context
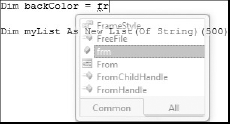
In Visual Studio 2008, IntelliSense appears almost as soon as you begin to type within the code window. Figure 16-3 illustrates the IntelliSense displayed during the creation of a For loop in VB.NET. On the left side of the image IntelliSense appeared as soon as the f was entered, and the list of available words progressively shrank as each subsequent key was pressed. As you can see, the list is made up of all the alternatives, whether they be statements, classes, methods, or properties, that match the letters entered (in this case those beginning with the prefix for).
Figure 16.3. Figure 16-3

Notice the difference in the right-hand image of Figure 16-3, where a space has been entered after the word for. Now the IntelliSense list has expanded to include all the alternatives that could be entered at this position in the code. In addition, there is a tooltip that indicates the syntax of the For statement. Lastly, there is a <new variable> item just above the IntelliSense list. This is to indicate that it's possible for you to specify a new variable at this location.
While it can be useful that the IntelliSense list is reduced based on the letters you enter, this feature is a double-edged sword. Quite often you will be looking for a variable or member but won't quite remember what it is called. In this scenario, you might enter the first couple of letters of a guess and then use the scrollbar to locate the right alternative. Clearly, this won't work if the alternative doesn't begin with the letters you have entered. To bring up the full list of alternatives, simply hit the backspace key with the IntelliSense list visible.
If you find that the IntelliSense information is obscuring other lines of code, or you simply want to hide the list, you can press Esc. Alternatively, if you simply want to view what is hidden behind the IntelliSense list without closing it completely, you can hold down the Ctrl key. This will make the IntelliSense list translucent, enabling you to read the code behind it, as shown in Figure 16-4.
Figure 16.4. Figure 16-4
16.1.2.2. List Members
Because IntelliSense has been around for so long, most developers will be familiar with the member list that appears when you type the name of an object and immediately follow it by a period. This indicates that you are going to refer to a member of the object, and Visual Studio will automatically display a list of members available to you for that object (see Figure 16-5). If this is the first time you've accessed the member list for a particular object, Visual Studio will simply show the member list in alphabetic order with the top of the list visible. However, if you've used it before, it will highlight the last member you accessed to speed up the process for repetitive coding tasks.
Figure 16-5 also shows another helpful aspect of the member list for Visual Basic programmers. The Common and All tabs (at the bottom of the member list) enable you to view either just the commonly used members or a comprehensive list.
Figure 16.5. Figure 16-5
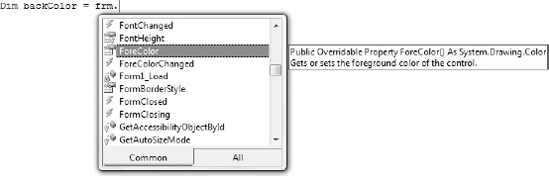
Only Visual Basic gives you the option to filter the member list down to commonly accessed properties, methods, and events.
16.1.2.3. Stub Completion
In addition to word and phrase completion, the IntelliSense engine has another feature known as stub completion. This feature can be seen in its basic form when you create a function by writing the declaration of the function and pressing Enter. Visual Studio will automatically reformat the line, adding the appropriate ByVal keyword for parameters that don't explicitly define their contexts, and also adding an End Function line to enclose the function code.
Visual Studio 2008 takes stub completion an extra step by enabling you to do the same for interface and method overloading. When you add certain code constructs such as an interface in a C# class definition, Visual Studio will give you the opportunity to automatically generate the code necessary to implement the interface. To show you how this works, the following steps outline a task in which the IntelliSense engine generates an interface implementation in a simple class.
Start Visual Studio 2008 and create a C# Windows Forms Application project. When the IDE has finished generating the initial code, open Form1.cs in code.
At the top of the file, add a using statement to provide a shortcut to the System.Collections namespace:
using System.Collections;
Add the following line of code to start a new class definition:
public class MyCollection : IEnumerable
As you type the IEnumerable interface, Visual Studio will first add a red wavy line at the end to indicate that the class definition is missing its curly braces, and then add a smart tag indicator at the beginning of the interface name (see Figure 16-6).
Figure 16.6. Figure 16-6

Hover your mouse pointer over the smart tag indicator. When the drop-down icon appears, click it to open the menu of possible actions. You should also see the tooltip explaining what the interface does, as shown in Figure 16-7.
Figure 16.7. Figure 16-7

Click the "Explicitly implement interface 'IEnumerable'" command and Visual Studio 2008 will automatically generate the rest of the code necessary to implement the minimum interface definition. Because it detects that the class definition itself isn't complete, it will also add the braces to correct that issue at the same time. Figure 16-8 shows what the final interface will look like.
Figure 16.8. Figure 16-8

Event handlers can also be automatically generated by Visual Studio 2008. The IDE does this much as it performs interface implementation. When you write the first portion of the statement (for instance, myBase .OnClick +=), Visual Studio gives you a suggested completion that you can select by simply pressing Tab.
16.1.3. Parameter Information
In old versions of Microsoft development tools, such as Visual Basic 6, as you created the call to a function, IntelliSense would display the parameter information as you typed. Thankfully, this incredibly useful feature is still present in Visual Studio 2008.
The problem with the old way parameter information was displayed was that it would only be shown if you were actually modifying the function call. Therefore, you could see this helpful tooltip as you created the function call or when you changed it but not if you were just viewing the code. The result was that programmers sometimes inadvertently introduced bugs into their code because they intentionally modified function calls so they could view the parameter information associated with the calls.
Visual Studio 2008 eliminates that risk by providing an easily accessible command to display the information without modifying the code. The keyboard shortcut Ctrl+Shift+Space will display the information about the function call, as displayed in Figure 16-9. You can also access this information through the Edit ![]() IntelliSense
IntelliSense ![]() Parameter Info menu command.
Parameter Info menu command.
Figure 16.9. Figure 16-9
16.1.4. Quick Info
In a similar vein, sometimes you want to see the information about an object or interface without modifying the code. The Ctrl+K, Ctrl+I keyboard shortcut will display a brief tooltip explaining what the object is and how it was declared (see Figure 16-10).
You can also display this tooltip through the Edit ![]() IntelliSense
IntelliSense ![]() Quick Info menu command.
Quick Info menu command.