
17.1. Code Snippets Revealed
Code snippets have been around in a variety of forms for a long time but generally required third-party add-ins for languages such as Visual Basic 6 and the early versions of Visual Studio. Visual Studio 2008 includes a full-fledged code snippet feature that not only includes blocks of code, but also allows multiple sections of code to be inserted in different locations within the module. In addition, replacement variables can be defined that make it easy to customize the generated snippet.
17.1.1. Original Code Snippets
The original code snippets from previous versions of Visual Studio were simple at best. These snippets can be used to store a block of plain text that can be inserted into a code module when desired. The process to create and use them is simple as well: select a section of code and drag it over to the Toolbox. This creates an entry for it in the Toolbox with a default name equal to the first line of the code. You can rename and arrange these entries like any other element in the Toolbox. To insert the snippet you simply drag the code to the desired location in the "Code view" as shown in Figure 17-1. Alternatively, positioning the cursor where you want the snippet to be inserted, holding Shift, and clicking the snippet will place the code at the cursor location.
Figure 17.1. Figure 17-1

Many presenters used this simple technology to quickly generate large code blocks in presentations, but in a real-world situation it was not as effective as it could have been, because often you had to remember to use multiple items to generate code that would compile.
Unfortunately this model was too simple, as there was no way to share these so-called snippets, and equally hard to modify them. Nevertheless, this method of keeping small sections of code is still available to programmers in Visual Studio 2008, and it can prove useful when you don't need a permanent record of the code, but rather want to copy a series of code blocks for short-term use.
17.1.2. "Real" Code Snippets
In Visual Studio 2008, code snippets refer to something completely different. Code snippets are XML-based files containing sections of code that can include not only normal source code, but references, Imports statements, and replaceable parameters as well.
Visual Studio 2008 ships with many predefined code snippets for the three main languages, Visual Basic, C#, and J#. These snippets are arranged hierarchically in a logical fashion so that you can easily locate the appropriate snippet. Rather than locate the snippet in the Toolbox, you can use menu commands or keyboard shortcuts to bring up the main list of groups.
New code snippets can be created to automate almost any coding task and then can be stored in this code snippet library. Because each snippet is stored in a special XML file, you can even share them with other developers.
17.1.3. Using Snippets in Visual Basic
Code snippets are a natural addition to the Visual Basic developer's tool set. They provide a shortcut to insert code that either is difficult to remember or is used often with minor tweaks. One common problem some programmers have is remembering the correct references and Imports statements required to get a specific section of code working properly; code snippets in Visual Basic solve this problem by including all the necessary associations as well as the actual code.
To use a code snippet you should first locate where you want the generated code to be placed in the program listing and position the cursor at that point. You don't have to worry about the associated references and Imports statements; they will be placed in the correct location.
There are three scopes under which a snippet can be inserted:
Class Declaration: The snippet will actually include a class declaration, so it should not be inserted into an existing class definition.
Member Declaration: This snippet scope will include code that defines members, such as functions and event handler routines. This means it should be inserted outside an existing member.
Member Body: This scope is for snippets that are inserted into an already defined member, such as an event handler routine.
Once you've determined where the snippet is to be placed, the easiest way to bring up the Insert Snippet dialog is to use the keyboard shortcut combination of Ctrl+K, Ctrl+X. There are two additional methods to start the Insert Snippet process. The first is to right-click at the intended insertion point in the code window and select Insert Snippet from the context menu that is displayed. The other option is to use the Edit ![]() IntelliSense
IntelliSense ![]() Insert Snippet menu command.
Insert Snippet menu command.
The Insert Snippet dialog is a special kind of IntelliSense that appears inline in the code window. Initially it displays the words Insert Snippet along with a drop-down list of code snippet groups from which to choose. Once you select the group that contains the snippet you require (using up and down arrows, followed by the Tab key), it will show you a list of snippets, from which you simply double-click the one you need (alternatively, pressing Tab or Enter with the required snippet selected will have the same effect).
Because you can organize the snippet library into many levels, you may find that the snippet you need is multiple levels—deep in the Insert Snippet dialog. Figure 17-2 displays an Insert Snippet dialog in which the user has navigated through two levels of groups and then located a snippet named Draw a Pie Chart.
Figure 17.2. Figure 17-2

Figure 17-3 displays the result of selecting the Draw a Pie Chart snippet. This example shows a snippet with Member Declaration scope because it adds the definition of two subroutines to the code. To help you modify the code to your own requirements, the sections you would normally need to change are highlighted, with the first one conveniently selected.
Figure 17.3. Figure 17-3

When changing the variable sections of the generated code snippet, Visual Studio 2008 helps you even further. Pressing the Tab key will move to the next highlighted value, ready for you to override the value with your own. Shift+Tab will navigate backward, so you have an easy way of accessing the sections of code that need changing without needing to manually select the next piece to modify. Some code snippets use the same variable for multiple pieces of the code snippet logic. This means changing the value in one place will result in it changing in all other instances.
You might have noticed in Figure 17-2 that the tooltip text includes the words "Shortcut: drawPie." This text indicates that the selected code snippet has a text shortcut that you can use to automatically invoke the code snippet behavior without bringing up the IntelliSense dialog. Of course, you need to know what the shortcut is before you can use this feature, but for those that you are aware of, all you need to do is type the shortcut into the code editor and press the Tab key. In Visual Basic the shortcut isn't even case-sensitive, so this example can be generated by typing the term "drawpie" and pressing Tab.
Note that in some instances the IntelliSense engine may not recognize this kind of shortcut. If this happens to you, press Ctrl+Tab to force IntelliSense to intercept the Tab key.
17.1.4. Using Snippets in C# and J#
The code snippets in C# and J# are not as extensive as those available for Visual Basic but are inserted in the same way. Only Visual Basic supports the advanced features of the code snippet functionality, such as references and Imports statements. First, locate the position where you want to insert the generated code and then use one of the following methods:
The keyboard chord Ctrl+K, Ctrl+X
Right-click and choose Insert Snippet from the context menu
Run the Edit
 IntelliSense
  Insert Snippet menu command
At this point, Visual Studio will bring up the Insert Snippet list for the current language, as Figure 17-4 shows. As you scroll through the list and hover the mouse pointer over each entry, a tooltip will be displayed to indicate what the snippet does and again the shortcut that can be used to invoke the snippet via the keyboard.
Figure 17.4. Figure 17-4

Although the predefined C# and J# snippets are limited in nature, you can create more functional and complex snippets for them.
17.1.5. Surround With Snippet
The last refactoring action, available in both C# and VB.NET, is the capability to surround an existing block of code with a code snippet. For example, to wrap an existing block with a conditional try-catch block, you would select the block of code and press Ctrl+K, Ctrl+S. This displays the Surround With dialog that contains a list of surrounding snippets that are available to wrap the selected line of code, as shown in Figure 17-5.
Figure 17.5. Figure 17-5

Selecting the try snippet results in the following code:
public void MethodXYZ(string name)
{
    try
    {
        MessageBox.Show(name);
    }
    catch (Exception)
    {
        throw;
    }
}
17.1.6. Code Snippets Manager
The Code Snippets Manager is the central library for the code snippets known to Visual Studio 2008. You can access it via the Tools ![]() Code Snippet Manager menu command or the keyboard shortcut chord Ctrl+K, Ctrl+B.
Code Snippet Manager menu command or the keyboard shortcut chord Ctrl+K, Ctrl+B.
When it is initially displayed, the Code Snippets Manager will show the snippets for the language you're currently using. Figure 17-6 shows how it will look when you're editing a Visual Basic project. The hierarchical folder structure follows the same set of folders on the PC by default, but as you add snippet files from different locations and insert them into the different groups, the new snippets slip into the appropriate folders.
If you have an entire folder of snippets to add to the library, such as when you have a corporate setup and need to import the company-developed snippets, you use the "Add" button. This brings up a dialog that you use to browse to the required folder. Folders added in this fashion will appear at the root level of the treeview — on the same level as the main groups of default snippets. However, you can add a folder that contains sub-folders, which will be added as child nodes in the treeview.
Figure 17.6. Figure 17-6

Removing a folder is just as easy — in fact, it's dangerously easy. Select the root node that you want to remove and click the "Remove" button. Instantly the node and all child nodes and snippets will be removed from the Snippets Manager without a confirmation window. You can add them back by following the steps explained in the previous walkthrough, but it can be frustrating trying to locate a default snippet folder that you inadvertently deleted from the list.
The location for the code snippets that are installed with Visual Studio 2008 is deep within the installation folder. By default, the code snippet library will be installed in C:Program FilesMicrosoft Visual Studio 9.0VBSnippets1033. Individual snippet files can be imported into the library using the "Import" button. The advantage of this method over the "Add" button is that you get the opportunity to specify the location of each snippet in the library structure.
17.1.7. Creating Snippets
Visual Studio 2008 does not ship with a code snippet creator or editor. However Bill McCarthy's VB Snippet Editor allows you to create, modify, and manage your snippets (supports VB, C#, XML, and J# snippets). Starting as an internal Microsoft project, the Snippet Editor was subsequently placed on GotDotNet where Bill fixed the outstanding issue and proceeded to add functionality. With the help of other MVPs it is now also available in a number of different languages. You can download the Visual Studio 2008 version from http://BillMcCarthy.com/projects/Snippet_Editor.
Creating code snippets by manually editing XML files can be tedious. It can also result in errors that are hard to track down, so it's recommended that you use the Snippet Editor where possible. When you start the Snippet Editor, it will display a welcome screen showing you how to browse and create new snippets. The left side of the screen is populated with a treeview containing all the Visual Basic snippets defined in your system and known to Visual Studio 2008. Initially the treeview is collapsed, but by expanding it you'll see a set of folders similar to those in the code snippet library (see Figure 17-7).
If you have other versions of Visual Studio installed, the Snippet Editor may have defaulted to manage the snippets for that installation. To select the Visual Studio edition to manage, use the Select Product drop-down on the Languages tab of the Options dialog. This dialog can be launched via the "Options" button in the top-right corner of the Snippet Editor.
Figure 17.7. Figure 17-7

17.1.8. Reviewing Existing Snippets
An excellent feature of the Snippet Editor is the view it offers of the structure of any snippet file in the system. This means you can browse the default snippets installed with Visual Studio, which can provide insight into how to better build your own snippets.
Browse to the snippet you're interested in and double-click its entry to display it in the Editor window. Figure 17-7 shows a simple snippet to Display a Windows Form. Four main panes contain all the associated information about the snippet. From top to bottom, these panes are described in Table 17-1.
| Pane | Function |
|---|---|
| Properties | The main properties for the snippet, including title, shortcut, and description. |
| Code | Defines the code for the snippet, including all Literal and Object replacement regions. |
| References | If your snippet will require assembly references, this tab allows you to define them. |
| Imports | Similar to the References tab, this tab enables you to define any Imports statements that are required in order for your snippet to function correctly. |
Browsing through these tabs enables you to analyze an existing snippet for its properties and replacement variables. In the example shown in Figure 17-7, there is a single replacement region with an ID of formName and a default value of "Form".
To demonstrate how the Snippet Editor makes creating your own snippets straightforward, follow this next exercise, in which you will create a snippet that creates three subroutines, including a helper subroutine:
Start the Snippet Editor and create a new snippet. To do this, select a destination folder in the treeview, right-click, and select Add New Snippet from the context menu that is displayed.
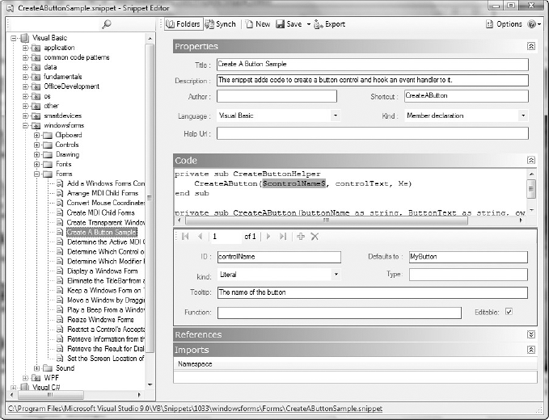
When prompted, name the snippet "Create A Button Sample" and click "OK". Double-click the new entry to open it in the Editor pane.
Note that creating the snippet will not automatically open the new snippet in the Editor — don't overwrite the properties of another snippet by mistake!
The first thing you need to do is edit the Title, Description, and Shortcut fields (see Figure 17-8):
Because this snippet contains member definitions, set the Type to "Member Declaration."
In the Editor window, insert the code necessary to create the three subroutines:
Private Sub CreateButtonHelper
    CreateAButton(controlName, controlText, Me)
End Sub

Private Sub CreateAButton(ByVal ButtonName As String, ByVal ButtonText As String, _
                                                      ByVal Owner As Form)
    Dim MyButton As New Button

    MyButton.Name = ButtonName
    MyButton.Text = ButtonName
    Owner.Controls.Add(MyButton)

    MyButton.Top = 0
    MyButton.Left = 0
    MyButton.Text = ButtonText
    MyButton.Visible = True

    AddHandler MyButton.Click, AddressOf ButtonClickHandler
End Sub

Private Sub ButtonClickHandler(ByVal sender As System.Object, _
                                ByVal e As System.EventArgs)
    MessageBox.Show("The " & sender.Name & " button was clicked")
End Sub
You will notice that your code differs from that shown in Figure 17-8 in that the word controlName does not appear highlighted. In Figure 17-8 this argument has been made a replacement region. You can do this by selecting the entire word, right-clicking, and selecting Add Replacement (or alternatively, clicking the "Add" button in the area below the code window).
Change the replacement properties like so:
ID: controlName
Defaults to: "MyButton"
Tooltip: The name of the button
Repeat this for controlText:
ID: controlText
Defaults to: "Click Me!"
Tooltip: The text property of the button
Your snippet is now done and ready to be used. You can use Visual Studio 2008 to insert the snippet into a code window.