
17.3. Refactoring Actions
The following sections describe each of the refactoring options and provide examples of how to use built-in support for both C# and Refactor! for VB.NET.
17.3.1. Extract Method
One of the easiest ways to refactor a long method is to break it up into several smaller methods. The Extract Method refactoring action is invoked by selecting the region of code you want moved out of the original method and selecting Extract Method from the context menu. In C#, this will prompt you to enter a new method name, as shown in Figure 17-10. If there are variables within the block of code to be extracted that were used earlier in the original method, they will automatically appear as variables in the method signature. Once the name has been confirmed, the new method will be created immediately after the original method. A call to the new method will replace the extracted code block.
Figure 17.10. Figure 17-10

For example, in the following code snippet, if you wanted to extract the conditional logic into a separate method, then you would select the code, shown with a gray background, and choose Extract Method from the right-click context menu:
private void button1_Click(object sender, EventArgs e)
{
    string output = Properties.Settings.Default.AdventureWorksCS;
    if (output == null)
    {
        output = "DefaultConnectionString";
    }
    MessageBox.Show(output);
    /* ... Much longer method ... */
}
This would automatically generate the following code in its place:
Private void button1_Click(object sender, EventArgs e)
{
    string output = Properties.Settings.Default.AdventureWorksCS;
    output = ValidateConnectionString(output);
    MessageBox.Show(output);
    /* ... Much longer method ... */
 }

private static string ValidateConnectionString(string output)
{
    if (output == null)
    {
        output = "DefaultConnectionString";
    }
    return output;
}
Refactor! handles this refactoring action slightly differently. After you select the code you want to replace, Refactor! prompts you to select a place in your code where you want to insert the new method. This can help developers organize their methods in groups, either alphabetically or according to functionality. Figure 17-11 illustrates the aid that appears to enable you to position, using the cursor keys, the insert location.
Figure 17.11. Figure 17-11

After selecting the insert location, Refactor! will insert the new method, giving it an arbitrary name. In doing so it will highlight the method name, enabling you to rename the method either at the insert location or where the method is called (see Figure 17-12.
Figure 17.12. Figure 17-12

17.3.2. Encapsulate Field
Another common task when refactoring is to encapsulate an existing class variable with a property. This is what the Encapsulate Field refactor action does. To invoke this action, select the variable you want to encapsulate and then choose the appropriate refactor action from the context menu. This will give you the opportunity to name the property and elect where to search for references to the variable, as shown in Figure 17-13.
Figure 17.13. Figure 17-13

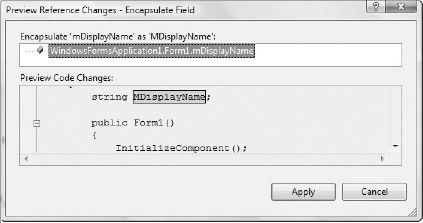
The next step after specifying the new property name is to determine which references to the class variable should be replaced with a reference to the new property. Figure 17-14 shows the preview window that is returned after the reference search has been completed. In the top pane is a tree indicating which files and methods have references to the variable. The checkbox beside each row indicates whether a replacement will be made. Selecting a row in the top pane brings that line of code into focus in the lower pane. Once each of the references has been validated, the encapsulation can proceed. The class variable is updated to be private, and the appropriate references are updated as well.
Figure 17.14. Figure 17-14
The Encapsulate Field refactoring action using Refactor! works in a similar way, except that it automatically assigns the name of the property based on the name of the class variable. The interface for updating references is also different, as shown in Figure 17-15. Instead of a modal dialog, Refactor! presents a visual aid that can be used to navigate through the references. Where a replacement is required, click the check mark. Unlike the C# dialog box, in which the checkboxes can be checked and unchecked as many times as needed, once you click the check mark, there is no way to undo this action.
Figure 17.15. Figure 17-15

17.3.3. Extract Interface
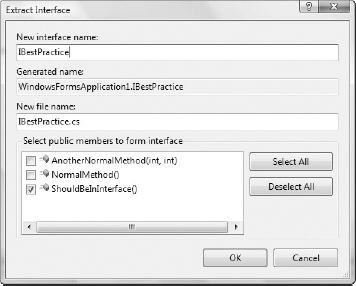
As a project goes from prototype or early-stage development to a full implementation or growth phase, it's often necessary to extract the core methods for a class into an interface to enable other implementations or to define a boundary between disjointed systems. In the past you could do this by copying the entire method to a new file and removing the method contents so you were just left with the interface stub. The Extract Interface refactoring action enables you to extract an interface based on any number of methods within a class. When this refactoring action is invoked on a class, the dialog in Figure 17-16 is displayed, which enables you to select which methods are included in the interface. Once selected, those methods are added to the new interface. The new interface is also added to the original class.
Figure 17.16. Figure 17-16
In the following example, the first method needs to be extracted into an interface:
public class ConcreteClass
{
    public void ShouldBeInInterface()
    { /* ... */ }

    public void AnotherNormalMethod(int ParameterA, int ParameterB)
    { /* ... */ }

    public void NormalMethod()
    { /* ... */ }
}
Selecting Extract Interface from the right-click context menu will introduce a new interface and update the original class as follows:
interface IBestPractice
{
    void ShouldBeInInterface();
}

public class ConcreteClass : WindowsFormsApplication1.IBestPractice
{
    public void ShouldBeInInterface()
    { /* ... */ }

    public void NormalMethod(int ParameterA, int ParameterB)
    { /* ... */ }

    public void AnotherNormalMethod()
    { /* ... */ }
}
Extracting an interface is also available within Refactor! but doesn't allow you to choose which methods you wish to include in the interface. Unlike the C# interface extraction, which places the interface in a separate file and is recommended, Refactor! simply extracts all class methods into an interface in the same code file.
17.3.4. Reorder Parameters
Sometimes it's necessary to reorder parameters. This is often for cosmetic reasons, but it can also aid readability and is sometimes warranted when implementing interfaces. The Reorder Parameters dialog, shown in Figure 17-17, enables you to move parameters up and down in the list according to the order in which you wish them to appear.
Figure 17.17. Figure 17-17

Once you establish the correct order, you're given the opportunity to preview the changes. By default, the parameters in every reference to this method will be reordered according to the new order. The Preview dialog, similar to the one shown in Figure 17-14, enables you to control which references are updated.
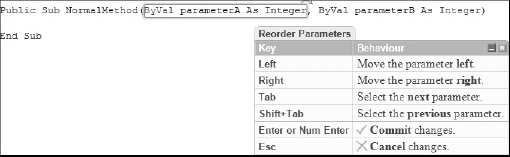
The Refactor! interface for reordering parameters is one of the most intuitive on the market. Again, the creators have opted for visual aids instead of a modal dialog, as shown in Figure 17-18. You can move the selected parameter left or right in the parameter list and navigate between parameters with the Tab key. Once the parameters are in the desired order, the search and replace interface, illustrated in Figure 17-15, enables the developer to verify all updates.
Figure 17.18. Figure 17-18
17.3.5. Remove Parameters
It is unusual to have to remove a parameter while refactoring, because it usually means that the functionality of the method has changed. However, having support for this action considerably reduces the amount of searching that has to be done for compile errors that can occur when a parameter is removed. The other time this action is particularly useful is when there are multiple overloads for a method, and removing a parameter may not generate compile errors; in such a case, there may be runtime errors due to semantic, rather than syntactical, mistakes.
Figure 17-19 illustrates the Remove Parameters dialog that is used to remove parameters from the parameters list. If a parameter is accidentally removed, it can be easily restored until the correct parameter list is arranged. As the warning on this dialog indicates, removing parameters can often result in unexpected functional errors, so it is important to review the changes made. Again, the preview window can be used to validate the proposed changes.
Figure 17.19. Figure 17-19

Refactor! only supports removing unused parameters, as shown in Figure 17-20. The other thing to note in figure 17-20 is that Refactor! has been accessed via the smart tag that appeared when parameterA was given focus.
Figure 17.20. Figure 17-20

17.3.6. Rename
Visual Studio 2008 provides rename support in both C# and VB.NET. The Rename dialog for C# is shown in Figure 17-21; it is similar in VB.NET although it doesn't have the options to search in comments or strings.
Figure 17.21. Figure 17-21

Unlike the C# rename support, which uses the preview window so you can confirm your changes, the rename capability in VB.NET simply renames all references to that variable.
17.3.7. Promote Variable to Parameter
One of the most common refactoring techniques is to adapt an existing method to accept an additional parameter. By promoting a method variable to a parameter, the method can be made more general. It also promotes code reuse. Intuitively, this operation would introduce compile errors wherever the method was referenced. However, the catch is that the variable you are promoting to a parameter must have an initial constant value. This constant is added to all the method references to prevent any changes to functionality. Starting with the following snippet, if the method variable output is promoted, then you end up with the second snippet:
public void MethodA()
{
    MethodB();
}
public void MethodB()
{
    string output = "Test String";
    MessageBox.Show( output);
}
After the variable is promoted, you can see that the initial constant value has been applied where this method is referenced:
public void MethodA()
{
    MethodB("Test String");
}
public void MethodB(string output)
{
    MessageBox.Show( output);
}
Promoting a variable to a parameter is not available within Refactor!, although you can promote a method variable to a class-level variable.
17.3.8. Generate Method Stub
As you write code, you may realize that you need a method that generates a value, triggers an event, or evaluates an expression. For example, the following snippet illustrates a new method that you need to generate at some later stage:
public void MethodA()
{
    string InputA;
    double InputB;
    int OutputC = NewMethodIJustThoughtOf(InputA, InputB);
}
Of course, the preceding code will generate a build error because this method has not been defined. Using the Generate Method Stub refactoring action (available as a smart tag in the code itself), you can generate a method stub. As you can see from the following sample, the method stub is complete with input parameters and output type:
private int NewMethodIJustThoughtOf(string InputA, double InputB)
{
    throw new Exception("The method or operation is not implemented.");
}
Generating a method stub is not available within Refactor!.
17.3.9. Organize Usings
Over time you are likely to need to reference classes from different namespaces, and the using statement is a useful way to reduce the clutter in your code, making it easy for someone to read. However, the side effect is that the list of using statements can grow and become unordered as shown in Figure 17-22. C# has the ability to both sort these statements and remove statements that are no longer used, via the Organize Usings shortcut.
Figure 17.22. Figure 17-22

After selecting Remove and Sort, this list shrinks to include just System and System.Windows.Forms.
VB.NET developers don't have a way to sort and remove unused Imports statements. However, on the References tab on the Project Properties dialog, it's possible to mark namespaces to be imported into every code file. This can save significantly on the number of Imports statements. On this page there is also the ability to remove unused assembly references.