
21.1. DataSet Overview
The .NET Framework DataSet is a complex object that is approximately equivalent to an in-memory representation of a database. It contains DataTables that correlate to database tables. These in turn contain a series of DataColumns that define the composition of each DataRow. The DataRow correlates to a row in a database table. Of course, it is possible to establish relationships between DataTables within the DataSet in the same way that a database has relationships between tables.
One of the ongoing challenges for the object-oriented programming paradigm is that it does not align smoothly with the relational database model. The DataSet object goes a long way toward bridging this gap, because it can be used to represent and work with relational data in an object-oriented fashion. However, the biggest issue with a raw DataSet is that it is weakly typed. Although the type of each column can be queried prior to accessing data elements, this adds overhead and can make code very unreadable. Strongly typed DataSets combine the advantages of a DataSet with strong typing to ensure that data is accessed correctly at design time. This is done with the custom tool MSDataSetGenerator, which converts an XML schema into a strongly typed DataSet, essentially replacing a lot of runtime type checking with code generated at design time. In the following code snippet, you can see the difference between using a raw DataSet, in the first half of the snippet, and a strongly typed DataSet, in the second half:
'Raw DataSet
Dim nontypedAwds As DataSet = RetrieveData()
Dim nontypedcontacts As DataTable = nontypedAwds.Tables("Contact")
Dim nontypedfirstContact As DataRow = nontypedcontacts.Rows(0)
MessageBox.Show(nontypedfirstContact.Item("FirstName"))

'Strongly typed DataSet
Dim awds As AdventureWorksDataSet = RetrieveData()
Dim contacts As AdventureWorksDataSet.ContactDataTable = awds.Contact
Dim firstContact As AdventureWorksDataSet.ContactRow = contacts.Rows(0)
MessageBox.Show(firstContact.FirstName)
Using the raw DataSet, both the table lookup and the column name lookup are done using string literals. As you are likely aware, string literals can be a source of much frustration and should be used only within generated code, and preferably not at all.
21.1.1. Adding a Data Source
You can manually create a strongly typed DataSet by creating an XSD using the XML schema editor. To create the DataSet, you set the custom tool value for the XSD file to be the MSDataSetGenerator. This will create the designer code file that is needed for strongly typed access to the DataSet.
Manually creating an XSD is difficult and not recommended unless you really need to; luckily in most cases, the source of your data will be a database, in which case Visual Studio 2008 provides a wizard that you can use to generate the necessary schema based on the structure of your database. Through the rest of this chapter, you will see how you can create data sources and how they can be bound to the user interface. To get started, create a new project called CustomerObjects, using the Visual Basic Windows Forms Application template. Then to create a strongly typed DataSet from an existing database, select Add New Data Source from the Data menu, and follow these steps:
Although this functionality is not available for ASP.NET projects, a workaround is to perform all data access via a class library.
The next screen prompts you to select the database connection to use. To create a new connection, click the New Connection button, which opens the Add Connection dialog. The attributes displayed in this dialog are dependent on the type of database you are connecting to. By default the SQL Server provider is selected, which requires the Server name, authentication mechanism (Windows or SQL Server), and Database name in order to proceed. There is a Test Connection that you can use to ensure you have specified valid properties.
After you specify a connection, it will be saved as an application setting in the application configuration file.
When the application is later deployed, the connection string can be modified to point to the production database. This process can often take longer than expected to ensure that various security permissions line up. Because the connection string is stored in the configuration file as a string without any schema, it is quite easy to make a mistake when making changes to it. In Chapter 39 you learn more about connection strings and how you can customize them for different data sources.
A little-known utility within Windows can be used to create connection strings, even if Visual Studio is not installed. Known as the Data Link Properties dialog, you can use it to edit Universal Data Link files, files that end in .udl. When you need to create or test a connection string, you can simply create a new text document, rename it to something.udl and then double-click it. This opens the Data Link Properties dialog, which enables you to create and test connection strings for a variety of providers. Once you have selected the appropriate connection, this information will be written to the UDL file as a connection string, which can be retrieved by opening the same file in Notepad. This can be particularly useful if you need to test security permissions and resolve other data connectivity issues.
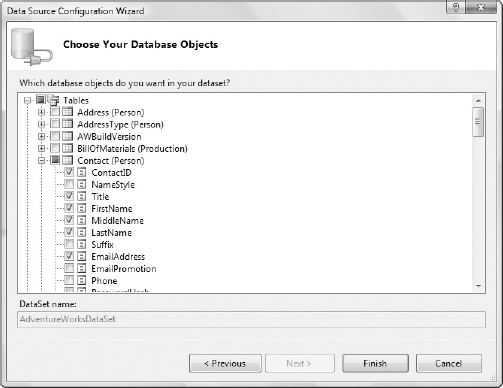
After specifying the connection, the next stage is to specify the data to be extracted. At this stage you will be presented with a list of tables, views, stored procedures, and functions from which you can select what to include in the DataSet. Figure 21-1 shows the final stage of the Data Source Configuration Wizard with a selection of columns from the Contact table in the AdventureWorks database.
You will probably want to constrain the DataSet so it doesn't return all the records for a particular table. You can do this after creating the DataSet, so for the time being simply select the information you want to return. The editor's design makes it easier to select more information here and then delete it from the designer, rather than create it afterwards.
Figure 21.1. Figure 21-1
Click Finish to add the new DataSet to the Data Sources window, shown in Figure 21-2, where you can view all the information to be retrieved for the DataSet. Each column is identified with an icon that reflects the type of data. For example, the Contact ID field is numeric and ModifiedDate is datetime, whereas the other fields are all text.
Figure 21.2. Figure 21-2
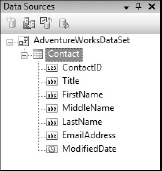
The Data Sources window changes the icons next to each field depending on whether you are working in a code window or a design surface. This view shows the type of each field and is visible while working in the code window.
21.1.2. DataSet Designer
The Data Source Configuration Wizard uses the database schema to guess the appropriate .NET type to use for the DataTable columns. In cases where the wizard gets information wrong, it can be useful to edit the DataSet without the wizard. To edit without the wizard, right-click the DataSet in the Data Sources window and select Edit DataSet with Designer from the context menu. Alternatively, you can open the Data Sources window by double-clicking the XSD file in the Solution Explorer window. This will open the DataSet editor in the main window, as shown in the example in Figure 21-3.
Figure 21.3. Figure 21-3
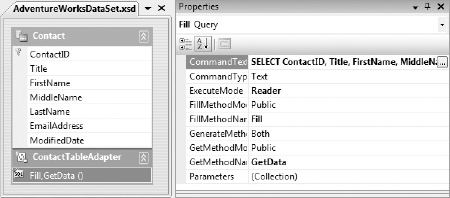
Here you start to see some of the power of using strongly typed DataSets. Not only has a strongly typed table (Contact) been added to the DataSet, you also have a ContactTableAdapter. This TableAdapter is used for selecting from and updating the database for the DataTable to which it is attached. If you have multiple tables included in the DataSet, you will have a TableAdapter for each. Although a single TableAdapter can easily handle returning information from multiple tables in the database, it becomes difficult to update, insert, and delete records.
As you can see in Figure 21-3, the ContactTableAdapter has been created with Fill and GetData methods, which are called to extract data from the database. The following code shows how you can use the Fill method to populate an existing strongly typed DataTable, perhaps within a DataSet. Alternatively, the GetData method creates a new instance of a strongly typed DataTable:
Dim ta As New AdventureWorksDataSetTableAdapters.ContactTableAdapter

'Option 1 - Create a new ContactDataTable and use the Fill method
Dim contacts1 As New AdventureWorksDataSet.ContactDataTable
ta.Fill(contacts1)

'Option 2 - Use the GetData method which will create a ContactDataTable for you
Dim contacts2 As AdventureWorksDataSet.Conta1ctDataTable = ta.GetData
In Figure 21-3, the Fill and GetData methods appear as a pair because they make use of the same query. The Properties window can be used to configure this query. A query can return data in one of three ways: using a text command (as the example illustrates), a stored procedure, or TableDirect (where the contents of the table name specified in the CommandText are retrieved). This is specified in the CommandType field. Although the CommandText can be edited directly in the Properties window, it is difficult to see the whole query and easy to make mistakes. Clicking the ellipsis button (at the top right of Figure 21-3) opens the Query Builder window, shown in Figure 21-4.
Figure 21.4. Figure 21-4
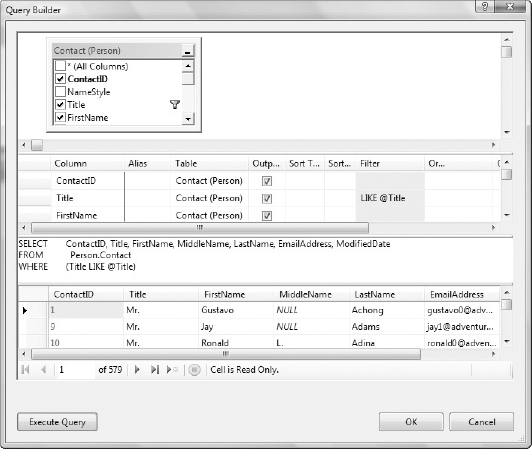
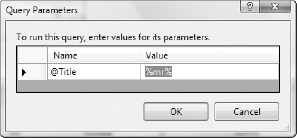
The Query Builder dialog is divided into four panes. In the top pane is a diagram of the tables involved in the query, and the selected columns. The second pane shows a list of columns related to the query. These columns are either output columns, such as FirstName and LastName, or a condition, such as the Title field, or both. The third pane is, of course, the SQL command that is to be executed. The final pane includes sample data that can be retrieved by clicking the Execute Query button. If there are parameters to the SQL statement (in this case, @Title), a dialog will be displayed, prompting for values to use when executing the statement (see Figure 21-5).
Figure 21.5. Figure 21-5
To change the query, you can make changes in any of the first three panes. As you move between panes, changes in one field are reflected in the others. You can hide any of the panes by unchecking that pane from the Panes item of the right-click context menu. Conditions can be added using the Filter column. These can include parameters (such as @Title), which must start with the at (@) symbol.
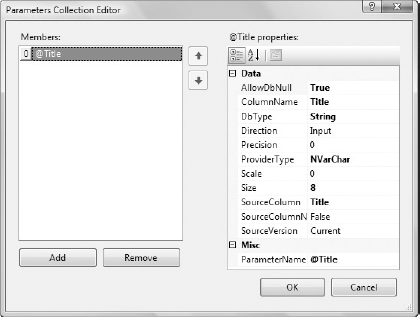
Returning to the DataSet designer, and the properties window associated with the Fill method, click the ellipsis to examine the list of parameters. This shows the Parameters Collection Editor, as shown in Figure 21-6. Occasionally, the Query Builder doesn't get the data type correct for a parameter, and you may need to modify it using this dialog.
Figure 21.6. Figure 21-6
Also from the properties window for the query, you can specify whether the Fill and/or GetData methods are created, using the GenerateMethods property, which has values Fill, Get, or Both. You can also specify the names and accessibility of the generated methods.