
3.2. The Editor Space
Like most IDEs, Visual Studio 2008 has been built up around the central code-editing window. Over time it has evolved and is now much more than a simple text editor. While most developers will spend considerable time writing code in the editor space, there are an increasing number of designers for performing tasks such as building forms, adjusting project settings, and editing resources. Regardless of whether you are writing code or doing form design, you are going to spend a lot of your time within Visual Studio 2008 in the editor space. Because of this it is important for you to know how to tweak the layout so you can work more efficiently.
3.2.1. Fonts and Colors
Some of the first things that presenters change in Visual Studio are the fonts and colors used in the editor space, in order to make the code more readable. However, it shouldn't just be presenters who adjust these settings. Selecting fonts and colors that are easy for you to read and that aren't harsh on the eyes will make you more productive and enable you to code for longer without feeling fatigued. Figure 3-7 shows the Fonts and Colors node of the Options dialog, where you can make adjustments to the font, size, color, and styling of different display items. One thing to note about this node in the Options dialog is that it is very slow to load, so try to avoid accidentally clicking it.
Figure 3.7. Figure 3-7

In order to adjust the appearance of a particular text item within Visual Studio 2008, you first need to select the area of the IDE that it applies to. In Figure 3-7 the Text Editor has been selected, and has been used to determine which items should appear in the "Display items" list. Once you have found the relevant item in this list, you can make adjustments to the font and colors.
Some items in this list, such as Plain Text, are reused by a number of areas within Visual Studio 2008, which can result in some unpredictable changes when you tweak fonts and colors.
When choosing a font, remember that proportional fonts are usually not as effective for writing code as non-proportional fonts (also known as fixed-width fonts). As indicated in Figure 3-7, fixed-width fonts are distinguished in the list from the variable-width types so they are easy to locate. One of the problems with Courier New is that it is less readable on the screen than other fixed-width fonts. A viable alternative as a readable screen font is Consolas (you may need to download and install the Consolas Font Pack from www.microsoft.com).
3.2.2. Visual Guides
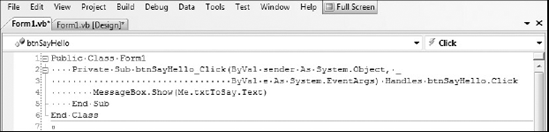
When you are editing a file, Visual Studio 2008 will automatically color-code the code based on the type of file. For example, in Figure 3-8, which shows a VB.NET code file, it has highlighted keywords in blue, variable names and class references are in black, and string literals are in red. You will also note that there is a line running up the left side of the code. This is used to indicate where the code blocks are. You can click on the minus sign to condense the btnSayHello_Click method or the entire Form1 code block.
Various points about visual guides are illustrated in Figures 3-8 to 3-10. Those readers familiar with VB.NET will realize that Figure 3-8 is missing the end of the line where the method is set to handle the Click event of the btnSayHello button. This is because the rest of the line is being obscured by the edge of the code window. To see what is at the end of the line, the developer has to either scroll the window to the right or use the keyboard to navigate the cursor to the end of the line. In Figure 3-9 word wrap has been enabled via the Options dialog (see the Text Editor ![]() All Languages
All Languages ![]() General node).
General node).
Figure 3.8. Figure 3-8

Figure 3.9. Figure 3-9

Figure 3.10. Figure 3-10

Unfortunately, enabling word wrapping can make it hard to work out which lines have been wrapped. Luckily Visual Studio 2008 has an option (immediately below the checkbox to enable word wrapping in the Options dialog) that can display visual glyphs at the end of each line that with have been wrapped to the next line, as you can see in Figure 3-10. In this figure you can also see two other visual guides. On the left, outside the code block markers, are line numbers. These can be enabled via the "Line numbers" checkbox below both the Word Wrap and Visual Glyphs checkboxes. The other guide is the dots that represent space in the code. Unlike the other visual guides, this one can be enabled via the Edit ![]() Advanced
Advanced ![]() View White Space menu item when the code editor space has focus.
View White Space menu item when the code editor space has focus.
3.2.3. Full-Screen Mode
If you have a number of tool windows and multiple Toolbars visible, you will have noticed that you quickly run out of space for actually writing code. For this reason, Visual Studio 2008 has a full-screen mode that you can access via the View ![]() Full Screen menu item. Alternatively, you can press Shift+Alt+Enter to toggle in and out of full-screen mode. Figure 3-11 shows the top of Visual Studio 2008 in full-screen mode. As you can see, no Toolbars or tool windows are visible and the window is completely maximized, even to the exclusion of the normal minimize, restore, and close buttons.
Full Screen menu item. Alternatively, you can press Shift+Alt+Enter to toggle in and out of full-screen mode. Figure 3-11 shows the top of Visual Studio 2008 in full-screen mode. As you can see, no Toolbars or tool windows are visible and the window is completely maximized, even to the exclusion of the normal minimize, restore, and close buttons.
Figure 3.11. Figure 3-11
If you are using multiple screens, full-screen mode can be particularly useful. Undock the tool windows and place them on the second monitor. When the editor window is in full-screen mode you still have access to the tool windows, without having to toggle back and forth.
3.2.4. Tracking Changes
To enhance the experience of editing, Visual Studio 2008 uses line-level tracking to indicate which lines of code you have modified during an editing session. When you open a file to begin editing there will be no line coloring. However, when you begin to edit you will notice that a yellow mark appears next to the lines that have been modified. In Figure 3-12 you can see that the MsgBox line has been modified since this file was last saved.
Figure 3.12. Figure 3-12

When the file is saved the modified lines will change to having a green mark next to them. In Figure 3-13 the first MsgBox line has changed since the file was opened, but those changes have been saved to disk. However, the second MsgBox line has not yet been saved.
Figure 3.13. Figure 3-13

If you don't find tracking changes to be useful, you can disable this feature by unchecking the Text Editor
General
Track Change item in the Options dialog.