33.2. Creating a Document-Level Customization
This section walks through the creation of a Word document customization. This demonstrates how to create a document-level customization complete with Word 2007 Content Controls and a custom Actions Pane.
Although this example uses Word 2007, if you do not have that version installed, you can still follow most of the instructions and create a document-level customization for Word 2003. Some features are not available in Word 2003, such as the Content Controls and the Ribbon.
33.2.1. Your First VSTO Project
When you create a document-level customization with Visual Studio 2008, you can either create the document from scratch, or jump-start the design by using an existing document or template. A great source of templates, particularly for business-related forms, is the free templates available from Microsoft Office Online at http://office.microsoft.com/templates/.
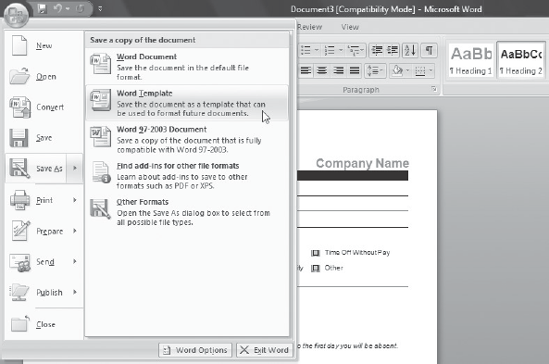
This example uses the Absence request form that is available under the Forms, Employment category. When you download a template from the Office Online web site using Internet Explorer, it will open a new document based on the template in Word. Save this document as a Word Template to a convenient location on your computer, as shown in Figure 33-2.
Next launch Visual Studio 2008 and select File ![]() New
New ![]() Project. Filter the project types by selecting Visual C# followed by Office, and then choose a new Word 2007 Template. You will be presented with a screen that prompts you to create a new document or copy an existing one. Select the option to copy an existing document and then navigate to and select the document template you saved earlier. When you click OK, the project will be created and the document will open in the Designer as shown in Figure 33-3.
Project. Filter the project types by selecting Visual C# followed by Office, and then choose a new Word 2007 Template. You will be presented with a screen that prompts you to create a new document or copy an existing one. Select the option to copy an existing document and then navigate to and select the document template you saved earlier. When you click OK, the project will be created and the document will open in the Designer as shown in Figure 33-3.
Figure 33.2. Figure 33-2
There are a few things worth pointing out in Figure 33-3. First, you'll notice that along the top of the Designer is the Office Ribbon. This is the very same Ribbon that is displayed in Word, and you can use it to modify the layout and design of the Word document. Second, in the Solution Explorer to the right, the file that is currently open is called ThisDocument.cs. You can right-click this file and select either View Designer to display the design surface for the document, currently shown in Figure 33-3, or View Code to open the source code behind this document in the Code Editor. Finally, in the Toolbox to the left, there is a tab group called Word Controls, which contains a set of controls that allow you to build rich user interfaces for data input and display.
Figure 33.3. Figure 33-3

To customize this form, first drag three PlainTextContentControl controls onto the design surface for the Employee Name, Employee Number, and Manager. Rename these controls to txtEmpName, txtEmpNumber, and txtManager, respectively.
Next drag a DropDownListContentControl next to the Department field, and rename it ddDept.
Rather than use a set of checkboxes for the Type of Absence Requested, we will use a ComboBoxContentControl. Delete all the checkboxes from the document and in their place drag this ComboBoxContentControl and rename it cboType.
Following this, drag two DatePickerContentControls for the From and To dates, and rename these to be dtDateFrom and dtDateTo. Then drag a RichTextContentControl under the Reason for Absence label and rename it to txtReason.
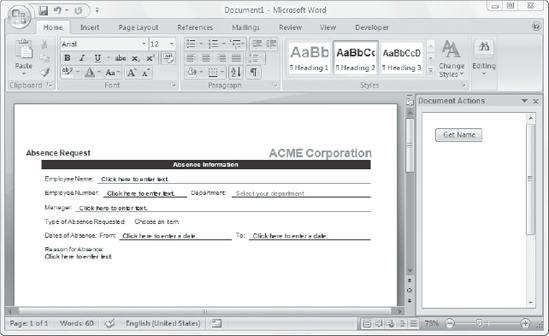
Finally, to clean up the document a little, remove all the text that is below the RichTextContentControl. Once you have done this, your form should look similar to what is shown in Figure 33-4.
Figure 33.4. Figure 33-4

Before you run this project you will need to populate the Department and Type of Absence Requested drop-down lists. Although this can be done declaratively via the Properties field, we will perform it programmatically. Right-click the ThisDocument.cs file in the Solution Explorer and select View Code to display the managed code that is behind this document. Two methods will be predefined: a function that is run during startup when the document is opened, and a function that is run during shutdown when the document is closed.
Add the following code for the ThisDocument_Startup method to populate the Department and Type of Absence Requested drop-down lists:
private void ThisDocument_Startup(object sender, System.EventArgs e)
{
  ddDept.PlaceholderText = "Select your department";
  ddDept.DropDownListEntries.Add("Finance", "Finance", 0);
  ddDept.DropDownListEntries.Add("HR", "HR", 1);
  ddDept.DropDownListEntries.Add("IT", "IT", 2);
  ddDept.DropDownListEntries.Add("Marketing", "Marketing", 3);
  ddDept.DropDownListEntries.Add("Operations", "Operations", 4);

  cboType.PlaceholderText = "Select a reason, or enter your own";
  cboType.DropDownListEntries.Add("Sick", "Sick", 0);
  cboType.DropDownListEntries.Add("Vacation", "Vacation", 1);
  cboType.DropDownListEntries.Add("Bereavement", "Bereavement", 2);
  cboType.DropDownListEntries.Add("Leave Without Pay", "Leave Without Pay", 3);
  cboType.DropDownListEntries.Add("Military", "Military", 4);
  cboType.DropDownListEntries.Add("Jury Duty", "Jury Duty", 5);
  cboType.DropDownListEntries.Add("Maternity ", "Maternity ", 6);
}
You can now run the project in debug mode by pressing F5. This will compile the project and open the document in Microsoft Word. You can test out entering data in the various fields to obtain a feel for how they behave.
33.2.2. Protecting the Document Design
While you have the document open you may notice that in addition to entering text in the control fields that you added, you can also edit the surrounding text and even delete some of the controls. This is obviously not ideal in this scenario. Fortunately, Office 2007 and VSTO provide a way to prevent the document from undesirable editing.
Within Word 2007, click the Office button and click the Word Options button on the bottom of the screen. In the Word Options dialog window, check the box next to the "Show Developer tab in the Ribbon" option.
When you stop debugging and return to Visual Studio, you will see a new tab on the Toolbar above the Ribbon, as shown in Figure 33-5. This provides some useful functions for Office development-related tasks.
Figure 33.5. Figure 33-5

To prevent the document from being edited, you must perform a couple of steps. First, ensure that the Designer is open and then press Ctrl+A to select everything in the document (text and controls). On the Developer tab click Group ![]() Group. This will allow you to treat everything on the document as a single entity, and easily apply properties to all elements in one step.
Group. This will allow you to treat everything on the document as a single entity, and easily apply properties to all elements in one step.
With this new group selected, open the Properties window and set the Lock Content Control property to True. Now when you run the project you will find that the standard text on the document cannot be edited or deleted, and you can only input data into the content controls that you have added.
33.2.3. Adding an Actions Pane
The final customization we will add to this document is an Actions Pane window. An Actions Pane is typically docked to one side of a window in Word, and can be used to display related information or provide access to additional information. For example, you could add an Actions Pane that retrieved and displayed the current employees' available leave balance.
An Actions Pane, and custom Task Pane in the case of application-level add-ins, is nothing more than a standard user control. In the case of an Actions Pane, Visual Studio has included an item template; however, this does little more than add a standard user control to the project with the Office namespace imported. For application-level add-ins there is no custom Task Panes item template, so you can simply add a standard user control to the project.
To add an Actions Pane to this document customization, right-click the project in the Solution Explorer, then select Add ![]() New Item. Select Actions Pane Control, provide it with a meaningful name, and click Add. The Actions Pane will open in a new designer window. You are simply going to add a button that retrieves the user name of the current user and adds it to the document. Drag a button control onto the form and rename it btnGetName. Then double-click the control to register an event handler and add the following code for the button click event:
New Item. Select Actions Pane Control, provide it with a meaningful name, and click Add. The Actions Pane will open in a new designer window. You are simply going to add a button that retrieves the user name of the current user and adds it to the document. Drag a button control onto the form and rename it btnGetName. Then double-click the control to register an event handler and add the following code for the button click event:
private void btnGetName_Click(object sender, EventArgs e)
{
    System.Security.Principal.WindowsIdentity myIdent =
        System.Security.Principal.WindowsIdentity.GetCurrent();
    Globals.ThisDocument.txtEmpName.Text = myIdent.Name;
}
The Actions Pane components are not added automatically to the document because you may want to show different Actions Panes, depending on the context users find themselves in when editing the document. However, if you have a single Actions Pane component and simply want to add it immediately when the document is opened, add the component to the ActionsPane.Controls collection of the document at startup, as demonstrated in the following code:
private void ThisDocument_Startup(object sender, System.EventArgs e)
{
    this.ActionsPane.Controls.Add(new NameOfActionsPaneControl)
}
For application-level add-ins, add the user control to the CustomTaskPanes collection.
When you next run the project it will display the document in Word with the Actions Pane window shown during startup, as shown in Figure 33-6.
Figure 33.6. Figure 33-6