
47.3. Visual Basic Compile Page
Visual Basic projects have an additional set of options that control how the build process will occur. To access the compile options for a specific project, open My Project by double-clicking its entry in the Solution Explorer. When the project Options page is shown, navigate to the Compile page from the list on the left side (see Figure 47-4).
Figure 47.4. Figure 47-4

The "Build output path" option controls where the executable version (application or DLL) of your project is stored. For Visual Basic, the default setting is the binRelease directory, but you can change this by browsing to the desired location.
It is recommended that you enable the "Treat all warnings as errors" option because this will, in most cases, encourage you to write better, less error-prone code.
You should be aware of two additional sets of hidden options. The Build Events button in the lower-right corner is available to Visual Basic developers who want to run actions or scripts before or after the build has been performed. They are discussed in a moment.
47.3.1. Advanced Compiler Settings
Clicking the Advanced Compile Options button displays the Advanced Compiler Settings dialog (see Figure 47-5) in which you can fine-tune the build process for the selected project, with settings divided into two broad groups: Optimizations and Compilation Constants.
Figure 47.5. Figure 47-5

47.3.1.1. Optimizations
The settings in the Optimizations group control how the compilation is performed to make the built output or the build process itself faster or to minimize the output size. Normally, you can leave these options alone, but if you do require tweaks to your compilation, here's a summary of what each option does:
Remove integer overflow checks: By default, your code is checked for any instance of a possible integer overflow, which can be a potential cause for memory leaks. Deactivating this option removes those checks, resulting in a faster-running executable at the expense of safety.
Enable optimizations: Optimizing the build may result in faster execution with the penalty being that it takes marginally longer to build.
DLL base address: This option enables you to specify the base address of the DLL in hexadecimal format. This option is disabled when the project type will not produce a DLL.
Generate debug info: This controls when debug information will be generated into your application output. By default, this option is set to Full (for Debug configurations), which will enable you to attach the debugger to a running application. You can also turn debugging information off completely or set the option to pdb-only (the default for Release configurations) to generate only the PDB debugging information. The latter will mean that you can still debug the application when it is started from within Visual Studio 2008, but you will only be able to see the disassembler if you try to attach to a running application.
47.3.1.2. Compilation Constants
Compilation constants can be used to control what information is included in the build output and even what code is compiled. The Compilation Constants options control the following:
Define DEBUG constant and Define TRACE constant: Enable debug and trace information to be included in the compiled application based on the DEBUG and TRACE flags, respectively.
Custom constants: If your application build process requires custom constants, you can specify them here in the form ConstantName="Value". If you have multiple constants, they should be delimited by commas.
The last three options don't really fall under compilation constants, but they do allow you to further customize the way the project builds.
Generate serialization assemblies: By default this option is set to Auto, which enables the build process to determine whether serialization assemblies are needed or not, but you can change it to On or Off if you want to hard-code the behavior.
Target CPU: Depending on what CPU types are known to your system, this option enables you to optimize the build output to a specific platform. The default option of AnyCPU provides output that can be run on any CPU that supports the .NET Framework.
Target framework: This is the only option in this dialog that applies to all configurations and is used to determine what version of the base class libraries the project is compiled against.
47.3.2. Build Events
You can perform additional actions before or after the build process by adding them to an events list. Click the Build Events button on the My Project Compile page to display the Build Events dialog. Figure 47-6 shows a post-build event that executes the project output after every successful build.
Figure 47.6. Figure 47-6
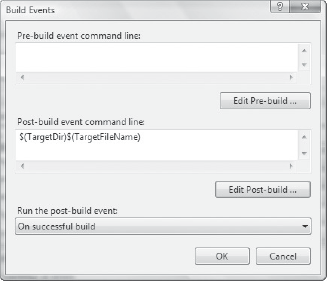
Each action you want to perform should be on a separate line, and can be added directly into either the "Pre-build event command line" text area or the "Post-build event command line" text area, or you can use the Edit Pre-build and Edit Post-build buttons to access the known predefined aliases that you can use in the actions.
Shown in Figure 47-7, the Event Command Line dialog includes a list of macros you can use in the creation of your actions. The current value is displayed for each macro so you know what text will be included if you use it.
Figure 47.7. Figure 47-7
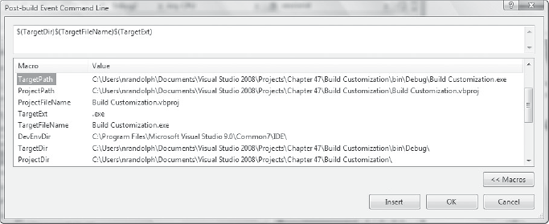
In this sample, the developer has created a command line of $(TargetDir)$(TargetFileName) $(TargetExt), assuming that it would execute the built application when finished. However, analyzing the values of each of the macros, it's easy to see that the extension will be included twice, which can be amended quickly by either simply removing the $(TargetExt) macro or replacing the $(TargetFileName) macro with $(TargetPath).