
50.1. Web Application Deployment
There are a variety of ways to deploy web applications that range from building an installer capable of creating the necessary virtual directory to using FTP to copy the web site to a remote server. In this section you see a number of the options you can use from within Visual Studio 2008.
50.1.1. Publish Web Site
One of the simplest ways to deploy a web site from Visual Studio 2008 is to publish it via the Publish item on the Build menu. Exactly what options are displayed when you go to publish your web site will depend on whether you are using the ASP.NET Web Application or the ASP.NET Web Site project template. Figure 50-1 displays the two different dialogs that are presented: on the left are the options for publishing a web site and on the right are the options for publishing a web application. As you can see, some of the options that are presented for the web site are not relevant to a web application, or they are contained in the project settings that can be accessed via the Web tab of the project properties editor.
Figure 50.1. Figure 50-1

Irrespective of whether you are publishing a web site or a web application, you need to define the target location, which can be a local instance of IIS, an FTP site, elsewhere on the file system, or a remote instance of IIS. Clicking the ellipses button next to the Target Location textbox in Figure 50-1 brings up a dialog to specify the details of where you want to publish to, as shown in Figure 50-2.
Figure 50.2. Figure 50-2
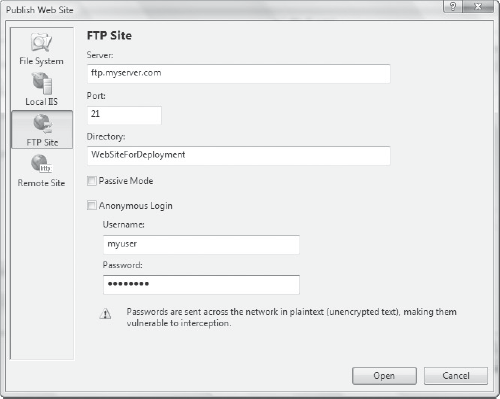
Here we are publishing to a private FTP account, and if this is the first time we are publishing this site we may have to define this folder as an IIS application in order for the web site to function.
50.1.2. Copy Web Project
Once a web site has been published, it is important that you have some way of updating it. One option is to go through the process of publishing your web site. However, this will publish the entire web site, even if only a single file needs to be updated. An alternative is to use the Copy Web Site tool, shown in Figure 50-3, to synchronize files between your development project and the web site. This tool can be accessed from the right-click context menu in the Solution Explorer, or via the web site menu.
Figure 50.3. Figure 50-3

In order to view the existing files on the remote web site, you need to either select a recent connection from the drop-down list or click the Connect button. This will open a dialog similar to Figure 50-2 where you can specify how to connect to the remote web site. Once you have connected you can see which files are out of sync. You can then use the right and left arrows to move files between your local project and the remote web site.
Note that this tool is only available for ASP.NET Web Site Projects.
50.1.3. Web Deployment Projects
Despite having two different ways to build ASP.NET web applications there are still some constraints when it comes to customizing the deployment process for web applications. Due to a significant amount of feedback requesting features such as the ability to specify different configuration settings depending on the build type, Microsoft has released the Visual Studio 2008 Web Deployment Projects (available as a download from www.microsoft.com). These project types complement both Web Site and Web Application projects so that you can package your application ready for deployment. Unlike other project templates that appear in the New Project dialog, Web Deployment Projects need to be created via the right-click context menu in the Solution Explorer, as illustrated in Figure 50-4.
Figure 50.4. Figure 50-4

Because there is a one-to-one association between a Web Site/Application Project and a Web Deployment Project, you need to ensure you have the correct project selected before you select Add Web Deployment Project from the shortcut menu. This will then prompt you for a name and location before going ahead and creating the project in your solution.
It is recommended that you use a Solution Folder to group together each web site/application with the associated Web Deployment Project, particularly if you have a large solution with many projects. This becomes even more relevant when you then build an installer for your web application — by grouping the three projects together they become much easier to manage.
To begin configuring the Web Deployment Project right-click the project in the Solution Explorer tool window and select Property Pages. This will open a modal dialog that allows you to define the usual project properties such as output folder, whether debugging information is generated, the assembly version and signing information, as well as some web application specifics. Some of the properties specific to web applications include how the assemblies are built and defining configuration file section replacements.
In most cases you will only want to select the creation of a single output assembly. However, for large web applications where it may be necessary to update portions of the site independently, it may be preferable to create separate assemblies for each folder. This is configurable via the Output Assemblies page in the Property Pages dialog.
In Figure 50-5 you can see the Deployment page of the Property Pages dialog, which is where you can define configuration file section replacements. As you can see from the tooltip, this is displayed when you click the examples link, the idea being that you provide a separate file that contains the relevant configuration information. You will notice that these properties are defined for a specific build configuration. This means that you can have one set of settings that you use during debugging and another set that is used when you do a release build. For more information on using separate files for different configuration sections, see Chapter 38.
Figure 50.5. Figure 50-5

A Web Deployment Project is essentially just an MSBuild file that you can open by selecting Open Project File from the right-click shortcut menu off the project in the Solution Explorer tool window. Not only will this open the project file using the XML editor, but you will see that there is also IntelliSense support for making changes. In Figure 50-6, you can see the IntelliSense provided when adding a Copy task to the AfterBuild event of the Web Deployment Project.
Figure 50.6. Figure 50-6

Figure 50-6 also shows the Import element, which includes the relevant targets so that MSBuild knows how to build the Web Deployment Project types. As the comment implies, there is more information in the targets file on how you can further customize the build process.
50.1.4. Web Project Installers
Whether you use a Web Deployment Project or not, if you are redistributing your web application you will want to create a Windows Installer that is capable of installing the web application and configuring IIS. To do this you will need to create a Web Setup Project from the Other Project Types ![]() Setup and Deployment node in the New Project dialog. This is essentially a normal setup project that has been configured with the relevant output folder (see the File System view) and user interface (see the User Interface view) for deploying web applications. Once you have created the setup project, you will need to add the appropriate project outputs. The left image of Figure 50-7 shows the Add Project Output Group dialog for adding a web site to the setup project. Because a web site contains only content files, this is the only option available.
Setup and Deployment node in the New Project dialog. This is essentially a normal setup project that has been configured with the relevant output folder (see the File System view) and user interface (see the User Interface view) for deploying web applications. Once you have created the setup project, you will need to add the appropriate project outputs. The left image of Figure 50-7 shows the Add Project Output Group dialog for adding a web site to the setup project. Because a web site contains only content files, this is the only option available.
Figure 50.7. Figure 50-7

Alternatively, when you are using a Web Deployment Project you will want to select the Precompiled Web Outputs of that project to add to the setup project, as shown in the right image of Figure 50-7. Lastly, if you are adding a web application to the setup project, you will need to remember to include both the Primary output and Content Files to ensure the application will function correctly.
One of the unique features of the Web Setup Project is the screen that is added to the user interface to enable the user to define the web site, virtual directory, and application pool that will be used by the web application being installed. Figure 50-8 illustrates this dialog as part of the installation process.
Figure 50.8. Figure 50-8
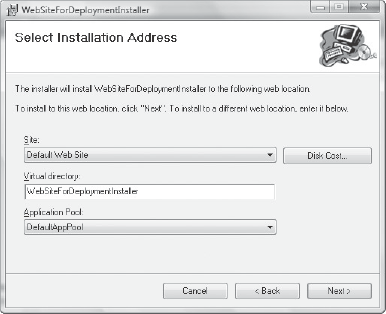
In previous versions of Visual Studio, the web site installation wizard would only prompt the user to specify the name of the virtual directory into which the application was to be installed, and this directory would then be created in the default web site. If multiple web sites were hosted on the same server (often the case with products such as SharePoint installed), then this could result in the application being installed on the wrong web site. Being able to specify the web site during installation reduces any post-installation administration that would have been required in the past.