
10.1. Creating Templates
There are two types of templates: those that create new project items and those that create entire projects. Both types of templates essentially have the same structure, as you will see later, except that they are placed in different template folders. The project templates appear in the New Project dialog, whereas the item templates appear in the Add New Item dialog.
10.1.1. Item Template
Although it is possible to build a template manually, it is much quicker to create one from an existing sample and make changes as required. This section begins by looking at an item template—in this case, an About form that contains some basic information, such as the application's version number and who wrote it.
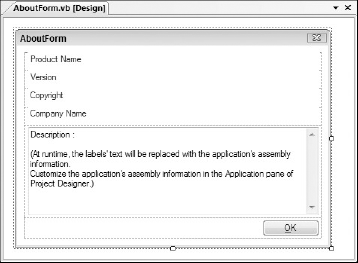
To begin, create a new Visual Basic Windows Forms application called StarterProject. Instead of creating an About form from scratch, you can customize the About Box template that ships with Visual Studio. Right-click the StarterProject project, select Add ![]() New Item, and add a new About Box. Customize the default About screen by deleting the logo and first column of the TableLayoutPanel. The customized About screen is shown in Figure 10-1.
New Item, and add a new About Box. Customize the default About screen by deleting the logo and first column of the TableLayoutPanel. The customized About screen is shown in Figure 10-1.
Figure 10.1. Figure 10-1
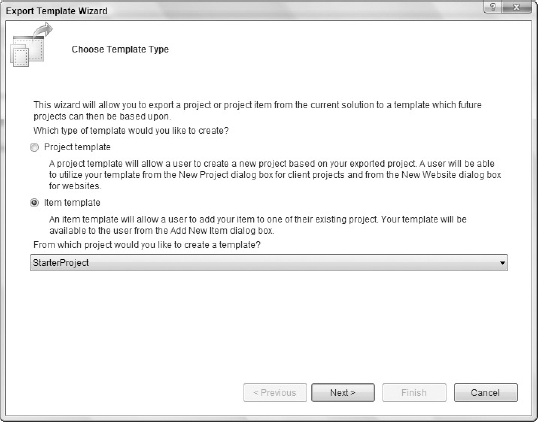
To make a template out of the About form, select the Export Template item from the File menu. This starts the Export Template Wizard, shown in Figure 10-2. If you have unsaved changes in your solution, you will be prompted to save before continuing. The first step is to determine what type of template you want to create. In this case, select the Item Template radio button and make sure that the project in which the About form resides is selected in the drop-down list.
Figure 10.2. Figure 10-2
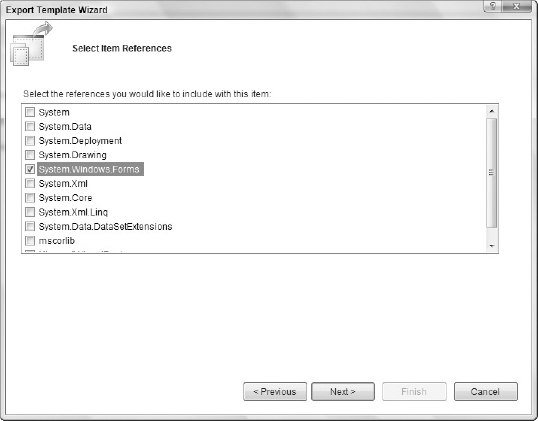
Click "Next >". You will be prompted to select the item on which you want to base the template. In this case, select the About form. The use of checkboxes is slightly misleading, as you can only select a single item on which to base the template. After you make your selection and click "Next >", the dialog shown in Figure 10-3 enables you to include any project references that you may require. This list is based on the list of references in the project in which that item resides. Because this is a form, include a reference to the System.Windows.Forms library. If you do not, and a new item of this type were added to a class library, it is possible that the project would not compile, as it would not have a reference to this assembly.
Figure 10.3. Figure 10-3
The final step in the Export Template Wizard is to specify some properties of the template to be generated, such as the name, description, and icon that will appear in the Add New Item dialog. Figure 10-4 shows the final dialog in the wizard. As you can see, it contains two checkboxes, one for displaying the output folder upon completion and one for automatically importing the new template into Visual Studio 2008.
Figure 10.4. Figure 10-4

By default, exported templates are created in the My Exported Templates folder under the current user's Documents/Visual Studio 2008 folder. Inside this root folder are a number of folders that contain user settings about Visual Studio 2008 (as shown in Figure 10-5).
Figure 10.5. Figure 10-5

Also notice the Templates folder in Figure 10-5. Visual Studio 2008 looks in this folder for additional templates to display when you are creating new items. Not shown here are two sub-folders beneath the Templates folder that hold item templates and project templates, respectively. These, in turn, are divided by language. If you check the "Automatically import the template into Visual Studio" option on the final page of the Export Template Wizard, the new template will not only be placed in the output folder but will also be copied to the relevant location, depending on language and template type, within the Templates folder. Visual Studio 2008 will automatically display this item template the next time you display the Add New Item dialog, as shown in Figure 10-6.
Figure 10.6. Figure 10-6

10.1.2. Project Template
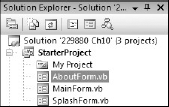
You build a project template the same way you build an item template, with one difference. Whereas the item template is based on an existing item, the project template needs to be based on an entire project. For example, you might have a simple project, as shown in Figure 10-7, that has a main form, complete with menu bar, an About form, and a splash screen.
Figure 10.7. Figure 10-7
To generate a template from this project, you follow the same steps you took to generate an item template, except that you need to select Project Template when asked what type of template to generate. After you've completed the Export Template Wizard, the new project template will appear in the New Project dialog, shown in Figure 10-8.
Figure 10.8. Figure 10-8

10.1.3. Template Structure
Before examining how to build more complex templates, you need to understand what is produced by the Export Template Wizard. If you look in the My Exported Templates folder, you will see that all the templates are exported as compressed zip folders. The zip folder can contain any number of files or folders, depending on whether they are templates for single files or full projects. However, the one common element of all template folders is that they contain a .vstemplate file. This file is an XML document that determines what happens when the template is used. The following listing illustrates the project template that was exported earlier.
<VSTemplate Version="2.0.0"
   xmlns="http://schemas.microsoft.com/developer/vstemplate/2005" Type="Project">
  <TemplateData>
    <Name>Application Template</Name>
    <Description>My Custom Project Template</Description>
    <ProjectType>VisualBasic</ProjectType>
    <ProjectSubType></ProjectSubType>
    <SortOrder>1000</SortOrder>
    <CreateNewFolder>true</CreateNewFolder>
    <DefaultName>Application Template</DefaultName>
    <ProvideDefaultName>true</ProvideDefaultName>
    <LocationField>Enabled</LocationField>

    <EnableLocationBrowseButton>true</EnableLocationBrowseButton>
    <Icon>__TemplateIcon.ico</Icon>
  </TemplateData>
  <TemplateContent>
    <Project TargetFileName="StarterProject.vbproj" File="StarterProject.vbproj"
      ReplaceParameters="true">
      <ProjectItem ReplaceParameters="true" TargetFileName="AboutForm.vb">
         AboutForm.vb</ProjectItem>
<ProjectItem ReplaceParameters="true" TargetFileName="AboutForm.Designer.vb">
AboutForm.Designer.vb</ProjectItem>
<ProjectItem ReplaceParameters="true" TargetFileName="AboutForm.resx">
AboutForm.resx</ProjectItem>
<ProjectItem ReplaceParameters="true" TargetFileName="MainForm.vb">
MainForm.vb</ProjectItem>
<ProjectItem ReplaceParameters="true" TargetFileName="MainForm.Designer.vb">
MainForm.Designer.vb</ProjectItem>
<ProjectItem ReplaceParameters="true" TargetFileName="MainForm.resx">
MainForm.resx</ProjectItem>
<Folder Name="My Project" TargetFolderName="My Project">
<ProjectItem ReplaceParameters="true" TargetFileName="Application.myapp">
Application.myapp</ProjectItem>
<ProjectItem ReplaceParameters="true"
TargetFileName="Application.Designer.vb">
Application.Designer.vb</ProjectItem>
<ProjectItem ReplaceParameters="true" TargetFileName="AssemblyInfo.vb">
AssemblyInfo.vb</ProjectItem>
<ProjectItem ReplaceParameters="true" TargetFileName="Resources.resx">
Resources.resx</ProjectItem>
<ProjectItem ReplaceParameters="true"
TargetFileName="Resources.Designer.vb">
Resources.Designer.vb</ProjectItem>
<ProjectItem ReplaceParameters="true" TargetFileName="Settings.settings">
Settings.settings</ProjectItem>
<ProjectItem ReplaceParameters="true"
TargetFileName="Settings.Designer.vb">
Settings.Designer.vb</ProjectItem>
</Folder>
<ProjectItem ReplaceParameters="true" TargetFileName="SplashForm.vb">
SplashForm.vb</ProjectItem>
<ProjectItem ReplaceParameters="true"
TargetFileName="SplashForm.Designer.vb">
SplashForm.Designer.vb</ProjectItem>
<ProjectItem ReplaceParameters="true" TargetFileName="SplashForm.resx">
SplashForm.resx</ProjectItem>
</Project>
</TemplateContent>
</VSTemplate>At the top of the sample, the VSTemplate node contains a Type attribute that determines whether this is an item template (Item), a project template (Project), or a multiple project template (ProjectGroup). The remainder of the sample is divided into TemplateData and TemplateContent. The TemplateData block includes information about the template itself, such as its name and description and the icon that will be used to represent it in the New Project dialog, whereas the TemplateContent block defines the structure of the template.
In the preceding example, the content starts with a Project node, which indicates the project file to use. The files contained in this template are listed by means of the ProjectItem nodes. Each node contains a TargetFileName attribute that can be used to specify the name of the file as it will appear in the project created from this template. In the case of an item template, the Project node is missing and ProjectItems are contained within the TemplateContent node.
It's possible to create templates for a solution that contains multiple projects. These templates contain a separate .vstemplate file for each project in the solution. They also have a global .vstemplate file, which describes the overall template and contains references to each projects' individual .vstemplate files.
For more information on the structure of the .vstemplate file, see the full schema at C:Program FilesMicrosoft Visual Studio 9.0XmlSchemas1033vstemplate.xsd.
10.1.4. Template Parameters
Both item and project templates support parameter substitution, which enables replacement of key parameters when a project or item is created from the template. In some cases these are automatically inserted. For example, when the About form was exported as an item template, the class name was removed and replaced with a template parameter, as shown here:
Public Class $safeitemname$
There are 14 reserved template parameters that can be used in any project. These are listed in the following table.
In addition to the reserved parameters, you can also create your own custom template parameters. You define these by adding a <CustomParameters> section to the .vstemplate file, as shown here:
<TemplateContent>
    ...
    <CustomParameters>
        <CustomParameter Name="$timezoneName $" Value="(GMT+8:00) Perth"/>
        <CustomParameter Name="$timezoneOffset $" Value="+8"/>
    </CustomParameters>
</TemplateContent>
You can refer to this custom parameter in code as follows:
string tzName = "$timezoneName$";
string tzOffset = "$timezoneOffset$";
When a new item or project containing a custom parameter is created from a template, Visual Studio will automatically perform the template substitution on both custom and reserved parameters.