
Chapter 10
Writing Effective jQuery Code
WHAT’S IN THIS CHAPTER?
- JavaScript Optimization Techniques
- Using JavaScript Patterns
- The $.data() Method
Now that you’ve walked through the breadth of what jQuery has to offer, it’s time to look at some specific ways in which you can improve your jQuery code.
In this chapter, you learn a variety of techniques, best practices, and patterns that you can apply to your code immediately to make it more efficient, maintainable, and clear.
You’ll discover optimization techniques pulled from an understanding of JavaScript fundamentals, an understanding of the relationship between the DOM and the JavaScript engine in web browsers, and from the way CSS selectors are parsed by Sizzle and other selector engines.
You also learn about common jQuery patterns and how best to use them to create maintainable, clear code for use in projects of all shapes and sizes.
Finally, you are introduced to the jQuery $.data() method, which enables you to store and retrieve application data in a clear, standardized way.
After reading this chapter, your code will be faster and your coworkers will applaud you for your code organization.
This section focuses on a variety of simple optimization techniques to keep in mind when writing jQuery, or, in many cases, pure JavaScript code.
Be warned — once you start to pay strict attention to performance, it can infect all of your coding.
Your users will love you.
Minimize DOM Updates
One of the most fundamental concepts of optimized front-end code is to keep the number of DOM updates in any given interaction down to the absolute minimum. Crossing over from the JavaScript engine into the DOM is a costly proposition. This is especially true if the operation is going to cause a repaint or reflow.
If you’re unfamiliar with the concept of reflows and repaints, pay particular attention to the next section. Understanding these concepts, how they differ, and how they affect both perceived and clock performance of a web page or application, is vital knowledge for the serious front-end engineer.
Reflows and Repaints
Two common, but potentially expensive operations in the life of a web page are reflows and repaints. Reflows and repaints happen when the browser needs to update its rendering model (the combination of the DOM and the CSS rules that make up the style component of the page). This happens at least once a page load (because the browser must draw something at least once), but can happen many more times in the case of dynamic applications.
The two events are related, but slightly different. Understanding the difference can make or break performance of a page:
- A repaint is caused by a stylistic change to the page that doesn’t change the overall page geometry. Hiding an element or changing an element’s background color would cause a repaint.
- A reflow is caused by a structural update to the page. Adding or removing an element from a document, changing its dimensions, or changing its display property can all cause a reflow. This is the more expensive of the two events because it involves calculating page geometry using the current DOM/CSS landscape.
Minimizing DOM Updates in Practice
You can see a dramatic and simple illustration of the performance penalty for DOM updates in Listing 10-1. The first example appends 10,000 rows to a table by calling $.append() during every iteration of the for loop. The second example creates a string, entirely in the JavaScript domain, and then writes the results to the DOM once, after the loop is completed.
LISTING 10-1: Minimizing DOM updates
for ( var i=0; i < 10000; i++ ){
  $( “#main table” ).append( “<tr><td>My job is to log table rows, this is row #”
   +i
   +”</tr></td>” );
}

var tableRows= “”;
for ( var i=0; i < 10000; i++ ){
  tableRows += “<tr><td>My job is to log table rows, this is row #”+i+”</tr></td>”;
}
$( “#main table” ).append( tableRows );
Code snippet is from minimize-dom-updates.txt
Looking at Table 10-1, you can see that the difference is dramatic, especially in Internet Explorer 8, where the example using multiple DOM updates takes nearly a full minute to complete.
TABLE 10-1: The Importance of Minimizing DOM Manipulations
| BROWSER | 10,000 APPENDS | 1 APPEND |
| Firefox 7.0 | 5,673 ms | 421.5 ms |
| Chrome 15 | 9,372 ms | 119.8 ms |
| Internet Explorer 8 | 50,783 ms | 773 ms |
Average of 10 runs
Leverage DOM Hyperspace
Another, related way to improve DOM manipulations is to do them in what’s been referred to as “DOM Hyperspace.” Basically, this boils down to creating and/or manipulating DOM elements entirely on the JavaScript side of the bridge and crossing over to the DOM itself only once manipulations are complete. You can do this by creating loaded jQuery nodes as variables to be manipulated or by using $().detach() to pull elements out of the DOM to manipulate. In each case, the fragments are inserted after the operations are completed. The basic idea behind each technique is shown in Listing 10-2.
LISTING 10-2: Creating and manipulating elements in JavaScript
//Using detach to pull elements out of the document.
var $sideBar = $( “#sidebar” ).detach();
/*
Populate the sidebar with menus, ads, and other miscellaneous elements
*/
$( “#main” ).append( $sideBar )

//Creating DOM elements with jQuery to later append to the document
var $sideBar = $( “<aside id='sidebar></aside>” ).detach();
/*
Populate the sidebar with menus, ads, and other miscellaneous elements
*/
//insert it into the DOM
$( “#main” ).append( $sideBar )
Code snippet is from dom-hyperspace.txt
More Effective Looping
Before you get into this particular optimization, it should be pointed out that, most of the time, using the jQuery convenience method $.each() on a collection is a perfectly acceptable solution to iterating over the members of an array.
Sometimes, however, using $.each() isn’t acceptable. With larger collections where speed is an issue, using traditional control structures is a more effective solution.
$.each() and Array.forEach(): Trading Convenience for Speed
All implementations of this functionality, whether it’s the aforementioned jQuery convenience method or the EcmaScript 5th Edition Array method forEach(), are slower than an associated for loop. To understand why this is, it’s useful to understand the scope in which the looped code runs.
The Price of Function Creation and Adding Levels to Symbol Lookup
Take a look at the simple example in Listing 10-3 that looks through a collection of integers and tests to see if they’re multiples of the number 5. One test is done with a traditional for loop, one with [].forEach(), and the other is done with $.each().
LISTING 10-3: $.each() vs. [].forEach() vs. a traditional for loop
/*
* Here's the setup function which populates an array with integers
*/

var numbers = [],
    fives = [];
for ( var i=0; i<1000000; i++ ){
  numbers.push( Math.round( Math.random()*i ) );
}

/*
* First we use a traditional for loop,
* caching the length
*/

var test = numbers.length;
for ( var j = 0; j<test; j++ ){
  if ( ( numbers[j] % 5 ) === 0  &&  numbers[j] !== 0 ) {
    fives.push( numbers[j] );
  }
}

/*
* Now we use the ES5 forEach method.
* This is actually what jQuery falls back on if it's available
*/

numbers.forEach(
  function( e,I ){
    if ( ( e % 5 ) === 0  &&  e !== 0 ) {
      fives.push( e );
    }
  }
)

/*
* Finally we use the $.each, convenience method.
*/

$.each( numbers,
  function( i,e ){
    if ( ( e % 5 ) === 0  &&  e !== 0 ) {
      fives.push( e );
    }
  }
)
Code snippet is from looptest.txt
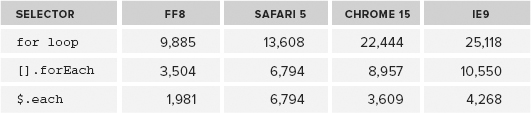
The difference in speed between the three versions is shown in Table 10-2. As you can clearly see, the for loop is significantly faster than the convenience methods.
TABLE 10-2: for loop, forEach, and $.each (Higher is Better)
The difference comes down to two things that, when understood, can help you write more effective JavaScript code. The first is being wary of extraneous function creation. Because they accept functions as arguments, the convenience methods require the JavaScript engine to create a new execution context for each step in the loop. Compare that to the traditional loop, which executes in the containing scope without the overhead of a new execution context.
Scope is the second piece. Because the operations are happening inside a function, any variables that reference the outer scope are now placed one level away in the scope chain. The looped code has to constantly walk the scope chain up a level to validate references. Because the traditional loop executes in one scope, any variables defined outside the loop still remain in the current scope.
Caching Objects
Building on the idea of using local variables to speed up your script, you’ll also want to think of caching objects in local scope to avoid additional script overhead. In general, if you’re going to use an object more than once in a function, it’s useful to cache that object in a local variable. It shortens lookup time, and if the variable is the result of a jQuery call, it cuts down on the number of times jQuery needs to do its selector magic.
It’s very common to need to do this with $(this) because the object bound to a function is often the subject of multiple operations in a function.
As a matter of style, when the object being saved to a local variable is a jQuery object, it’s also helpful to append a $ to the variable name. This indicates to anyone else on the project that it’s more than just a plain variable and has jQuery methods baked right in. Listing 10-4 shows a simple example that illustrates this technique on two separate variables.
LISTING 10-4: Caching objects for repeated use
var $this = $( this ),
    $active = $( “.active” );
if ( $this.hasClass( “detail” ) ){
  if ( $this.hasClass( “next” ) ){
    $active
      .toggleClass( “hidden” )
      .removeClass( “active” )
      .next( “.details” )
      .toggleClass( “hidden” )
      .addClass( “active” );
  } else if ( $this.hasClass(“prev”) ){
    $active
      .toggleClass( “hidden” )
      .removeClass( “active” )
      .prev( “.details” )
      .toggleClass( “hidden” )
      .addClass( “active” );
  }
}
Code snippet is from caching-objects.txt
Use Efficient Selectors
It’s not often that a 10-year-old article causes a ripple that spreads across the web development community, but that’s exactly what happened when people sat up and took notice of an article written in April 2000 by Mozilla engineer David Hyatt. Entitled “Writing efficient CSS for use in the Mozilla UI” (https://developer.mozilla.org/en/Writing_Efficient_CSS), the article lays out the way in which the browser parses the elements in a CSS selector and outlines several selector patterns that are particularly expensive.
The basic takeaways from this article are:
- The engine evaluates each rule from right to left, starting with the “key” selector and moving through each selector until it finds a match or gives up.
- Using fewer rules is generally more efficient.
- Be as specific as possible — IDs are better than tags.
- Avoid unnecessary redundancy.
What’s interesting is that JavaScript selector engines, including Sizzle and even the built-in document.querySelectorAll, also use some of the same techniques and also benefit from the same attention to efficiency.
In general, keeping your selectors short and sweet (leveraging IDs, for example) and keeping your key selectors as specific as possible will speed up your site whether you’re working with JavaScript or CSS.
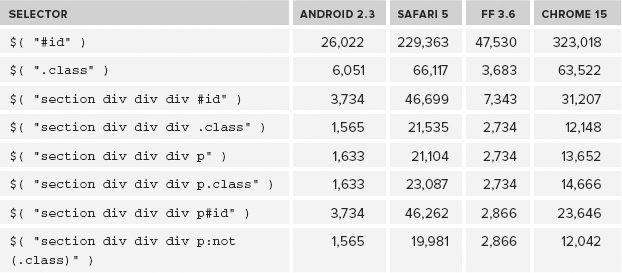
Table 10-3 illustrates applying these general selector rules to jQuery. As you can clearly see, no matter what browser you’re using, leveraging IDs and single classes are by far the fastest ways to select an element. Anything more complicated than that is going to be much slower in every browser. It’s not always possible to use an ID or single class, but it’s fastest when you can.
TABLE 10-3: jQuery Selector Performance (Higher is Better)

jQuery-Specific Selector Performance
To be as efficient as possible, it’s also important to understand jQuery’s strategy for selectors. In general, jQuery wants to pass the selector immediately on to a native DOM method. As you saw in the previous section, if you’re using #id as a selector, jQuery passes that directly to document.getElementById(“id”). As you saw in Table 10-3, that’s extremely fast. Selectors that can be passed along to document.getElementsByTagName and document.getElementsByClassName are also fast for the same reason.
As an aside, if you know your browser feature lists, you’ll know that the latter isn’t supported in older versions of IE, so that explains why class selectors are so slow in Internet Explorer 6 and 7.
document.querySelectorAll and jQuery Extensions
Selectors that can be passed to document.querySelectorAll (QSA) when it’s available are also very fast. The thing to keep in mind is that every available jQuery selector isn’t necessarily available in the native implementations of QSA. Because they’re hand-rolled implementations and not browser-optimized, these jQuery extensions to the CSS3 selectors are comparatively slow.
The jQuery extensions to the CSS3 selection engine are listed in Table 10-4. Use them with care. When using these selectors, it’s suggested that you pass a pure CSS selector to jQuery and then use .filter() to gather your specific results.
TABLE 10-4: jQuery Extensions to CSS3 Selectors
| SELECTOR | SELECTS |
| :animated | All elements that are in the progress of an animation at the time the selector is run |
| [name!=”value”] | Elements that either don’t have the specified attribute, or do have the specified attribute but not with a certain value |
| :button | All button elements |
| :checkbox | All checkbox elements |
| :eq() | The element at index n within the matched set |
| :even | Even elements |
| :file | All file elements |
| :first | The first matched element |
| :gt() | All elements at an index greater than the argument index within the matched set |
| :has() | Elements that contain at least one element that matches the specified selector |
| :header | All header elements |
| :hidden | All hidden elements |
| :image | All image elements |
| :input | All input, textarea, select, and button elements |
| :last | The last matched element |
| :lt() | All elements at an index less than index within the matched set |
| :odd | Odd elements |
| :parent | All elements that are the parent of another element |
| :password | All password elements |
| :radio | All radio elements |
| :reset | All reset elements |
| :selected | All selected elements |
| :submit | All submit elements |
| :text | All text elements |
| :visible | All visible elements |
http://api.jquery.com/category/selectors/jquery-selector-extensions/
Give Your Selectors a Context
By default, when you pass a selector into jQuery, it traverses the entire DOM. There’s an underused, second possible context argument into jQuery that limits that search to a specific section of the DOM. As a note, it helps to pass in fast selectors as the additional context. It doesn’t much help to speed things up with a context if the context itself is slow to be reached.
This traverses the whole DOM:
$(“.className”);
This searches only element#id:
$(“.className”,”#id”)
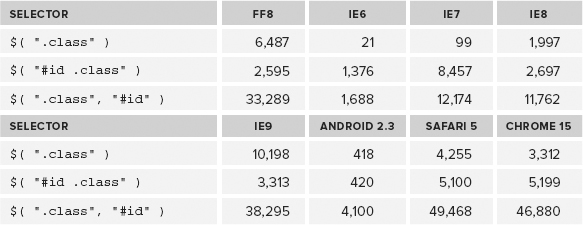
As Table 10-5 shows, adding in a context is always faster than a whole DOM selector or a selector with two (or more) elements.
TABLE 10-5: jQuery Selector Performance (Higher is Better)
Consider Skipping jQuery Methods Entirely
If performance is of primary concern to your site or application, it’s useful to keep in mind the places where it’s safe to skip jQuery methods entirely, falling back to quicker core JavaScript methods and properties. One common example is using attr() to get the href attribute and then using attr() to apply it to another element:
$( “#baz” ).attr( “href”, $( this ).attr( “href” ) );
If you know core JavaScript methods, the preceding line can be rewritten as follows:
document.getElementById(“baz”).href = this.href;
As you can see, two calls to jQuery are removed because you use document.getElementById to reference the element in question and then use direct lookups to the href attribute of each element instead of attr(). As Table 10-6 shows, even with this simple example, using native methods is faster in all major browsers.
TABLE 10-6: Going Native (Higher is Better)
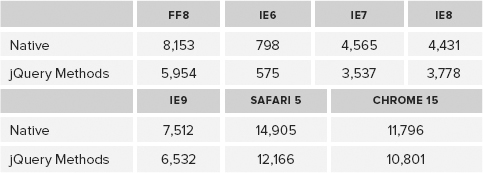
Clearly, this isn’t going to be an option for every statement as there are cross-browser issues and you lose the ability to chain methods. If it was possible for everything, you wouldn’t be using jQuery in the first place. It’s just a good idea to know where you can fall back to the native methods to get a performance tweak. Simple property lookups to grab a string for later manipulation or to test against (this.id, this.className) are a common area, but look for examples in your own code. If performance becomes an issue, there might be easy gains waiting for you.
DRY
“Don’t repeat yourself” (or DRY) is an oft-repeated mantra in software development. It’s an important principle for maintenance and performance. With the simple elegance of the jQuery API, it’s important stylistically as well. One place where jQuery can encourage repetition is with the liberal use of anonymous functions. Because it’s so common to pass an anonymous function in as an event handler, it’s not uncommon to see several short functions doing the same thing in a block of code. Although this may feel faster and convenient in the short term, it’s in your best long-term interest to simplify the repeated code. You don’t want to wade through a thousand lines later to make edits to similar code that lives in five places in your application.
A typical example is shown in Listing 10-5. The function changes the class of the bound element, fires off an Ajax request, and then shows a jQuery UI dialog indicating the results of the request. Writing it once as an anonymous function makes sense. It’s short and full of common code. If it appears several times throughout your site, it’s time to simplify.
LISTING 10-5: Repeating yourself
$( “#foo” ).click(
  $( this ).addClass( “active” );
  $.get( “/my/app/service/”, function( data ){
    $( “#dialog” ).text( data.status ).dialog( “open” );
  }
);
$( “#bar” ).click(
  $( this ).addClass( “active” );
  $.get( “/my/app/service/”, function( data ){
    $( “#dialog” ).text( data.status ).dialog( “open” );
  }
);
$( “#baz” ).click(
    $( this ).addClass(“active”);
    $.get( “/my/app/service/”, function( data ){
    $( “#dialog” ).text( data.status ).dialog( “open” );
  }
);
Code snippet is from repeating-yourself.txt
You can simplify this code by collecting the selectors in use:
 $( “#baz, #bar, #foo” ).click(
    $( this ).addClass( “active” );
    $.get( “/my/app/service/”, function( data ){
        $( “#dialog” ).text( data.status ).dialog( “open” );
    }
);
Code snippet is from dry.txt
Alternatively, if the events are spread out across your site or application, you can create a callable function accessible from anywhere:
 function ourHandler(){
  $( this ).addClass( “active” );
  $.get( “/my/app/service/”, function( data ){
    $( “#dialog” ).text( data.status ).dialog( “open” )
  }
}

$( “#baz” ).click( ourHandler );
Code snippet is from dry-callable-function txt
Keeping code DRY takes a bit of vigilance, but once you start to recognize areas where it typically starts to creep in, you can stay ahead of it by immediately making the more maintainable solution.
Although the subject of software design patterns is far too broad a topic to cover here in depth, understanding and implementing basic patterns can go a long way toward making your code more maintainable.
For more on software design patterns in general, the classic “Gang of Four” book, Design Patterns: Elements of Reusable Object-Oriented Software by Erich Gamma, Richard Helm, Ralph Johnson, and John Vlissides, is the indispensable reference. Check it out if anything in the following section strikes a chord with you.
In this section, you learn about techniques that limit global namespace pollution, provide logical module initialization, and allow for easier collaboration among multiple developers.
Creating an Application Namespace with a Singleton
One of the simplest techniques you can use to structure your code is to use well-chosen namespaces. This pattern is commonly called a singleton.
Before you look at the singleton, look at the unstructured approach it approves upon. This style of code is still common and was especially prevalent in the earliest days of JavaScript programming. For a long time, it was typical to simply present a series of function declarations defined at the global space. This throwback approach is shown in Listing 10-6.
LISTING 10-6: The old-school approach
function myAppInit(){
  //code to initialize your application
}

function myAppDashboard(){
  //your dashboard feature goes here
}

function myControlPanel() {
  //control panel code goes here
}

function myAppSettings(){
  //code that updates settings goes here
}

//kicked off with the ready() function
$( document ).ready(myAppInit)
Code snippet is from multiple-functions.txt
Though there’s nothing wrong about this pattern in a technical sense, it does present some compatibility hurdles.
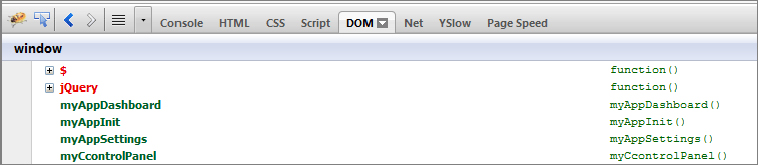
To see the compatibility issues, you can just pop open Firebug and navigate to the DOM tab. There you’ll see all the functions created available in the global namespace. This is illustrated in Figure 10-1.
It doesn’t take long for a JavaScript developer to discover that populating the global namespace with multiple variables can cause serious issues. For an obvious example, imagine naming a variable i,_, or $ in the global namespace. That’s going to cause a problem somewhere down the line.
More obscure names might be safer, but they’re still not safe, so don’t think that naming your variables after characters from Jabberwocky is going to save you from variable collisions.
Just wait until you have two Lewis Carroll freaks on a project.
So, instead of merely dropping a series of functions into a global namespace, you can alternatively leverage a single variable to hold all of your application code. In the simplest example, this variable is an object literal, which in turn will contain your application modules and properties. A simple example is shown in Listing 10-7.
LISTING 10-7: A singleton
var myApp = {
  init :  function(){
    //code to initialize your application
  },
  dashboard:  function(){
    //your dashboard feature goes here
  },
  controlPanel:  function() {
    //control panel code goes here
  },
  appSettings:  function(){
      //code that updates settings goes here
    }

}
//kick it off with ready()
$( document ).ready( myApp.init )
Code snippet is from singleton.txt
Firing up Firebug with this new structure shows that there’s only the single myApp variable in the global namespace. You can see this in Figure 10-2.

Even in this simplified example, that cuts down the possibilities of a variable name collision significantly. If your application has dozens or even hundreds of similar methods and properties, the benefit of an application namespace is even greater.
There’s more to namespaces than preventing bugs. This simple singleton can be expanded to create separate objects for individual application features and/or site sections.
This allows for multiple developers to work in a single application namespace across multiple files, allowing for greater maintainability and less chance of conflicts in version control or otherwise stepping on each other’s toes. Though individuals might be able to get away with it, teams working with a monolithic JavaScript file can cause disasters.
You can see the simple object literal you’ve been working with broken out into multiple application objects in Listing 10-8. Structurally, each site section would be broken out into a separate file. These would be common.js, dashboard.js, controlPanel.js, and settings.js in this example. With the exception of common.js, individual developers could own each site section and file without really worrying about what anyone else was doing. common.js would be owned by the project lead, both for the sake of maintenance and because the question of what’s truly “common” has some nuance to it.
LISTING 10-8: A simple application framework
var myApp = {
//a common object holds code common to all application sections
  common : {
    init :  function(){
      //common code to initialize your application
    }
  }
};
myApp.dashboard = {
//your dashboard feature has an init function as well.
  init : function(){
    //init code
  },
  update : function(){
    //code to update the dashboard
  },
  render :  function(){
    //code to render the dashboard
  }
};

myApp.controlPanel = {
//your control panel feature has an init function as well.
  init : function(){
    //init code
  },
  settings : function(){
    //code for control panel settings
  }
};
myApp.settings = {
//your settings page has an init as well
  init : function(){
       //init code
  },
  update : function(){
    //code to update site settings
  }
}
Code snippet is from a-simple-application-framework.txt
One thing to note is that, although working in multiple files is a best practice, actually serving multiple files to your users is definitively not suggested. If you’re working in multiple files in your project, it’s worth looking at ways to automatically concatenate (and minify) your files together into a single file. A good starting point for this kind of task is the HTML5 Boilerplate project and its associated build script. You can find it at http://html5boilerplate.com/. As an alternative to a static build script, a script loader like LABjs http://labjs.com/ offers a JavaScript-based method for loading files on an as-needed basis.
The Module Pattern
A variation on the singleton, the module pattern was created by Douglas Crockford, Chief JavaScript Architect at Yahoo! and author of the JSON data interchange format. It was popularized in a post by Eric Miraglia on the Yahoo! User Interface Blog in June 2007 (http://www.yuiblog.com/blog/2007/06/12/module-pattern/) and is cover in depth in Crockford’s book, JavaScript: The Good Parts (O’Reilly Media, 2008). It enhances the encapsulation provided by the singleton and adds the ability to create private methods and properties.
The module pattern consists of three main components: a namespace similar to the one leveraged in the previous example, a function that immediately executes, and the function’s return object, which contains publicly available methods and properties. You can see a simplified example in Listing 10-9.
LISTING 10-9: The JavaScript module pattern
//Our app namespace. We pass in the jQuery object to shorten lookups
var myApp = function ( $ ) {
  // private variables and methods, only available within this myApp
  var message = “not directly accessible from outside the module”;
  function multiplier ( x,y ) {
    return x * y
  };
//the return object contains the public
//properties and public methods
  return  {
    init : function(){
       //initialize the app
    },
    prop : “42”,
    specialNumber : function () {
      //access to our private method
      var num = multiplier( 7 , 6 );
      return “Our special number is definitely “ + num;
    },
    //we provide controlled access to private variables
    shareMessage : function( arg ){
      if ( arg === “open sesame” ) {
        return message + “,unless you know the magic word”;
      } else {
        throw new Error( “You need to know the magic word” );

      }
    }
  };
}( jQuery );
Code snippet is from module-pattern.txt
Examining this sample app on the console illustrates the way the module works. The private variables can be referenced within the module body, but can’t be called directly from the outside. You are able to grant access in special cases through methods exposed in the return object. As you can see in Listing 10-10, examining the module using console.log illustrates both cases.
LISTING 10-10: Examining the module pattern in the JavaScript console
>>> console.log( myApp.message )
undefined

>>> console.log( myApp.multiplier() )
TypeError: myApp.privateMethod is not a function

>>> console.log( myApp.shareMessage( “please?” ) )
“You need to know the magic word”

>>> console.log( myApp.shareMessage( “open sesame” ) )
not directly accessible from outside the module,unless you know the magic word

>>> console.log( myApp.prop );
42

>>> console.log( myApp.specialNumber() );
Our special number is definitely 42
Extending the pattern to additional modules is straightforward. Listing 10-11 illustrates a dashboard module, complete with a private configuration object and a public method to allow gated access to dashboard configuration based on a set of predefined criteria. If you’ve got experience with languages like C#, Java, and C++, then you’re familiar with the usage of the private and public keywords. This pattern allows JavaScript to provide similar functionality. It’s not every day that you’ll need to use this kind of protected access, but it’s important to know that it’s there when the need does arise.
LISTING 10-11: A dashboard module
myApp.dashboard = function ( $ ) {
  // private variables and methods
  var config = {
    “color” : “blue”,
    “title” : “my dashboard”,
    “width” : “960px”
  };
  return  {
    init : function(){
      //initialize the dashboard
    },
//updateConfig allows for monitored configuration
//of the private config object
    updateConfig : function( obj ) {

if ($.inArray(obj.color, [“red”, “blue”, “green”, “purple”] !== -1))
{
        config.color = obj.color;
      }
      config.title = obj.title || config.title;
     config.width = obj.width || config.width;

    },
    render : function() {
      //renders the dashboard
      var $dashboard = $( “<div/>” ).html( “<h1/>” )
     $dashboard.text( config.title )
       .css(
         { “width” : config.width,
           “color” : config.color }
       );
       $( “#main” ).append( $dashboard );
    }
  };
}( jQuery );
Code snippet is from advanced-module.txt
The Garber-Irish Implementation
The following pattern expands on the singleton and module pattern with cleverly chosen markup and style hooks to create a seamless initialization pattern for sites and applications.
This pattern was introduced by in 2009 by Paul Irish in a blog post entitled “Markup-based unobtrusive comprehensive DOM-ready execution” (http://paulirish.com/2009/markup-based-unobtrusive-comprehensive-dom-ready-execution/) and later modified by Jason Garber in a blog post entitled “http://www.viget.com/inspire/extending-paul-irishs-comprehensive-dom-ready-execution/).
In short, it leverages a small utility script and either CSS classes or HTML5 data attributes on the body element to selectively fire init() events depending on the site section or page type. This pattern alleviates the problem of trying to hunt down multiple $(document).ready() calls strewn throughout an application, instead providing a consistent, structured approach that works across multiple domains (server code, JavaScript, and style).
You can use either version, depending on your taste, so I’ll share both flavors. First up is Paul’s original version.
The Original Recipe
The pattern starts with a typical object literal. This variation has a couple of specific enhancements that are shown in Listing 10-12. Take note of the sections with init methods and the common section, which contains a method called finalize. The init methods are designed to fire on $( document ).ready() when the relevant section or feature is needed. This need is determined by the HTML structure you’ll see shortly. The finalize methods are for code that needs to execute as soon as possible but doesn’t affect the initial load of the page.
LISTING 10-12: Object literal enhanced for “markup-based unobtrusive comprehensive DOM-ready execution.”
myApp = {
  common : {
    init : function(){
      //init()
  },
    finalize : function(){
      //we're saving these for a little later
    }
  },
  dashboard : {
    init : function(){
      //dashboard init
    },
    settings: function(){
      //dashboard settings
    },
    render : function(){
      //render
    },
  }
}
Code snippet is from garber-irish-object-literal.txt
The next component is a small utility script, which parses the body id and className and attempts to fire functions based on the patterns exposed. This code, taken directly from Paul’s original post, is shown in Listing 10-13.
LISTING 10-13: “Markup-based unobtrusive comprehensive DOM-ready execution.”
/* from
* http://paulirish.com/2009/markup-based-unobtrusive-comprehensive-dom-ready-execution/
* License: CC0 1.0 Universal (CC0 1.0) Public Domain Dedication
*/

UTIL = {

  fire : function(func,funcname, args){

    var namespace = myApp;  // indicate your obj literal namespace here

    funcname = (funcname === undefined) ? 'init' : funcname;
    if (func !== '' && namespace[func]
        && typeof namespace[func][funcname] == 'function'){
      namespace[func][funcname](args);
    }

  },

  loadEvents : function(){

    var bodyId = document.body.id;

    // hit up common first.
    UTIL.fire('common'),

    // do all the classes too.
    $.each(document.body.className.split(/s+/),function(i,classnm){
      UTIL.fire(classnm);
      UTIL.fire(classnm,bodyId);
    });

    UTIL.fire('common','finalize'),

  }

};

// kick it all off here
$(document).ready(UTIL.loadEvents);
Code snippet is from irish.txt
The final piece is an HTML document with a body tag with a class and an id that correspond to site sections or features mapped out in the object literal:
<body id=”settings” class=”dashboard”>
Putting them all together would fire events in the following order:
- myApp.common.init()
- myApp.dashboard.init()
- myapp.dashboard.settings()
- myapp.common.settings()
This pattern can expand beyond the single class shown in the previous example. Multiple classes can be strung together, which allows multiple features to fire automatically. This is especially cool because once it’s in place, it allows JavaScript features to be initialized without having to touch a line of JavaScript code. An engineer working in PHP or Java can simply append a class to a page and know that the proper initialization code for a module will fire.
Using HTML5 Data Attributes Instead of CSS Classes and IDs
Jason Garber’s variation is very similar, with the key difference that it uses HTML5 data attributes to trigger the execution.
If you’re unfamiliar with them, HTML5 data attributes are defined methods for storing custom data in HTML attributes. Application developers had long stored string data in custom attributes, so this is a case of the Web Hypertext Application Technology Working Group (WHATWG) “paving the cowpaths” and standardizing common developer behavior. The benefit of standardization is that the data-* prefix allows for predictable programmatic access to the custom attributes. You learn more about that in an upcoming section, but for now, you see the slight difference in the body tag:
<body data-controller=”dashboard” data-action=”render”>
Instead of using CSS classes and IDs, this method maps controllers to actions. This is a very elegant method, especially if you’re building a Ruby on Rails (or similar) application where consistent naming conventions are a high priority. It also allows body IDs and classes to be used for other methods, if the need arises.
The one downside is that leveraging data attributes for section-specific styling is awkward. In a sense, it’s a case of choosing where the one-to-one correspondence will be — on the server with your Ruby on Rails controllers and actions or in your CSS file with section-specific classes and IDs.
Regardless of what specific example you choose, this pattern provides an elegant addition to your toolset, adding in a consistent, scalable, and maintainable method of running code on $(document).ready().
As you saw in the previous section, the new HTML5 data attribute is designed for structured, programmatic access to custom attributes. jQuery provides a straightforward method to do just that with $.data(). Any data attributes set on an HTML element are immediately available to be retrieved with $.data(). Though that’s extremely convenient, $.data() also provides the ability to bind any data to a DOM element. This allows arrays and complicated objects to be stored as well as the string values previously possible with hand-rolled custom attributes. It should be noted that while $.data() can read HTML5 data attributes, it doesn’t actually write values to elements in the form of data- attributes. This makes sense because arbitrary arrays and objects don’t lend themselves to being stored as string values of HTML attributes.
This is extremely powerful, and if you’ve been doing this for a while, it should feel like something you’ve been searching for your whole career.
If you’ve ever passed an object as an argument between several methods, you’ll be happy to know you’ll never have to do that again if you learn to embrace the $.data() method. Gone are the days of managing application state with function argument chains spreading across a half dozen method calls. Now, you can simply bind application or component data directly on the DOM element itself for convenient, direct access throughout the application life cycle.
Additionally, it’s important to note that the data API stores data in a way that’s safe from circular references, which prevents memory leaks.
A note on support: HTML5 data attribute support was added in jQuery 1.4.3 and a revision was released to match the W3C spec more closely in jQuery 1.6.
The Basics of the .data() API
Like many jQuery methods, $.data() can be used as both a setter and a getter. If two arguments, as a name/value pair, or an object of name/value pairs is passed in, $.data() will set the data values accordingly. A single string passed in will return the value of named data property. Some basic examples, including strings, Boolean, arrays, and objects being used as values for the $.data() method, are shown in Listing 10-14.
LISTING 10-14: Simple .data() examples
$('#dashboard').data('updated', 1321358806453);

$('body').data('fantastic', true);

$('#settings').data('faves', [1,4,6,8,9,14,27,42]);

$('#boston').data('bostonTeams', {
 'nba' : 'Celtics', 'nhl' : 'Bruins', 'mlb' : 'Red Sox', 'nfl' : 'Patriots' });
Code snippet is from data-examples.txt
Although the basics of the API are straightforward, the power and convenience can’t be understated. Having a coherent, standard method of storing and retrieving application data clears up years of awkward coding and disparate patterns. The following section lays out this benefit with a more realistic example.
Before we look at that example, it should be noted that though $.data() allows for storing page-level data, it does not help you at all with storing persistent data. To store persistent data, you’ll still have to deal with cookies or the new TML5 storage API, which are the standards for persistent data in the browser.
Fully Leveraging the Data API
Listing 10-15 illustrates an application fragment. This piece initializes a small Google Maps application. In it, you create a Google Map and use the W3C’s new Geolocation API to place a marker on the map based on the user’s latitude and longitude.
Throughout this example, the .data() method is used to capture variables, objects, and even instantiated Google Maps objects.
Initially, you store a reference to the map itself. Every Google Maps API call works off of an instantiated object; for example, a map, geocoder, or marker. Storing the reference to your map simplifies later map manipulations. You also store the initial mapOptions object. This is a simple scheme to store the initial state of the map if you need to reset it for any reason.
Later on, in both the success and failure functions, you store a geocoder object and an initialLocation. The geocoder can be used for any later address lookups without the cost of instantiation, and the initialLocation can be used to reset or recenter the map based on the updated latitude and longitude provided by the geolocation lookup.
LISTING 10-15: Using .data() in an application context
var loadMap = {
  init : function() {
    var GM = google.maps,
        defaultPosition = new GM.LatLng(42, -71),
        mapOptions = {
        zoom: 12,
        center: defaultPosition,
        mapTypeId: GM.MapTypeId.ROADMAP
        },
        map = new GM.Map( document.getElementById( 'map' ), mapOptions);

    $( “#map” ).data({ “map” : map, “mapOptions” : mapOptions } );
    var success = function( data ){
      var position = new GM.LatLng(
            data.coords.latitude,
            data.coords.longitude ),
          niceAddress = “Your location”,
          geocoder = new GM.Geocoder();
      $( “#map” ).data( “geocoder” , geocoder );
      geocoder.geocode(
        { 'latLng': position },
        function( results, status ) {
          if ( status == GM.GeocoderStatus.OK ) {
            if (results[0]) {
              niceAddress = results[0].formatted_address;
            }
          }
          var infowindow = new GM.InfoWindow({
            map: map,
            position: position,
            content: niceAddress
          });
          $( “#map” ).data( “infowindow” , infowindow  )
        });
      map.setCenter( position );
      $( “#map” ).data( “initialLocation” , position  )

    },
    failure = function( error ){
      var formResponse = function(e){

        var geocoder = new GM.Geocoder(),
            position = defaultPosition,
            niceAddress = “Sorry We Couldn't Find Your Location”;
        $( “#map” ).data( “geocoder” , geccocoder );
        geocoder.geocode(
          { 'address': $(“#location”).val() },
          function( results, status ) {
            if ( status == GM.GeocoderStatus.OK ) {
              //set position
            }
            var options = {
              map: map,
              position: position,
              content: niceAddress
            },
            infowindow = new google.maps.InfoWindow(options);
            $( “#map” ).data( “infowindow” , infowindow  )
            map.setCenter( options.position );
            $( “#map” ).data( “initialLocation” , position  )
            $( “#geocode” ).hide();
          }
        )
      return false;
    }
    var $fallback = $( “<from id='geocode'></form>” );
    if ( error ) {
      switch( error.code ) {
        /* error handling */
       }
     }
     fallback.append(“<label for='location'>Enter Your Location”
       +  ”<input type='text' id='location' /></label>”
       + “<input type='submit' />”);
     fallback.bind(“submit”,formResponse);
     $(“#main”).append( $fallback );
   };
  if (navigator.geolocation){
    navigator.geolocation.getCurrentPosition(
      success,
      failure,
     {timeout:5000});
  } else {
    failure();
    }
  },
  reset : function(){
    var map = $( “#map” ).data( “map” ),
        position = $( “#map” )
         .data( “initialLocation” ),
        infowindow = $( “#map” )
         .data( “infowindow” , infowindow  );
    infowindow.close()
    map.setCenter( position );
  }
}
$( document ).ready( loadMap.init );
Code snippet is from data-api.txt
In just this small example, you’ve stored a wealth of data about your application in an accessible, standard way. Accessing it in the simple reset method, you have immediate access to the current map, infowindow, and the original latitude and longitude coordinates supplied when the map was created, allowing you to quickly reset the map to its original state. Once you start to leverage the $data() method across an application, you’ll wonder how you ever survived without it.
This chapter exposed you to a variety of techniques to improve your jQuery and JavaScript code. You now have an understanding of common techniques and approaches that will produce faster, more efficient code. From understanding the way the browser updates the DOM, to the price of convenience and a variety of selector optimizations, you should have a strong cache of techniques to speed up your site or application.
Additionally, you have an understanding of some common JavaScript design patterns that will allow you to create more maintainable, consistent code.
Finally, you had a glimpse at the power of the jQuery Data API, which allows you to conveniently and safely store application data associated with DOM elements in a standardized way.