
Chapter 14
Unit Testing with QUnit
WHAT’S IN THIS CHAPTER?
- An Introduction to Unit Testing
- Getting Started with QUnit
- Asynchronous Testing
- Putting It All Together
In this chapter, you learn about the benefits of unit testing and about the specific unit testing framework created and used by the jQuery project itself, QUnit. You learn how to write your own tests and how to integrate QUnit with your own projects to increase code quality, maintainability, and overall confidence.
AN INTRODUCTION TO UNIT TESTING
If you’re coming to jQuery and JavaScript engineering from some other programming discipline, the concept of unit testing is likely familiar to you. If that’s the case, or you’re among the minority of front-end engineers already doing unit testing, feel free to skip ahead to the sections that deal specifically with unit testing with QUnit. Otherwise, read on and learn about the benefits of a development approach centered on a structured, atomic testing framework.
As a note, this is an area of front-end engineering where there’s an opportunity to get ahead of the curve. As the DailyJS JavaScript Developer Survey 2011 Results (http://dailyjs.com/2011/12/15/javascript-survey-results/) show, only 42 percent of JavaScript engineers are unit testing their code. That number is up from 2010, but it still shows that there’s a gap between the tools commonly used in other programming disciplines and the ones used in the average JavaScript project.
As you’ll soon see, the benefits are potentially significant, so ramping up to include unit testing in your development toolbox is a worthwhile effort.
Unit testing is a software practice where individual pieces of code (called units) are tested to determine their viability for a specific task. Units should be as small as possible, have one or a few inputs, and a single output.
Unit tests are generally automated, either as part of a build process, or as a pre-commit hook for check-ins or some other step of the software life cycle. Each test returns a binary pass/fail result.
Unit testing is a vital partner of a style of testing much more familiar to JavaScript developers: functional testing. Functional testing, what most people think of as “QA” or, more formally, acceptance testing, tests the site or application from the end user’s perspective, after it’s complete. Unit tests flip that model on its head. Unit tests are written alongside the code they’re meant to test and are, most importantly, written from the developer’s perspective.
Instead of testing the result, an end user will see unit tests analyze the expected result, from a software perspective, of a piece of code.
Benefits of Unit Testing
Some of the benefits of unit testing should be obvious. Testing code early and often improves code quality by uncovering issues that might be glossed over with simple, unstructured developer tests. Better code quality means fewer bugs during functional testing or, worse, in production.
“Fewer bugs” should make everyone involved with your project happy, including your users.
Beyond producing better code at the start of a project, one other key use of unit testing is automated regression testing. This is one of the most important uses of unit testing in the jQuery project itself. Using automated unit tests ensures that new features and/or bug fixes don’t introduce other errors. This is a key to ensuring the stability of the library.
Rick Waldron’s line in the jQuery Bug Fixing Guide (http://weblog.bocoup.com/javascript-jquery-bug-fixing-guide) bellows (in all caps) the importance of this with the admonition “ALWAYS RUN THE FULL SUITE BEFORE COMMITTING AND PUSHING A PATCH!!!” That’s clarity.
Running the full test suite and ensuring all tests still pass means you’ve added to, but not subtracted from, the library as a whole.
The unit testing structure allows for easier refactoring. Because you know exactly what tests a particular piece of code needs to pass, you can more confidently refactor that code without the nagging fear that you’re missing some dependency or other. No developer wants to feel the fear that the code she or he has rewritten will bring the whole application crashing down. Passing existing unit tests alleviates that fear significantly.
Additionally, because good unit testing relies on testing standalone modules, coding for unit testing forces developers to write more loosely coupled code. You want to avoid writing tests that spread across more than one module, so you’re forced to write more abstract interfaces for inputs and outputs that can more easily be mocked up in a testing framework.
Coding for standalone unit tests also means that code can be tested and verified well before other, dependent systems are complete. With a well-documented interface and well-written unit tests, modules can be coded confidently even if other modules are to be created later on in the process. This can be especially beneficial with large teams spread across different organizations. A consultant can come in, create a module for which he’s specifically suited, and if his code is well tested and works properly with the agreed-upon interface, he could theoretically move on to his next gig, well before the rest of the organization catches up to his progress. This doesn’t negate the need for integration tests (tests to ensure that the actual systems involved function as expected when coupled together), but it should alleviate many of the surprises that can pop up with a less structured approach to development.
Test-Driven Development
Unit testing is the foundation of an advanced software methodology called Test-Driven Development (TDD). TDD encourages extremely short development cycles by centering the development life cycle on small unit tests. A developer will start by writing a failing unit test. He’ll then write the minimum amount of code to pass that failing test. Finally, he’ll move on to the next feature and/or refactor the code for better quality. Although this chapter doesn’t go into specific TDD practices, TDD is often mentioned alongside unit testing, so the relationship is important to point out.
Basically, though you can’t do TDD without unit tests, you can unit test without signing up to practice the full spectrum of TDD.
Understanding What Makes a Good Unit Test
Now that you know about the basics of unit testing, it’s important to get a sense of how to create a quality unit test.
There are several hallmarks of a good unit test. The following list outlines some tenets to follow. In general, unit tests should be:
- Automated: Getting developers to do anything is hard enough as it is. Testing has to be as easy as possible or else there won’t be buy-in from the front lines.
- Fast: Anything else and developers are going to be less likely to get with the testing program.
- Focused: They should test as narrow a component as is possible to cut down on ambiguity.
- Independent: This can be approached from two different angles. Both are important:
- Self-contained: Tests need to be atomic. This means that you may need to use some code to stand in for external inputs/outputs. This code is known in testing circles as “mocks” or “stubs.” You see more about mocks later in the chapter.
- Standalone: In addition to having no external dependencies, unit tests should be able to be run in any order, without having sequential dependencies on any other test.
- Consistent: Tests should always return the same results.
- Readable: Tests should be clear in intent and focus so that the developers that follow you onto a project will be able to pick up on the purpose of your tests without so much ramp-up time.
- Maintainable: Unit tests will live with your project, so they should be maintainable. Having out-of-date tests is better than having no tests at all, but out-of-date tests will cause their own problems.
- Trustworthy: Developers should have complete confidence in the result of a unit test.
Now that you’ve got a handle on unit testing in general, it’s time to take a look at the star of the show, QUnit.
QUnit was born May 2008, out of the jQuery project’s own testrunner. As it evolved, it was spun off as a separate project, gaining a name, documentation, and eventually being completely decoupled from jQuery.
If you’re comfortable with the concepts of unit testing in general, getting up and running with QUnit is relatively straightforward. The following section outlines the key structure of QUnit testing and illustrates the basic assertions you’ll use to test your code.
The QUnit Hello World Using equal
The following file shows a bare-bones QUnit test. It contains a copy of jQuery, a copy of the QUnit script file, a copy of the QUnit CSS file, and some script and markup that make up the body of the test itself.
The script block uses the QUnit method test. test does what the name implies — it sets up a test to run. Here it accepts a pair of arguments, a name, “Hello World,” and a function that actually represents the test. The function argument itself uses the QUnit function equal. In unit testing terminology, equal is referred to as an assertion. An assertion indicates what you expect the code to do. As the name implies, equal tests equivalence. It accepts three arguments: an actual variable to be tested, the asserted expected value, and a message to display alongside the assertion.
The markup contains several QUnit-specific HTML elements:
#qunit-header contains the name of the test suite.
#qunit-banner shows up red with a failing test and green if all tests pass.
#qunit-userAgent displays the navigator.userAgent property.
#qunit-tests is a container for the test results.
#qunit-fixture is where you place and manipulate your test markup. You learn more about #qunit-fixture in a later section.
 <!DOCTYPE html>
<html>
<head>
<script
src=”http://code.jquery.com/jquery-1.7.1.js”>
</script>
<link rel=”stylesheet”
  href=”http://code.jquery.com/qunit/git/qunit.css”
  type=”text/css”
  media=”screen” />
<script
src=”http://code.jquery.com/qunit/git/qunit.js”></script>
<script>
$( function(){
  test(“Hello World”, function() {
    var message = “hello world”;
    equal( message,
      “hello world”,
      “We expect the message to match”
    );
  });
});</script>
</head>
<body>
  <h1 id=”qunit-header”>QUnit example</h1>
  <h2 id=”qunit-banner”></h2>
  <div id=”qunit-testrunner-toolbar”></div>
    <h2 id=”qunit-userAgent”></h2>
    <ol id=”qunit-tests”>
    </ol>
  <div id=”qunit-fixture”>Test Markup</div>
</body>
</html>
Code snippet is from simple-test.html
Running that single test produces the output shown in Figure 14-1.

If you see that for all of your tests, it’s time to go to lunch. You’ve earned it.
The Differences between xUnit and QUnit
Although the name might imply otherwise, it should be noted that QUnit isn’t part of the xUnit family.
xUnit is the name given to a family of testing frameworks that trace their roots back to a design by Kent Beck, outlined in the paper “Simple Smalltalk Testing: With Patterns” (http://www.xprogramming.com/testfram.htm). Originally implemented for Smalltalk as SUnit, this design has gone on to be ported to several other languages including Java (JUnit), C++ (CppUnit), and .NET (NUnit).
Though QUnit shares basic concepts like assertions, significant differences exist between the xUnit design and QUnit. For example, in the previous example, you saw two arguments for equal:actual and expected. In the xUnit design, the order of those arguments is reversed.
Say xUnit and QUnit also have completely different assertion names. Looking again at the previous example, equal is analogous to the xUnit assertion assertEquals. They serve the same purpose, just with slightly different syntax. Another difference is that some assertions included in xUnit are missing from QUnit.
None of this will matter if you’re not familiar with the xUnit family, of course. If you are, it is worth keeping your eye on the differences so you don’t get tripped up moving forward.
Now that you’ve gotten that potential gotcha out of the way, you can continue your examination of QUnit.
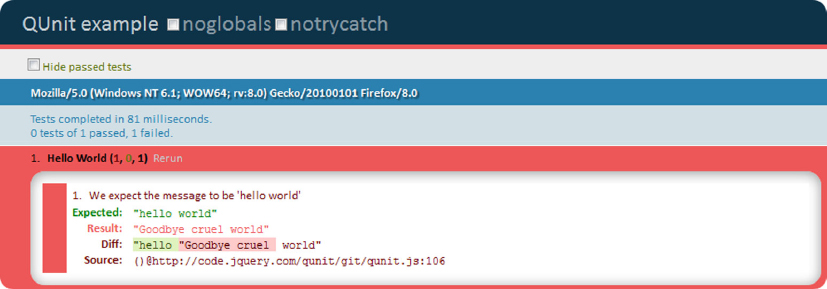
A Failing QUnit Test
You’ve seen a passing test; now it’s time to look at a failing test. With the same markup as the previous example, you can run the following test with an equal assertion:
 test(“Hello World”, function() {
  var message = “Goodbye cruel world”;
  equal( message, “hello world”, We expect the message to match“ );
});
Code snippet is from failing-test.html
As you can see in Figure 14-2, a failing test provides much more interesting information than a passing test. For starters, the message defined as the third test argument is displayed alongside the expected and actual values of the variable being tested, in this case “hello world” and “Goodbye cruel world,” respectively. Additionally, it does a diff of the variables and a pointer to the line that generated the error.
Testing for Truthiness with ok
In some ways, this would have made a better “Hello World” example, because it’s the most basic assertion. ok accepts two arguments: a Boolean state to test and a message to display in the case of a failing test. It passes if the state is truthy. The following code example shows ok in action. It tests whether the return value of a function is an array using the jQuery method $.isArray.
 test(“Truthiness is golden”, function() {
  var val = function(){
    var arr = [1,2,3,4,5]
    //dostuff
    return arr;
  }
  ok( $.isArray(val()), “We're expecting an array as a return value” );

});
Code snippet is from ok.html
Setting Expectations
One good habit to get into is to set expectations for your tests. Basically, you tell QUnit, “Expect to see x assertions.” If QUnit doesn’t see exactly x assertions, the whole test will fail. This is true even if the assertions that did run all passed.
Tests might not run for a variety of reasons, from something as simple as a typo to more complicated issues relating to application flow. You see the prime example of why expect is important when you learn about asynchronous testing in a later section.
You set expectations in QUnit in two ways. The first is by calling the expect method within the test body. The following example shows expect in use. Two assertions are expected but only one is present, so the whole test fails.
 test(“Hello World”, function() {
  expect(2)
  var message = “hello world”;
  equal( message, “hello world”, “ We expect the message to match.” );
});
Code snippet is from expect.html
Figure 14-3 illustrates the result of this test. The test fails even though all of the assertions that did run passed.

In addition to the expect method, it’s possible to set expectations with an optional second argument to the test method:
 test(“Hello World”, 2, function() {
  var message = “hello world”;
  equal( message, “hello world”, “We expect the message to match );
});
Code snippet is from expect.html
While both are valid options, and you’ll see both in use in large test suites, the explicit call to expect within the test body is much cleaner and easier to read. I prefer it over the second argument to test.
Additional Assertions
Table 14-1 lists all available assertions in QUnit. For the most part, they all have the same straightforward syntax you’ve already seen with the other assertions in this section. They either provide negative assertions like notEqual (the opposite of equal) or offer more/different levels of precision like deepEqual and strictEqual. Familiarize yourself with this list; it will help when you’re writing your own tests and need that extra bit of precision.
TABLE 14-1: QUnit Assertions
| ASSERTION | ARGUMENTS | DESCRIPTION |
| Ok | state, message | A Boolean assertion. Passes if state is truthy. |
| Equal | actual, expected, message | A comparison assertion. Compares actual and expected. Passes if actual and expected are leniently (==) equals. |
| notEqual | actual, expected, message | A comparison assertion. Compares actual and expected. Passes if actual and expected are leniently unequal. |
| deepEqual | actual, expected, message | A deep recursive comparison assertion. Recursively compares objects. Fails if some property isn’t equal. |
| notDeepEqual | actual, expected, message | A deep recursive comparison assertion. Recursively compares objects. The inverse of deepEqual. Passes if some property isn’t equal. |
| strictEqual | actual, expected, message | A comparison assertion. Compares actual and expected. Passes if actual and expected are strictly (===) equal. |
| notStrictEqual | actual, expected, message | A comparison assertion. Compares actual and expected. Passes if actual and expected are strictly unequal. |
| Raises | block, expected, message | This assertion tests if code throws an error. |
Testing DOM Elements
If you’re doing any DOM manipulations (and because you’re reading a jQuery book, you probably are), you’ll want to be able to test the output. QUnit provides an interface to do just that. To test DOM elements, simply set your markup in #qunit-fixture, make your DOM magic, and then use assertions to test the state of the DOM. QUnit will reset qunit-fixture after each test.
A simple example is shown in the following code:
<!DOCTYPE html>
<html>
<head>
<script src=”http://code.jquery.com/jquery-1.7.1.js”></script>
<link rel=”stylesheet” href=”http://code.jquery.com/qunit/git/qunit.css” />
<script type=”text/javascript” src=”http://code.jquery.com/qunit/git/qunit.js”></script>
<script>
$(function(){
  test(“DOM”, function() {
    expect(3);
    $test = $(“#dom-test”);
    $test.css(“width”,”200px”).text(“Testing the DOM”).show();

    equal( $test.css(“width”), “200px”, “200px!” );
    equal( $test.text(), “Testing the DOM”, “We're testing the DOM” );
    equal( $test.css(“display”), “block”, “display:block” );
  });
});
</script>
</head>
<body>
  <h1 id=”qunit-header”>QUnit example</h1>
  <h2 id=”qunit-banner”></h2>
  <div id=”qunit-testrunner-toolbar”></div>
  <h2 id=”qunit-userAgent”></h2>
  <ol id=”qunit-tests”>
  </ol>
  <div id=”qunit-fixture”><div id=”dom-test” style=”display:none”></div></div>
</body>
</html>
Code snippet is from dom-test.html
The jQuery project contains many more examples. With the amount of DOM manipulation that goes on with jQuery, the project needs to ensure that it’s performing reliably. Therefore, hundreds of assertions exist to test the state of the DOM.
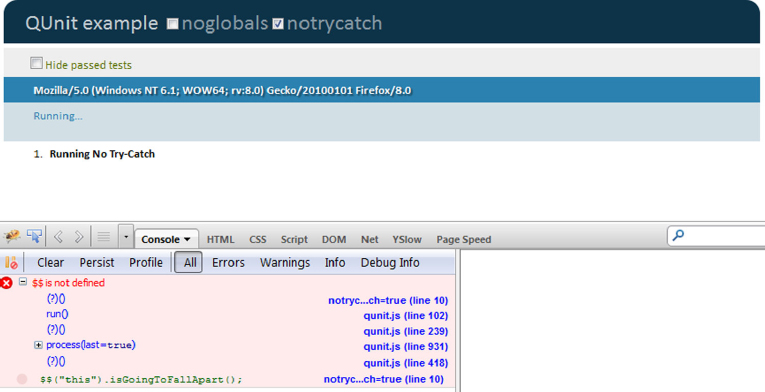
Using noglobals and notrycatch
Two additional options to note have been staring you in the face throughout all the examples you’ve seen so far. They appear as options on every test as two checkboxes, noglobals and notrycatch, as shown in Figure 14-4.

Both set file-level flags on the test that will change the behavior of all tests performed on the page.
The noglobals flag will fail a test if a new global variable is introduced by the running code. If you’re coding in ES5 strict mode or are running a code linter like JSHint (http://www.jshint.com/), this shouldn’t be a problem for you. It’s still a useful check to have for those situations where globals might sneak through to the testing phase.
This simple example shows a test that will trigger the noglobals flag and the ensuing error message in the testrunner, as shown in Figure 14-5:
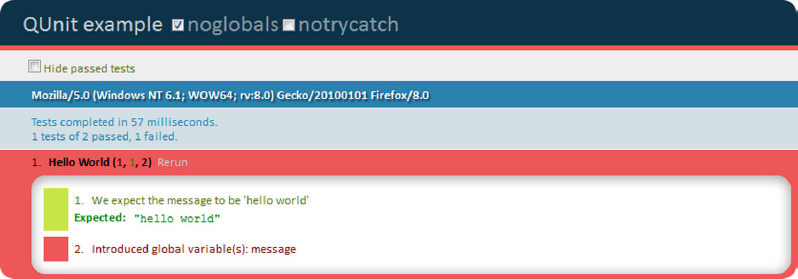
test(“Hello World”, function() {
  message = “hello world”;
  equal( message, “hello world”, “We expect the message to be 'hello world'”);
});
Setting notrycatch will run QUnit without a surrounding try-catch block. This will actually stop the testrunner in its tracks but will allow for deeper debugging of an issue. The following example shows this option in action:
test(“No Try-Catch”, function() {
// $$ will cause an exception
  var test = $$(this).isGonnaExplode();

  equal( test , “Return Value of Doom”, “We're looking for a cool return value” );
});
Figure 14-6 shows the exception in Firebug. Without notrycatch, the Firebug console would be empty and the error would be logged in the testrunner.
In addition to running these tests by checking some checkboxes, you can also run them by appending a querystring parameter to the URL. To run tests with noglobals, for example, you would run this test list:
http://example.com/tests/tests.html?noglobals=true
This is a handy feature if you’re running multiple tests on a large application.
Organizing Tests into Modules
One key feature of QUnit is the ability to organize tests into modules. Just like the code you’re testing, the ability to organize code into separate modules allows for greater flexibility when running tests.
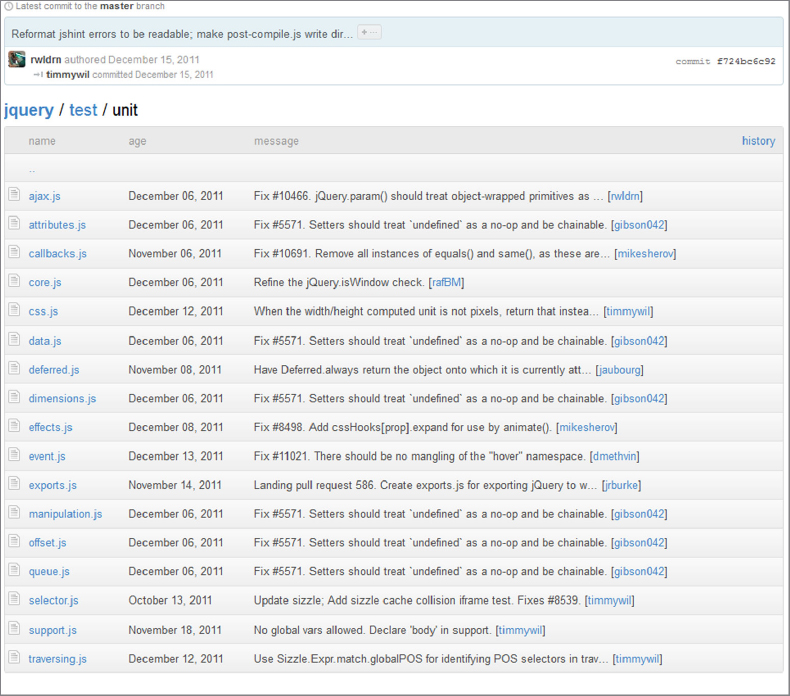
Grouping multiple tests that target a specific method or feature is a prime example of module usage. Looking at the test suite for the jQuery core in Figure 14-7, you can see that the project is broken into 17 separate modules.
Additionally, you can filter modules at run time (more on that in a second) and set up specific environment variables for the module’s test to run under.
The following code shows a simplified module, complete with two additional new features that empower the custom environment: setup and teardown. These are methods that are run before and after the tests in the module, and allow for great flexibility in terms of setting up the test environment for similar methods.
The following example sets up a variable to test throughout the module, arr (an array). It also stores a value in a variable, control, to test against later, on the off chance that something crazy happens to arr during the test. Inside the module itself are two tests. One contains two ok assertions and the other contains deepEqual. These are all testing different pieces of the Array.
module(“fun with arrays”, {
  setup: function() {
    this.arr = [1,2,3,4,5];
    this.control = this.arr.length;
  },
  teardown: function() {
    equal(this.arr.length, this.control, “Just Checking to see if it's still an Array”);
  }
});
test(“Truthiness is golden”, function() {
  expect(3);
  var bool = $.isArray(this.arr);

  ok( bool, “We're expecting an array” );

  bool = this.arr.indexOf(5);
  ok(bool, “We expect 5 to be in the Array”);

});
test(“Getting Deep”, function() {
  expect(2);
  deepEqual(this.arr, [1,2,3,4,5]);
});
Code snippet is from module.html
Running these tests produces the output shown in Figure 14-8. As you can see, the tests are nested under the “fun with arrays” module name.

This organizational approach allows you to test specific site sections or features without having to run an entire test suite. This is a useful feature if you’re on a large project with many associated tests.
Filtering Tests with URL Parameters
Similar to the way you can set the noglobals and notrycatch flags with query parameters, you can also filter tests. Simply add ?filter=filtername to the URL and QUnit will only run tests whose names contain filtername. This can be based on module names or test names and allows you to easily target specific features when doing tests.
The use of this feature is made apparent when bug fixing the jQuery core. Although you’re required to run the full test suite before issuing a pull request, you don’t want to test the entire library when you’re testing against your feature-specific fix.
With filtering, you can only test against the pertinent areas while doing development and then you only need to run the full test once, before you send off your (presumably heroic) bug fix.
Sometimes, you need to be able to control the flow of a test. An obvious example is an Ajax request. Looking at the following code sample, you see an Ajax request that is part of the test. Inside the callback are two assertions, ok and equal.
 test(“stops & starts”, function() {
expect(2);

var url = “/data/json/”;

$.getJSON(url, {name: “Testing”}, function(data) {
ok(data, “data is returned from the server”);
equal(data.name, “Testing”, “We're Testing”);
});
});
Code snippet is from broken-ajax-test.html
Running the test generates the result shown in Figure 14-9.
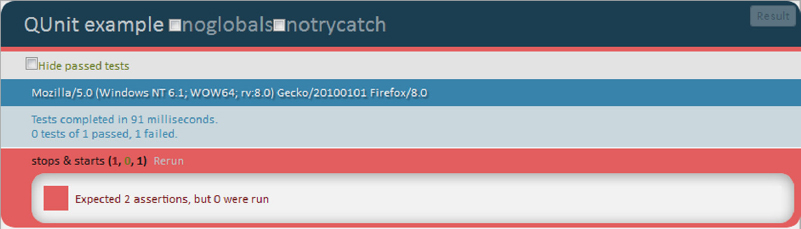
This is an unexpected result.
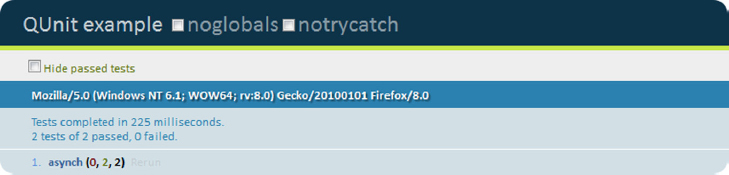
Because the Ajax request is asynchronous, neither of the tests is run. You’re not going to catch many errors that way. Thankfully, QUnit provides a pair of methods to control this flow: start and stop. Rewriting the previous test to work as expected, the test is paused with stop() before the Ajax request, and then the test is restarted with start() at the end of the callback.
 test(“asynch”, function() {
  expect(2);

  stop();
  $.getJSON(“/data/json/”, function(data) {
    ok( data, “We expect to get data from the server”);
    equal(data.name, “Testing”, “We expect the name property to match);
    start();
  });

});
Code snippet is from start-stop.html
Running this code produces the desired result. As you see in Figure 14-10, both expected tests are run and both pass.
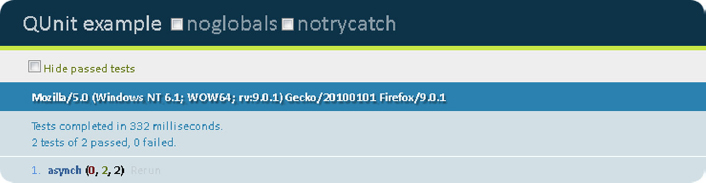
Using asyncTest
Like the convenience methods available with $.Ajax, QUnit has a convenience method for the common pattern of starting a test, and then stopping it for an asynchronous action.
The following code sample shows the previous example rewritten with that convenience method, asyncTest:
 asyncTest(“asynch”, function() {
  expect(2);

  $.getJSON(“/data/json/”, function(data) {

    ok( data, “We expect to get data from the server”);
    equal(data.name, “Testing”, “We expect the name to match);

    start();
  });

});
Code snippet is from asynctest.html
This is a definitely a recommended option. It guarantees your asynchronous tests will be set up correctly and will allow you to differentiate between regular and asynchronous tests. Doing so will make your tests more readable. Other developers will know, without reading any of the assertions or other logic within the test body, that this is an asynchronous test.
Mocking Ajax Requests
Though it’s possible to test Ajax requests with live data, it’s not recommended. As you’ll remember from earlier in the chapter, one of the fundamentals of unit testing is that tests be self-contained. To that end, it’s a best practice to mock your Ajax requests.
Thankfully, there’s a plugin already available to do just that in QUnit. Mockjax from the fine folks at appendto (https://github.com/appendto/jquery-mockjax) allows you to set up URLs that will be captured by the Mockjax plugin. Doing so means they’ll be intercepted before they hit the traditional Ajax method and the response will be handled by Mockjax. Mockjax allows you to craft a testable response and customize it with headers of your own design.
Rewriting the previous example to better follow testing best practices, the following example shows a way to wire up a proper, testable Ajax request with Mockjax.
In this example, the Mockjax plugin takes three arguments: the url to be captured and mapped to Mockjax, the responseTime, used to simulate latency, and the responseText, which, in this case, will be converted to the JSON data passed into any successful Ajax callback methods.
With Mockjax, the test is now self-contained.
 test(“asynch”, function() {
expect(2)
  $.mockjax({
  url: '/data/json/',
  responseTime: 100,
  responseText: {
    status: 'success',
    name: 'Testing'
  }
});
  stop();
  $.getJSON(“/data/json/”, function(data) {
    ok( data, “We expect to get data from the server”);
       equal( data.name, “Testing”, “We expect the name match”);
       start();
  });

});
Code snippet is from mockjax.html
Even without an Internet connection or a completed data service, the test will pass. This allows you to test your code without worrying about the state of other parts of the system. If you’re working in a large team, this ability to write and test to an interface without the interface existing is invaluable. Figure 14-11 shows a completed test using mockjax.
Additional Mockjax Features
Because modern web application development needs to handle more than just a simple, successful JSON request, you’ll be glad to know that Mockjax has enough features to handle most Ajax situations. It’s worth exploring them in full because you never know what you might have to accommodate in testing, but the two that follow are worth looking at right off the bat.
Using a Mockjax Data Proxy
One especially nice feature is the ability to create a data proxy. Listing out a couple of data elements when setting up a simple test is convenient, but if you’re trying to test a full interface, it can be awkward to wrap a large data structure inside the plugin setup call. To fix this, Mockjax has an option to set a data proxy, which will point to a static file to serve as the data source for your Ajax request. All it takes, other than having the file itself, is to add an optional proxy parameter when the plugin is set up. The simplest possible example would look like this:
$.mockjax({
  url: '/data/json',
  proxy: '/mock/data.json'
});
Do that and you can use complicated data structures without worrying about embedding them directly in your testing framework. Note that you do need to have access to JSON.stringify, which may require the use of json2.js (https://github.com/douglascrockford/JSON-js) if you’re going to be testing in legacy browsers.
Adding Additional HTTP Headers
Mockjax also allows you to set additional HTTP headers. For advanced Ajax programming, this is vital. Some standard ones, like HTTP status and contentType are available directly from the Mockjax setup object. Others can be set using an optional headers property, which can contain a series of name/value pairs representing the desired HTTP headers. The following example shows all three of these headers:
$.mockjax({
  url: '/data/json',
//file not found!
  status: 40,
  contentType: 'text/json',
  headers: {
    secretSauce: 'shhh'
  }
});
PUTTING IT ALL TOGETHER IN A TEST SUITE
Once again, the jQuery test suite is going to offer some lessons on how to organize QUnit tests. There’s really no better place to look for practical QUnit implementation hints because it’s the largest, most mature set of QUnit tests available.
As you saw earlier, the jQuery test suite is broken out into 17 modules representing more granular sections of the library, like data, css, and deferred. Within those modules are multiple tests, each containing multiple assertions. To get a sense of how those modules are organized in a real project, take a look at this heavily edited version of the Core test module presented in the following code sample. Many tests have been dropped and almost all of the assertions have been commented out, but the lessons on structure, granularity, and the way tests evolve can still be seen throughout.
Specific features are tested individually with multiple assertions per test. Also, note the presence of bug report numbers as in jQuery.merge() and jQuery('html', context). These issues were reported, test cases were created, and the code was fixed. The test cases remain, providing confidence that the bug remains fixed even months or years later. Additionally, a simple reminder that QUnit is JavaScript and that tests can be dynamically created can be seen in the jQuery.camelCase() test, which uses an Array of test subjects and then jQuery.each to loop through them, testing each of the seven expected assertions.
module(“core”, { teardown: moduleTeardown });
test(“Basic requirements”, function() {
    expect(7);
  ok( Array.prototype.push, “Array.push()” );
  ok( Function.prototype.apply, “Function.apply()” );
  ok( document.getElementById, “getElementById” );
  ok( document.getElementsByTagName, “getElementsByTagName” );
  ok( RegExp, “RegExp” );
  ok( jQuery, “jQuery” );
  ok( $, “$” );
});

test(“jQuery()”, function() {
  expect(29);
//29 assertions
});

test(“selector state”, function() {
  expect(31);
//31 assertions
});
test(“jQuery('html')”, function() {
  expect(18);
//18 assertions
});

test(“jQuery('html', context)”, function() {
  expect(1);

  var $div = jQuery(“<div/>”)[0];
  var $span = jQuery(“<span/>”, $div);
  equal($span.length, 1, “Verify a span created with a div context works, #1763”);
});

test(“first()/last()”, function() {
  expect(4);

  var $links = jQuery(“#ap a”), $none = jQuery(“asdf”);

  deepEqual( $links.first().get(), q(“google”), “first()” );
  deepEqual( $links.last().get(), q(“mark”), “last()” );

  deepEqual( $none.first().get(), [], “first() none” );
  deepEqual( $none.last().get(), [], “last() none” );
});

test(“map()”, function() {
  expect(8);
//8 assertions
});

test(“jQuery.merge()”, function() {
  expect(8);

  var parse = jQuery.merge;

  deepEqual( parse([],[]), [], “Empty arrays” );

  deepEqual( parse([1],[2]), [1,2], “Basic” );
  deepEqual( parse([1,2],[3,4]), [1,2,3,4], “Basic” );

  deepEqual( parse([1,2],[]), [1,2], “Second empty” );
  deepEqual( parse([],[1,2]), [1,2], “First empty” );

  // Fixed at [5998], #3641
  deepEqual( parse([-2,-1], [0,1,2]), [-2,-1,0,1,2],
  “Second array including a zero (falsy)”);

  // After fixing #5527
  deepEqual( parse([], [null, undefined]), [null, undefined],
  “Second array including null and undefined values”);
  deepEqual( parse({length:0}, [1,2]), {length:2, 0:1, 1:2},
  “First array like”);
});

test(“jQuery.extend(Object, Object)”, function() {
  expect(28);
  //28 assertions
});

test(“jQuery.each(Object,Function)”, function() {
  expect(14);
//14 assertions
});

test(“jQuery.sub() - Static Methods”, function(){
    expect(18);
//18 assertions
});

test(“jQuery.sub() - .fn Methods”, function(){
  expect(378);
//378 assertions

});

test(“jQuery.camelCase()”, function() {

  var tests = {
    “foo-bar”: “fooBar”,
    “foo-bar-baz”: “fooBarBaz”,
    “girl-u-want”: “girlUWant”,
    “the-4th-dimension”: “the4thDimension”,
    “-o-tannenbaum”: “OTannenbaum”,
    “-moz-illa”: “MozIlla”,
    “-ms-take”: “msTake”
  };

  expect(7);

  jQuery.each( tests, function( key, val ) {
    equal( jQuery.camelCase( key ), val, “Converts: “ + key + “ => “ + val );
  });
});
Code snippet is from jquery-suite.html
You’ve now been introduced to the fundamental concepts of unit testing. You’ve also been introduced to everything you need to write your own unit tests with QUnit. From the assertions you’ll use to the methods you’ll use to test DOM manipulations and Ajax interactions, you have a full toolset at your disposal to start testing your own applications.
This chapter also marks the end of the book. At this point, you’ve gone in-depth through much of what jQuery has to offer. From the core concepts covered in the first half of the book to the more advanced topics covered in the later chapters, you should be a confident, capable jQuery programmer. Moving beyond simple DOM manipulations, canned animations, and implementing plugins, you should be ready to go toe to toe with the ninjas and pirates of the JavaScript world. Maybe you’re going to dive in and do some plugin development of your own, enhancing and extending core jQuery functionality into new and useful areas, or maybe you’re going to dive in and add some rigor to your JavaScript practice with a formal testing framework using QUnit. Whatever lessons you take away from this book, the biggest one should be that any library or tool is only as valuable as you make it. Diving into the subject with the depth you have in this book will empower you to make jQuery very valuable indeed.
We can’t wait to see what you do with that power.