
Chapter 6
HTML Forms, Data, and Ajax
WHAT’S IN THIS CHAPTER?
- jQuery Data Appreciation
- Validating Forms With jQuery
- Using jQuery’s Ajax Methods
The three main topics of this chapter are closely related cousins. HTML forms contain and process data, an everyday operation of the Web. More often than not, form data is processed and posted to a server somewhere asynchronously, rather than the old-fashioned post-process-reload technique. Here, you explore one of the biggest revolutions in web development of the past 10 years — Ajax. You also learn how insanely easy jQuery makes it, simplifying asynchronous communication with the server side.
An often misused feature of tag elements is using attributes such as alt or class to attach useful data to an element. For example:
<!DOCTYPE html>
<html>
  <head>
      <script src=”http://code.jquery.com/jquery-1.6.1.js”></script>
      <script type=”text/javascript”>
          $(function(){
              $( “#randomEl” ).attr( “alt” , “1999” );
          });
      </script>
  </head>
    <body>
        <img src=”usefulImage.jpg” id=”randomEl”></div>
    </body>
</html>
Just for the record, we’re aware of the fact that we can assign “1999” directly to the alt attribute, but just suppose you needed to add the string programmatically. There’s a semantic problem with this because the attribute used to store the data isn’t meaningfully associated. Is 1999 a year, a random integer, or what? A better approach is to use jQuery’s .data() method, which stores arbitrary data for an element with a meaningful key. It takes the following form:
$.data( element, key, value );
Or, to retrieve the stored data use:
$.data( element, key );
For example:
<!DOCTYPE html>
<html>
  <head>
    <script src=””></script>
    <script type=”text/javascript”>
      $(function(){
        $( “#randomEl” ).data( “itemPrice”, “1999” );
      });
    </script>
  </head>
  <body>
    <img src=”usefulImage.jpg” id=”randomEl”></div>
  </body>
</html>
Now it’s obvious that 1999 isn’t a year, but rather a price. HTML5 introduces custom data attributes, where any attribute that is prefixed with data- can be used in a standardized, programmatic way. For example, the following div element contains the data attribute data-age. That’s an alternative for storing information on the client side.
<div id=”person” data-age=”31”></div>
Microsoft contributed to the community three additional plugins that were, for a time, officially endorsed by the jQuery project; Data Link, Template, and Globalization. In a later chapter we review the Template plugin. The Data Link plugin allows two-way binding between objects. In other words, it links the field of one object to another, so changing the value of one field changes the corresponding field on the second object. You can use this feature to simplify communication between a form and an object because it removes glue code. For example:
<!DOCTYPE html>
<html>
  <head>
    <script src=”http://code.jquery.com/jquery-1.6.1.js”></script>
    <script src=”jquery.datalink.js”></script>
    <script type=”text/javascript”>
      $(document).ready(function(){
        var registration = {};
        $( “form” ).link(registration);

        // set some default values
        $( registration ).setField( “name”, “New User Registration” );
        $( registration ).setField( “email”, “[email protected]” );

        $( “form” ).change(function(){
          console.log( registration.name + “ “ + registration.email );
        });
      });
    </script>
  </head>
  <body>
    <form method=”post”>
      <label for=”name”>User Name </label>
      <input type=”text” name=”name” />

      <label for=”email”>email </label>
      <input type=”email” name=”email” />

      <input type=”submit” value=”send it” />
    </form>
  </body>
</html>
Code snippet is from datalink.txt
In this example, after changing the value of the form, there’s a console.log showing the value of the registration object, which reflects the new changes.
So you’ve seen that jQuery has some shortcuts and methods for working with data, but end users can’t be trusted! The following section explains the ins-and-outs of data validation.
Form validation is important for a list of reasons, anywhere from preventing unintentionally messing up a database to securing your system from malicious injection attacks, as well as the more mundane reasons such as making sure that the data entered makes sense. For example, a first name field probably shouldn’t permit special characters like $%&#@ or numbers.
Traditionally, you would use jQuery, or some form of JavaScript, to either mask a field or validate the data entered. The simplest example is to check that data has been entered for a required field:
if($(“#myInput”).val() !== ''){
// handle here
}
A note of caution: your carefully crafted validation is useless if end users turn off JavaScript features on their browsers. Data should be sanitized on both the server and client side before saving.
Feature Detection with Modernizr
Before going any further with HTML5 forms and jQuery, it’s a good time to mention the Modernizr library. It can greatly simplify the task of detecting browser features that aren’t yet implemented in all mainstream browsers. Modernizr does this by using a process called feature detection. Instead of relying on the old-school method of User Agent (UA) Sniffing, detecting a browser’s capabilities based on the unreliable navigator.userAgent string, feature detection tests for specific browser capabilities. This is a much more future-proof and user-friendly method of feature testing. It doesn’t matter if some new browser appears or some version of Chrome or Firefox hits the Web with a novel navigator.userAgent string. If the feature is supported, Modernizr will report it as being available.
For example, you could use Modernizer to detect if a browser supports the canvas element: In this sample, you’ll see one of the great features of Modernizr. For every feature it detects it stores a Boolean flag in the Modernizr object representing the result of the test. In this example, with supporting browsers, Modernizr.canvas will evaluate to true. In addition to this Modernizr also adds CSS classes to the html element indicating the availability of features.
<!DOCTYPE html>
<html>
  <head>
    <script src=”http://code.jquery.com/jquery-1.6.1.js”></script>
<!-- Link to modernizr, useful for feature detection -->
    <script   src=”http://ajax.cdnjs.com/ajax/libs/modernizr/1.7/modernizr-1.7.min.js”>
</script>

    <script type=”text/javascript”>
      if(Modernizr.canvas){
        // code that depends on canvas here
      } else {
        // oops, canvas doesn't exist, deal with situation
        // here
      }
    </script>
  </head>
  <body>
  </body>
</html>
Code snippet is from modernizr.txt
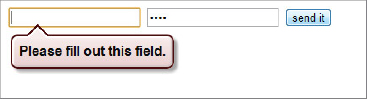
Anywhere I need to use Modernizr, we link to the code using the public JavaScript CDN ajax.cdnjs.com. Let’s put Modernizr to some use. Another great feature of HTML5 forms is the required field flag. For example, the following form:
<!DOCTYPE html>
<html>
  <body>
    <form>
      <input type=”text” name=”userName” required/>
      <input type=”password” name=”password” required/>
      <input type=”submit” value=”send it” />
    </form>
  </body>
</html>
renders the message seen in Figure 6-1 in supporting browsers, in this case, Chrome, after attempting to submit a blank form.
Not all browsers support this feature, or even any of the other HTML5 features. Again, jQuery comes to the rescue for validating forms. As the following code illustrates you can use feature detection to determine if a browser has the “required field” feature, and if it doesn’t use jQuery techniques instead. Modernizr tests for the presence of the “required field” feature, and if it’s absent, a message div is appended to the document and a simple form handler is attached to the form. This handler tests to see if any of the required fields are empty using the jQuery form utility .val(). If one is empty it throws up the message div, adds a small border to the form field and prevents submission of the form. This is clearly a simplified form validation example, but it illustrates the basic concepts of form validation with jQuery and the basic concepts of using feature detection to take advantage of modern browser features.
<!DOCTYPE html>
<html>
  <head>
    <script src=”http://code.jquery.com/jquery-1.7.1.js”></script>
    <script src=”http://ajax.cdnjs.com/ajax/libs/modernizr/1.7/modernizr-1.7.min.js”>
    </script>

    <script type=”text/javascript”>
       $(function(){
  if( !Modernizr.input.required ){
    var $msg = $( “<div id='reqMessage'>Required Fields Missing</div>” );
    $msg.css( “background-color”, “yellow” )
        .hide();

    $( “body” ).append( $msg );

    $( “#fDet” ).on(“submit”, function(e){
      $( “input[required]” ).each(function(){
        if ( $(this).val() === “” ) {
          $( “#reqMessage” ).show();
          $( this ).css( “border” , “1px solid red” );
          e.preventDefault();
        }
      });
    });
  }
});
</script>
</head>
<body>
<form id=”fDet” action=”#”>
<input type=”text” name=”userName” required/>
<input type=”password” name=”password” required/>
<input type=”submit” value=”send it” />
</form>
</body>
<html>
Code snippet is from featureDetection-form.txt
WORKING WITH HTML FORM ELEMENTS
As you’ve seen, missing HTML5 functionality can be reconstructed using jQuery techniques. This section explores some of the additions to form elements.
It’s just as important to know when not to use jQuery as when to use it. HTML5 brings to the table new form elements and functionality. Table 6-1 shows a selection of the new input types and controls.
TABLE 6-1: New HTML5 Form Controls
| CONTROL TYPE | INPUT TYPE | DESCRIPTION |
| URL | url | A control for editing a URL. |
| A control for entering or editing an e-mail address. | ||
| Telephone | tel | A one-line plain-text edit control for entering a telephone number. |
| Search | search | A one-line plain-text edit control for entering one or more search terms. |
| Slider | range | An imprecise control for setting the element’s value to a string representing a number. |
| Number | number | A precise control for setting the element’s value to a string representing a number. |
| Date | date | A control for setting the element’s value to a string representing a date. |
| Date and Time | datetime | A control for setting the element’s value to a string representing a global date and time (with timezone information). |
| Color | color | A color-well control for setting the element’s value to a string representing a simple color. |
From http://www.w3.org/TR/html-markup
In addition to new input controls, HTML5 also introduces a shortcut for adding placeholder text. Placeholder text is a temporary default text message displayed inside an input field until the user focuses on the field. Before, JavaScript was necessary to achieve this effect, but the newer HTML5 browsers support this by default with a placeholder attribute. For example, the following code sample shows two inputs with the placeholder attribute set. Figure 6-2 shows these inputs rendered on the page.
<!DOCTYPE html>
<html>
  <body>
    <form>
      <input type=”text” placeholder=”name” >
      <input type=”text” placeholder=”email” >
    </form>
  </body>
</html>
This placeholder attribute solves, at the browser level, a normally hand-coded usability enhancement. It’s a nice feature to have without having to write a line of code. Unfortunately, not every browser supports placeholder natively, so we’re not at the place where we can put away the code solutions. The following code sample will show how to implement a polyfill for placeholder using jQuery. Again, you’ll use Modernizr to detect if the browser supports this feature, and then use some jQuery goodness to fill in the gap for other browsers.
In a production environment, you’d likely just use one of the excellent placeholder polyfill plugins, like the one written by Mathias Bynens: https://github.com/mathiasbynens/jquery-placeholder. It is still instructive to see how you might solve this problem without the use of plugins. Feature detection and polyfills are a strong piece of modern web development, so seeing how it works under the hood can enlighten in ways simply using a plugin can’t.
<!DOCTYPE html>
<html>
  <head>
    <script src=”http://code.jquery.com/jquery-1.7.1.js”></script>
    <script src=”http://ajax.cdnjs.com/ajax/libs/modernizr/1.7/modernizr-1.7.min.js”>
    </script>

    <script type=”text/javascript”>
       $(function(){
  if( !Modernizr.input.placeholder ){
    $( 'input[type=text]' ).focus(function(){
      if( $(this).val() === $( this ).attr( 'placeholder' ) ){
        $( this ).val(''),
      }
    });
    $( 'input[type=text]' ).blur( function(){
    if( $( this ).val() === ''){
      $( this ).val($( this ).attr( 'placeholder' ));
    }
    });
  }
});
</script>
</head>
  <body>
    <form>
      <input type=”text” name=”userName” placeholder=”Enter your Name” />
      <input type=”text” name=”address” placeholder=”Enter your Address” />
    </form>
  </body>
</html>
Code snippet is from placeholder.txt
The next example implements an e-mail input widget. Again, there is a native HTML5 version, but that isn’t implemented in all browsers.
<!DOCTYPE html>
<html>
  <head>
     <script src=”http://code.jquery.com/jquery-1.7.1.js”></script>
     <script src=”http://ajax.cdnjs.com/ajax/libs/modernizr/1.7/modernizr-1.7.min.js”>
     </script>

     <script type=”text/javascript”>
       $(function(){
  var emailRegEx = /^([w-.]+@([w-]+.)+[w-]{2,4})?$/;
  $( “#errorDiv” ).hide();
  If ( !Modernizr.inputtypes.email ){
    $( “input[type=email]” ).blur( function(){
      var emailValue = $( this ).val();
      if( emailValue !== '' ){
        var passes = emailRegEx.test( emailValue );
        if( !passes ){
          // display validation error message
          $( “#errorDiv” ).show();

          // disable submit button
          $( “input[type='submit']” ).attr( “disabled” );
        } else {
          $( “#errorDiv” ).hide();
          $( “input[type='submit']” ).attr( “disabled”,”” );
        }
      }
    });
  }
});
</script>
</head>
<body>
  <form>
    <input type=”email” name=”companyEmail” />
    <input type=”submit” />
    <div id=”errorDiv”>Invalid email format.</div>
  </form>
</body>
</html>
Code snippet is from email-input.txt
HTML5 controls degrade gracefully. That means that if a browser doesn’t support a particular control — for example, at the time of this writing only Opera supports the color control — a regular text input box is displayed.
In some cases you may want to validate against values in a database, and using Ajax you can achieve this effect. But first, the following section provides a quick review of Ajax and later on we return to form validation.
The definition of Ajax has evolved from its original acronym of Asynchronous JavaScript and XML, a method for sending and retrieving data (using XML) to a server asynchronously without the need to completely reload a web document. It now refers to methods for creating interactive web and dynamic applications with JavaScript, as you’ve seen in previous chapters, as well as asynchronous communication between the client and server. These days it’s not always XML that’s used to transport information between the server and client, but often other formats such as JSON.
At the heart of Ajax is the XmlHttpRequest object, which dates back to 2000 when Microsoft introduced an ActiveX object for asynchronous communication between server and client. In 2005, the term “Ajax” was coined by Jesse James Garrett to describe this technique.
The same disparity between the way browsers manage events is also observed with Ajax, albeit not as complex. For example, to create a new request object in Internet Explorer, you would do the following:
var xhr = new ActiveXObject(“Microsoft.XMLHTTP”);
or in even older versions of IE:
var xhr = new ActiveXObject(“MSXML2.XMLHTTP”);
In IE7 or above and any other browser that supports XMLHttpRequest, you use the native JavaScript XMLHttpRequest object:
var xhr = new XMLHttpRequest();
Luckily, the methods used between the standard XMLHttpRequest object and the Microsoft ActiveX object are remarkably similar, hence simplifying matters. Typically, if you were to handle the details yourself you might use bit of code like this to instantiate a request object:
/∗
Support for the original ActiveX object in older versions of Internet Explorer
This works all the way back to IE5.
∗/
if ( typeof XMLHttpRequest == “undefined” ) {
  XMLHttpRequest = function () {
    try {
        return new ActiveXObject( “Msxml2.XMLHTTP.6.0” );
    }
    catch (e) {}
    try {
        return new ActiveXObject( “Msxml2.XMLHTTP.3.0” );
    }
    catch (e) {}
    try {
        return new ActiveXObject( “Msxml2.XMLHTTP” );
    }
    catch (e) {}
    throw new Error( “No XMLHttpRequest.” );
  };
}
var xhr = new XMLHttpRequest();
Once the details of creating the request object have been taken care of, a connection must be established with the server, using the xhr.open() method, which follows the form:
xhr.open(method, url, isAsynchronous);
where method refers to the HTTP method, the action to be performed on the specified resource. While the full list of HTTP methods (or “verbs”) is much longer, Ajax requests will typically be a POST or a GET. The second parameter is the url used to exchange data, and isAsynchronous is a Boolean flag indicating whether or not the call is asynchronous. This flag indicates whether or not the request should block the execution of the rest of the script. As the name of the technique implies, this will normally be set to true. So, you can use the request object to make synchronous posts to the server, but that would be defeating the whole purpose of Ajax. After opening the connection, use the xhr.send() method to initiate the request to the server. It accepts a data argument:
xhr.open(“POST”, “/request/url/”, true);
xhr.send(data);
Because the communication is asynchronous you can’t count on sequential execution of methods. For example:
xhr.send(data);
doSomething();
The send method is executed and returns immediately, whereas the request and response each operate on separate threads. You won’t have the response from the server when doSomething(); gets executed. The solution is to use the callback handler onreadystatechange, which is invoked when there is a request state change. So, the previous snippet can be rewritten as:
xhr.onreadystatechange = function(){
  if( this.readyState === 4 ){
    if( this.status >== 200 && this.status < 300 ){
      doSomething();
    } else {
      // problem with communication
    }
  }
}
xhr.send( data );
Now, when the request is completed and successful, doSomthing() is executed. Table 6-2 shows the different ready states.
TABLE 6-2: The ReadyState Object
| STATE | DESCRIPTION |
| 0: Uninitialized | The object has been constructed. |
| 1: Loading | The open() method has been successfully invoked. During this state request headers can be set using setRequestHeader() and the request can be made using the send() method. |
| 2: Loaded | All redirects (if any) have been followed and all HTTP headers of the final response have been received. Several response members of the object are now available. |
| 3: Interactive | The response entity body is being received. |
| 4: Completed | The data transfer has been completed or something went wrong during the transfer (e.g., infinite redirects). |
From: http://www.w3.org/TR/XMLHttpRequest/#states
After the request is completed and successful, you can get the response using the xhr object’s responseText method. What the responseText returns is dependent on the server-side code. It can be text of any format, not just XML. Now given that, you can expect any data format to come from the server — HTML, XML, JSON, plain text, and so on, each with its own pros and cons for parsing data returned.
The major trend these days is toward using JSON at the data interchange format of choice. Since it’s a native JavaScript object, people find it much easier to deal with programmatically. Instead of firing up DOM traversal methods to walk through the XML DOM returned by the server, you can simply use dot notation to access properties of the JSON response. Also, JSON is generally less verbose than XML so it lowers the cost of each request over the wire.
You’ll still see XML, of course, and there are uses for plain text and even full blocks of HTML, but it’s much more common to see JSON these days.
As you’ve no doubt expected, jQuery offers alternative ways of handling Ajax request and response in a more simplified manner.
Just as you saw in the previous chapter with event handling, jQuery abstracts away many of the details of Ajax communication. For example, you don’t have to worry about how the xhr object is instantiated. The general jQuery method used for sending Ajax calls is (drum roll...) the $.ajax() method, which takes the form:
$.ajax(url, [settings]);
Or a single settings object:
$.ajax([settings]);
Many of the following examples require a server to respond to the Ajax calls. The samples include both Python and PHP backends to support the frontend; both are freely available. Unfortunately, explanation of either of these technologies is beyond the scope of this book.
Table 6-3 lists some of the most important available settings. For a full list check out the online documentation at http://api.jquery.com/jquery.ajax/#jQuery-ajax-settings.
TABLE 6-3: jQuery $.ajax() Settings
| PROPERTY | DESCRIPTION |
| url | The URL of the resource to be requested. |
| type | The HTTP method of the Ajax request. This will generally be a GET or a POST, although more esoteric HTTP methods like PUT or DELETE are possible, depending on browser support. |
| data | Data to be sent to the server. |
| dataType | The type of data that you’re expecting back from the server. The available types are: “XML”, “HTML”, “script”, “JSON”, “JSONP” and “text”. |
| success(data, textStatus, jqXHR) | A function to be called if the request succeeds. |
| error(jqXHR, textStatus, errorThrown) | A function to be called if the request fails. |
| complete(jqXHR, textStatus) | A function to be called when the Ajax request is completed. |
| timeout | Set a timeout (in milliseconds) for the request. |
The following example sends a post to the URL /post/2/here.html, which receives some plain text, and logs the result on success, or displays another log on error:
<!DOCTYPE html>
<html>
  <head>
    <script src=”http://code.jquery.com/jquery-1.7.1.js”></script>
    <script type=”text/javascript”>
      $.ajax({
      url : “/post/2/here.html”,
      dataType: “html”,
      success: function(r){
        console.log( “made it” );
      },
      error : function(r){
        console.log( “Something didn't work” );
      }
    })
  </script>
 </head>
 <body>
 </body>
</html>
Valid types of data that can be returned are XML, HTML, JSON, JSONP, text and script.
As you’ve seen in previous chapters, jQuery is particularly adept at traversing DOM trees. In a situation where the server response is XML, jQuery has the $.find() method for getting data from an XML document. Say you have an Ajax call that returns an XML document that describes a book, and you’d like to retrieve the chapter titles. The following code illustrates a use of $.find() to parse some XML data and append it into the DOM.
<!DOCTYPE html>
<html>
  <head>
    <scriptsrc=”http://code.jquery.com/jquery-1.7.1.js”></script>
    <script type=”text/javascript”>
      $.ajax({
        url : “/book.html”,
        dataType: “xml”,
        success: function( data ){
          $( data ).find( “chapter” ).each(function() {
            $( “document” ).append($( this ).find( “title” ).text());
          });
        },
        error : function(data){
          console.log( “unable to process request” );
        }
     });
</script>
</head>
  <body>
  </body>
</html>
Code snippet is from ajax-find.txt
This example appends the titles found to the document body. The .find() method searches an XML document for the element name specified. Just like an HTML document, if you want to access an attribute use the .attr() method.
These days it’s fairly common to request data in JSON format, which is completely logical considering that JSON objects are JavaScript objects. They also have the advantage of being lighter-weight than XML data. You could use the $.ajax() method to obtain a JSON object from the server like this:
$.ajax({
  url: “/jsonBook.html”,
  dataType: 'json',
  data: data,
  success: function( data ){
    // process json data
  }
});
But, jQuery provides a shortcut method for obtaining data from the server asynchronously in JSON format — it’s called $.getJSON():
<!DOCTYPE html>
<html>
  <head>
  <script src=”http://code.jquery.com/jquery-1.7.1.js”></script>
  <script type=”text/javascript”>
    $.getJSON(“/url/2/get/json.php”, function(data, text, jqXHR){
      // handle callback here
    });
  </script>
</head>
  <body>
  </body>
</html>
Unfortunately, there is no equivalent $.postJSON() method.
By now, you’ll notice that many of your applications will use a common set of options. jQuery provides a method that globally sets the Ajax options called $.ajaxSetup(). These values will be used in any call to $.ajax() unless overridden. $.ajaxSetup() takes the form:
$.ajaxSetup(options);
where options is an object instance whose properties are used to set the global Ajax properties. For example, to set the default type, dataType, and error callback:
$.ajaxSetup({
    type : “GET”,
    dataType : “json”,
    error : universalGoofupFunction
});
It should be noted that $.ajaxSetup() overrides the settings for all Ajax requests on the page so it should be used sparingly unless you’re in complete control of all the JavaScript code running on the page.
But, before continuing this is a good time to review a feature introduced in jQuery 1.5, which is deferred objects. These objects are an example of the promise pattern. A promise is an object that “promises” to give a value at a convenient future time; this is particularly useful for asynchronous computing. jQuery deferred objects, also based on the promise pattern, allow chainable callback functions.
Deferred objects begin in the unresolved state, and can change from unresolved to either resolved or rejected. Deferred objects are covered in depth in Chapter 13.
The $.ajax() method, indeed all jQuery Ajax methods, returns a promise object called a jqXHR object, which is a superset of the XmlHTTPRequest object. This allows Ajax calls to be rewritten, now, as:
$.ajax({url : “/go/here”})
.success(function(){ /∗ handle success ∗/ })
.complete(function(){ /∗ handle complete method ∗/ });
There are some shortcut utility methods as well, $.get() and $.post(), which send get and post requests, respectively. In the case of $.get(), instead of having to write:
$.ajax({
   type: “get”,
  url: “/go/here.php”,
  data: data,
  success: callBackFunction,
  dataType: “json”
});
you can instead type:
var jqxhr = $.get( “/go/here.php”, function(data){} );
The general format is:
$.get( url, parameters, callback, type );
Just like $.ajax(), the $.get() method returns a jqXHR object. The corresponding shortcut for posts, $.post(), is almost identical, except for the type, of course:
$.post( url, parameters, callback, type );
jQuery also has an incredibly useful method, $.load(), for making Ajax requests and loading HTML fragments into a matched element, all in the same call. It takes the following form:
$( selector ).load( url, [data], [success(response, status, XHR)] )
It accepts a target url, an optional data object, and an optional success object, which itself will receive a response text, a status string, and an XMLHttpRequest object. For example:
$( “#latestNews” ).load( “/getLatest.php”, dateObj, function(resp, status, XHR){
if(status === “success”){
// handle here
}
});
Assuming all went well on the server, the latestNews element will be loaded with the text obtained from the server.
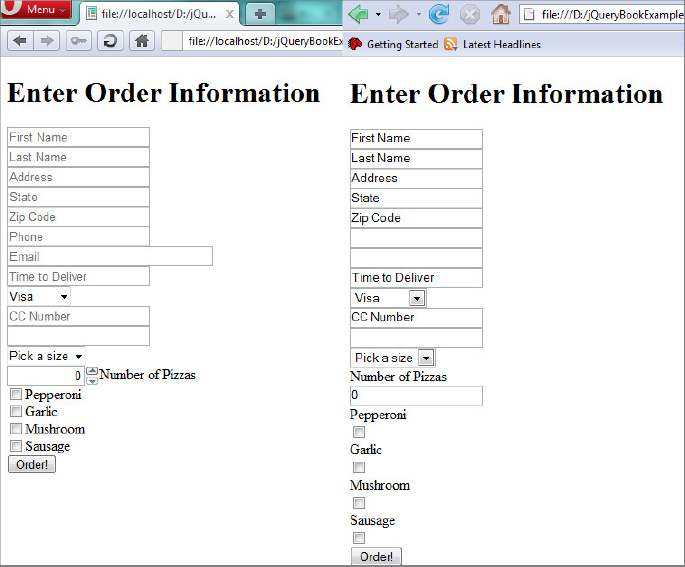
The last example of this chapter is a pizza order form, and uses the new HTML5 controls and jQuery’s $.load() Ajax method. To accommodate customers using older browsers, you’ll employ jQuery to fill in the functionality, but also to validate input and post the order.
As a note, this sample doesn’t handle the case of users without JavaScript. While that’s an important factor to keep in mind when designing web forms, the majority of the hard work to do that properly (setting up a fallback validation service on the server) is outside the scope of a book like this.
The customer is not required to register with the pizza shop in order to get a pizza, but must fill out several fields. The order form will have the following fields:
- first name
- last name
- address
- state
- zip
- phone
- time of delivery
- cc type
- cc number
- pizza size
- toppings
First design the form, and instead of using labels to indicate each field, use placeholder text. All fields are required except for pizza toppings. The state field will use an Ajax autocomplete feature. In order to sniff out the browser features, you’ll employ Modernizr again. To bring things around full circle, add the Data Link plugin to shorten the process of getting data from the form fields to the server. After posting to the server, if no exception is thrown, the customer is shown a receipt of the order.
The following code listing shows the markup. Remember that the full source code for this example is available at the book’s website; no need to type all of this!
<!DOCTYPE html>
<html>
   <head>
    <script src=”http://code.jquery.com/jquery-1.7.1.js”></script>
    <script src=”http://ajax.cdnjs.com/ajax/libs/modernizr/1.7/modernizr-1.7.min.js”>
    </script>
    <script src=”jquery.datalink.js”></script>
    <script type=”text/javascript”>
//Application code will go here.
  </script>
</head>
<body>
  <h1>Enter Order Information</h1>
  <form id=”pizzaOrderForm”>
    <input type=”text” name=”firstName” placeholder=”First Name” required >
    <input type=”text” name=”lastName” placeholder=”Last Name” required >
    <input type=”text” name=”address” placeholder=”Address” required >
    <input type=”text” name=”state” placeholder=”State” required >
    <input type=”text” name=”zip” placeholder=”Zip Code” required >
    <input type=”tel” name=”phone”
      pattern=”999-999-9999” placeholder=”Phone” required >
    <input type=”email” name=”email” placeholder=”Email” required >
    <input type=”text” name=”timeOfDeliver” placeholder=”Time to Deliver” required >
    <select name=”ccType”>
      <option value=”visa”>Visa
      <option value=”amex”>AmEx
      <option value=”discover”>Discover
    </select>
    <input type=”text” name=”ccNumber” placeholder=”CC Number” required >
    <input type=”text” name=”pizzaSize” placeholder=”” required >
    <select name=”pizzaSize”>
      <option value=”0”>Pick a size
      <option value=”1”>personal
      <option value=”2”>small
      <option value=”3”>medium
      <option value=”4”>large
      <option value=”5”>sportsman
    </select>
    <label> Number of Pizzas
      <input type=”number” name=”numOfPizzas” min=”0” max=”99”
       value=”0” placeholder=”Zip Code” required ></label>
    <label>Pepperoni<input type=”checkbox” name=”toppings” value=”pepperoni”></label>
    <label>Garlic<input type=”checkbox” name=”toppings” value=”garlic”></label>
    <label>Mushroom<input type=”checkbox” name=”toppings” value=”mushrooms”></label>
    <label>Sausage<input type=”checkbox” name=”toppings” value=”sausage”></label>
    <input type=”button” value=”Order!” >
  </form>
  <div id=”price”></div>
</body>
</html>
Building on previous examples from this chapter, this example uses the Modernizr library to determine if the email input, required, and placeholder features are present. As you’ll see in the JavaScript that follows, when any of the features aren’t present, jQuery is employed to fill in the missing functionality.
In order to auto-fill in the order object, the Data Link plugin is used, thereby removing some intermediate steps. This is as simple as creating an empty object that will serve as the container for the field data, selecting the form, and calling the inherited link method on the wrapper object.
var order = {};
$(“#pizzaOrderForm”).link(order);
We use the traditional submit method of the form and add a simple test to see if the required fields have been filled in browsers that don’t support the required attribute. The $.load() method is used to make an order to the server. The response text returned is an HTML string, which is inserted inside of the #price div, avoiding the need to append text. The following code block demonstrates the complete JavaScript example.
  $( “form” ).bind( “submit”, function( e ){
    var valid = true;
      if(!Modernizr.input.required){
        $( “input[required]” ).each(function(){
        if ( $( this ).val() === “” ) {
          $( “#reqMessage” ).show();
          $( this ).css( “border” , “1px solid red” );
          valid = false;
        }
      });
    }
      e.preventDefault();
      if (valid) {
      $( “#price” ).load( “/process”, data, function(responseTxt, status, XHR ){
        if(status === “success”){
          $( “[type=button]” ).attr( “disabled” );
         } else if(status === “error”){
          $( “#price” ).append( “unable to process request, game over man” );
         }
        });
     }
   });
...
<script type=”text/javascript”>
$(function(){
// for browsers that don't yet process HTML5 //
// Placeholder implementation
  if(!Modernizr.input.placeholder){
    $('input[type=text]').each(function(){
       $( this ).val($( this ).attr('placeholder'));
    });    $('input[type=text]').focus(function(){
      if($( this ).val() === $( this ).attr('placeholder')){
        $( this ).val(''),
      }
    });
    $('input[type=text]').blur(function(){
      if($( this ).val() === ''){
        $( this ).val($( this ).attr('placeholder'));
      }
    });
  }

// required implementation
  if(!Modernizr.input.required){
    var $msg = $( “<div id='reqMessage'>Required Fields Missing</div>” );
    $msg.css( “background-color”, “yellow” )
        .hide();
    $( “body” ).append( $msg );
  }
// email input implementation
  var emailRegEx = /^([w-.]+@([w-]+.)+[w-]{2,4})?$/;
  if( !Modernizr.inputtypes.email ){
    $('input[type=url]').blur( function(){
    var emailValue = $( this ).val();
    if( emailValue !== ''){
      var passes = emailRegEx.test(emailValue);
      if( !passes ){
        // display validation error message
        $( ”#errorDiv” ).show();
        // disable submit button
        $( ”input[type='submit']” ).attr( ”disabled” );
      } else {
        $( ”#errorDiv” ).hide();
        $( ”input[type='submit']” ).attr( ”disabled”,”” );
      }
     }
    });
   }

// ordering stuff
  var order = {};
  $( ”#pizzaOrderForm” ).link( order );
  $( ”form” ).bind( ”submit”, function( e ){
    var valid = true;
      if(!Modernizr.input.required){
        $( ”input[required]” ).each(function(){
        if ( $( this ).val() === ”” ) {
          $( ”#reqMessage” ).show();
          $( this ).css( ”border” , ”1px solid red” );
          valid = false;
        }
      });
    }
      e.preventDefault();
      if (valid) {
      $( ”#price” ).load( ”/process”, data, function(responseTxt, status, XHR ){
        if(status === ”success”){
          $( ”[type=button]” ).attr( ”disabled” );
         } else if(status === ”error”){
          $( ”#price” ).append( ”unable to process request, game over man” );
         }
        });
     }
   });
});
</script>
</head>
...
Code snippet is from pizza-form.txt
Figure 6-3 shows a side-by-side comparison of the same form with Opera 11, which supports HTML5, and the older Firefox 2, which does not.
This chapter concludes most of what you need to know about Ajax handling. You’ve seen how jQuery helps attach data to form elements in a meaningful way, helps form validating, and helps in the current transition from previous versions of HTML to HTML5. You’ve also explored the foundations of Ajax, and how jQuery makes asynchronous calls just that much easier, not to mention its many utility methods for further simplifying common operations like quick gets and posts.
http://diveintohtml5.org/forms.html
http://www.bennadel.com/blog/1404-jQuery-Data-Method-Associates-Data-With-DOM-Elements-SWEET-ASS-SWEET-.htm
http://marcgrabanski.com/article/5-tips-for-better-jquery-code
http://www.matiasmancini.com.ar/jquery-plugin-ajax-form-validation-html5.html
http://en.wikipedia.org/wiki/Ajax_(programming)
http://www.jibbering.com/2002/4/httprequest.html
http://www.w3.org/TR/html-markup/input.email.html
http://msdn.microsoft.com/en-us/library/ms536648(v=vs.85).aspx
http://en.wikipedia.org/wiki/Hypertext_Transfer_Protocol
http://ejohn.org/blog/html-5-data-attributes/
http://www.modernizr.com/docs/#features-html5
http://wiki.commonjs.org/wiki/Promises/A
http://www.erichynds.com/jquery/using-deferreds-in-jquery/