Chapter 2. Handling Concurrency using callbacks
The idiomatic way of handling concurrency in Kotlin is by using coroutines. However, this has been done in Java for some time, using threads and callbacks. So why do we need coroutines?
To answer this question, we will revisit a typical Kotlin implementation on Android, and discuss the pitfalls of using threads. Knowing the weak points of the traditional approach is the key to understanding the motivation behind the design of coroutines.
In Android applications, long-running tasks shouldn’t be done on the UI thread, as you’ve seen in the previous chapter. If we block the main thread - the UI thread - your app might not have the resources it needs to draw the screen or update it appropriately. In fact, lint will complain if you attempt to do an obvious I/O call (e.g., make an HTTP connection) while on the UI thread.
An Android application runs smoothly when the main thread completes all its tasks in less than frame-time, which is 16ms on most devices. This is a rather short amount of time, and all blocking calls like network requests (blocking IO) should be performed on a background thread1.
When you delegate a task to another thread, you typically call a function which starts the asynchronous job. On some cases this is just “fire and forget”, but most often you’re waiting for a result - and you need to act on it. This is done by providing a function which will be called once the job finishes. This function is called a callback. A callback often accepts arguments, so the background thread commonly calls the callback with the result of the job. Doing computation that calls an arbitrary or injected function when complete is known as the callback pattern.
Using callbacks is quite efficient, though it has some limitations and drawbacks. To illustrate this, we’ll implement a simple yet realistic example in Kotlin. Coroutines address all issues with callbacks, but before jumping right into coroutines, it’s important to understand which problem they aim at solving.
Example of purchase feature
Suppose you’re working on a paid feature of an Android application. After a user registers, you check the list of
purchases this user has already made, then act upon it. To get the list of purchases, let’s use an object called
BillingClient. Note that we’re not talking about the actual BillingClient provided by the Android framework,
com.android.billingclient.api.BillingClient. We’re using our own much simpler version of the basic concept:
Example 2-1. BillingClient interface
interfaceBillingClient{funinterfaceBillingCallback{funonInitDone(provider:PurchasesProvider?)}/* Implementations should be non-blocking */funinit(callback:BillingCallback)}
A typical task flow would be:
-
Initialize a connection to the
BillingClient. Wait for it to be ready - your callback provides aPurchasesProvider, or null in case of error. For now, we won’t handle errors. -
Use the returned
PurchasesProviderto asynchronously fetch the list of purchases of the user. Your program will wait for the response, which will contain the list of purchases and perhaps some additional metadata. -
React to this new information; you might show a list of purchases with UI to provide even more details, or request status, cancel an item in an order, etc.
For further references, we’ll call this the preceding flow our logic.
As you can see, this is just an interface with a single method, taking a BillingCallback as input. The
BillingCallback is declared inside the BillingClient interface because this callback is only used inside
BillingClient. When an interface is declared inside a class or interface, it tells you about the relationship between
the class and the interface: the author intended that the class shouldn’t depend on another entity to provide the
interface. This avoids the risk of breaking the compatibility between the class and the interface. The two are coupled
and if you ship a BillingClient, you also ship a BillingCallback.
Notice that we’re using Kotlin 1.4’s new fun interface instead of a classic interface. This will allow for a concise
syntax when we’ll provide implementations.
Also, the documentation of the init method says that implementations should be non-blocking. If you haven’t read the
previous chapter, it means that whatever thread calls this method, it isn’t blocked waiting for the method to return.
Similarly, here is our PurchaseProvider:
Example 2-2. PurchaseProvider interface
interfacePurchasesProvider{funinterfacePurchaseFetchCallback{funonPurchaseFetchDone(purchases:List<String>)}funfetchPurchases(user:String,callback:PurchaseFetchCallback)}
For now, let’s assume that we provide those abstractions and their implementations. Even though a real application would
use framework-provided classes, the important part of this example is the business logic - not the implementations of
BillingClient and PurchasesProvider.
The architecture
As an Android developer, we hope that you’re familiar with the core concepts of Android Jetpack’s ViewModel, but don’t
worry if this isn’t the case, as the details of ViewModel operation aren’t the focus of this discussion. Even without
ViewModel, you’ve probably got some version of MVC or MVP or MVVM, all of which largely follow the same pattern. The
view does presentation work, the model does logical work, and the controller or view model is the glue that connects
them, and serves as the network that allows the two to communicate. The important part is the implementation of the
logic. Everything else is context or framework code - but still important nevertheless.
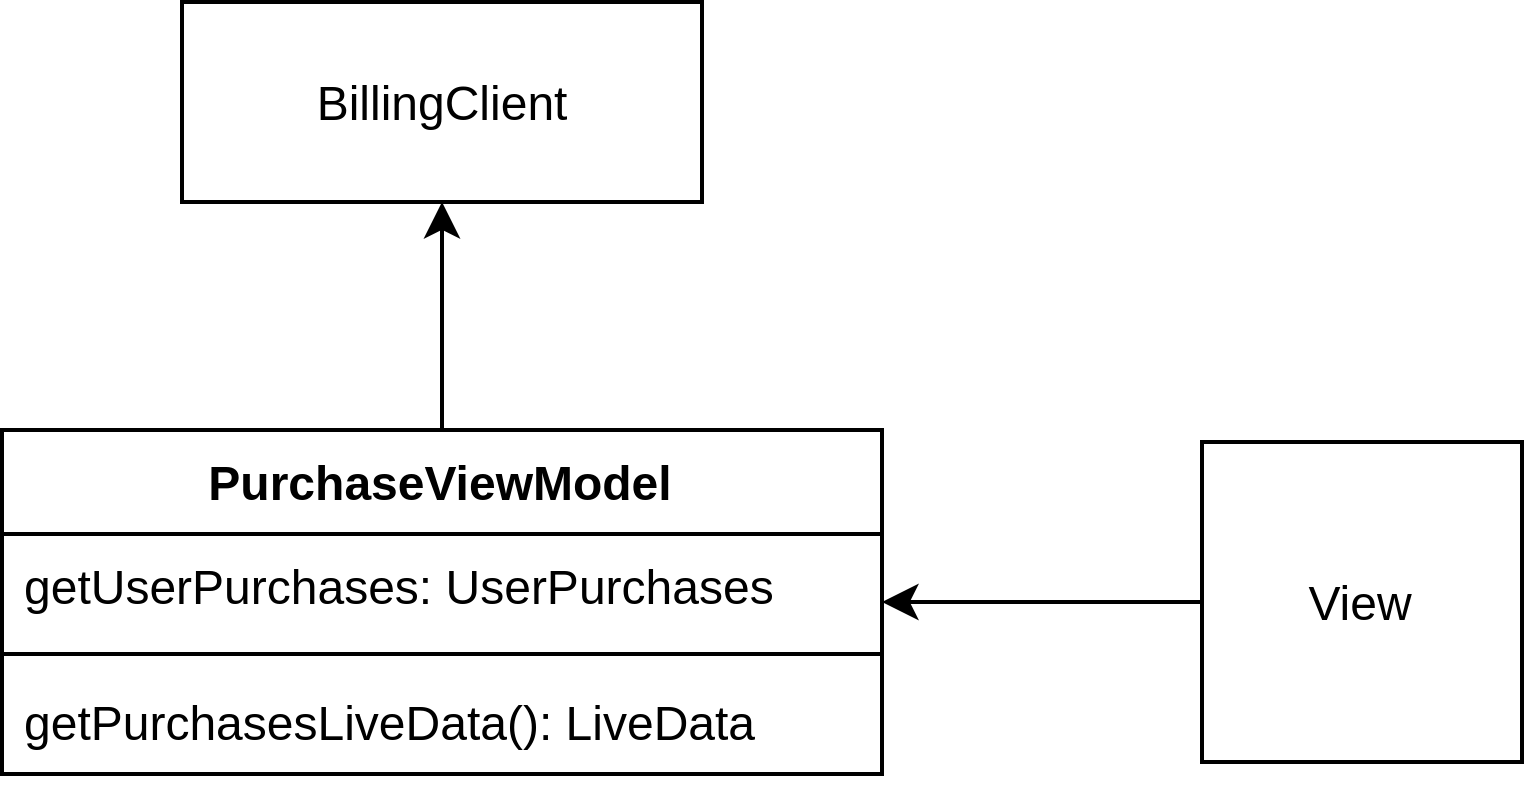
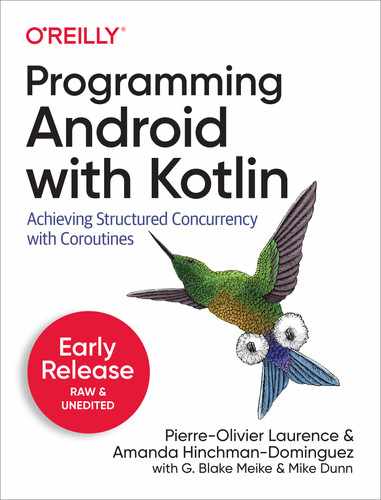
Figure 2-1. Architecture
Suppose now that you’ve structured your application following the single-activity architecture 2. The view should be a fragment which displays the purchases of the current user. The lifecycle of the fragment should be taken into account in the design. At any moment, the device could be rotated, and the fragment re-created. The user could go back, and the fragment be put into the back stack, if not destroyed.
This is where LiveData, a lifecycle-aware component, comes into play. Every time the fragment is created, it requests
an instance of PurchaseViewModel. We will explain more in detail how it works later.
Creating the app
In this section, we’ll show you a typical implementation inside an Android application. If you’re already familiar with this, you might jump directly to the next section, where we discuss the implementation of the logic.
View-model
So the business logic is implemented inside a ViewModel (see Example 2-3).
The view-model requires a BillingClient instance to be constructor-injected 3 by some other component - as you’ll see
shortly. BillingClient is a dependency of the ViewModel, and PurchaseProvider is a dependency of BillingClient.
The view which interacts with this ViewModel triggers the getUserPurchases method (which we haven’t implemented yet)
in the getter of the purchasesLiveData property. You may have noticed that type of purchasesLiveData property is
LiveData while the private backing property, _purchases, is a MutableLiveData. This is because the ViewModel
should be the sole component to change the value of the LiveData. So the exposed type to clients of this ViewModel
is only LiveData.
Example 2-3. PurchasesViewModel
classPurchasesViewModelinternalconstructor(privatevalbillingClient:BillingClient,privatevaluser:String):ViewModel(){privatevar_purchases=MutableLiveData<UserPurchases>()privatefungetUserPurchases(user:String){// TODO: implement}valpurchasesLiveData:LiveData<UserPurchases>get(){getUserPurchases(user)return_purchases}interfaceBillingClient{/* removed for brevity*/}interfacePurchasesProvider{/* removed for brevity*/}}
We’re almost done - now all we’re missing is the view.
View
Example 2-4. PurchasesFragment
classPurchasesFragment:Fragment(){overridefunonCreate(savedInstanceState:Bundle?){super.onCreate(savedInstanceState)/* Create a ViewModel the first time this Fragment is created. * Re-created Fragment receives the same ViewModel instance after * device rotation. */valfactory:ViewModelProvider.Factory=PurchaseViewModelFactory()valmodelbyviewModels<PurchasesViewModel>{factory}model.purchasesLiveData.observe(this){(_,purchases)->// update UIprintln(purchases)}}}
Every time the fragment is created, it subscribes to updates of UserPurchases by following three steps:

Create a factory for the
ViewModel(remember, theViewModelhas dependencies, and it’s certainly not the responsibility of the Fragment to supply them). Strictly speaking, this factory shouldn’t be created inside the fragment, as the factory is now tightly coupled with your fragment - aPurchasesFragmentalways uses aPurchaseViewModelFactory. In a test environment, where you should test the view independently, this would be a problem. So this factory should be injected inside the Fragment using either a dependency injection framework or manually injected. For the sake of simplicity, we’ve decided to create it here inside the fragment. For the record,ViewModelfactory as shown in Example 2-5.
An instance of
PurchasesViewModelis obtained from theviewModelsfunction. This is the recommended way to get aViewModelinstance.
Finally, a
LiveDatainstance is retrieved from theViewModel, and observed by anObservableinstance using the method of the same name (“observe”). In this example, the observer is only a lambda function which prints the list of purchases into the console. In a production application, you would typically trigger an update of all the related views inside the fragment.
A ViewModel also has its own lifecycle. It depends on whether the ViewModel is bound to a fragment or an activity.
In this example, it’s bound to a fragment. You can tell that by the use of by viewModels<..>. If we had used
by activityViewModels<..> instead, the view-model would have been bound to the activity.
When bound to the fragment, the ViewModel survives device rotations but is destroyed when it isn’t used anymore (e.g
when all fragments that were bound to it are destroyed except for device rotation).
On the other hand, if the ViewModel had been bound to the activity, the idea would be the same: it would outlive the
activity on device rotation but would be destroyed in every other scenario where the activity is destroyed.
About the use of ViewModel
As a ViewModel is retained through configuration change, which destroys and recreates the containing activity, it
should never reference a view, Lifecycle instance, or any class instance that may hold a reference to the activity
context. It can, however, reference the Application context.
If you look at the code of the actual BillingClient of the framework, creating a BillingClient.Builder requires
that you supply a context.
It can be an activity context, because internally the builder calls context.getApplicationContext() and this is the
only context reference kept by the BillingClient. An ApplicationContext remains the same during the whole
Application lifetime. Therefore, you won’t create a memory leak by referencing the ApplicationContext somewhere in
your app. This is the reason why BillingClient is safe to be referenced inside a ViewModel.
The dependencies of the ViewModel are created inside of PurchaseViewModelFactory:
Example 2-5. PurchaseViewModelFactory
classPurchaseViewModelFactory:ViewModelProvider.Factory{privatevalprovider:PurchasesProvider=PurchasesProviderImpl()privatevalbillingClient:BillingClient=BillingClientImpl(provider)privatevaluser="user"// Get in from registration serviceoverridefun<T:ViewModel?>create(modelClass:Class<T>):T{if(modelClass.isAssignableFrom(PurchasesViewModel::class.java)){returnPurchasesViewModel(billingClient,user)asT}throwIllegalArgumentException("Unknown ViewModel class")}}
BillingClientImpl is the real implementation of the previously shown BillingClient interface - see
Example 2-6 and Example 2-7.
Example 2-6. BillingClientImpl
classBillingClientImpl(privatevalpurchasesProvider:PurchasesProvider):BillingClient{privatevalexecutor=Executors.newSingleThreadExecutor()overridefuninit(callback:BillingCallback){/* perform asynchronous work here */executor.submit{try{Thread.sleep(1000)callback.onInitDone(purchasesProvider)}catch(e:InterruptedException){e.printStackTrace()}}}}
Example 2-7. PurchasesProviderImpl
classPurchasesProviderImpl:PurchasesProvider{privatevalexecutor=Executors.newSingleThreadExecutor()overridefunfetchPurchases(user:String,callback:PurchaseFetchCallback){/* perform asynchronous work */executor.submit{try{// Simulate blocking IOThread.sleep(1000)callback.onPurchaseFetchDone(listOf("Purchase1","Purchase2"))}catch(e:InterruptedException){e.printStackTrace()}}}}
To conform to the application design that we established, the init and fetchPurchases methods should be non-blocking. This
can be achieved with a background thread. For efficiency reasons (see the upcoming section), you may not want to create
a new thread every time you connect to the BillingClient. So you can use a thread pool, which can be created using
ThreadPoolExecutor instances directly, or many common configurations are available via the java.util.concurrent.Executors’s factory
methods. Using Executors.newSingleThreadExecutor(), you have a single dedicated thread at your disposal which can be
reused for each asynchronous calls. You might think that BillingClientImpl and PurchasesProviderImpl should share
the same thread pool. It’s up to you - though we didn’t do it for brevity. For a production app, you may have a
multiple ThreadPoolExecutors that service different parts of your app.
If you look at how callbacks are used in those implementations, you can see that they’re called right after
Thread.sleep() (which simulates a blocking IO call). Unless explicitly posted to the main thread (generally through
an instance of the Handler class, or through a LiveData instance’s postValue method), callbacks are invoked within the
context of the background thread. This is critical and it’s very important to be aware of how to communicate between
thread contexts, as you’ll see in the next section.
Warning
Be careful to be aware of which thread runs the provided callback, as it depends on the implementation. Sometimes, the callback is asynchronously run on the calling thread, whereas it can be synchronously executed on the background thread.
Implement the logic
Now that all necessary components are set in place, the logic can be implemented. The steps are:
Example 2-8. Logic
privatefungetUserPurchases(user:String){billingClient.init{provider->// this is called from a background threadprovider?.fetchPurchases(user){purchases->_purchases.postValue(UserPurchases(user,purchases))}}}
Call
BillingClient.initand supply a callback which will be called whenever the client’s initialization process finishes. Only if the client supplies a non-nullPurchasesProviderinstance, proceed with the next step.At this point you have
PurchasesProviderinstance ready for use. Then callfetchPurchases, providing the current user as the first parameter, and the callback that should be executed once the provider has done its job. Look carefully the content of the callback:
_purchases.postValue(UserPurchases(user,purchases))
On a MutableLiveData instance, you either use the setValue or the postValue method. The difference between the
two is that you’re only allowed to use setValue if you’re calling it from the main thread. When this isn’t the case,
using postValue adds the new value into a queue that the MutableLiveData will process on the next frame of the main
thread. This is an implementation of the work queue pattern (see chapter #), and a thread-safe way to assign a new value
to a MutableLiveData.
Discussion
So this is it. It works - or at least, it fulfills the specifications. Now, we invite you to step back a little and look
at the big picture. What is the structure of getUserPurchases? It’s made of a function call, which is provided another
function which itself calls a function which is provided another function… It’s like russian dolls. Already a little
hard to follow, after add exception handling this can quickly become “nesting hell”. In order to keep our example logic
simple and easy to follow, we’ve obmited corner cases where some api calls fail; for example, networking issues or
authorization errors make some I/O background work brittle and prone to failure, and production code should be able to
handle this.

Figure 2-2. Callback usage
The code which specifies what happens upon a response of the BillingClient (callback 2) is included in the code of
the first callback. If you decide to inline all this code, like we did in Example 2-8, you have
several levels of indentations, which rapidly grows as the problem to solve becomes more complex. On the other hand, if
you decide to encapsulate the first callback into its own function, you will indeed reduce the indentation level of
getUserPurchases and its apparent complexity. At the same time, you would increase the number of directions to follow
to fully understand the business logic.
This is the first drawback of code using callbacks. It rapidly becomes complex, and may become hard to maintain, if not administered with caution and thoughtful design. Some would consider that even with careful precautions this path is dangerous. As developers, we strive to create a system that we and our coworkers can handle.
Note
Using CompletableFuture or other similar library like RxJava, you can rewrite getUserPurchases like this:
privatevoidgetUserPurchases(Stringuser){billingClient.initAsync().thenCompose{provider->fetchPurchasesAsync(provider,user)}.thenAccept{purchases->this.purchases.postValue(...)}}
It’s a bit cleaner, with no nested indentations, and even handles exceptions properly. However, you can see that it
relies on combinators - thenCompose and thenAccept which operate on CompletableFuture<T>. While our simple example
uses only two combinators, a lot of them exist, each one for a specific purpose. Some would consider the learning curve
of another, unfamiliar pattern and API to be a weakness of this pattern .
Structured concurrency
Imagine now that some API calls are quite expensive computationally. For example, a user of your app navigates to a view
which triggers some of those API calls, but as the content isn’t loading instantly they lose patience and tap back, and
starts some new series of operations in another part of the app. In this situation, you don’t want your expensive API
calls to continue running, as they may put unnecessary load on your backend servers, or even on the application itself.
Further, what happens if a UI that should be updated when a callback fires no longer exists? A NullPointerException is
probably your best case, and a memory leak your worst. Instead, let’s cancel the procedure initialized inside the
view-model. How would you do that? You would have to listen to a particular lifecycle event of the fragment lifecycle
termination events: onStop, onPause, or onDestroy. In this specific case, you’d probably want to do that inside
onStop, which would be fired just before resources are reclaimed.
onPause would fire each time the application was background in favor of an incoming call or when switching between
apps, and onDestroy happens a little later than we need. When onStop event fires, you should notify the view-model
that it should stop any background processing. This requires a thread-safe way of interrupting threads. A volatile
isCancelled boolean would be checked inside the callbacks to decide whether they should proceed or not. So it’s
definitely possible, but cumbersome and fragile.
What if this cancellation was done automatically? Imagine that the background processing was tied to the lifecycle of the view-model. The moment that the view-model is destroyed, all background processing gets cancelled. It’s not a fairy tale - it even has a name: structured concurrency.
Memory leaks
Automatically cancelling dangling background threads also has another benefit: reducing the risk of memory leak. A
callback might hold a reference on a component which either has a lifecycle, or is a child
of a component which has one. If this component is eligible to garbage collection, while a reference of that component
exists in some running thread, the memory can’t be reclaimed, and you have a memory leak. Using LiveData like in the
previous example is safe even if you don’t cancel background tasks. Nevertheless, more generally speaking, it’s never
good to let tasks running for nothing.
Cancellation isn’t the only possible thing that can go wrong. There are other pitfalls to using threads as primitives for asynchronous computations (which we’ll refer to as the threading model), which we’ll cover into the next section.
Limitations of the threading model
In an Android application, memory for processes and tasks are always in competition. With only one Main thread, or UI thread, the clever Android developer must find ways to manipulate and handle threading efficiently.
Using a single thread, asynchronous tasks offloaded to that thread execute serially - one task after another. If one of the tasks takes forever to execute, the remaining work cannot be processed until that task completes.
Figure 2-3. Tasks execute serially inside a thread.
In such situations where some background task might take a long time to execute, you need more than one background thread.
The ThreadPoolExecutor primitive lets you spin up a number of threads and toss blocks of work to execute on it.

Figure 2-4. A ThreadPoolExecutor handles all the heavy lifting of spinning up the threads, load balancing work across those threads, and even killing those threads:
However, having more threads isn’t always a good thing. Here are some caveats:
-
CPUs can only execute a certain number of threads in parallel.
-
Threads themselves are memory expensive - each thread costs you at least 64Kb of RAM.
-
When a CPU core switches execution from one thread to another, a thread context switch happens 4. Those switches aren’t free. While it’s not a problem when having a few threads, the impact of thread context switches can be noticeable if you keep adding more threads. You could reach the point were your code is actually slower than with using fewer threads.
Summary
-
You can implement asynchronous logic using callbacks. You might also want to check out some other related framework APIs like
HandlerandHandlerThread. Using callbacks can lead to complex nested function calls, or to situations where the flow of the logic is split in several classes, and may become hard to follow. If this becomes problematic, one solution is to rely onCompletableFutures, or a similar APIs; the third-party framework RxJava has this kind of functionality, but requires learning yet another set of APIs that can quickly become coupled to your business logic and change the way you write your application code. -
Most often, asynchronous logic is about retrieving and manipulating data which is then rendered as View instances on screen. To this purpose, Android Jetpack’s ViewModel offer lifecycle-aware components which help you produce more organized and maintainable code.
-
When a component reaches the end of its lifecycle, chances are that some related background tasks should now be cancelled, otherwise they just consume memory and increase the risk of memory leak, or even an application crash. Structured concurrency is the ideal solution to this, which we’ll cover in the next chapter.
-
Using threads as concurrency primitives has its limitations, because you need to make sure not creating too many of them because of their memory cost, and the performance drop that could arise from too many thread context switches.
Coroutines are meant to address the limitations of the threading model. The next four chapters - Introduction to Coroutines, Structured Concurrency, Channels, and Flows - are the “peak” of the book covering how Kotlin gives Android developers a true advantage in gaining control over asynchronous computations.
1 Non-blocking IO using java.nio.channels.SocketChannel can be done on UI thread without blocking it. However, most of the time when dealing with IO, you will be using blocking APIs like java.io.InputStream.
2 a single activity and multiple fragments
3 Developing to interfaces, and not to actual implementations, improves the testability and portability of your code. Inside a test environment, you’re able to swap the actual implementations of the dependencies with custom mocked ones. By portability, let’s assume you have an interface called AnalyticsManager that provides some methods that you’ll implement to notify your analytics service. Considering that a robust analytics SaaS with dashboards and heavy data visualization and authorization is a heavy lift by itself, most app developers are going to leverage a third party library to handle that part of their flow. If, for example, you change from one provider to another, as long as you’ve composed your interactions to match the AnalyticsManager interface, your client code never gets touched or changes or potentially introduced a new bug, all that’s updated is the business logic of the AnalyticsManager implementation.
4 Thread switching involves saving and loading CPU registers and memory maps.