Chapter 3. Coroutines concepts
In the previous chapter, you learned of the pitfalls of the threading model.
As an alternative to the threading model, the Kotlin language has a library called kotlinx.coroutines which aims at
fixing the previously mentioned limitations. Coroutine-enabled primitives allow developers to write sequential,
asynchronous work at a low cost.
The design of coroutines comprises suspending functions, structured concurrency, and other specific
considerations like coroutine context and coroutine scope. Each of those subjects are closely related to each other. We’ll cover each one
of these considerations in a way that is incremental and digestible.
What exactly is a coroutine?
The official Kotlin documentation qualifies them as “lightweight threads” in an effort to leverage an existing and well-known paradigm. You may conceptualize Coroutines as blocks of code that can be dispatched to threads that are non-blocking.
Coroutines are indeed lightweight, but it is important to note that coroutines aren’t threads themselves. In fact, many coroutines can run on a single thread, although each has a lifecycle of its own. Rather, you’ll see in this section that they really are just state machines, with each state corresponding to a block of code that some thread will eventually execute.
Note
You might be surprised to find that the concept of coroutines goes all the way back to the early 1960s with the creation of Cobol’s compiler, which used the idea of suspending and launching functions in assembly language. Coroutines can also be spotted in the languages Go, Perl and Python.
The coroutine library offers some facilities to manage those threads out of the box. However, you can configure the coroutine builder to manage your threads yourself if you need to.
Your first coroutine
Throughout this section, we’ll introduce a lot of new vocabulary and concepts from kotlinx.coroutines.*
package. To make this learning smooth, we chose to start with a simple coroutine usage, and explain
how this works along the way.
The following example, as well as the others in this chapter, use semantics declared in the kotlinx.coroutines package.
funmain()=runBlocking{valjob:Job=launch{vari=0while(true){println("$i I'm working")i++delay(10)}}delay(30)job.cancel()}
The method runBlocking runs a new coroutine and blocks the current thread until the coroutine work has completed.
This coroutine builder is typically used in main functions and testing as it serves as a bridge to regular blocking code.
Inside the code block, we create a coroutine with the launch function. Since it creates a coroutine, it’s
a coroutine builder - you’ll see later that other coroutine builders exist. The method launch returns a reference to
a Job, which represents the lifecycle of the coroutine launched.
Inside the coroutine, there’s a while-loop that executes indefinitely. Below the job coroutine, you may
notice that the job is cancelled later on. To demonstrate what this means, we can run our program:
Output
0 I'm working
1 I'm working
2 I'm working
It appears that the coroutine ran like clock work - in tandem, the code continues to execute in the Main thread, giving
us a total of 3 printed lines within a 30 millisecond window given to us by the delay call, as shown in
Figure 3-1.

Figure 3-1. First coroutine
The delay function looks suspiciously like Thread.sleep in its usage. The major difference is that delay is non-blocking
while Thread.sleep(...) is blocking. To demonstrate what we mean, let’s examine our code again, but replace the
delay call in our coroutine with Thread::sleep:
funmain()=runBlocking{valjob:Job=launch{while(true){println("I'm working")Thread.sleep(10L)}}delay(30)job.cancel()}
Observe what happens when running the code again:
Output
I'm working
I'm working
I'm working
I'm working
I'm working
I'm working
I'm working
I'm working
I'm working
I'm working
I'm working
.....
The output seems to run infinitely now. When the coroutine executes, the Thread.sleep(10L) call blocks the
main thread until the coroutine started by launch completes. As the coroutine started with launch makes the main
thread either sleep or print, the coroutine never completes, so execution never leaves the coroutine 1, as shown in
Figure 3-2.

Figure 3-2. Never ending program
What’s important to remember
-
The
launchcoroutine builder is “fire and forget” work - in other words, there is no result to return. -
Once called, it immediately returns a
Jobinstance, and starts a new coroutine. AJobrepresents the coroutine itself, like a handle on its lifecycle. The coroutine can be cancelled by calling thecancelmethod on itsJobinstance. -
A coroutine started with
launchwill not return a result, but rather, a reference to the background job.
If, on the other hand, you need to get a result from an asynchronous computation, then you should use the async coroutine
builder.
The async coroutine builder
The async coroutine builder can be compared to Java’s Future/Promise model to support asynchronous programming:
classWorkingClass(){publicCompletableFuture<SomeOtherResult>doBothAsync(){somethingAsync().thenAcceptBoth(somethingElseAsync()){one,two->// combine results of both calls here};}}
Instead of making a blocking call to get the data, an asynchronous function immediately returns a wrapper
around the result. Depending on the library you use, this wrapper is called Future, CompletableFuture,
Promise, etc. This wrapper is like a handle, from which you can check if the result is available or not.
If you wish, you can block a thread until the result is available with the Future.get() method.
Just like a Future, the async coroutine builder returns a wrapper around a result ; and the type of this wrapper
is Deferred<T> (the generic type is the type of the result), as shown in Example 3-1.
Example 3-1.
funmain()=runBlocking{valslow:Deferred<Int>=async{varresult=0delay(1000)// simulate some slow background workfor(iin1..10){result+=i}println("Call complete for slow: $result")result}valquick:Deferred<Int>=async{delay(100)// simulate some quick background workprintln("Call complete for quick: 5")5}valresult:Int=quick.await()+slow.await()println(result)}
The data type of quick and slow is a future result as an implementation of Deferred<Int>, otherwise known as a
Job with a result. By calling the method await on each Deferred<Int> instances, the program waits for the result
of each coroutine.
This time, we’ve launched two coroutines using the async coroutine builder. The code itself can give us a good
guess at what might happen, but let’s run it anyway to see:
Output
Call complete for quick: 5
Call complete for slow: 55
60
The program above delays the slow async job by 1000ms while the quick async job by 100ms - the result waits for both to complete before printing out the result.
What’s important to remember
-
The
asynccoroutine builder is intended for parallel decomposition of work - that is, you explicitly specify that some tasks will run concurrently. -
Once called, an
asyncreturns immediately aDeferredinstance.Deferredis a specializedJob, with a few extra methods like await. It’s aJobwith a return value. -
Very similarly to
FuturesandPromises, you invoke theawaitmethod on theDeferredinstance to get the returned value 2.
You may have noticed by now that the examples provided with the Coroutine Builder launch and async are wrapped with
a runBlocking call. We mentioned earlier that runBlocking runs a new coroutine and blocks the current thread until
the coroutine work has completed. To better understand the role of runBlocking, we must first give a sneak preview on
structured concurrency, a concept which will be explored in detail in the upcoming chapter.
A quick detour about Structured Concurrency
Coroutines aren’t just yet another fancy way to launch background tasks. The coroutines library is built around the structured concurrency paradigm. Before going further in your discovery of coroutines, you should understand what it is, and the problems the coroutine library aims at solving.
Making development easier is a worthwhile goal. In the case of structured concurrency, it’s almost a happy side effect of a response to a more general problem. Consider the simplest construct every developer is familiar with: a function.
Functions are predictable in the sense that they are executed from top to bottom. If we put aside the possibility that exceptions can be thrown from inside the function 3, you know that prior to a function returning a value, execution order is serial: each statement executes prior to the next. What if inside the function, your program creates and starts another thread? It’s perfectly legal, but now you have two flows of execution as shown in Figure 3-3.

Figure 3-3. Two flows
Calling this function doesn’t only produce one result, it has the side effect of creating a parallel flow of execution. This can be problematic for the following reasons:
1. Exceptions aren’t propagated
If an exception is thrown inside the thread, and it isn’t handled, then the JVM calls the thread’s UncaughtExceptionHandler, which is a simple interface:
interfaceUncaughtExceptionHandler{fununcaughtException(t:Thread,e:Throwable)}
You can provide a handler using the Thread.setUncaughtExceptionHandler method on your thread instance.
By default, when you create a thread, it doesn’t have a specific UncaughtExceptionHandler. When an exception isn’t
caught, and you haven’t set a specific one, the default handler is invoked.
Tip
There is actually a mechanism
involved before the default handler is invoked. Every thread can belong to a ThreadGroup which can handle exceptions.
Each thread group can also have a parent thread group. Within the Android framework, two groups are
statically created: “system”, and a child of the system group known as “main”. The “main” group always delegates
exception handling to the “system” group parent, which then delegates to Thread.getDefaultUncaughtExceptionHandler()
if it isn’t null. Otherwise, the “system” group prints the exception name and stacktrace to System.err.
In the Android framework, it’s important to note that the default UncaughtExceptionHandler will cause
your app to crash by killing the app’s native process. Android designers made this choice because it’s
generally better for an Android application to fail-fast, as the system shouldn’t make decisions on behalf of
the developer when it comes to unhandled exceptions. The stack trace is then relevant to the real
problem, while recovering from it might produce inconsistent behaviours and problems that are less
transparent, as the root cause can be much earlier in the call stack.
In our example, there’s nothing in place to inform our function if something bad happens in the background thread. Sometimes, this is just fine because errors can be directly handled from the background thread, but you may have logic that is more complex and requires the calling code to monitor issues to react differently and specifically.
2. Execution flow is hard to control
Since a thread can be created and started from anywhere, imagine that your background thread instantiates and starts 3 new threads to delegate some of its work, or perform tasks in reaction to computation performed in the parent thread’s context.

Figure 3-4. Multiple flows
How do you make sure that the function returns only when all background processing is done? This can
be error prone: you need to make sure that you wait for all child threads to finish their work
4. When using a Future-based
implementation (for example CompletableFuture s), even omitting a Future.get invocation might
cause the flow of execution to terminate prematurely.
Later, and while the background thread and all of its children are still running, all this work might have to be cancelled (the user exited the UI, an error was thrown, etc.). In this case, there’s no automatic mechanism to cancel the entire task hierarchy.
When working with threads, it’s really easy to forget about a background task. Structured concurrency is nothing but a concept meant to address this issue.
In the next section, we’ll detail this concept and explain how it relates to coroutines.
The parent-child relationship in structured concurrency
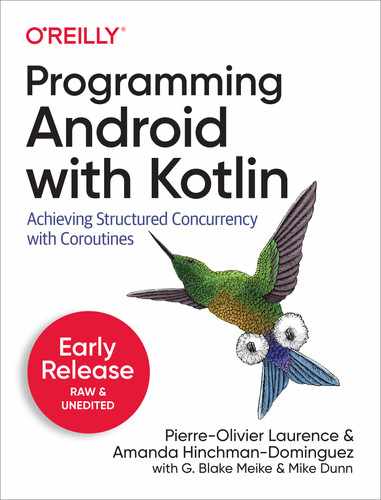
Until now, we’ve spoken about threads, which were represented by arrows in the previous illustrations. Let’s imagine a higher level of abstraction where some parent entity could create multiple children as shown in Figure 3-5.
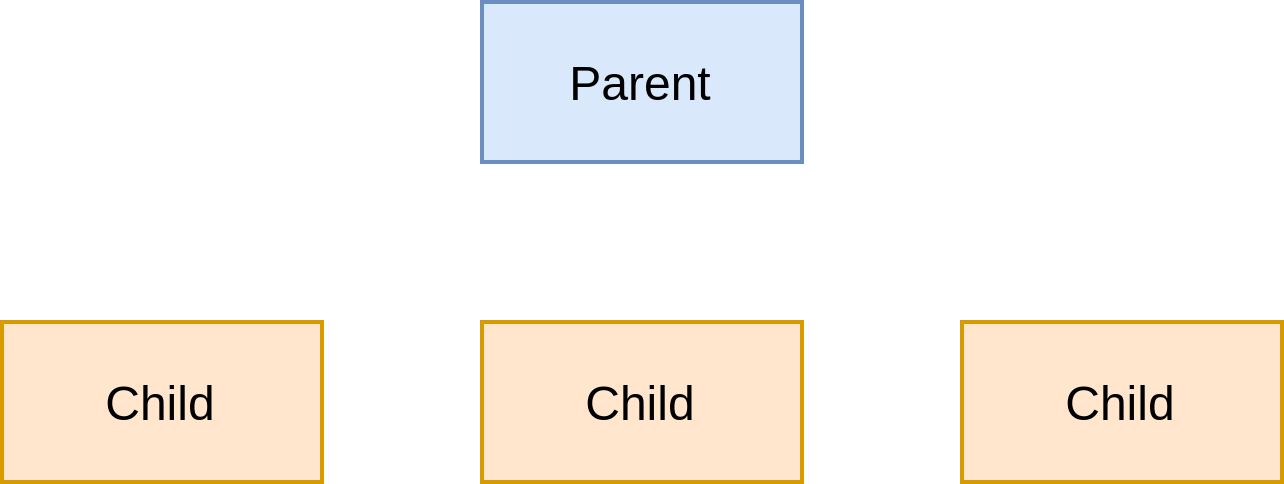
Figure 3-5. Parent-Child
Those children can run concurrently with each other as well as the parent. If the parent fails 5 or is cancelled, then all its children are also cancelled. Here is the first rule of structured concurrency:
First rule of structured concurrency
Cancellation always propagates downwards
Just as a parent entity could fail or be cancelled, this can happen to any of the children. In the case of cancellation of one of the children, referencing the first rule we know that the parent will not be cancelled (cancellation propagates downwards, not upwards). In case of failure, what happens next depends on the problem you’re trying to solve. The failure of one child should or should not lead to the cancellation of the other children, as shown in Figure 3-6. Those two possibilities characterize the parent-child failure relationship, and is a parametrization of the parent.
Second rule of structured concurrency
How failure of one child affects other children of the same level is a parametrization of the parent
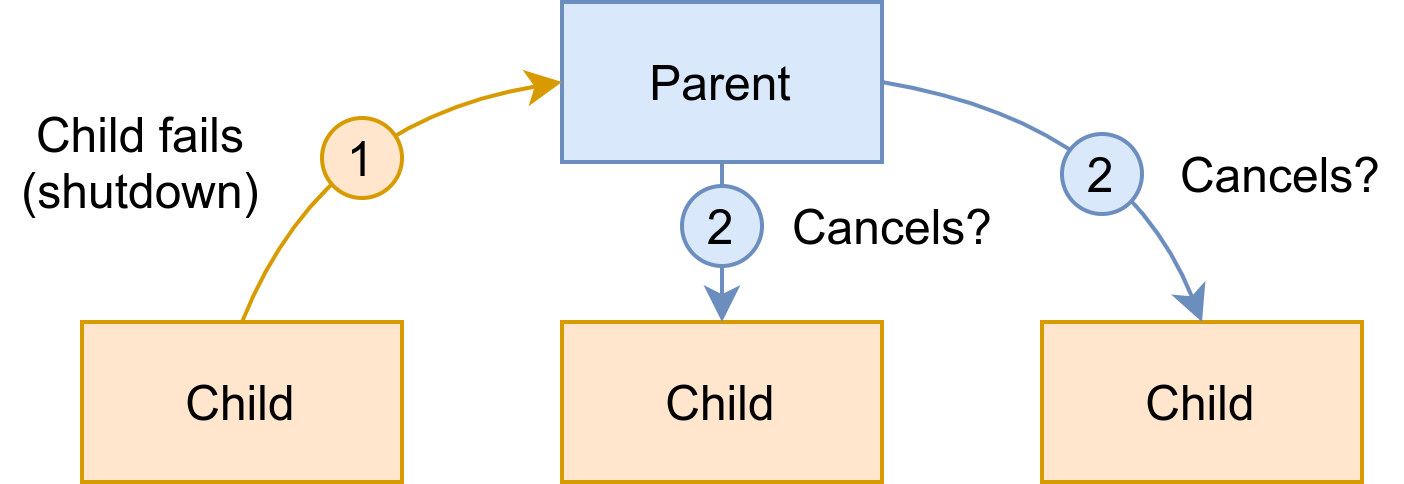
Figure 3-6. Cancellation policy
Third rule of structured concurrency
The parent always waits for all its children to complete.
Other rules could be added around exception propagation, but they would be implementation specific, and it’s time to introduce some concrete examples.
Structured concurrency is available in Kotlin coroutines with CoroutineScopes and CoroutineContext.
CoroutineScopes and CoroutineContexts play the role of the “parent” in previous illustrations. Coroutines, on
the other hand, play the role of the “children”.
In the following section, we’ll cover more in detail those CoroutineScopes and CoroutineContext.
CoroutineScope and CoroutineContext
We’re about to dive into the details of the kotlinx.coroutine library . There will be a lot of new concepts in the
upcoming section. While those concepts are important if you want to master coroutines, you don’t have to understand
everything right now to get started and be productive with coroutines. There will be a lot of examples following this
section and in the next chapter, which will give you good sense of how coroutines work. Therefore, you might find it
easier to come back to this section after you practiced a bit.
Now that you have an idea of what structured concurrency is, let’s revisit the whole runBlocking thing again.
Why not just call launch or async outside of a runBlocking?
The following code will not compile:
funmain(){launch{println("I'm working")// will not compile}}
The compiler reports: “Unresolved reference: launch”.
This is because coroutine builders are extension functions of CoroutineScope.
A CoroutineScope controls the lifecycle of a coroutine within a well-defined scope or lifecycle.
It’s an object which plays the role of the parent in structured concurrency - its purpose is to manage
and monitor the coroutines you create inside of it. You might be surprised to find that in the previous
example with the async coroutine builder, a CoroutineScope`had already been provided to launch
a new coroutine. That `CoroutineScope was provided by the runBlocking block.
How? This is the simplified signature of runBlocking:
fun<T>runBlocking(// function arguments removed for brevityblock:suspendCoroutineScope.()->T):T{// impl}
The last argument is a function with a receiver type CoroutineScope. Consequently, when you supply a
function for the block argument, there is a CoroutineScope at your disposal and which can invoke extension functions
of CoroutineScope. Android Studio is able to pick up the implicit type-referencing in Kotlin so that if you
enable “type hints”, you are able to see the type parameter:

Figure 3-7. Type hint in Android Studio
Besides providing a CoroutineScope, what is the purpose of runBlocking? runBlocking blocks the current thread until
its completion. It can be invoked from regular blocking code as a bridge to code that use suspending functions (
we’ll cover suspending functions later in this chapter).
To be able to create coroutines, we have to bridge our code to the “regular” function main in our code. However, the following sample won’t compile, as we’re trying to start a coroutine from regular code:
funmain()=launch{println("I'm a coroutine")}
This is because the launch coroutine builder is actually an extension function of CoroutineScope:
funCoroutineScope.launch(context:CoroutineContext=EmptyCoroutineContext,// other params removed for brevity,block:suspendCoroutineScope.()->Unit):Job{/* implementation */}
Since regular code doesn’t provide a CoroutineScope instance, you cannot directly invoke coroutine builders from there.
So what’s this CoroutineContext? To answer this, you need to understand the details of CoroutineScope.
If you look at the source code, a CoroutineScope is an interface:
interfaceCoroutineScope{valcoroutineContext:CoroutineContext}
In other words, a CoroutineScope is a container for a CoroutineContext.
The purpose of a CoroutineScope is to encapsulate concurrent tasks (coroutines and other scopes) by applying
structured concurrency. Scopes and coroutines from a tree-like architecture with a scope at its root, as shown
in Figure 3-8.
Figure 3-8. Tree-like relashionship (coroutines are represented as squares)
A CoroutineContext, which we’ll refer to as context for future reference, is a broader concept. It’s an immutable
union set of context elements. For future reference, we’ll use the term “element” to designate context element.
That’s for the theory. In practice, you’ll most often use a special context element to control which thread or which
thread pool will execute you coroutine(s). For example, imagine that you have to run CPU heavy computations inside a
launch, while not blocking the main thread. This is where the coroutine library is really handy because thread pools
for most common usages are available out of the box. In the case of CPU-bound tasks, you don’t have to define your own
thread pool. All you have to do is to use the special Dispacthers.Default context element like so:
funmain()=runBlocking<Unit>{launch(Dispatchers.Default){println("I'm executing in ${Thread.currentThread().name}")}}
The output is now:
I'm executing in DefaultDispatcher-worker-2 @coroutine#2
Dispatchers.Main is a context element. As you’ll see later, different context elements can be combined together
using operators to tweak even more the behavior of coroutines.
As its name suggests, the purpose of a Dispatcher is to dispatch coroutines on a specific thread or
thread pool. By default, there are four Dispatchers available out of the box: Main, Default, IO, and Unconfined.
-
Dispatchers.Mainuses the Main thread, or the UI thread, of the platform you’re using -
Dispatchers.Defaultis meant for CPU-bound tasks, and is backed by a thread pool of 4 threads by default -
Dispatchers.IOis meant for IO-bound tasks, and is backed by a thread pool of 64 threads (by default) -
Dispatchers.Unconfinedisn’t something you should use or even need as you’re learning coroutines. It’s primarily used in the internals of the coroutines library.
By just changing the dispatcher, you can control which thread or thread pool your coroutine will be executed on.
The context element Dispatcher.Default is a subclass of CoroutineDispatcher, but other context elements
also exist.
By providing a dispatcher context, you can easily designate where logic flow executes. Thus, it is the developer’s responsibility to supply the context to the coroutine builder.
In coroutine framework parlance, a coroutine always runs inside a context, and this context is provided by a coroutine scope. This context is different from the context you supply. To avoid confusion, we will call the context of the coroutine the coroutine context, and we’ll call the context you supply to the coroutine builder the supplied context.
The difference is subtle - remember the Job object? A Job instance is a handle on the lifecycle of the
coroutine - it’s part of the coroutine context too. Every coroutine has a Job instance which represents it,
and this job is part of the coroutine context.
It’s time to unveil how those contexts are created. We’ll take an example which slightly differs from the previous one:
Example 3-2. Dispatchers example
funmain()=runBlocking<Unit>(Dispatchers.Main){launch(Dispatchers.Default){valthreadName=Thread.currentThread().nameprintln("I'm executing in $threadName")}}
This block of code creates two coroutines with their own respective Job instance: runBlocking starts the first
coroutine, and the other one is started by launch.
The coroutine created by runBlocking has its own context. Since this is the root coroutine started inside
the scope, we call this context the scope context. The scope context encompasses the coroutine context like this:
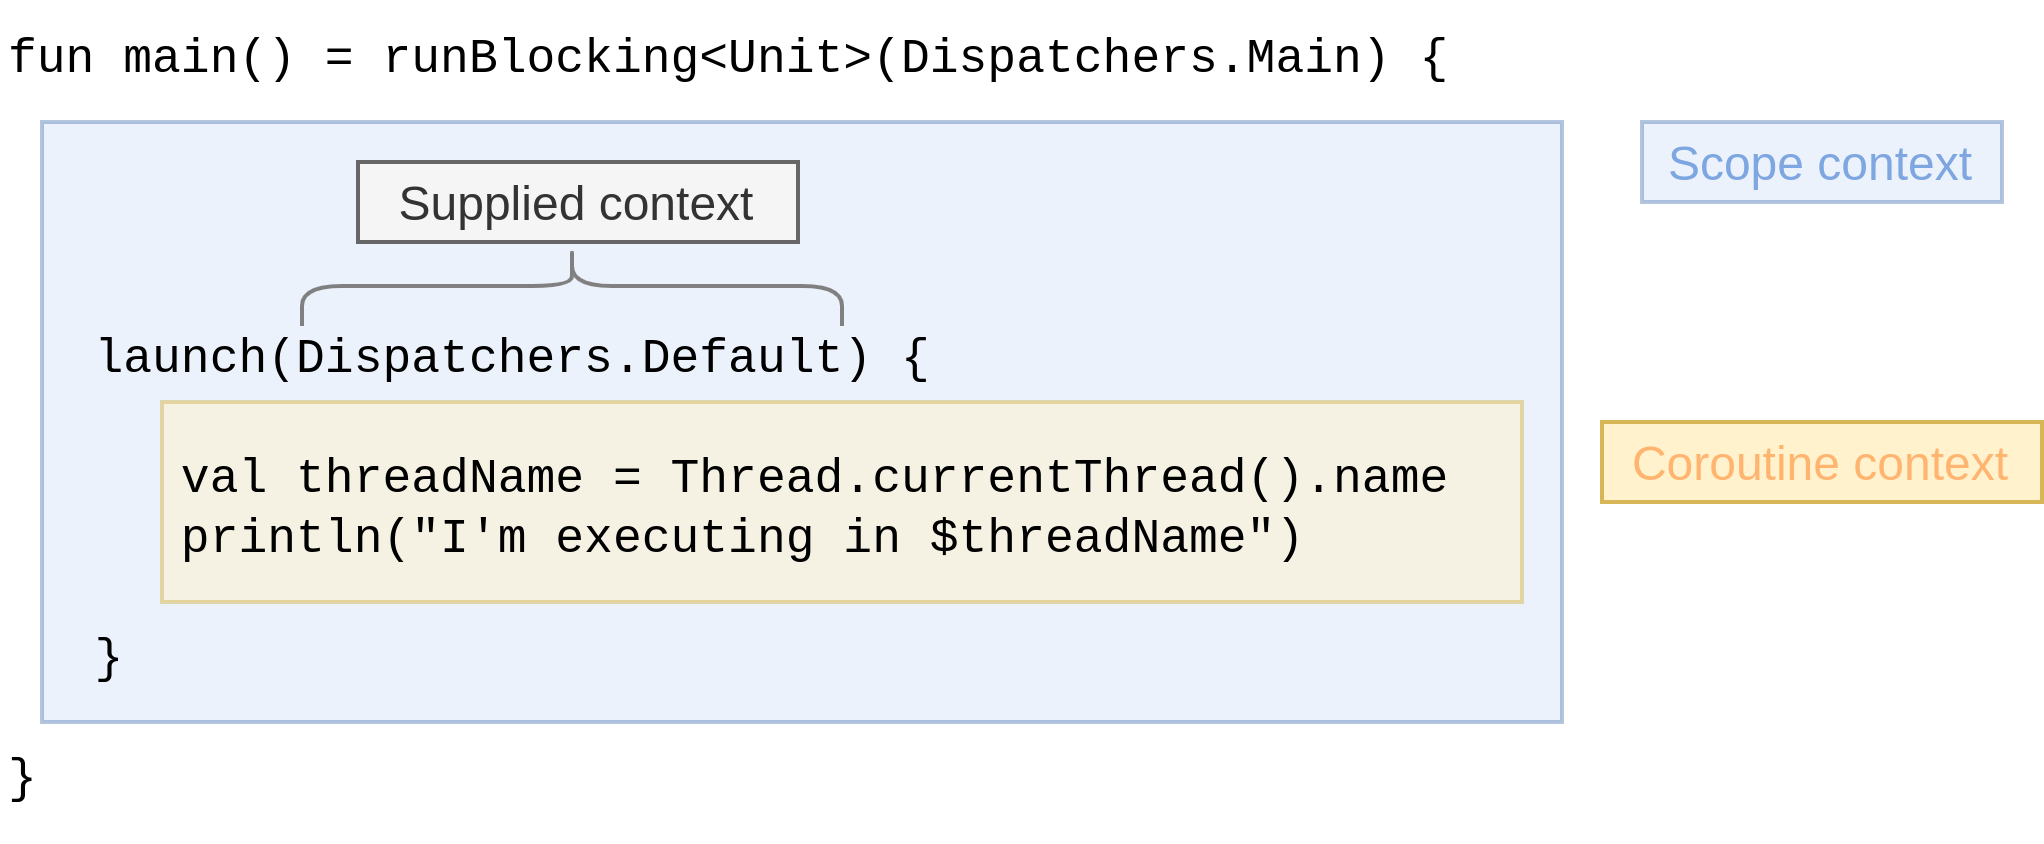
Figure 3-9. Contexts
You’ve seen that launch is an extension function of CoroutineScope (which holds a context),
and that it can receive a context as its first parameter. So there are two contexts at our disposal
in this function as shown in Example 3-2: one from the receiver type (the scope context), and
the other one from the context parameter (the supplied context).
What does launch do in its implementation before calling our provided function? It merges them so that the
elements from the context parameter take precedence over the other elements from the scope. From this
merge operation we obtain the parent context. At this point, the Job of the coroutine isn’t created yet.
At last, a new Job instance is created as a child of the Job from the parent context.
This new Job is then added to the parent context, replacing the Job instance of the parent context
to obtain the coroutine context.
These relationships and interactions are represented in figure Figure 3-10, in which a context is represented by a square containing other context elements. For example, this is how we would represent the context of Example 3-2:

This image represents a context which contains a Job instance, and a dispatcher
which is Dispatchers.Main
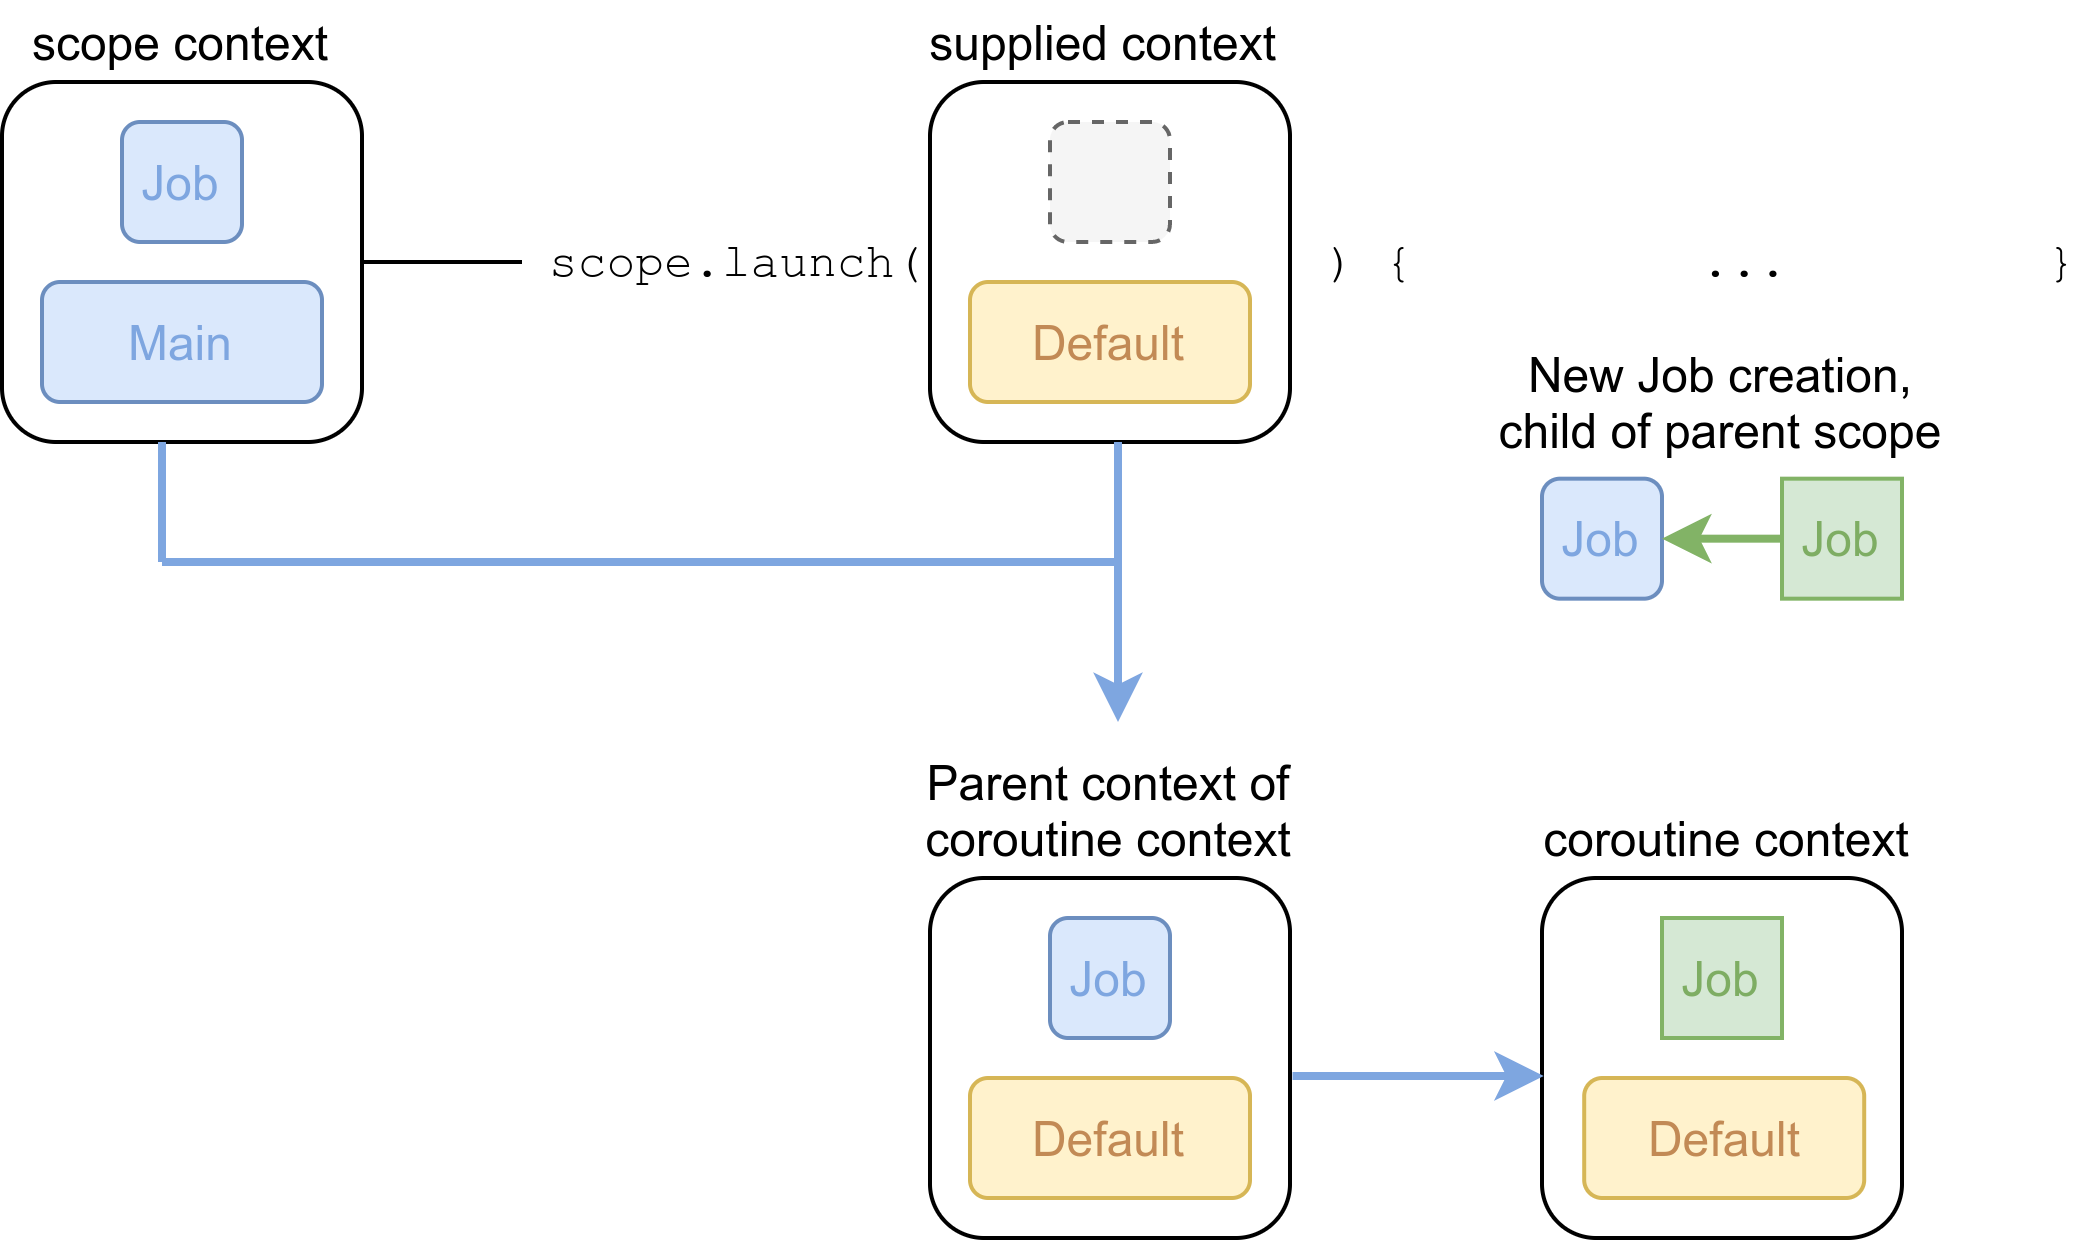
Figure 3-10. Context detail
Everything you provide in the supplied context to the launch method takes precedence over
the scope context. This results in a “parent context”, which inherits elements from
the scope context which were not provided in the supplied context (a Job in this case).
Then a new Job instance is created (in green), as a child of the parent Job which is
also in this case the Job of the scope context. This results in the coroutine context,
which is made of elements from the parent context except for the Job, which is a child Job of the Job in the parent context.
This coroutine context is the context in which the lambda we provide to launch will be executed.
Structured concurrency is possible because the Job in the coroutine context is a child of the Job
from the parent context. If the scope is cancelled for any reason, every child coroutine started is then automatically
cancelled 6.
More importantly, the coroutine context inherits context elements from the scope context, which are not overridden by the context supplied as a parameter to launch; the async method behaves identically in this regard.
Suspending functions
We’ve examined how to launch a coroutine with Coroutine Builders launch and async and touched on what it means
for something to be blocking or nonblocking.
At its core, Kotlin coroutines offers something different that will really reveal how powerful coroutines can be:
suspending functions.
Imagine that you invoke two tasks serially. The first task completes before the second can proceed with its execution:

When task A executes, the underlying thread cannot proceed with executing other tasks - the task A is then said to be a blocking call.
However, a task A spending a reasonable amount of time waiting for a longer-running job (e.g an HTTP request) ends up
blocking the underlying thread, rendering the waiting task B useless.
So task B waits for task A to complete. The frugal developer may see this scenario as a is a waste of thread resources,
since the thread could (and should) proceed with executing another task while task A is waiting for the result of
its network call.
Using suspending functions, tasks can be split into chunks which can suspend. In the case of our example, task A can be
suspended when it performs its remote call, leaving the underlying thread free to proceed with another task (or just a part
of it). When task A gets the result of its remote call, it can be resumed at a later point in time:

Figure 3-11. The time saved is represented is in red at the end.
As you can see, the two tasks complete sooner compared to the previous scenario. This interleaving of bits of tasks leaves the underlying thread always busy executing a task. Therefore, a suspending mechanism requires fewer threads to produce the same overall throughput. And this quite important, when each thread has its own stack which costs a minimum of 64k of memory. Typically, a thread occupies 1Mb of RAM.
Using a suspending mechanism, we can be more frugal by using more of the same resources.
Suspending functions under the hood
So far, we’ve introduced a new concept: the fact that a task can suspend. A task can “pause” its execution without blocking the underlying thread. While this might sound like magic to you, it’s important to understand that it all comes down to lower level constructs - which we’ll explain in this section.
A task, or more precisely a coroutine, can suspend if it makes use of at least one suspending function. A suspending function is easily recognisable as it’s declared with the suspend modifier, like in Example 3-3.
When the Kotlin compiler encounters a suspending function, it compiles to a regular function with an additional
parameter of type Continuation<T>, which is just an interface:
publicinterfaceContinuation<inT>{/*** The context of the coroutine that corresponds to this continuation.*/publicvalcontext:CoroutineContext/*** Resumes the execution of the corresponding coroutine passing a successful* or failed [result] as the return value of the last suspension point.*/publicfunresumeWith(result:Result<T>)}
Assuming that you define this suspending function:
Example 3-3.
suspendfunbackgroundWork():Int{// some background work on another thread, which returns an Int}
At compile time, this function is transformed into a regular function (without the suspend modifier), with an
additional Continuation argument:
funbackgroundWork(callback:Continuation<Int>):Int{// some background work on another thread, which returns an Int}
Note
Suspending functions are compiled to regular functions taking an additional Continuation object argument. This is an
implementation of Continuation Passing Style (CPS), a style of programming where control-flow is passed on in the
form of a Continuation object.
This Continuation object holds all the code that should be executed in the body of backgroundWork function.
What does the Kotlin compiler actually generates for this Continuation object?
For efficiency reasons, the Kotlin compiler generates a state-machine 7. A state-machine implementation is all about allocating as few objects as possible, because coroutines being lightweight, thousands of them might be running.
Inside this state-machine, each state corresponds to a suspension point inside the body of the suspending function.
Let’s take an example. Imagine that in an Android project, we use the presenter layer to execute some long-running
processes surrounding IO and graphic processing, where the following block has two suspension points with the
self-managed coroutine launched from the viewModelScope 8:
suspendfunrenderImage(){valpath:String=getPath()valimage=fetchImage(path)// first suspension point (fetchImage is a suspending function)valclipped=clipImage(image)// second suspension point (clipImage is a suspending function)postProcess(clipped)}/** Here is an example of usage of the [renderImage] suspending function */funonStart(){viewModelScope.launch(Dispatchers.IO){renderImage()}}
The compiler generates an anonymous class which implements the Continuation interface. To give you a sense of what is
actually generated, we’ll provide a pseudo code of what is generated for the renderImage suspending function.
The class has a state field holding the current state of the state machine, and fields for each variable that are
shared between states.
object:Continuation<Unit>{// stateprivatevarstate=0// fieldsprivatevarpath:String?=nullprivatevarimage:Image?=nullfunresumeWith(result:Any){when(state){0->{path=getPath()state=1// Pass this state-machine as Continuation.valfirstResult=fetchImage(path,this)if(firstResult==COROUTINE_SUSPENDED)return// If we didn't get COROUTINE_SUSPENDED, we received an// actual Image instance, execution shall proceed to// the next state.resumeWith(firstResult)}1->{image=resultasImagestate=2valsecondResult=clipImage(image,this)if(secondResult==COROUTINE_SUSPENDED)returnresumeWith(secondResult)}2->{valclipped=resultasImagepostProcess(clipped)}else->throwIllegalStateException()}}}
This state-machine is initialized with state = 0. Consequently, when the coroutine started with launch invokes the
renderImage suspending function, the execution “jumps” to the first case (0). We retrieve a path, set the next state to
1, then invoke fetchImage - which is the first suspending function in the body of renderImage.
At this stage, there are two possible scenarios:
-
fetchImageexpectedly requires some time to return anImageinstance, and immediately returnsCOROUTINE_SUSPENDEDvalue. By returning this specific value,fetchImagebasically tells: “I need more time to return an actual value, so give me your state-machine object, and I’ll use it when I have a result”. WhenfetchImagefinally has anImageinstance, it invokesstateMachine.resumeWith(image). Since at this pointstateequals 1, the execution “jumps” to the second case of thewhenstatement. -
fetchImageimmediately returns anImageinstance. In this case, execution proceeds with the next state (viaresumeWith(image)).
The rest of the execution follows the same pattern, until the code of the last state invokes the postProcess function.
Note
This explanation is not the exact state of the state machine generated in the bytecode, but rather, a pseudo-code of its representative logic to convey the main idea. For the sake of pragmatic everyday use, what is less important is implementation details of the actual finite state machine generated in the Kotlin bytecode, and more for the Android developer to understand what happens under the hood.
Conceptually, when you invoke a suspending function, a callback (Continuation) is created along with generated
structures, so that the rest of the code after the suspending function will be called only when the suspending function
returns.
With less time spent on boilerplate code, you can focus on business logic and high level concepts.
So far, we’ve analyzed how the Kotlin compiler restructures our code under the hood, in such a way that we don’t have to
write callbacks on our own.However, you don’t have to be fully aware of the finite state-machine code generation to use
suspending functions. Only the concept is important to grasp. For this purpose, nothing is better than practicing!
Using coroutines and suspending functions, a practical example
Now imagine that in an Android application you wish to load a user’s profile with an id. When navigating to the profile,
it might make sense to fetch the user’s data based on the id in a method named fetchAndLoadProfile.
Using what you’ve learned in the previous section, you can use coroutines for that.
For now, assume that somewhere in your app (typically a controller in MVC architecture, or a
ViewModel in MVVM), you have a CoroutineScope which has this dispatcher Dispatchers.Main
in its CoroutineContext. In this case, we say that this scope dispatches coroutines on the main thread,
which is identical to default behavior. In the next chapters we will give you detailed explanations and examples
of coroutine scopes - how you can access and create them yourself if you need to.
The fact that scope defaults to the main thread isn’t limiting in any way, since you can create coroutines with any
CoroutineDispatcher you want inside this scope. This implementation of fetchAndLoadProfile illustrates this:
funfetchAndLoadProfile(id:String){scope.launch{valprofileDeferred=async(Dispatchers.Default){fetchProfile(id)}valprofile=profileDeferred.await()loadProfile(profile)}}
This is done in four steps:

Start with a
launch. You want thefetchAndLoadProfileto return immediately so you can proceed serially on the main thread. Since the scope defaults to the main thread, a launch without additional context inherits the scope’s context, so runs on the main thread.
Using
asyncandDispatchers.Default, you callfetchProfile, which is a blocking call. As a reminder, usingDispatchers.Defaultresults in havingfetchProfileexecuted on a thread pool. You immediately get aDeferred<Profile>, which you nameprofileDeferred. At this point, ongoing background work is being done on one of the threads of the thread pool. This is the signature offetchProfile:fun fetchProfile(id: String): Profile { // impl }. It’s a blocking call which might perform a database query on a remote server.
You cannot use
profileDeferredright away to load the profile - you need to wait for the result of the background query. This is done usingprofileDeferred.await(), which will generate and return aProfileinstance.
Finally, you can invoke
loadProfileusing the obtained profile. As the outer launch inherits its context from the parent scope,loadProfileis invoked on the main thread. We’re assuming that this is expected, as most UI-related operations have to be done on the main thread.
Whenever you invoke fetchAndLoadProfile, a background processing is done off UI thread to retrieve a profile. As soon
as the profile is available, the UI is updated. You can invoke fetchAndLoadProfile from whatever thread you want - it
won’t change the fact that loadProfile is eventually called on the UI thread.
Not bad, but we can do better
Notice how this code reads from top to bottom, without indirection and callbacks. However, you could argue that the
“profileDeferred” naming and the await calls feels clunky. It could be even more apparent when you fetch a profile,
wait for it, then load it. This is where suspending functions come into play.
Suspending functions are at the heart of the coroutine framework.
Tip
Conceptually, a suspending function is a function which may not return immediately. If it doesn’t return right away, it suspends the coroutine that called this suspending function while computation occurs. This inner computation should not block the calling thread. Later, the coroutine is resumed when the inner computation completes.
A suspending function can only be called from inside a coroutine or from another suspending function.
By “suspend the coroutine”, we mean that the coroutine execution is stopped. Here is an example:
suspendfunbackgroundWork():Int{// some background work on another thread, which returns an Int}
First off, a suspending function isn’t a regular function - it has its own suspend keyword.
It can have a return type, but notice that in this case it doesn’t return a Deferred<Int> - only bare
Int.
Secondly, it can only be invoked from a coroutine, or another suspending function.
Back to our previous example, fetching and waiting for a profile was done with an async block.
This is conceptually exactly the purpose of a suspending function. We’ll borrow the same name as the
blocking fetchProfile function and re-write it like this:
suspendfunfetchProfile(id:String):Profile{// for now, we’re not showing the implementation}
The two major differences with the original async block are the suspend modifier and the return type.
This allows you to simplify fetchAndLoadProfile:
funfetchAndLoadProfile(id:String){scope.launch{valprofile=fetchProfile(id)// suspendsloadProfile(profile)}}
Now that fetchProfile is a suspending function, the coroutine started by launch is suspended when invoking fetchProfile.
Suspended means that the execution of the coroutine is stopped - that the next line does not execute.
It will remain suspended until the profile is retrieved, at which point the coroutine started
by launch resumes. The next line (loadProfile) is then executed.
Notice how this reads like procedural code. Imagine how you would implement a complex, asynchronous logic where each step requires a result from the previous one. You would call suspending functions like this, one after another, in a classic procedural style. Code which is easy to understand is more maintainable. This is one of the most immediately helpful aspects of suspending functions.
As a bonus, IntelliJ IDEA and Android Studio help you in spotting suspending calls in one glimpse. In this screenshot, you can see a symbol in the margin indicating a suspending call:

Figure 3-12. suspend call
When you see this symbol in the margin, you know that a coroutine can temporarily suspend at this line.
Don’t be mistaken about the suspend modifier
However impressive it looks, adding the suspend modifier to a regular function doesn’t magically turn it into a
non-blocking function.
There’s more to it, and here is an example with the suspending fetchProfile function:
suspendfunfetchProfile(id:String)=withContext(Dispatchers.Default){// same implementation as the original fetchProfile, which returns a Profile instance}
fetchProfile(...) uses the withContext function from the coroutines framework, which accepts a CoroutineContext
as parameter.
In this case, we provide Dispatchers.Default as the context.
Almost every single time you’ll use withContext, you’ll only provide a Dispatcher.
The thread that will execute the body of withContext is determined by the provided Dispatcher. For example, using
Dispatchers.Default, it would be one of the thread of the thread-pool dedicated for CPU-bound tasks. In the case of
Dispatchers.Main, it would be the main thread.
Why and how does fetchProfile suspend?
This is an implementation detail of withContext and of the coroutine framework in general.
The most important concept to remember is simple: a coroutine calling a suspending function might suspend its execution. In coroutine parlance, we say that it reaches a suspension point.
Why did we say that it might suspend? Imagine that inside your implementation of fetchProfile,
you check whether you have the associated profile in cache.
If you have the data in the cache, you may immediately return it. Then there’s no need to suspend the
execution of the outer coroutine 9.
There are several ways to create a suspending function. Using withContext is only one of them, although
probably the most common.
Summary
-
Coroutines are always launched from a
CoroutineScope. In structured concurrency parlance, theCoroutineScopeis the parent, and coroutines themselves are children of that scope. ACoroutineScopecan be a child of an existingCoroutineScope. See the next chapter to get aCoroutineScopeor make one. -
A
CoroutineScopecan be seen as a root coroutine. In fact, anything which has aJobcan be technically considered as being a coroutine. The only difference is the intended usage. A scope is meant to encompass his child coroutines. As you’ve seen in the beginning of this chapter, a cancellation of a scope results in the cancellation of all of its child coroutines. -
launchis a coroutine builder which returns a Job instance. It is meant for “fire and forget”. -
asyncis a coroutine builder which can return values, very much like Promises and Futures. It returns an instance ofDeferred<T>, which is a specializedJob. -
A
Jobis a handle on the life cycle of a coroutine. -
The context of a newly created coroutine started with launch or async, the coroutine context, inherits from the scope context and from the context passed in as a parameter (the supplied context)- the latter taking precedence over the former. One context element is always freshly created: the
Jobof the coroutine. For example:
launch(Dispatchers.Main){async{// inherits the context of the parent, so is dispatched on// the main thread}}
-
A suspending function denotes a function which might not return immediately. Using
withContextand the appropriateDispatcher, any blocking function can be turned into a non-blocking suspending function. -
A coroutine is typically made of several calls to suspending functions. Everytime a suspending function is invoked, a suspension point is reached. The execution of the coroutine is stopped at each of those suspension points, until it is resumed 10.
A final word on this chapter
Scope and context are new notions and are just one aspect of the coroutine mechanism. Other topics like exception handling, and cooperative cancellation will be covered in the next chapter.
1 In this scenario, job.cancel() has no effect on the coroutine started by launch. We’ll touch on that in the next chapter (a coroutine must be cooperative with cancellation to be cancellable)
2 This suspends the calling coroutine until the value is retrieved, or an exception is thrown if the coroutine started with async is cancelled or failed with an exception. More on that later in this chapter.
3 We assume that exceptions are handled and don’t interfere with the execution flow
4 The join() method of a thread causes the calling thread to go into a waiting state. It remains in a waiting state until the original thread terminates.
5 A failure of an entity corresponds to any abnormal event the entity cannot recover from. This is typically implemented using unhandled or thrown exceptions.
6 You may have noticed that nothing prevents you from passing a Job instance inside the “provided context”. What happens then? Following the logic explained, this Job instance becomes the parent of the Job of the coroutine context (e.g, the newly created coroutine). So the scope is no longer the parent of the coroutine; the parent-child relation is broken. This is the reason why doing so is strongly discouraged, except in specific scenarios which wil l be explained in the next chapter.
7 Actually, when a suspending function only invokes a single suspending function as tail call, a state machine isn’t required.
8 viewModelScope is coming from the androidx implementation of ViewModel. A viewModelScope is scoped to the ViewModel lifetime. More on that in the next chapter.
9 We’ll show you how to do this later in Chapter 4
10 The coroutine mechanism resumes a coroutine when the suspending function which caused it to suspend exits