Working with XML Elements
Often it is necessary to do more than simply read and/or display XML data; often you want to add data to an XML document. The XmlElement class is used to create new elements that can be appended to an existing XmlDocument object. Much like creating new DataRows in a DataTable, XmlElements are created by setting an instance of the XmlElement class to the result of calling XmlDocument.CreateElement([element name]). For example, it would be very useful to add new users to the users.xml document in the previous examples. Effectively, you could create a Web Form for adding new users to your application by accepting the user information in a form and creating a new <User> element in the users.xml document.
Creating an instance of the XmlNode class that represents the root element of the XML document is the first step in adding new elements to an XmlDocument. You then create a new XmlElement for each element that you are adding by calling XmlDocument.CreateElement(). After the XmlElements have been created, and their values set, you append the elements to the XmlDocument by calling XmlNode.AppendChild(XmlElement), where XmlNode is an instance of the XmlDocument's root element. Listing 12.11 shows how to do this.
Listing 12.11. Adding Elements to the XmlDocument Class
[VB]
01: <%@ Import Namespace="System.Xml" %>
02: <script language="VB" runat=server>
03: Protected Sub Page_Load(Sender As Object, E As EventArgs)
04: If Not IsPostBack Then
05: Dim xmlDoc As XmlDocument = New XmlDocument()
06: xmlDoc.Load(Server.MapPath("users.xml"))
07: myXml.Document = xmlDoc
08: End If
09: End Sub
10:
11: Protected Sub Submit_Click(Sender As Object, E As EventArgs)
12: Dim xmlDoc As XmlDocument = New XmlDocument()
13: xmlDoc.Load(Server.MapPath("users.xml"))
14:
15: Dim xmlRoot As XmlNode = xmlDoc.DocumentElement
16:
17: Dim xmlUser As XmlElement = xmlDoc.CreateElement("User")
18: Dim xmlName As XmlElement = xmlDoc.CreateElement("Name")
19: Dim xmlEmail As XmlElement = xmlDoc.CreateElement("Email")
20: Dim xmlPassword As XmlElement = xmlDoc.CreateElement("Password")
21:
22: xmlName.InnerXml = Name.Text
23: xmlEmail.InnerXml = Email.Text
24: xmlPassword.InnerXml = Password.Text
25:
26: xmlUser.AppendChild(xmlName)
27: xmlUser.AppendChild(xmlEmail)
28: xmlUser.AppendChild(xmlPassword)
29: xmlRoot.AppendChild(xmlUser)
30:
31: xmlDoc.Save(Server.MapPath("users.xml"))
32: xmlDoc.Load(Server.MapPath("users.xml"))
33: myXml.Document = xmlDoc
34: End Sub
35: </script>
[C#]
01: <%@ Import Namespace="System.Xml" %>
02: <script language="C#" runat=server>
03: protected void Page_Load(Object sender, EventArgs e){
04: if(!IsPostBack){
05: XmlDocument xmlDoc = new XmlDocument();
06: xmlDoc.Load(Server.MapPath("users.xml"));
07: myXml.Document = xmlDoc;
08: }
09: }
10:
11: protected void Submit_Click(Object sender, EventArgs e){
12: XmlDocument xmlDoc = new XmlDocument();
13: xmlDoc.Load(Server.MapPath("users.xml"));
14:
15: XmlNode xmlRoot = xmlDoc.DocumentElement;
16:
17: XmlElement xmlUser = xmlDoc.CreateElement("User");
18: XmlElement xmlName = xmlDoc.CreateElement("Name");
19: XmlElement xmlEmail = xmlDoc.CreateElement("Email");
20: XmlElement xmlPassword = xmlDoc.CreateElement("Password");
21:
22: xmlName.InnerXml = Name.Text;
23: xmlEmail.InnerXml = Email.Text;
24: xmlPassword.InnerXml = Password.Text;
25:
26: xmlUser.AppendChild(xmlName);
27: xmlUser.AppendChild(xmlEmail);
28: xmlUser.AppendChild(xmlPassword);
29: xmlRoot.AppendChild(xmlUser);
30:
31: xmlDoc.Save(Server.MapPath("users.xml"));
32: xmlDoc.Load(Server.MapPath("users.xml"));
33: myXml.Document = xmlDoc;
34: }
35: </script>
[VB & C#]
36: <html>
37: <head>
38: <title>Programming Datadriven Web Apps - Chapter 12</title>
39: <style rel="stylesheet" type="text/css">
40: H3 { font: bold 11pt Verdana, Arial, sans-serif;}
41: .label { font: bold 9pt Verdana, Arial, sans-serif;}
42: .header { font: bold 9pt Verdana, Arial, sans-serif; background-color:tan; color:
|
In Listing 12.11, you create a Web Form that has TextBoxes for inputting the user name, e-mail, and password (for sample purposes, the password TextBox does not mask the password when it is entered). Clicking on the Submit New User button fires the Submit_Click() event handler. In the Submit_Click() event handler, you reload the XML document and add the new elements to it.
On line 15, you create an instance of the XmlNode class and set it to the xmlDoc.DocumentElement property. This is the parent, or root element, of the XmlDocument. On lines 17 through 20, you create a new instance of the XmlElement class for each element you are adding. On lines 22 through 24, you set the InnerXml property of each XmlElement to the appropriate values from the TextBoxes. On lines 26 through 28, you append the child elements—<Name>, <Email>, and <Password> to the <User> element. On line 29, you append the <User> element to the XmlNode object, which represents the XmlDocument root element. Basically what you have done is add the following XML element to the XmlDocument object:
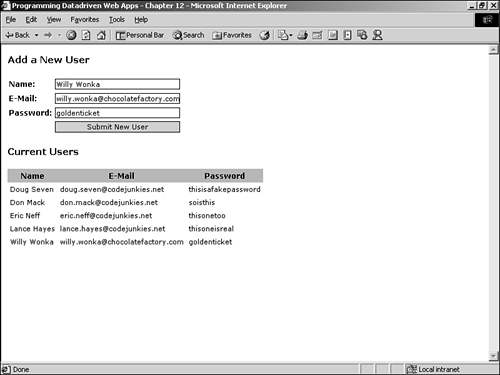
<User>
 <Name>Willy Wonka</Name>
 <Email>[email protected]</Email>
 <Password>goldenticket</Password>
</User>
Of course, the primary goal here is to persist the revised XmlDocument to disk. This is done by calling XmlDocument.Save() to write the XmlDocument to the file system. You pass in the path to save to as the only argument. This is done on line 31. Before exiting the Submit_Click() event handler, you reload the XmlDocument and set it to the Xml server control's Document property. The reloading is only to show you that the XML data was written to the users.xml file. Figure 12.6 shows the rendered Web Form after the Submit New User button has been clicked.
Figure 12.6. New elements can be added to an XML document by creating instances of the XmlElement class and appending them to the XmlDocument's root element.