
So far in this book, you have worked with models that closely match the database. You have made some simple changes to the names of entities, and in one case you went deeper and leveraged inheritance in the model.
The Entity Data Model (EDM) offers enormous flexibility when it comes to customizing models so that they are more than mere reflections of your database. This capability is one of the main reasons many developers choose to use the Entity Framework.
In this chapter, you will learn about the many ways in which you can customize an EDM, the benefits of these customizations, and when you would want to take advantage of them. Although most customization occurs in the Conceptual Schema Definition Layer (CSDL), you can use additional mappings and even storage schema modifications to create a model that truly describes your data in a way that fits well with your vision of how the data should look.
Customizations that are created in the conceptual layer are dependent on their mappings back to the database to function properly. Because of this, the customizations are more often referred to as mappings, as you will see throughout this chapter.
You will also learn how to build queries using the new mappings and interact with the objects that are based on the various entities.
A number of modeling techniques are related to stored procedures as well. I will cover those in the next chapter.
This chapter will first cover mappings that you can achieve using the Designer. These are the mappings that are more commonly used. The EDM allows other types of model customizations, but unfortunately the Designer does not currently support them. Later in this chapter, we’ll look at additional modeling techniques that require you to manually modify the XML. Many of the stored procedure mappings covered in the next chapter will also require manually editing the EDMX file.
The Designer-supported mappings are inheritance mapping (implemented in a number of ways), conditional mapping, and entity splitting (sometimes called vertical splitting), which allows you to build an entity that maps back to multiple tables. We’ll start with the most common implementation for inheritance, Table per Type (TPT). While working through the TPT implementation, you’ll also learn about inheritance in the model in general.
The BreakAway business has a number of different types of
contacts. The Contact table keeps
track of the common information for all contacts, such as FirstName and LastName. Some of those contacts are
customers, and a separate table keeps track of the additional
information about these types of contacts—their preferences, notes, and
the date they first became customers. In the past few chapters, when
working with customers you have had to constantly go back to the
Contacts entity to get the customers’
names and addresses.
In object-oriented programming, when one object is a type of
another object, you can use inheritance to share properties so that the
properties of a base type (e.g., Contact) are exposed directly in a derived
type (e.g., Customer). The EDM
supports inheritance as well. The inheritance mapping used to allow
Customer to derive from Contact and absorb Contact’s properties is called Table
per Type inheritance. Let’s investigate this one first, and
modify the model to simplify working with customers.
Table per Type (TPT) inheritance defines an inheritance that is described in the database with separate tables where one table provides additional details that describe a new type based on another table. Figure 12-1 depicts the concept of TPT inheritance.
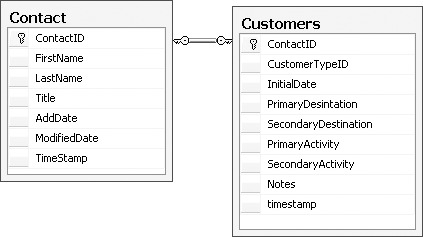
Figure 12-1 shows
a 1:0..1 (One to Zero or One) relationship between Contact and Customer in the database. This means a
Contact could have a related Customer entity, but it’s not required. It
also means a Contact cannot have more
than one related Customer entity. The Customer table provides additional information
about this subset of the contacts.
Let’s replace the navigation that the Entity Data Model Wizard
created between Contact and Customer with an inheritance hierarchy that
maps back to the database tables.
Warning
Samples used throughout the rest of this book will be dependent on most of the model changes that the mapping walkthroughs in the chapter describe. If you are following the examples, be sure to perform the steps described in this chapter. A few of the walkthroughs at the end of the chapter are not used by later examples (these are noted).
Delete the association between
ContactandCustomerthat the EDM Wizard created when you originally created the model in Chapter 7.You can do this by selecting the line that represents the association and deleting it.
Add an inheritance object between the
Contactand theCustomer, withContactas the base type andCustomeras the derived type.The Designer provides two ways to add inheritance. You can select an inheritance object from the Toolbox and click on the entity that will be derived from the other entity, or you can add it from an entity’s context menu. Let’s use the context menu method.
Right-click the
Contactentity. Choose Add and then Inheritance from the context menu.In the Add Inheritance window, select Contact as the base entity and Customer as the derived entity, as show in Figure 12-2.
Customerwill inherit properties fromContact.Delete the
EntityKey(ContactID) from the derived type (Customer).Customerwill now inherit itsEntityKeyfromContact.Open the Mapping Details window for
Customer.Map the
Customer’s newContactIDproperty (which now comes from theContactentity) to theContactIDcolumn in theCustomerstable.
When the inheritance is set up, the Customer entity will have a glyph at the top
that indicates it is inheriting from Contact. There is an inheritance line
between the two entities as well, with the arrow pointing to the base
entity (see Figure 12-3).

Because the Customer’s
ContactID was deleted so that it
can now inherit from Contact, a
number of the mappings for associations involving Customer were broken. If you compile the
model, you’ll find a list of mapping errors. The associations still
exist, so you’ll need to remap the associations.
Note
Understanding how to map associations in the model is another important mapping technique. The inheritance you are building conveniently forces you to learn this as well.
The Customer entity has six
associations defined with other entities. This will be a good lesson
in mapping associations, because this task is not very intuitive in
the Designer.
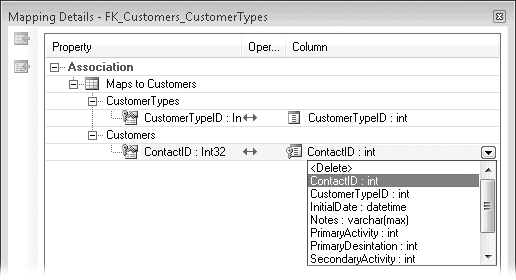
Select the association between Customer and CustomerType. You’ll see that the CustomerTypeID mapping
is still in place, but the ContactID mapping to the Customers table is gone. Select ContactID in
the drop-down under Column to map from the ContactID property, as shown in Figure 12-4.
Remap the ContactID property
in the association between Customer
and Reservation.
Although you could edit the existing mappings for the
associations, you will be better off completely removing and
re-creating the four associations between Customer, Activity, and Destinations. As you delete the
associations, the navigation properties will also disappear. Don’t
worry; they will return as you re-create the associations.
There are two associations between Customer and Activity. In the following exercise, you
will create the first Activity
association and mapping:
Create the first association by selecting the
Associationcontrol from the ToolBox and positioning the cursor on theCustomerentity. Click on theCustomerentity, which will set the first end of the association, then click theActivityentity to set the other end of the association.Fix the navigation property names. In the
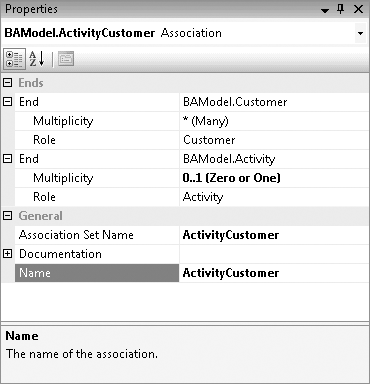
Activityentity, rename theCustomernavigation property toPrimaryPrefCustomers. In theCustomerentity, renameActivitytoPrimaryActivity.Define the multiplicity between the entities. The relationship between
ActivityandCustomeris 0..1:*, which means you can have zero or one activity for a customer and each activity can be mapped to many customers. In the Properties window, edit the ends of the association so that the activity end is 0..1 (Zero or One) and the customer end is * (Many), as shown in Figure 12-5.Warning
There is a bug in the Designer that is related to 0..1:* mappings. You should create the mapping first as a 1:* (with the Activity end as the “one” and Customer as the “many”), and then define the mappings in step 4. Then return to the association’s properties and change the Activity end to 0..1 (“zero or one”). The Designer must insert a condition element for the mapping but neglects to when mapping a 0..1 end. By performing the steps in this order, the condition element will be inserted properly. Follow the same steps for the other 0..1:* associations.
Create the mapping by right-clicking the association and selecting Table Mapping to get to the association mappings.
When creating association mappings, if there is a Many end of the association, choose its table for the Maps To option. In this case,
Customeris on the Many end of the relationship, so selectCustomersfor the mapping.ContactIDshould map automatically. MapActivityIDto theCustomers.PrimaryActivitycolumn, as shown in Figure 12-6.

Now you can create the second mapping between Customer and Activity. To begin, add another association
between Customer and Activity. Follow steps 1–4 in the preceding
exercise, but this time change the navigation properties to SecondaryCustomerPrefs and SecondaryActivity, fix the multiplicity, and
then map the association to Customers.SecondaryActivity and Customers.ContactID.
Follow steps 1–4 again to remap the associations used for the
Customer’s PrimaryDestination and SecondaryDestination properties. The
navigation properties for the first association will be PrimaryCustomerPrefs and PrimaryDestination. This association will
map to the Customers.PrimaryDestination property. The
navigation properties for the second association will be SecondaryCustomerPrefs and SecondaryDestination. This association will
map to the Customers.SecondaryDestination property.
Both the Customers and the
Contact tables have a TimeStamp column for concurrency checking.
However, because the Customer is
inheriting all of the properties of Contact, the Customer now has two TimeStamp properties. To avoid conflict,
change the name of the Customer’s
TimeStamp property to custTimeStamp. In Chapter 18, you’ll learn more
about concurrency with inherited types.
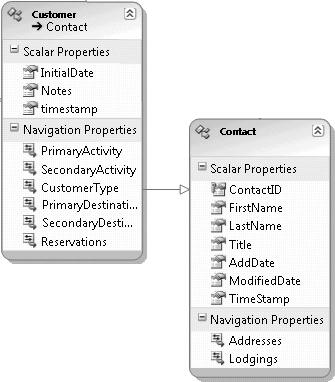
As a result of the inheritance, the Customer object inherits the Contact properties. You no longer need to
navigate to Contact to get the
Customer’s LastName, FirstName, or other Contact properties. You can also navigate
directly to the Addresses
EntityCollection through the Addresses property.
In the model, this means the Customers
EntitySet is now gone, and Customer is served up from the Contacts EntitySet. When you request
Contacts, those Contacts that have a Customer entity will be returned as Customer types.
To query for customers specifically, you will need to use the
OfType method to specify which type
of contact you are seeking, as shown in the following code:
VB
From c in Contacts.OfType(Of Customer) Select c
C#
from c in Contacts.OfType<Customer> select c;You’ll see many more examples of querying types in an inheritance hierarchy throughout this chapter and the rest of the book.
To test this new TPT inheritance, as well as the various customizations you will be creating further on in this chapter, create a new Console Application project and then follow these steps:
Set up the Console Application project to use the model, as you did with the previous projects:
Add a reference to
System.Data.Entity.Add a reference to the model project.
Copy the connection string from the model’s app.config file into the new project’s app.config file.
Open the project’s main code file (Module1.vb or program.cs).
Import the model’s namespace at the top of the code file using the following commands:
VB
Imports BAGA.BreakAwayModel
C#
using BAGA.BreakAwayModel;Let’s see the inheritance in action.
Add the method in Example 12-1 to the test module. This will query for contacts who are customers.
Example 12-1. Querying a derived type
VB
Private Sub TPTMap()
  Using context As New BAEntities
    Dim query = From c In context.Contacts.OfType(Of Customer)() _
                Select c
    Console.WriteLine("Customers: " & query.Count.ToString)
    'query all Contacts
    Console.WriteLine("All Contacts: " & _
                      context.Contacts.Count.ToString)

    Dim newCust As New Customer
    With newCust
      .FirstName = "Noam"
      .LastName = "Ben-Ami"
    End With
    context.AddToContacts(newCust)

    context.SaveChanges()
  End Using
End Sub
C# private static void TPTMap() { using (BAEntities context = new BAEntities()) { var query = from c in context.Contacts.OfType<Customer>() select c; Console.WriteLine("Customers: " + query.Count().ToString()); //query all Contacts Console.WriteLine("All Contacts: " + context.Contacts.Count().ToString()); Customer newCust = new Customer(); newCust.FirstName = "Noam"; newCust.LastName = "Ben-Ami"; context.AddToContacts(newCust); context.SaveChanges(); } }Call the
TPTMapmethod from the module’sMainmethod.Set a breakpoint at the line that instantiates
newCust.Run the application.
When debugging the Customer
results, you can see that the Customer has inherited the LastName and FirstName properties of Contact. When debugging the Contact results, you can see that only the
Contact properties are there, even
for contacts who are customers.
Finally, looking at the counts displayed in the output, you’ll find that the number of queried customers is much smaller than the number of contacts, and is, in fact, a subset of contacts.
In Example 12-1, a Customer was created in memory, added to the
context, and then saved to the database with context.SaveChanges. When SaveChanges is called, the Entity Framework
constructs commands to first create a new Contact record, and then, based on the newly
generated ID returned from the database, to create the Customer record.
Example 12-2
shows the two commands executed on the database as a result of the
code in Example 12-1. The first inserts
a contact and does a SELECT to
return the new ContactID and TimeStamp. The second inserts a new Customer using the new ContactID, 851.
Example 12-2. T-SQL commands created based on the new Customer created in the previous example
exec sp_executesql
N'insert [dbo].[Contact]([FirstName], [LastName],
  [Title], [AddDate], [ModifiedDate])
  values (@0, @1, null, @2, @3)
  select [ContactID], [TimeStamp]
  from [dbo].[Contact]
  where @@ROWCOUNT > 0 and [ContactID] = scope_identity()',
N'@0 nchar(4),@1 nchar(7),@2 datetime2(7),@3 datetime2(7)',
  @0=N'Noam',@1=N'Ben-Ami',@2='2008-10-23 14:07:33.7290000',
  @3='2008-10-23 14:07:34.6000000'

exec sp_executesql
N'insert [dbo].[Customers]([ContactID], [CustomerTypeID], [InitialDate],
  [PrimaryDesintation], [SecondaryDestination], [PrimaryActivity],
  [SecondaryActivity], [Notes])
  values (@0, @1, null, null, null, null, null, null)
  select [timestamp]
  from [dbo].[Customers]
  where @@ROWCOUNT > 0 and [ContactID] = @0',
N'@0 int,@1 int',@0=851,@1=1
Notice that the AddDate and
ModifiedDate have values in the
Contact insert, and the Customer insert has a value for CustomerTypeID. These values are coming from
the custom SavingChanges event you
built in the preceding chapter. The new Customer record is seen as both a Contact type and a Customer type. Therefore, as SavingChanges tested for the entity type and
populated values based on that, the new Customer entity got the required values for
Contact and for Customer.
You can explicitly query for different types within an
inheritance structure. To specify a derived type with LINQ or Object
Services you can append the OfType
method to the entity set being queried:
VB
Context.Contacts.OfType(Of Customer)
C#
Context.Contacts.OfType<Customer>
You can do this in a variety of other ways in LINQ, as well.
In Visual Basic, you can use the TypeOf operator for type
filtering:
VB
From c In context.Contacts  _
Where TypeOf c Is Customer Select c

From c In context.Contacts  _
Where Not TypeOf c Is Customer Select c
In C#, you can do direct type comparison:
C#
from c in context.Contacts where c is Customer select c;

from c in context.Contacts where !(c is Customer) select c;
Entity SQL also has operators for working with types, and in fact, it can filter out types in a way that is not possible with LINQ to Entities.
The type operators you will use most commonly in Entity SQL are
OFTYPE and IS [NOT] OF. The following code snippets
represent examples of how you could rewrite the preceding queries with
Entity SQL. Note that you could do this by using query builder
methods, as well.
To return only Customer
types:
SELECT VALUE c
FROM OFTYPE(BAEntities.Contacts, BAModel.Customer)
AS c
To return Contacts which are
not Customer types:
SELECT VALUE c
FROM BAEntities.Contacts
AS c
where c IS NOT OF(BAModel.Customer)
There is an additional Entity SQL operator called TREAT AS that allows you to do type casting
directly in the Entity SQL expression.
The preceding two Entity SQL expressions will return results
that are still shaped like Contacts. To ensure that the results are
shaped like the types that you are seeking, you’ll need to use
TREAT AS. As with the OFTYPE operator, be sure to use the assembly
namespace in the strongly typed name of the type you are casting
to.
To return only Customer types
that are type-cast as Customer
types:
SELECT VALUE TREAT(c AS BAModel.Customer)
FROM OFTYPE(BAEntities.Contacts, BAModel.Customer)
AS c
As you can see, you can also use Object Services and EntityClient with Entity SQL to build more
complex queries around types.
In LINQ, the safest way to do type filtering is to use the
OfType method, because the rest of
the query will know you are working with Customer and not Contact, so you can do any filtering or
projection based on Customer
properties.
When you place the type filter in the Where clause, the rest of the query is still
based on the type being queried—in the preceding example, Contact. You won’t be able to do projection
or filtering on Customer
properties.
What if you have a contact that becomes a customer? This is an important business rule for BreakAway Geek Adventures, and one that TPT inheritance doesn’t readily support. This isn’t to say that the Entity Framework doesn’t support this scenario, but TPT by definition doesn’t support it.
Let’s look at what may seem like logical options using the Entity Framework, and why they won’t work. The counterpoints provide a lot of insight into the workings of Object Services:
- Add a new
Customerobject As you have seen, adding a new
Customerobject will cause a newContactto be created in the database. Therefore, you can’t just add a new customer for an existing contact.- Create a new
Customerand populate itsContactIDwith theContactIDof theContact If the
Contactis not in the context, the Entity Framework will still see this as a newCustomerand will try to add theContactto the database.- Get the
Contactinto the context and add a newCustomerwith the sameContactID Both the
Contactand theCustomerare members of theContactsentity set. You will not be able to add theCustomerto the context because a member of theContactsentity set with the sameEntityKeyalready exists in the context.- Detach the
Contactfrom the context, setCustomer.EntityKey=Contact.EntityKeyandCustomer.ContactID=Contact.ContactID, detach theContactfrom the context and attach theCustomerinstead, and then callSaveChanges You would be getting closer to a solution with this. However, the
Customerwill be seen as having no changes, and therefore nothing will happen whenSaveChangesis called. If you do something to make theCustomer“modified,” the database command that results will be to update a nonexistentCustomerrecord, and that too would fail.- Use Entity SQL’s
TREAToperator to “upcast” theContactto aCustomertype Unfortunately, this won’t work either. The Entity Framework cannot cast from one type to another.
Note
In addition to OFTYPE and
IS [NOT] OF, which you saw
earlier, the TREAT operator is
another operator you can use in Entity SQL queries for type
inspection.
Although you may want to continue banging your head against the
wall with creative hacks, the reality is that TPT inheritance does not
support this scenario, and even with all of the other benefits that
came along with having Customer
inherit from Contact, this is a big
problem.
Having Customer inherit from
Contact is something you should
consider prior to designing your EDM. TPT inheritance may be perfect
for your business model; it may create some rare annoyances; or it may
not be the right way to go at all. These are decisions you’ll need to
make.
Given the existing model, the best way to create a Customer for an existing Contact is to use a stored procedure. Not a
stored procedure that is wired up to the Customer entity through mappings, but a
separate one that can be called explicitly from code. This will allow
you to have your cake (the convenience of the derived type) and eat it
too (perform functions that TPT inheritance does not support). We will
discuss stored procedures in the next chapter, and at that time you’ll
see how to leverage the EDM’s flexibility to solve this
problem.
In the current inheritance model, the base type, Contact, is instantiated for some entities,
and Customer is instantiated for
others. It is possible to have base types that are
abstract, which means they are there to help
define the structure of entities that derive from them, but they will
never be instantiated.
If you turned Contact into an
abstract type, however, a few hundred contacts (those that are not
customers) will never appear in your application because they won’t
have an instantiated type to map to. You would have no way to access
contacts who are not customers.
To solve this you need to create derived entities to represent other types of contacts.
What would a derived type that accesses the non-customer contacts look like? Let’s modify the model to see:
Open the model in the Designer and select the
Contactentity.In the Properties window, change the value of the
Abstractproperty totrue.You will receive a warning saying that existing function mappings will be removed. Since you haven’t mapped any stored procedures to the
Contactentity, this isn’t a problem.Click OK. Now
Contactis an abstract type.Run the
TPTMapmethod again.When the breakpoint is hit, debug the results of the
Contactquery and you will see that only customers are returned. The entire set of data for contacts who are not customers is missing.
Now it’s time to create the new derived type:
In the EDM Designer, create a new entity and name it
NonCustomer.Select Contact from the “Base type” drop-down list. The other fields in the Add Entity window will become disabled since they don’t pertain to a derived type.
Click OK.
That’s it. Because there are no additional fields in this new entity, there’s no need to do any mapping.
If you were to look in the raw XML of the EDMX file, the only instance of
NonCustomeryou will find in the XML (other than the Designer information) is this element in the CSDL:<EntityType Name="NonCustomer" BaseType="BAModel.Contact" > </EntityType>
Note
If any fields in the
Contactentity were relevant to a noncustomer but were not relevant to a customer, you could move them over to the new entity. That scenario would require additional mapping. But in this case, everything you need forNonCustomeris already provided by theContactabstract type.
Run the application again and check out the
Contactquery results in the debugger when you hit the breakpoint. All of the additional contacts are back asNonCustomers.
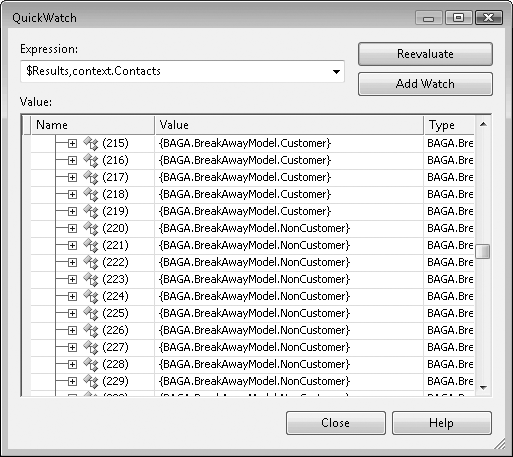
Remember that because you queried for just the Customers first and then all Contacts, the Customers that were pulled into the cache on
the first query will be up front. As you can see in Figure 12-7, when looking at
the results in the debugger, you’ll need to scroll down past the
Customer entities before you see
the NonCustomer entities.
Warning
With the NonCustomer entity
in the model, the model will present an error in the Error List that
reads “Entity type ‘NonCustomer’ is not mapped.” This is an
erroneous message due to a bug in the validators. You can ignore it
and it will not impact your ability to compile or run the
application.
I cover additional types of inheritance that the EDM supports later in this chapter.
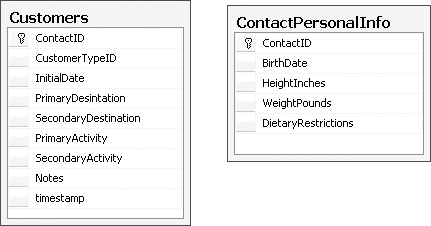
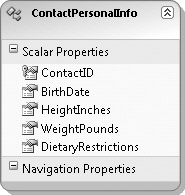
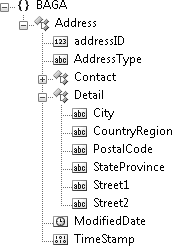
Entity splitting, also referred to as vertical splitting, allows you to map a single entity to more than one table. You can use entity splitting when tables share a common key; for example, if a contact’s personal and business information is stored in separate tables. You can use entity splitting as long as the primary keys in the two database tables match.
The model contains an entity that we have thus far ignored:
ContactPersonalInfo, which has a
ContactID property (see Figure 12-8 for the database
representation and Figure 12-9 for
the entity). The purpose of the database table from which the entity was
created is to provide additional information about customers that might
be useful for BreakAway employees to be aware of when these customers
participate in trips.
One way in which you can link this new entity to a customer is to
create a 1:1 association between Customers and ContactPersonalInfo using ContactID. That would make Customer a navigation
property of ContactPersonalInfo and
ContactPersonalInfo a navigation
property of Customer. However, this
wouldn’t be very convenient, because you would always have to traverse
the navigation to get to the properties—for example, Customer.ContactPersonalInfo.BirthDate.
Wouldn’t it be nice to just call Customer.BirthDate? Entity splitting can solve
this problem very easily, by mapping both the Customer table and the ContactPersonalInfo table to the Customer entity.
Thanks to the Designer’s copy-and-paste functionality, you can
easily copy the ContactPersonalInfo properties into the
Customer entity. Once you have done
that, all that’s left is to map the Customer entity’s new properties back to the
appropriate table:
Copy and paste all but the
ContactIDproperties fromContactPersonalInfointo theCustomerentity.Delete the
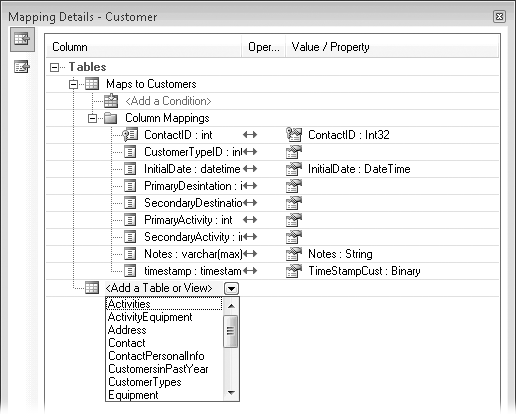
ContactPersonalInfoentity from the model.Open the table mappings for the
Customerentity.At the bottom of the property mappings, select Add a Table or View, which will cause a drop-down arrow to display to the right of the column, as you can see in Figure 12-10.
Click the drop-down arrow and choose ContactPersonalInfo from the list of available tables in the Store schema.
All of the column mappings except
ContactIDshould populate automatically.Map the
ContactIDcolumn to theContactIDproperty.Save the model.
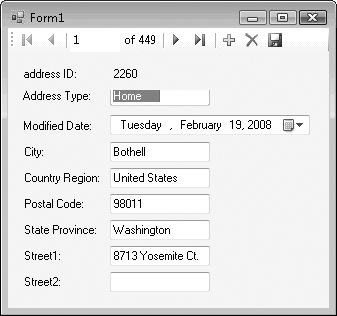
Now you can test the revised entity. In the following exercise, you’ll query the new entity, modify the returned object, create a new entity, and then save your changes. These actions will allow you to see how the Entity Framework handles an update and an insert involving multiple tables.
Add the method in Example 12-3 to the project’s main code file (Module1.vb or program.cs).
Example 12-3. Querying for and modifying a type that maps to multiple tables
VB
Private Sub EntitySplit()
  Using context = New BreakAwayEntities
    Dim firstCust = (From c In context.Contacts.OfType(Of Customer) _
                     Select c).FirstOrDefault
    firstCust.BirthDate = New Date("1981", "1", "24")

    Dim newcust = Customer.CreateCustomer(0, "Nola", "Claire", Now, Now)
    With newcust
      .HeightInches = 68
      .WeightPounds = 138
      .DietaryRestrictions = "Vegetarian"
    End With
    context.AddToContacts(newcust)
    context.SaveChanges()
  End Using
End Sub
C# private static void EntitySplit() { using (var context = new BAEntities()) { //query for a customer and modify a new property var firstCust = ( from c in context.Contacts.OfType<Customer>() select c).FirstOrDefault(); firstCust.BirthDate = new System.DateTime(1981, 1, 26); // Initialize two TimeSpamp's for the call to CreateCustomer byte[] contactTimestamp = new byte[] {0,0,0,0,0,0,0,0}; byte[] customerTimestamp = new byte[] {0,0,0,0,0,0,0,0}; var newCust = Customer.CreateCustomer (0, "Nola", "Claire", DateTime.Now, DateTime.Now, contactTimestamp, customerTimestamp); newcust.HeightInches = 68; newcust.WeightPounds = 138; newcust.DietaryRestrictions = "Vegetarian"; context.AddToContacts(newcust); //save modified customer and new customer to db context.SaveChanges(); } }Add code to call
EntitySplitin theMainmethod.Set a breakpoint at the line that instantiates the
newcustvariable.Run the project.
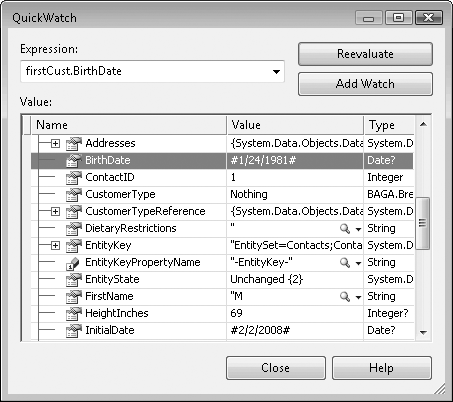
When the process stops at the breakpoint, debug the firstCust variable and you can see in the
QuickWatch window that the new properties of Customer are populated, as shown in Figure 12-11.
A quick check in SQL Profiler shows that when querying for the
first customer, an inner join was used to include the values from the
ContactPersonalInfo table.
The SQL Profiler screenshot in Figure 12-12 shows the
commands that are executed when editing a Customer and when adding a new Customer. The first two commands update the
ModifiedDate field in Contact and the BirthDate field in ContactPersonalInfo for the first
Customer that was queried and
edited. The newly added Customer
results in the creation of a Contact, a ContactPersonalInfo record, and finally, a
new row in the Customers
table.

The first insertion occurs because of the inheritance you
created between Customer and
Contact, but the insertion to the
ContactPersonalInfo table occurs
thanks to the entity splitting you just defined in the model. The
Entity Framework is able to work out this customization in the model
and translate it into the correct commands in the database without the
developer having to worry about modification operations or about the
fact that a number of tables are involved in the query.
The next area of customization to cover is conditional mapping. You can use conditional mapping directly when mapping an entity to the data store, or in inheritance scenarios. We’ll look at the first situation in this section and the second situation later in the chapter.
Conditional mapping places a permanent filter on an entity by defining that an entity will be mapped to data in the database under only certain conditions. Therefore, if you have a scenario in which you will need to filter data 100% of the time on a particular value, rather than having to add this filter to every single query you can define it as part of the mapping. Figure 12-13 depicts the concept of conditional mapping to ensure that only water-related activities are ever used in the application.

As an example, imagine that BreakAway Geek Adventures decides that from now on it will provide only water-related activities. However, it does not want to delete historical data from the database. The company can use conditional mapping to ensure that anytime activities are requested only water-related activities are brought into the application, and that anytime a new activity is created it will automatically be defined as a water activity.
As another example, rather than filtering by activity type, you
can introduce a Boolean field named Discontinued into the Activities table in the database. Then in the
conditional mapping, you can
create a filter that allows only activities to be returned from the
database when Discontinued=0 or
False.
It is possible to use conditional mapping in the following ways:
[value] Is Null |
[value] Is Not
Null |
[integer value] (e.g.,
1) |
[string value] (e.g.,
Water) |
The Designer supports conditional mapping, but in the Designer, you do not use the quotations around the integer or the string. In the XML, those values will be surrounded by quotations.
The Activity entity does
contain a Category property that is a
string. In the following section, we will walk through the first
scenario: working solely with activities whose category is
“Water”.
Warning
The changes made to the model in this walkthrough will not be used going forward. At the end of the walkthrough, you will be instructed to undo this mapping.
You must remove from the entity’s scalar properties whatever property you will be using for a conditional mapping:
Select the
Activityentity.Delete the
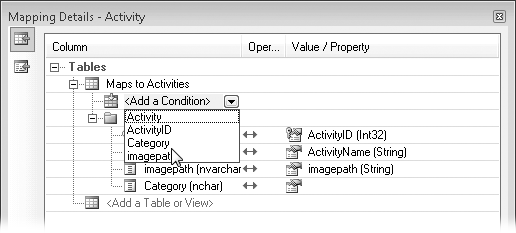
Categoryproperty from the entity.Open its Mapping Details window.
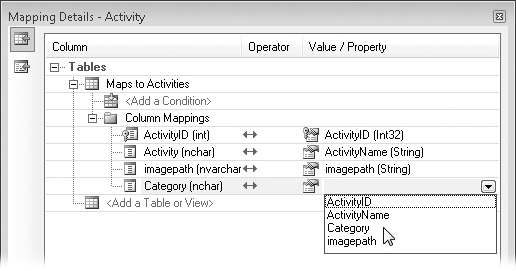
Click <Add a Condition>, and then click the drop-down arrow that appears.
Select Category from the drop-down list, as shown in Figure 12-14.
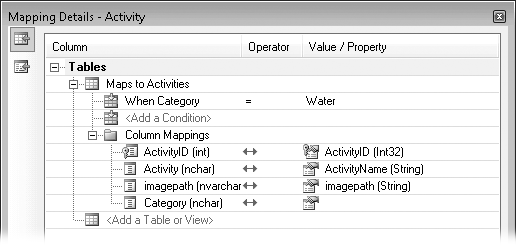
In this mapping, use the default operator (
=) for the value comparison.Under Value/Property, type
Water. Figure 12-15 shows what the settings should look like when you are finished.
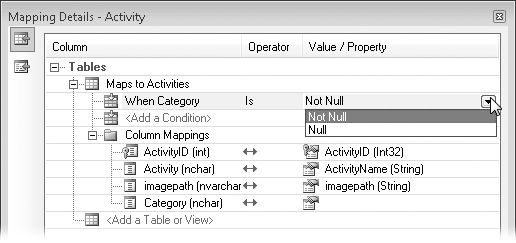
If you wanted the condition to test for null values, you can change the operator by using the drop-down and selecting Is. When you set the operator to Is, Value/Property becomes a drop-down with the options Null and Not Null, as shown in Figure 12-16.
You’ll see with the following exercise that the condition not only filters data coming from the database, but also impacts data going into the database.
Add to the test module the method shown in Example 12-4.
Example 12-4. Querying, creating, and saving conditionally mapped entities
VB
Private Sub ConditionalMap()
  Using context = New BreakAwayEntities
    Dim query = From a In context.Activities Select a
    Dim activities = query.ToList

    Dim newAct = New Activity
    With newAct
      .ActivityName = "WindSurfing"
    End With
    context.AddToActivities(newAct)
    context.SaveChanges()
  End Using
End Sub
C# private static void ConditionalMap() { using (var context = new BAEntities()) { var query = from a in context.Activities select a; var activities = query.ToList(); var newAct = new Activity(); newAct.ActivityName = "WindSurfing"; context.AddToActivities(newAct); context.SaveChanges(); } }Call the
ConditionalMapmethod from the module’sMainmethod.Comment out the call to the
EntitySplitmethod.Set a breakpoint on the code after
query.ToListis called.Run the application.
When you hit the breakpoint, look at the activities variable in the QuickWatch
window. You will see that only activities in the Water category were
retrieved.
The insert is even more interesting. Although the only property
you set in code was the ActivityName, look at the T-SQL that was
generated and you will see that Water was inserted into the Category field:
exec sp_executesql N'insert [dbo].[Activities]([Activity],
                            [imagepath], [Category])
values (@0, null, @1)
select [ActivityID]
from [dbo].[Activities]
where @@ROWCOUNT > 0 and [ActivityID] = scope_identity()',
N'@0 nchar(50),@1 nchar(10)',@0=N'WindSurfing      ',@1=N'Water     '
The condition was automatically used in the insert. The
condition that all Activity
entities should have a category of “Water” also means that any newly
created Activity entities will also have a
category of “Water”.
What if you wanted to include any activity except
water-related activities? Unfortunately, it is not possible to map
this directly in the model. There is no operator for “not equals”
and it is not possible to map a table column more than once. What
you see in the Designer—an equals sign combined with an integer or
string, Is Null, and Is Not Null—is the full extent of what the
model is capable of. This also means that in conditional mapping,
you can’t use operators such as greater than (>) or less than (<), or filter on other types such as a
date. However, deeper in the model there is still a way to achieve
this, using a mapping element called QueryView. We will discuss QueryView in more detail in the next
chapter.
If it’s an option, you may need to resort to adding a new
column, such as WaterActivity or DiscontinuedActivity, into the database
table. Then you can easily create a conditional mapping on the
Boolean field.
You may not want to have this conditional mapping in place
going forward, so feel free to remove it. You’ll need to add the
Category property back into the
Activity entity and map it to the
Category field in the Activities table.
Click the When Category mapping in the Mapping Details window.
Select <Delete> from the drop-down list.
Right-click the
Activityentity in the Designer, and choose Add and then Scalar Property from the context menu.Rename the property to Category.
Return to the Mapping Details window and map the
Categoryfield of theActivitiestable to theCategoryproperty, as shown in Figure 12-17.
Another type of inheritance that the EDM supports is Table per Hierarchy (TPH). TPH inheritance depends on conditional mapping. Rather than including only records that match the condition, the condition is used to define records as different types.
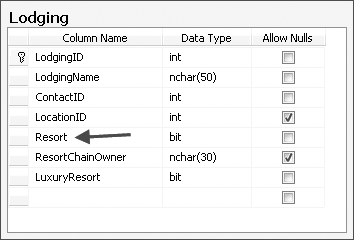
Figure 12-18
displays the Lodging table that uses
the Boolean, Resort, to define
lodgings that are resorts. You can use this Boolean to create a new type
in your model, Resort, which will
inherit from Lodging. This is very
different from the tables that provided for TPT inheritance where the
properties of the derived type were defined in a separate table.
As you’ll see in the following walkthrough, TPH mapping uses conditional mapping to help determine which data describes a lodging that is not a resort and which data describes a resort.
The BreakAway Lodging entity
has a Boolean property called Resort. Let’s use this property to define
Resort as a new type of
lodging:
Right-click the background of the Designer.
From the context menu, choose Add and then Entity.
Change the entity name to Resort.
Select Lodging from the “Base type” drop-down.
Note
Notice that the EntitySet
automatically becomes Lodgings
and is disabled so that you cannot modify it. Since Resort will inherit from Lodging, it will be
part of the Lodgings
EntitySet.
Notice also that the section for the Key property has become disabled. The
Lodging entity will still control
the entity key, even for derived types.
Now that you have the new type defined, how will the Entity
Framework decide which Lodging
records go into the Lodging entity
and which go into the Resort
entity? The answer is conditional mapping.
First, we’ll use conditional mapping to filter Lodging records into the base or derived
type:
Delete the
Resortproperty from theLodgingentity.
Open the Mapping Details window for the
Lodgingentity and click <Add a Condition>.Select Resort from the Condition drop down and change the condition value to 0. This condition states that records that are filtered into the
Lodgingentity will be records whoseResortproperty equals0orFalse.Select the
Resortentity and open its Mapping Details window.Map the entity to the
Lodgingtable. Then create a condition forResort = 1(orTrue).
Note
The ContactID and LocationID are foreign keys in the
Lodging table. The navigation
property/association combinations in the Lodging entity take care of them.
Next, we’ll move resort-specific properties to the Resort entity type:
The
ResortChainOwnerandLuxuryResortproperties don’t make sense in theLodgingentity. They belong in theResortentity. So, cut and paste these two properties from theLodgingentity into theResortentity.Open the Mapping Details window for
Resort, and map theResortChainOwnerandLuxuryResortproperties to the appropriate columns in theLodgingtable.
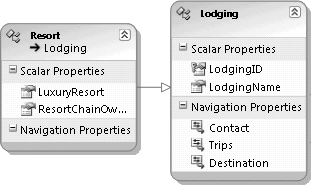
When you’re done, the Lodging
and Resort types should look as
they do in Figure 12-19.
If you try to run code against Lodging at this point, you will encounter a
problem. The LuxuryResort field is
a Boolean field. In the database, it is non-nullable and has a default
value of 0. The EDM Wizard does not bring the default value over to
the model’s Store Schema Definition Layer (SSDL). This creates a problem for the Lodging entity. The Lodging entity maps to the Lodging table but does not map the LuxuryResort or ResortChainOwner column because we removed
the properties from the Lodging
entity. Only the Resort entity maps
those fields. Because Lodging does
not map those fields, the model will throw a runtime exception telling
you that Lodging doesn’t know how
to deal with LuxuryResort because
it is non-nullable and has no default value. Therefore, it wants to
populate it. But because the properties don’t exist in Lodging, the field is not mapped, and
therefore the Lodging entity is
unable to modify the value.
The only way to correct this is to add the StoreGeneratedPattern attribute manually
into the SSDL to let the Entity Framework know that the database will
take care of this value. This is especially important if you are
creating new Lodging entities and
saving them back to the database.
Warning
Remember that if you run the Update Model from Database Wizard, this manual modification to the SSDL will be lost and you will need to add it back in manually again.
Open the model in the XML Editor.
Search for LuxuryResort as a quick way to find the
Lodgingtable.Verify that you are in the SSDL section of the model. You can tell by the property types, which will be database types, such as
int,nchar, andbit.Add
StoreGeneratedPattern="Computed"to theLuxuryResortproperty, as shown in Example 12-5.
Example 12-5. Adding the StoreGeneratedPattern attribute for an unmapped non-nullable field
<EntityType Name="Lodging">
  <Key>
    <PropertyRef Name="LodgingID" />
  </Key>
  <Property Name="LodgingID" Type="int" Nullable="false"
            StoreGeneratedPattern="Identity" />
  <Property Name="LodgingName" Type="nchar" Nullable="false"
            MaxLength="50" />
  <Property Name="ContactID" Type="int" Nullable="false" />
  <Property Name="LocationID" Type="int" />
  <Property Name="Resort" Type="bit" Nullable="false" />
  <Property Name="ResortChainOwner" Type="nchar" MaxLength="30" />
  <Property Name="LuxuryResort" Type="bit" Nullable="false"
            StoreGeneratedPattern="Computed"/>
</EntityType>The following method will help you see the effect of the TPH mapping. You can query for all lodgings, including any derived types, or for a specific derived type. It’s a little trickier to query for a subset that is not a derived type.
The following queries are executed in unique contexts so that entities that are a result of one query do not merge with entities of another query. In this way, you can more easily see the full impact of each of the various queries:
Add the method in Example 12-6 to the test module.
Example 12-6. Querying types in a TPH mapping
VB
Private Sub TPHMap()
  Using context = New BreakAwayEntities
    Dim query = From lodge In context.Lodgings
    Console.WriteLine("All Lodgings Results: " & query.Count.ToString)
  End Using
  Using context = New BreakAwayEntities
    Dim query = From lodge In context.Lodgings.OfType(Of Lodging)()
    Console.WriteLine("NonResort Only Results: " & query.Count.ToString)
  End Using
  Using context = New BreakAwayEntities
    Dim query = From lodge In context.Lodgings.OfType(Of Resort)()
    Console.WriteLine("Resort Only Results: " & query.Count.ToString)
  End Using
End Sub
C# private static void TPHMap() { using (var context = new BAEntities()) { var query = from lodge in context.Lodgings select lodge; Console.WriteLine("All Lodgings: " + query.Count().ToString()); } using (var context = new BAEntities()) { var query = from lodge in context.Lodgings.OfType<Lodging>() select lodge; Console.WriteLine("NonResort Results: " + query.Count().ToString()); } using (var context = new BAEntities()) { var query = from lodge in context.Lodgings.OfType<Resort>() select lodge; Console.WriteLine("Resort Results: " + query.Count().ToString()); } }Call the
TPHMapmethod from the module’sMainmethod.Run the application.
When you see the output of the console window, you may be
surprised that the second query, which you may have expected to return
only nonresort lodgings, returned all of the lodgings, regardless of
the Resort filter:
All Lodgings Results: 101
NonResort Type Only Results: 101
Resort Type Only Results: 10
Why is this?
Even though you put a condition on Lodging that states Resort=0 (false), Lodging is a base type. No matter what,
Lodging will return itself and all
types that derive from it. With a simple query it is not easy to say
“give me the base type but none of its derived types.” So, even though
the condition is there, you’ll continue to receive all of the Lodgings, even with Resort=1.
If you want an easy way to retrieve nonresort lodgings, you can
create a second derived type that inherits from Lodging to retrieve all of the Lodging entities that are not resorts. In
this case, the actual Lodging
entity would become an abstract type because it will never be
instantiated. The Lodging entity
itself cannot be instantiated and will never return Lodging entities. Instead, the Lodgings EntitySet will return only those
entities that come from its derived types: Resort and NonResort.
Although you performed this task when creating the NonCustomer entity, the following
walkthrough will act as a reminder to show you how to turn Lodging into an abstract type and then let
you see how the abstract and derived types behave in code:
In the Designer, create another new entity type, name it
NonResort, and set itsBaseTypetoLodging.Open the Mapping Details window for the
NonResortentity.Map the
NonResortentity to theLodgingtable. Because no fields are specific to this type, you won’t need to do any field-to-property mapping.Create a conditional mapping for the
Resortproperty using the=operator and the value0for the comparison.Validate the model using the Designer’s context menu.
You will see two errors regarding overlapping partitions. This is because the
Lodgingentity still has the conditional mapping that matches the conditional mapping you just created forNonResort. Because all of the records are now covered by the conditions inNonResortandResort, you can turn theLodgingentity into an abstract type and remove the conditional mapping.Open the Mapping Details window for
Lodging.Delete the conditional mapping. Remember that you can do this by selecting <Delete> from the drop-down.
In the Properties window for the
Lodgingentity change the value of Abstract to True.You will get a warning that all function mappings will be removed. This refers to stored procedures, but there are none for this type, and therefore it’s not a problem.
Rebuild the model project.
Open the code module and modify the second query so that it gets
NonResorttypes, as shown in the following code:VB From lodge In context.Lodgings.OfType(Of NonResort)()C# from lodge in context.Lodgings.OfType<NonResort>() select lodge
You just saw a demonstration of how TPH inheritance works. If your business rules define that you would never want to get the entire set of types (e.g., all of the lodgings at once), it makes sense to have the abstract class in the model and to use the derived types to interact with the objects. If your business rules define that in many cases you will want to work with all lodgings, regardless of type, using the base type without defining it as an abstract class may be preferable.
A number of mappings are not supported by the Designer. We will cover some of these in the rest of the chapter. How this impacts your work depends on which unsupported customization you are using. Non-supported features can affect the use of the Designer in the following ways:
The feature does not appear in the Designer.
The Designer goes into Safe Mode when you attempt to open the model in the Designer. Safe Mode presents a message that indicates the model cannot be opened in the Designer, and displays a link to open the model in XML view.
The Mapping Designer goes into Safe Mode, but the CSDL Designer displays.
An error is thrown when you attempt to open the model in the Designer.
As we walk through the following mappings, I will indicate how each mapping is handled (or not handled) by the Designer.
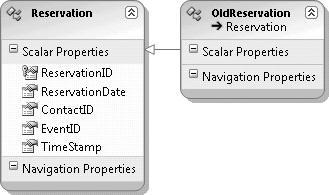
Another scenario where you can use inheritance mapping is when you
have database tables with overlapping fields. A classic example of this
appears in Figure 12-20,
where a copy of the Reservations
table was created to store old reservations that are rarely
accessed.
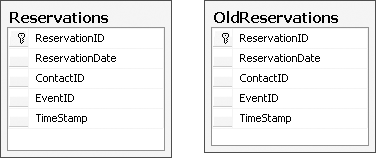
The inheritance implementation used for this mapping is called
Table per Concrete Type or TPC
inheritance. You can define the inheritance between the two in the
Designer, but you will have to manually map the OldReservations entity to its table in the
XML.
Note
The OldReservations table
does not exist in the BreakAway database. This example is not meant to
be implemented in your sample model.
To create the inheritance, you will need to remove all of the overlapping properties from the derived entity. In this case, that means every property. Figure 12-21 displays what the inheritance looks like in the EDM Designer.
You’ll find that none of the OldReservations table fields are mapped after
you make these modifications. You can map the ReservationID field to the ReservationID property, but the rest must be
mapped in the XML of the EDMX file.
Example 12-7 shows the mapping. The Reservation EntityTypeMapping contains a
mapping for the Reservation entity
and another mapping for the derived OldReservationEntity.
Example 12-7. TPC mapping
<EntitySetMapping Name="ReservationSet">
  <EntityTypeMapping TypeName="IsTypeOf(BreakAwayModel.Reservation)">
    <MappingFragment StoreEntitySet="Reservations">
      <ScalarProperty Name="ReservationID" ColumnName="ReservationID" />
      <ScalarProperty Name="ReservationDate" ColumnName="ReservationDate" />
      <ScalarProperty Name="ContactID" ColumnName="ContactID" />
      <ScalarProperty Name="EventID" ColumnName="EventID" />
      <ScalarProperty Name="TimeStamp" ColumnName="TimeStamp" />
    </MappingFragment>
  </EntityTypeMapping>
  <EntityTypeMapping TypeName="IsTypeOf(BreakAwayModel.OldReservation)">
    <MappingFragment StoreEntitySet="OldReservations">
      <ScalarProperty Name="ReservationID" ColumnName="ReservationID" />
      <ScalarProperty Name="ReservationDate" ColumnName="ReservationDate" />
      <ScalarProperty Name="ContactID" ColumnName="ContactID" />
      <ScalarProperty Name="EventID" ColumnName="EventID" />
      <ScalarProperty Name="TimeStamp" ColumnName="TimeStamp" />
    </MappingFragment>
  </EntityTypeMapping>
</EntitySetMapping>
With this mapping, you would be able to work with the OldReservations table when you need to. Also
with this mapping, you will get the OldReservations anytime you query for Reservation without specifically excluding
them. Therefore, you may want to consider turning Reservation into an abstract type and creating
another entity to represent current reservations as you did to solve a
similar problem with Lodging entities
that are not resorts.
Although you can’t see the mapping in the Designer, you will still be able to use the model in the Designer when TPC is implemented.
Complex types are a very convenient way of encapsulating a set of
properties. You may want to do this when you have properties that are
common among entities (e.g., different entities that have properties to
contain addresses). You may just want to use a complex type to create a
better structure in your entity. Imagine that in your model you had a
Contact entity that contained address
properties. You may prefer to navigate through the contact with the
address fields tucked inside a complex type. Therefore, rather than
having all of this to deal with when programming:
Customer
  FirstName
  LastName
  Street
  City
  State
  Zip
  Phone
you could encapsulate those properties related to the address into
a complex type called Address, and
then insert Address as a property
into the Customer type:
Customer
  FirstName
  LastName
  Address
  Phone
Then, to get at the address information, you can drill further:
Customer.Address.City
Customer.Address.State
What’s really nice is that the complex types are still types, so
you can instantiate them and use them outside their parent entity.
However, complex types are not EntityObjects, but ComplexObjects. They don’t have EntityKeys and are not contained in their own
EntitySet; therefore, they cannot be
queried for directly or persisted into the database.
Complex types are one of the mapping types that the Designer does not support, but you can still create them manually. As mentioned at the start of this chapter, “not supported by the Designer” can mean different things. In this case, when a complex type is defined in the model, you will not be able to open the model in the Designer. When you try to open it in the Designer, you will get the Designer’s “Safe Mode” display that says the Designer is unable to display the file, but provides a link to open the model in the XML Editor.
Note
The Visual Studio version of the EDM Designer will fully support complex types.
This will be highly inconvenient if you are still in the process of designing your model, but otherwise it should not be a showstopper if you find that you will get a lot of benefit from using complex types.
You can create the new complex type in the XML Editor by copying
the properties from the entity that originally contains them and
pasting them into a ComplexType
element. ComplexType elements are
siblings of EntityType
elements.
Warning
Because we have a lot more work to do in the Designer after this, you’ll need to unwind these changes at the end of this walkthrough. You will be guided to comment out XML rather than deleting it while you modify the model. At the end of the walkthrough, you will be able to remove the changes and uncomment the original XML.
As an example, you can create an AddressDetail type that encapsulates the
specific properties of the Address
entity that are part of the mailing address, leaving the AddressType and
modified date as scalar properties of Address.
The new complex type would look like Example 12-8.
Example 12-8. A ComplexType defined in the CSDL
<ComplexType Name="AddressDetail">
<Property Name="Street1" Type="String" MaxLength="50"
FixedLength="true" />
<Property Name="Street2" Type="String" MaxLength="50"
FixedLength="true" />
<Property Name="City" Type="String" MaxLength="50"
FixedLength="true" />
<Property Name="StateProvince" Type="String" MaxLength="50"
FixedLength="true" />
<Property Name="CountryRegion" Type="String" MaxLength="50"
FixedLength="true" />
<Property Name="PostalCode" Type="String" MaxLength="20"
FixedLength="true" />
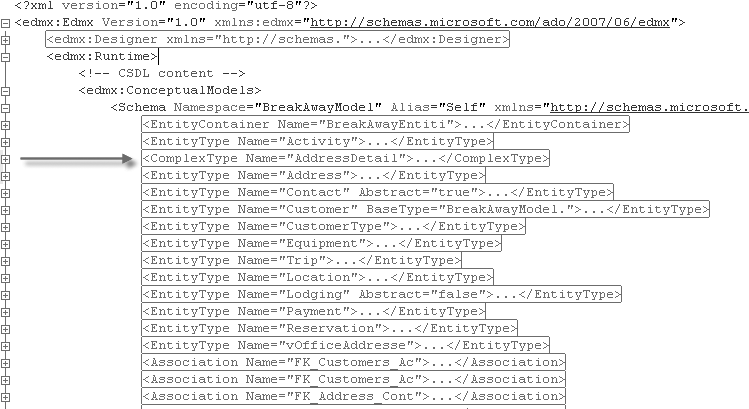
</ComplexType>As shown in Figure 12-22, the ComplexType element is positioned in the
CSDL section as a sibling of the EntityTypes. It is not critical where it is
placed relative to other entities.
In the Address EntityType,
you can now replace those properties with a single property to
represent the AddressDetails, as
shown in Example 12-9.
Note the new Detail property in the
address and entities.
Example 12-9. Using a complex type in an entity type
<EntityType Name="Address">
  <Key>
    <PropertyRef Name="addressID" />
  </Key>
  <Property Name="addressID" Type="Int32" Nullable="false" />
  <Property Name="Detail" Type="Self.AddressDetail" Nullable="false" />
  <Property Name="ModifiedDate" Type="DateTime" Nullable="false" />
  <NavigationProperty Name="Contact"
                      Relationship="BAModel.FK_Address_Contact"
                      FromRole="Address" ToRole="Contact" />
</EntityType>The required change to the mappings is not as complicated as you
might think. All you need to do is wrap those properties inside a
ComplexProperty tag, as shown in
Example 12-10. Note that the name of the
ComplexProperty element, Detail, matches the name used for the
property in the entities, and that the TypeName attribute points directly to the
complex types.
Example 12-10. Mapping the complex type
yyy<EntitySetMapping Name="Address">
 <EntityTypeMapping TypeName="IsTypeOf(BAModel.Address)">
  <MappingFragment StoreEntitySet="Address">
   <ScalarProperty Name="addressID" ColumnName="addressID" />
   <ComplexProperty Name="Detail"
                    TypeName="BAModel.AddressDetail">
     <ScalarProperty Name="Street1" ColumnName="Street1" />
     <ScalarProperty Name="Street2" ColumnName="Street2" />
     <ScalarProperty Name="City" ColumnName="City" />
     <ScalarProperty Name="StateProvince" ColumnName="StateProvince" />
     <ScalarProperty Name="CountryRegion" ColumnName="CountryRegion" />
     <ScalarProperty Name="PostalCode" ColumnName="PostalCode" />
   </ComplexProperty>
   <ScalarProperty Name="AddressType" ColumnName="AddressType" />
   <ScalarProperty Name="ModifiedDate" ColumnName="ModifiedDate" />
  </MappingFragment>
 </EntityTypeMapping>
</EntitySetMapping>
If you are using AddressDetail inside other entities, you
will need to map the properties in EntitySetMapping for that entity.
Rebuild the model project so that the projects using it see the changes.
Looking at the generated class for AddressDetail you will see that it is not an
EntityObject,
but rather a ComplexObject:
VB
Partial Public Class AddressDetail
  Inherits Global.System.Data.Objects.DataClasses.ComplexObject
C#
public partial class AddressDetail :
global::System.Data.Objects.DataClasses.ComplexObjectAlthough you can instantiate and use these types directly in
code, they do not have EntityKeys,
cannot be queried for directly, and cannot be persisted to the
database.
ComplexObject does allow the
properties of the ComplexType to be
change-tracked along with the other properties of its parent entity,
though. You can look further at the generated class and even drill
into the System.Data.Objects.DataClasses.ComplexObject
class in Visual Studio’s Object Browser or in another tool such as
Reflector.
The method in Example 12-11 shows the
ComplexType in action.
Example 12-11. Querying, creating, and saving entities that contain a complex type
VB
Private Sub ComplexType()
  Using context As New BreakAwayEntities
    Dim contact = (From c In context.Contacts.Include("Addresses") _
                   Take 1).FirstOrDefault
    Dim addDetail as AddressDetail = contact.Addresses(0).Detail
    Console.WriteLine("Street: {0}, City: {1}, State: {2}", _
                      addDetail.Street1, addDetail.City, _
                      addDetail.StateProvince)
    Dim newAD = New AddressDetail
    With newAD
      .Street1 = "1 Rue Cardinale"
      .City = "Montreal"
      .StateProvince = "Quebec"
    End With
    contact.Addresses(0).Detail = newAD
    context.SaveChanges()
  End Using
End Sub
C#
private void ComplexType()
{
using (var context = new BreakAwayEntities())
{
var contact = (from c in context.Contacts.Include("Addresses")
select c).Take(1).FirstOrDefault();
AddressDetail addDetail = contact.Addresses[0].Detail;
Console.WriteLine("Street: {0}, City: {1}, State: {2}",
addDetail.Street1, addDetail.City, addDetail.StateProvince);
var newAD = new AddressDetail();
newAD.Street1 = "1 Rue Cardinale";
newAD.City = "Montreal";
newAD.StateProvince = "Quebec";
contact.Addresses(0).Detail = newAD;
context.SaveChanges();
}
}This method first queries the model for a single Contact entity, along with its
addresses.
It then extracts the AddressDetail from the first address and
displays some of its properties, demonstrating that you can create an
instance of the complex type. Next, it instantiates a new AddressDetail, and sets that instance as the
Detail property of the first
address. Finally, SaveChanges is
called, which updates the address information for the contact.
Here is the T-SQL that was executed on the server. You can see that the change tracking does take into account the property values of the complex type:
exec sp_executesql N'update [dbo].[Address]
set [Street1] = @0, [Street2] = null, [City] = @1, [StateProvince] = @2,
    [CountryRegion] = null, [PostalCode] = null
where ([addressID] = @3)',
N'@0 nchar(50),@1 nchar(50),@2 nchar(50),@3 int',@0=N'1 Rue Cardinale',
@1=N'Montreal',@2=N'Quebec',@3=2513The complex type may not behave the way you would expect it to in data binding. Therefore, the next few pages will take a look at a number of data-binding scenarios.
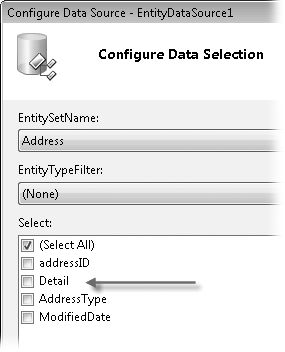
When you use complex types with the EntityDataSource, the EntityDataSource “flattens” the properties
within the complex type to make them easily accessible. When
configuring the EntityDataSource,
you will see the type, but not the properties, as you can see in
Figure 12-23.
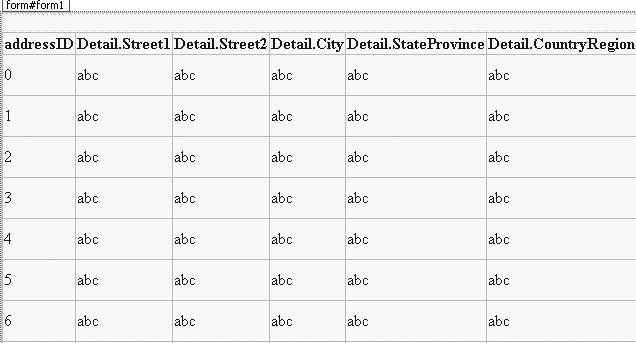
However, when binding controls to the data source, the properties of
the complex type appear as though they were simply properties of the
parent type. You can see this in the screenshot in Figure 12-24.
This flattening of the properties is a feature of the EntityDataSource, though it will occur
only under specific conditions. For details, see the blog post
“EntityDataSource: To wrap or not to wrap” by Diego Vega,
EntityDataSource program manager at Microsoft (http://blogs.msdn.com/diego/archive/2008/05/13/entitydatasource-to-wrap-or-not-to-wrap.aspx/).
When you attempt to perform data binding against query results
where complex types are involved and DataSource controls are not, you won’t have
such easy access to the properties.
For example, the following code in an ASP.NET page will fail,
with a message saying that Address
does not contain a property with the name Detail.City:
VB
Dim addresses = context.Addresses.ToList
With DropDownList1
  .DataTextField = "Detail.City"
  .DataValueField = "addressID"
  .DataSource = addresses
  .DataBind()
End With
C#
var addresses = context.Addresses.ToList();
DropDownList1.DataTextField = "Detail.City";
DropDownList1.DataValueField = "addressID";
DropDownList1.DataSource = addresses;
DropDownList1.DataBind();Attempting a similar binding to a ComboBox in a Windows form will have a
different effect. In the following code, the addressID will be displayed in the drop-down
list, rather than the ComplexType
property that is used for DisplayMember:
VB
Dim addresses = context.Addresses
With ComboBox1
  .DataSource = addresses
  .DisplayMember = "Detail.City"
  .ValueMember = "addressID"
End With
C#
var addresses = context.Addresses;
ComboBox1.DataSource = addresses;
ComboBox1.DisplayMember = "Detail.City";
ComboBox1.ValueMember = "addressID";Yet, if you were to debug into the results of the query and request the properties from the complex type, you would see that they are definitely available, just not for these data-binding scenarios.
In a Windows form, if you bound the results of a query programmatically, such as in the following code:
VB
Using context = New BAGA.BreakAwayModel.BreakAwayEntities
  Dim addresses = From a In context.Addresses Select a
  Me.DataGridView1.DataSource = addresses
End Using
C#
using (var context = new BAGA.BreakAwayModel.BreakAwayEntities())
{
var addresses =
from a in context.Addresses
select a;
this.DataGridView1.DataSource = addresses;
}the Detail property would be
represented incorrectly as a single column.
You’ll get the same effect even if you create a Windows Forms
DataSource and bind to that.
Even if you explicitly bind properties to the columns in this way:
VB
DataGridView1.Columns(1).DataPropertyName = "Detail.Street1"
C#
DataGridView1.Columns[1].DataPropertyName = "Detail.Street1";the binding will fail, with the columns that result being empty.
So, how can you get at these properties in these scenarios?
With ASP.NET, you have three paths to follow: list controls, data-bound controls, and templated controls. With each, you will need to take a different route for using a complex type.
DropDownList is not
actually a data-bound control. It is a list web server control.
Other controls in the category are ListBox, CheckBoxList, RadioButtonList, and BulletedList.
Instead of returning the objects that contain complex types (which can’t be displayed), your best bet is to use projections to flatten the properties yourself. As an example, here is a LINQ query that returns a list of distinct cities. You can bind this to a drop-down list and, upon selection, query for contacts from the selected city:
VB
Dim uniqueCities = From a In context.Addresses _
                   Select City = a.Detail.City Distinct
With DropDownList1
  .DataSource = uniqueCities
  .DataBind()
End With
C#
var uniqueCities =
(from a in context.Addresses
select City == a.Detail.City)
.Distinct();
DropDownList1.DataSource = uniqueCities;
DropDownList1.DataBind();GridView and FormView are bound controls and have the
same limitation as list controls. If you are not able to use the
EntityDataSource, you will need
to do projection to flatten the ComplexType properties. With projection,
you lose your ability to do updating, so you may want to consider
the EntityDataSource for this
scenario. You will have more control over the entities using a
business layer, which you will learn to do in Chapter 19.
With templated controls, such as ListView, you can access the ComplexType
properties using inline script.
Reverting back to the query:
context.Addresses
you can bind directly to the results with the following
markup in a ListView (see Example 12-12).
Example 12-12. Formatting the markup of a ListView to display complex type properties
<asp:ListView runat="server" ID="ListView1">
  <LayoutTemplate>
    <table runat="server" id="table1" >
      <tr runat="server" id="itemPlaceholder" ></tr>
    </table>
  </LayoutTemplate>
  <ItemTemplate>
    <tr runat="server">
      <td id="Td1" runat="server">
        <%-- Data-bound content. --%>
        <asp:Label ID="NameLabel" runat="server"
          Text='<%#Eval("Detail.Street1") %>' />
      </td>
      <td id="Td2" runat="server">
        <%-- Data-bound content. --%>
        <asp:Label ID="Label1" runat="server"
          Text='<%#Eval("Detail.City") %>' />
      </td>
    </tr>
  </ItemTemplate>
</asp:ListView>Like the EntityDataSource,
data sources in Windows Forms let you work with entities and their
properties that are complex types fairly easily.
Figure 12-25
shows an Object data source created from the revised Address entity.
You can use the complex type in a Windows form, which is
displayed and updated along with the rest of the entity. You can see
in the simple form shown in Figure 12-26 that the complex
type properties blend in as though they were scalar properties of
Address.
The code for this form doesn’t make any special accommodation
for the Detail property (see Example 12-13).
Example 12-13. Querying for entities with a complex type—which is no different from entities without a complex type
VB
Public Class Form1
  Private _context As BAEntities

  Private Sub Form1_Load(ByVal sender As System.Object, _
   ByVal e As System.EventArgs) Handles MyBase.Load
    _context = New BAEntities
    Dim query = From a In _context.Addresses Select a
    AddressBindingSource.DataSource = query
  End Sub

  Private Sub AddressBindingNavigatorSaveItem_Click _
   (ByVal sender As System.Object, ByVal e As System.EventArgs) _
   Handles AddressBindingNavigatorSaveItem.Click
    _context.SaveChanges()
  End Sub

End Class
C#
public partial class Form1 : Form
{
BAEntities _context;
public Form1()
{
InitializeComponent();
}
private void Form1_Load(object sender, EventArgs e)
{
_context = new BAEntities();
var query = from a in _context.Addresses select a;
addressBindingSource.DataSource = query;
}
private void addressBindingNavigatorSaveItem_Click
(object sender, EventArgs e)
{
_context.SaveChanges();
}
}If you have followed along and modified the model, you may want to undo these changes so that you’ll be able to open the model while working through more sample code in this book:
Comment out or delete the
ComplexTypedefinition forAddressDetail.Comment out or delete the
Detailproperty in theAddressentity type.Uncomment the original properties in the
Addressentity type that you commented out when you began these modifications.Comment out or delete the
ComplexPropertyelements in theEntitySetMappingforAddressesso that theScalarPropertyelements that you enclosed go back to their original positions.
You should now be able to open the model in the Designer again.
You may also need to remove or comment out any code that relates
to the AddressDetail complex type. The
compiler will point them out in the Error List window for
you.
QueryView is a mapping that
allows you to override the default mapping for an entity set and return
read-only data. QueryView is
something you need to enter manually in the XML, and it belongs in the
mapping layer.
A QueryView is a query that is
expressed using Entity SQL syntax. However, rather than creating the
Entity SQL expression against the conceptual layer of the model, the
target of the expression is the store (SSDL) layer. In other words, when
you construct the Entity SQL for a QueryView, the query is written against the
elements of the SSDL.
In addition to returning read-only entities, another benefit of
QueryView is that you can overcome
the limitations of conditional mapping. As you saw earlier, conditional
mapping lets you filter using =,
Is Null, and Is Not Null. Using a QueryView you can filter with a much wider
variety of operators, including >
and <. However, because QueryView returns
read-only data, if you need the entity that results to be updatable, you
can still achieve this by mapping stored procedures to the entity that
results.
Before using QueryView, you
should be aware of the following:
QueryViewis another mapping that the Designer does not support. Unlike complex types, however, it doesn’t prevent you from opening the model in the Designer. The lack of support in this case means you can only design the query view directly in the XML of the model.If an
EntitySetis being mapped with aQueryView, all relatedEntitySets andAssociationSets must be mapped withQueryViews as well.This could get a little trying in the BreakAway model, as every entity is related to at least one other entity through associations. So, you need to plan ahead if you want to take advantage of
QueryViews.For a nice example of adding
QueryViews to a model with TPH inheritance, see the blog post by Danny Simmons, of the Entity Framework team, titled “Mapping Read-only Entities” (http://blogs.msdn.com/dsimmons/archive/2007/11/08/mapping-read-only-entities.aspx/).Entities returned by
QueryVieware read-only. If you want the entities that result to be updatable, you can use function mappings to map stored procedures to the entity, as you did earlier in this book with thePaymententity. The next chapter deals with additional stored procedure mappings.In the
EntitySetMapping, you need to remove theStorageSetNameas well as the property mappings.QueryViews impact other types of mappings in the model. As per the MSDN documentation, you need to pay attention to these scenarios as well:Many-to-many associations
Inheritance hierarchies
The syntax for writing a
QueryViewis a subset of the Entity SQL language. Functions are not allowed, which means you can’t do something like create aFullNameproperty by concatenatingFirstNameandLastName.Here are the operators you can use with
QueryView:Cast,Case,Not,Or,And,IsNull,Equals,NotEquals,LessThan,LessThanOrEquals,GreaterThan,GreaterThanOrEquals,Project,NewInstance,Filter,Ref,Union,UnionAll,Scan,FullOuterJoin,LeftOuterJoin,InnerJoin,EntityRef
Because of the complexity of the BreakAway model, if you would
like to test the QueryView, it would be best to get your
first look with a simpler model.
In this exercise, you will be adding a condition to the Contacts EntitySet to make sure all queries
will return only customers who were added to the database since
January 1, 2007:
Create a new Console Application project with its own model created from the BreakAway database. Use the names
QVEntitiesandQVModelfor the connection string and model name. Add theContactandCustomerstables to this model when prompted by the EDM Wizard.Change the entity and
EntitySetnames toContact/ContactsandCustomer/Customers. On the latter, watch out for theEntitySetname changing toCustomerSetwhen you change the entity name.Save the model and then open it in the XML Editor.
Scroll down to the Mapping Schema Layer (MSL) content section. Comment out or delete everything inside the
EntitySetMappingelement forContact.In place of those elements, add the following
QueryView, which will be inside theEntitySetMappingtags:<EntitySetMapping Name="Contacts"> <QueryView> SELECT VALUE QVModel.Contact(c.ContactID,c.FirstName,c.LastName, c.Title,c.AddDate,c.ModifiedDate,c.TimeStamp) FROM QVModelStoreContainer.Contact as c WHERE c.AddDate>= DATETIME'2007-01-1 00:00' </QueryView> </EntitySetMapping>QVModelStoreContaineris the SSDL’sEntityContainername that the wizard generated automatically. Just as you need to use the model’sEntityContainername when constructing regular Entity SQL queries, you need to use the store’sEntityContainername with the Entity SQL expressions you create forQueryViews.Note
Notice that the
WHEREparameter uses aDATETIMEliteral, which you learned about in Chapter 4.What’s really nice here is that the Designer is able to validate the syntax of the query, something you can’t get when you write Entity SQL strings in your application.
To test that, remove the
as
            c
from the end of the query and build the project.The entire
EntitySetMappingsection will be underlined and in the Error List you will see the following error:The query view specified for the EntitySet 'Contact' is not valid. The query parser threw the following error : 'c.ContactID' could not be resolved in the current scope or context. Make sure that all referenced variables are in scope, that required schemas are loaded, and that namespaces are referenced correctly., near multipart identifier, line 1, column 30.
The cause of the error is that the
cinc.ContactIDcan’t be identified (i.e., resolved) because you removed the definition ofc.Replace the
as cand rebuild the project. The error message will go away.
Warning
A design-time validation bug will cause the entire model in
XML view to be underlined as though there is a serious problem. This
happens when you have a QueryView
in the model and any real errors have been eliminated. The syntax is
actually valid and you can ignore the error. The error message in
the Error List will read “No mapping transformations were generated
for any EntityContainerMapping.” You should be able to disregard
this and run your application with no problems.
In the main module of this project, add the following simple
code to verify the QueryView:
VB
Using context = New BAModel.BAEntities
      Dim contacts = context.Contacts.ToList
End Using
C#
using (var context = new BAModel.BAEntities())
{
var contacts = context.Contacts.ToList();
}Set a breakpoint at the end of the Using clause and run the test.
When the debugger stops at the breakpoint, check out the
contacts variable in the QuickWatch
window. If you drill into the different contacts in the list, you will
see only contacts whose AddDate is
1/1/2007 or later.
The order of the projected columns in the preceding example is
not random. Since you no longer have any property mappings, the Entity
Framework relies on the QueryView
to provide the values in the order in which the entity expects.
The following expression is different from those that you have written against the conceptual layer:
<QueryView>
SELECT VALUE QVModel.Contact(c.ContactID,c.FirstName,c.LastName,c.Title
                             c.AddDate,c.ModifiedDate,c.TimeStamp)
FROM QVModelStoreContainer.Contact as c
</QueryView>
Using VALUE designates that
you will be returning an object, as you have seen before. Following
that is a type constructor, similar to what you would use in .NET
code.
In fact, you can see this in action if you return to the XML and modify the query, perhaps by removing one of the fields or changing the order. Removing a field will throw an obvious mapping exception at runtime that reads as follows:
The query view specified for the EntitySet 'Contacts' is not valid.
The query parser threw the following error : The type constructor
argument 'ModifiedDate' is missing., near type 'BAModel.Contact'
constructor, line 1, column 29.
Remember that the returned types are read-only. If you modify
them and call SaveChanges, no commands will be
created to update the database. However, if you explicitly map stored
procedures to the entity using function mapping, any changes will be
persisted to the database when SaveChanges is called.
The database has stored procedures called InsertContact, UpdateContact, and DeleteContact. If you want to try this
out, update the model, adding these three stored procedures, and then
create the function mappings as you did in Chapter 6. You can modify the
code in the main module to test the change tracking and
updates.
One of the rules noted earlier is that if you use a QueryView on an entity that is part of an
inheritance hierarchy, you need to have QueryViews for all other entities in that
hierarchy.
Let’s add some inheritance into this sample model and see how to
set up the QueryViews for base and derived
entities:
Define a TPT inheritance between
ContactandCustomerby right-clicking theContactentity and selecting Add Inheritance from the context menu. Use the earlier example for help with this task.Don’t forget to delete
ContactIDfromCustomernow that it is inheriting fromContact. You’ll also need to either change the name of theTimeStampproperty inCustomer, or just delete it for this sample.Because these are the only two entities, the New Inheritance Wizard should default to showing
Contactas the base entity andCustomersas the derived entity. This is correct.Close the model and open it in the XML Editor.
Scroll down to the spot where you added the
QueryViewbefore.Comment out the entire
EntityTypeMappingsection that was created for theCustomerentity, including theEntityTypeMappingtags.Beneath the existing
QueryView, add theQueryViewshown in Example 12-14 for theCustomertype.Example 12-14. The Customer QueryView
<QueryView TypeName="IsTypeOf(QVModel.Customer)">

  SELECT VALUE QVModel.Customer(c.ContactID,c.FirstName,c.LastName,
   c.Title,c.AddDate,c.ModifiedDate,c.TimeStamp,
   cu.CustomerTypeID,cu.InitialDate,  cu.PrimaryDesintation,
   cu.SecondaryDestination,cu.PrimaryActivity,
   cu.SecondaryActivity,cu.Notes)
  FROM QVModelStoreContainer.Contact as c
  JOIN QVModelStoreContainer.Customers as cu
  ON c.ContactID=cu.ContactID
  WHERE c.AddDate>= DATETIME'2007-01-1 00:00'
</QueryView>
The hierarchy should now be as follows:
<EntitySetMapping Name="Contacts">
  <QueryView> (the contact query) </QueryView>
  <QueryView (the customer query) </QueryView>
</EntitySetMapping>
There are a few things to note regarding this new QueryView.
First, the QueryView’s
TypeName attribute is specified.
This is a requirement. The rule is that the first QueryView must not have
a TypeName attribute. A runtime
exception will specifically point this out if you break the rule. But
all other QueryViews within an
EntitySetMapping must have the
TypeName attribute. It is the same
attribute and value that are used in the regular mapping.
The next point to note is that the query is returning all of the
values for the customer record using a JOIN query. Standard mappings need to map
only the properties that are in the derived type. But with a QueryView, you need to return properties
from the base type. Except for the type constructor, this JOIN query is similar to the JOIN queries you saw in Chapter 4.
Here is an interesting point. This Customer’s QueryView will be used only when the code
explicitly requests Customers—for
example, by querying:
VB
TypeOf(Of Customer)
C#
context.Contacts.TypeOf<Customert>If you were to run the code that queries for context.Contacts right now, you would get
all of the records back, yet they would all be returned as Contact types. Recall the results of a
similar TPT query displayed in Figure 12-7, which
returned both Contact and
Customer types. Why is QueryView not doing the same? The reason
is that when querying the base type, only the base type’s QueryView will be used. The Entity
Framework does not use the QueryViews for each derived type. Instead,
the base QueryView needs to know
how to return Contacts and
Customers.
Example 12-15 shows the Entity SQL that will accomplish this.
Note
This expression demonstrates a number of operators for Entity SQL that we haven’t covered in previous chapters, as well as patterns that will give you a better understanding of the power of Entity SQL.
Example 12-15. A QueryView that can return a base type or an inherited type
<QueryView>
  SELECT VALUE
    CASE
    WHEN (cu.ContactID IS NULL) THEN
      QVModel.Contact(c.ContactID,c.FirstName,c.LastName,
      c.Title,c.AddDate,c.ModifiedDate,c.TimeStamp
    ELSE
      QVModel.Customer(c.ContactID,c.FirstName,c.LastName,
      c.Title,c.AddDate,c.ModifiedDate,c.TimeStamp,
      cu.CustomerTypeID,cu.InitialDate,cu.PrimaryDesintation,
      cu.SecondaryDestination,cu.PrimaryActivity,
      cu.SecondaryActivity,cu.Notes
    END
  FROM QVModelStoreContainer.Contact as c
  LEFT OUTER JOIN QVModelStoreContainer.Customers as cu
  ON cu.ContactID=c.ContactID
  WHERE c.AddDate>= DATETIME'2007-01-1 00:00'
</QueryView>
This query performs an outer join between Contact and Customer, which gives all Contacts regardless
of whether there are any Customers.
The CASE statement tests to
see whether the Customer exists
by evaluating whether Customer.ContactID is null. If it is null,
the SELECT is completed with a
type constructor for a Contact
type. This is the same expression that was used for the first
Contact QueryView. If the test for Customer is not null, the SELECT is completed with a type
constructor for a Customer type
using the same expression you wrote for the Customer’s QueryView.
The query results, therefore, are a collection of Contact and Customer types.
Now that you have modified the QueryView to account for the inheritance
hierarchy, let’s test it out with some code:
In the module, modify the query to return only
Customertypes:VB Context.Contacts.OfType(Of BAModel.Customer).ToListC# Context.Contacts.OfType<BAModel.Customer>.ToList()Run the application again.
When you hit the breakpoint, check out the results in the QuickWatch window and you will see that they contain
Customertypes, as shown in Figure 12-27.
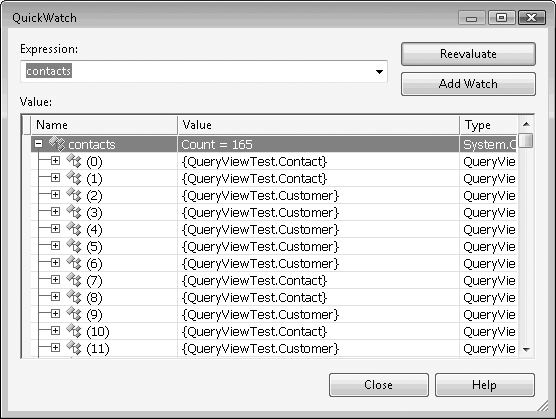
There are yet more ways to customize the EDM. This section details some interesting ones to be aware of. In addition, the Entity Framework team created a tool called the Entity Framework Mapping Helper, which is on their Code Gallery site at MSDN. It can give you a good view of the various mappings. See http://code.msdn.microsoft.com/EFMappingHelper/.
In addition to the function mapping you used earlier in the book, you can map stored procedures manually using a number of other methods. This includes mapping those that are already in your database and those that you can create directly in the model. We’ll cover these in the next chapter.
Multiple Entity Sets per Type (MEST) allows you to contain a single entity in different types, which could allow you to have different views of the same type without using an inheritance model. However, MEST gets tricky pretty quickly when you start to introduce entities that have relationships with other entities. Alex James from the Entity Framework team has a great blog post about MEST and its gotchas in his May 16, 2008, post, “MEST—What is it and how does it work?” (http://blogs.msdn.com/alexj/archive/2008/05/16/mest-what-is-it-and-how-does-it-work.aspx/).
You can find a great example of self-referencing associations in
the Northwind database, where employees and their supervisors (who are
also employees) are contained in the same table. A field called
ReportsTo points back to other
employees in the table. When you use the EDM Wizard to create a model
from AdventureWorksLT, you will see that an association has been
created that links the SupervisorID
back to the EmployeeID in the same table. Figure 12-28 shows this
association.
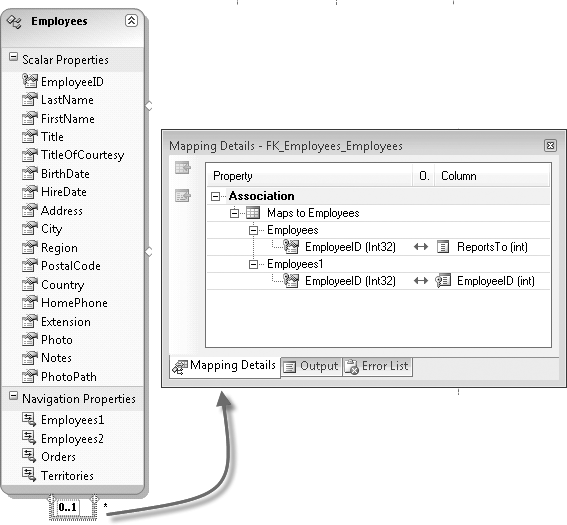
This chapter covered a lot of territory under the single topic of advanced EDMs. The real power of the EDM lies in its ability to go beyond the simplistic representation of the database to allow you myriad ways to shape your data model so that it is much better suited to your business and your applications.
Although the Designer supports some of the advanced techniques, you can achieve even more by working directly with the XML. And although the modeling capabilities are very sophisticated, unfortunately the Designer still has some catching up to do in the next version of the Entity Framework, but there’s no reason to miss out on the flexibility of the model.
You can take advantage of these features in far more ways than I discussed here, so don’t stop with this book. Keep your eyes open for blog posts and articles by the many people who are learning more and more about the Entity Framework to expand your understanding.