Stepping through source code is the most common action in a debugging session. Step commands step an application in source line or instruction increments, depending on the open window. With each step, execution continues incrementally. Between steps, expressions can be evaluated, variables updated, functions called, and scopes changed. Debug windows are updated between steps to reflect changes that occurred during the incremental execution. Excessive tracing, watches, and expressions in debug windows can precipitously hurt performance when stepping through an application.
There are several step commands, described as follows:
Step Into Steps to the next source line or instruction. If that line includes a function call, the debugger steps into the function. You then can step through that function. For nested function calls, the Step Into command steps into the innermost functions first.
Step Over Steps to the next source line or instruction. However, it will not step into a function call.
Step Out Executes the remainder of the current function. Execution is then interrupted at the first source line or instruction after the call site.
Set The Next Statement Lets developers move the next source line or instruction to execute, which is useful for skipping one or more lines of code. This also allows you to repeat instructions or blocks of code. In the source editor, the current line (the next statement to execute) is highlighted in yellow and a yellow arrow appears in the left-most (shaded) column. When the cursor hovers over the yellow arrow, the cursor changes into an arrow itself. You then can drag the yellow arrow up or down. The statement you choose must be within the scope of the current source or instruction. For example, dragging the yellow arrow to another function is illegal. This command is not available when debugging a StackOverflowException exception or a ThreadAbortException exception.
This example demonstrates the Set Next Statement command. In the sample application, variables locala and localb are initialized in MethodA, and then they are incremented. The SwitchValues method is called to swap the values of the local variables. The parameters are passed by reference. After the method call, locala is 11 and localb is 6. Here is the code:
public void MethodA()
{
    int locala = 5, localb = 10;
    ++locala;
    ++localb;
    SwitchValues(ref locala, ref localb);
    MessageBox.Show(locala.ToString());
    MessageBox.Show(localb.ToString());
}

public void SwitchValues(ref int param1,
    ref int param2)
{
    int temp = param1;
    param1 = param2;
    param2 = temp;
}
The following procedure uses the preceding code:
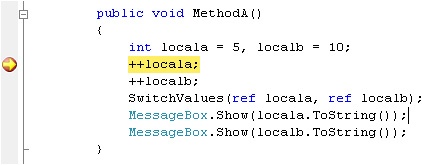
Set a breakpoint on the source line where locala is incremented. When the breakpoint is hit, the current line (the next statement to execute) is marked with a yellow arrow. The breakpoint and the current line are initially at the same location, as shown in Figure 15-23.
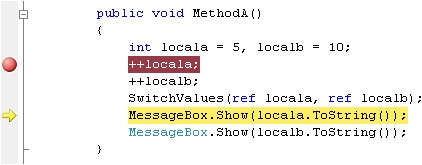
Drag the yellow highlight for the current line down to the first MessageBox.Show statement, which jumps past the statements that increment the local variables and past the SwitchValues method call. Therefore, the values are neither incremented nor swapped. Figure 15-24 shows the repositioned current line.
Continue execution, and the values for locala and localb are displayed. The locala variable is 5, whereas localb is 10. If the current line had not been changed, the values would have been 11 and 6, respectively.