
The remainder of the chapter discusses the common elements of Visual C# 2008 programs.
Namespaces provide hierarchical clarity of classes within and across related assemblies. The .NET Framework Class Library (FCL) is an example of the effective use of namespaces. The FCL would sacrifice clarity if it were designed as a single namespace with a flat hierarchy. Instead, the FCL is organized using a main namespace (System) and several nested namespaces. System, which is the root namespace of the FCL, contains the classes ubiquitous to .NET, such as Console. Types related to LINQ are grouped in the System.Linq namespace. Other .NET services are similarly nested in .NET namespaces. For example, data services are found in the System.Data namespace and are further delineated in the System.Data.SqlClient namespace, which contains classes specific to Microsoft SQL.
A nested namespace is considered a member of the containing namespace. Use the dot punctuator (.) to access members of the namespace, including nested namespaces.
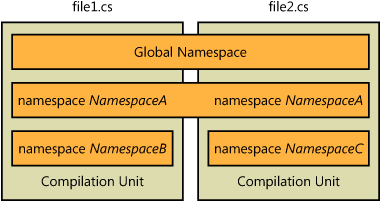
A namespace at file scope, not nested within another namespace, is considered part of the compilation unit and included in the global declaration space. (A compilation unit is a source code file. A program partitioned into several source files has multiple compilation units—one compilation unit for each source file.) Any namespace can span multiple compilation units. For example, all namespaces defined at file scope are included in a single global declaration space that also spans separate source files.
The following code has two compilation units and three namespaces. ClassB is defined in the global declaration space of both compilation units, which is a conflict. ClassC is defined twice in NamespaceZ, which is another conflict. For these reasons, the following program will not compile.
The global declaration space has four members. NamespaceY and NamespaceZ are members. The classes ClassA and ClassB are also members of the global namespaces. The members span the File1.cs and File2.cs compilation units, which both contribute to the global namespace:
// file1.cs

public class ClassA {
}

public class ClassB {
}

namespace NamespaceZ {
   public class ClassC {
   }
}

// file2.cs

public class ClassB {
}

namespace NamespaceY {
    public class ClassA {
    }
}

namespace NamespaceZ {

    public class ClassC {
    }

    public class ClassD {
    }
}
Attempt to compile the above code into a library from the command line with this statement. You will receive compile errors because of the conflicts:
csc /t:library file1.cs file2.cs
The relationship between compilation units, the global namespace, and nonglobal namespaces are illustrated in Figure 1-1.
The using directive makes a namespace implicit. You then can access members of the named namespace directly without their fully qualified names. Do you refer to members of your family by their "fully qualified names" or just their first names? Unless your wife is the queen of England, you probably refer to her directly, simply using her first name. The using directive means that you can treat members of a namespace like family members.
The using directive must precede the first member within a namespace in a compilation unit. The following code defines the namespace member ClassA. The fully qualified name is NamespaceZ.NamespaceY.ClassA. Imagine having to type that several times in a program!
using System;

namespace NamespaceZ {
    namespace NamespaceY {
        class ClassA {
            public static void FunctionM() {
                Console.WriteLine("FunctionM");
            }
        }
    }
}

namespace Application {
    class Starter {
        public static void Main() {
            NamespaceZ.NamespaceY.ClassA.FunctionM();
        }
    }
}
The using directive in the following code makes NamespaceZ.NamespaceY implicit. Now you can directly access ClassA without further qualification:
namespace Application {
    using NamespaceZ.NamespaceY;
    class Starter {
        public static void Main() {
            ClassA.FunctionM();
        }
    }
}
Ambiguities can occur when separate namespaces with identically named members are made implicit. When this occurs, the affected members can be assessed only with their fully qualified names.
The using directive also can define an alias for a namespace or type. Aliases are typically created to resolve ambiguity or simply as a convenience. The scope of the alias is the space where it is declared. The alias must be unique within that space. In this source code, an alias is created for the fully qualified name of ClassA:
namespace Application {
    using A=NamespaceZ.NamespaceY.ClassA;
    class Starter {
        public static void Main() {
            A.FunctionM();
        }
    }
}
In this code, A is the alias and a nickname for NamespaceZ.NamespaceY.ClassA and can be used synonymously.
Using directive statements are not cumulative and are evaluated independently. Take the following example:
using System.Text;
The previous statement makes System.Text implicit but not the System namespace. The following code makes both namespaces implicit:
using System;

using System.Text;
The extern alias directive is an alias to another assembly. The resulting alias can be combined with a namespace to make an explicit reference to a namespace in a different assembly. Separate the alias and referenced assembly with two colons as follows:
extern alias::namespace
Here is sample code for a library that contains two namespaces, stored in a file named mylib.cs:
using System;

namespace ANamespace{
    namespace BNamespace {
        public class XClass {
            public static void MethodA() {
                Console.WriteLine("MyLib::XClass.MethodA");
            }
        }
    }
}
The following command will compile the source file into a Dynamic Link Library (DLL) assembly:
csc /t:library mylib.cs
Here is sample code, stored in a file named program.cs, for an executable that uses the DLL assembly. The extern alias statement resolves the ambiguity between the library and the executable:
extern alias MyLib;
using System;

namespace ANamespace{
    namespace BNamespace {
        class XClass {
            public static void MethodA() {
                Console.WriteLine("Program::XClass.MethodA");
            }
        }
    }
}

class Startup{
    public static void Main() {
        MyLib::ANamespace.BNamespace.XClass.MethodA();
    }
}
The following command will compile the program and define MyLib as an alias for mylib.dll:
csc program.cs /r:MyLib=mylib.dll
In the preceding code, the call to XClass.MethodA is not ambiguous because of the extern alias. Because of the alias, the call to XClass.MethodA executes the version in the library rather than the version in the current compilation unit.
Main is the entry point method for a C# application and a member function of a class or struct (the entry point method is where the C# application starts executing). There are four valid signatures for Main when being used as the entry point method:
static void Main() {
    // main block
}

static int Main() {
    // main block
}

static void Main(string [] args) {
    // main block
}

static int Main(string [] args) {
    //
}
A class or struct can contain only one entry point method. Main must be static and should be private, although that is not required. Naturally, a public Main method is accessible as an entry point method.
Application arguments are passed into the program as a string array parameter of the Main function. Arrays in .NET are instances of the System.Array class. You can use the properties and methods of System.Array to examine the application arguments, including the Length field to determine the number of arguments passed into Main. The command arguments start at element zero of the string array. When no arguments are passed, the arg parameter is non-null but the array length is zero.
The return value of an entry point method is cached internally for interprocess communication. If the application is part of a system of applications and spawned to complete a specific task, the return value could represent a status code or the result of that task. The default exit code of an application is zero. The exit code of a process is stored in the Process Environment Block (PEB) and is accessible through the GetExitCodeProcess application programming interface (API).
What if the entry point is ambiguous? Look at this code, stored in main.cs:
using System;

namespace Application{
    class StarterA{
        static void Main() {
        }
    }
    class StarterB{
        static void Main() {

        }
    }
}
This code has two valid entry points, which is inherently ambiguous. The compiler option main is available to designate the class name where the desired entry point method is found. The following command successfully compiles the previous program:
csc /main:Application.StarterB main.cs.
Local variables are local to a statement block. Local variables can be declared anywhere in the block, but they must be defined before use. Local variables can refer to either value or reference types. A value type is allocated storage on the stack, whereas reference types have memory allocated on the managed heap. Actually, the reference itself is on the stack, while the object being referenced is on the managed heap. Value types are types such as primitives, structures, and enumerations. The memory storage for value types is released deterministically when the variable is no longer in scope. Reference types are types such as user defined types, interfaces, strings, arrays, and pointers. They are always initialized with the new keyword and removed nondeterministically by the Garbage Collector, which is a component of the CLR. Value types can be initialized with a simple assignment and declared in an individual declaration or in a daisy-chain:
int variablea = 5, variableb, variablec = 10;
The scope and visibility of a local variable is the statement block, where it is declared, and any subsequent nested code blocks in the current statement block. This is called the variable declaration space, in which local variables must be uniquely declared.
In the following code, several local variables are defined. The storage for variablea, variableb, variablec, and variabled is released at the end of the function block when the variables are no longer within scope. However, the lifetime of variablee, a local variable and reference type, is managed by the Garbage Collector. It is generally good policy to set reference types to null when they are no longer needed:
void Function() {
    int variablea = 0;
    int variableb = 1,variablec, variabled = 4;
    const double PI = 3.1415;
    UserDefined variablee = new UserDefined();

    // function code

    variablee = null;
}In the previous code, a reference type is set to null. Assigning null to an object indicates that it is unused. This is consistent for all reference types. Can you similarly flag an integer as unused? How can you stipulate that a value type contains nothing? Nulls are not assignable to primitive value types like an integer or char (a compilation error would occur).
int variablea = null; // compiler error
Setting an integer to –1 is a possible solution, assuming that this value is outside the range of expected values. However, this solution is non-portable, requires explicit documentation, and is not very extensible. Nullable types provide a consistent solution for setting a value type to null. This is especially important when manipulating data between C# and a database source, where primitives often contain null values.
Declare a nullable type by adding the ? type modifier in the value type declaration. Here is an example:
double? variable1 = null;
The object variable1 is a nullable type and the underlying type is double. A nullable type extends the interface of the underlying type. The HasValue and Value properties are added. Both properties are public and read-only. HasValue is a Boolean property, whereas the type of Value is the same as the underlying type. If the nullable type is assigned a non-null value, HasValue is true and the Value property is accessible. Otherwise, HasValue is false, and an exception is raised if the Value property is accessed. The acceptable range of values for a nullable type includes the null value and the limits of the underlying type.
The null coalescing operator (??) evaluates the value of a nullable type. The syntax is as follows:
variable ?? r_value
If the nullable type contains a value, the expression evaluates to that value. If the nullable type is empty (that is, it contains null), the expression evaluates to the r_value of the null coalescing operator. The stated r-value of the null coalescing operator must be the same type as the underlying type. The following code sets variable2 to the value of variable1 if variable1 is not null and to zero otherwise:
double variable2 = variable1 ?? 0;
Here is another example of nullable types:
static void Main() {
    int? variablea = null;
    Console.WriteLine(variablea.HasValue); // false
    int variableb = variablea ?? 5;
    Console.WriteLine(variableb);  // 5
}
Expressions resolve to a value. An expression commonly contains one or more operators. However, an expression also can be a single value or constant. Operators are unary, binary, or ternary.
With the exception of the assignment and ternary operators, expressions are evaluated from left to right. Expressions can contain multiple operators; operators are evaluated in order of precedence. Use parentheses to change the precedence or to clarify the desired precedence.
Table 1-1 lists the order of precedence.
Table 1-1. Order of precedence for expressions
Precedence | Operator |
|---|---|
1 | array ‘[ ]’, checked, function ‘( )’, member operator ‘.’, new, postfix decrement, postfix increment, typeof, default, anonymous method, delegate, and unchecked operators |
2 | unary addition ‘+’, casting ‘( )’, one’s complement ‘~’, logical not ‘!’, prefix decrement, prefix increment, and negation ‘-’ operators |
3 | division ‘/’, modulus ‘%’, and multiplication ‘*’ operators |
4 | binary addition ‘+’ and binary subtraction ‘–’ operators |
5 | left-shift ‘<<’ and right-shift ‘>>’ operators |
6 | as, is, less than ‘<’, less than or equal to ‘<=’, greater than ‘>’, and greater than or equal to ‘>=’ operators |
7 | equals ‘==’ and not equal ‘!=’ operators |
8 | Logical And ‘&’ operator |
9 | Logical XOR ‘^’ operator |
10 | Logical Or ‘|’ operator |
11 | Conditional And ‘&&’ operator |
12 | Conditional Or ‘||’ operator |
13 | Null coalescing ‘??’operator |
14 | Conditional ‘?:’ operator |
15 | Assignment ‘=’, compound ‘*=, /=, %=, +=, –=, <<=, >>=, &=, ^=, and |=’, and lambda operator ‘=>’ |
A selection statement evaluates an expression to determine what code branch is executed next. Selection statements include if statements, while loops, for loops, and goto and switch statements.
An if statement evaluates a Boolean expression. If the expression is true, control is transferred to the next true_statement. If the expression is false, execution is transferred to the first statement after the true_statement.
Here is the syntax of the if statement:
if (Boolean_expression) true_statement
In the preceding code, the true_statement is executed when Boolean_expression is true. When combined with an else condition, the if statement has true_statement and false_statement. The false_statement immediately follows the else statement. When the Boolean_expression is true, you are transferred to the true_statement. If it is false, control is transferred to the false_statement. If nested, the else statement belongs to the nearest if statement.
Here is the syntax:
if (Boolean_expression)
     true_statement;
else
     false_statement;
An alternative to nested if and else statements is the else if clause, which is particularly useful in evaluating choices. The else if statement can be used along with an else statement.
The syntax appears here:
if (Boolean_expression_1)
     true_statement_1;
else if (Boolean_expression_2)
     true_statement_2;

...
else if (Boolean_expression_n)
     true_statement_n;
else
     false_statement;
This is an example of various if statements:
static void Main() {
    Console.WriteLine("Enter command:");
    string menuChoice=(Console.ReadLine()).ToLower();
    if (menuChoice == "a")
        Console.WriteLine("Doing Task A");
    else if (menuChoice == "b")
        Console.WriteLine("Doing Task B");
    else if (menuChoice == "c")
        Console.WriteLine("Doing Task C");
    else
        Console.WriteLine("Bad choice");
}
A switch statement is sometimes a better solution then an if statement. Within a switch statement, execution jumps to the case label that matches the switch expression. The switch expression must resolve to an integral, char, enum, or string type. The case label is a constant or literal and must have the same underlying type as the switch expression.
Here is the syntax for the switch statement:
switch (switch_expression)
{
    case label1:
        switch_statement1;
    case label2:
        switch_statement2;
    default:
        default_statement;
}
A switch statement contains a switch expression and is followed by a switch block, which contains one or more case statements. Within the switch block, each case statement must evaluate to a unique label. After the switch expression is evaluated, control is transferred to the matching case label. The matching case has the same value as the switch expression. If no case label matches the switch expression, control is transferred to the default case statement or (if the default case statement is not present) to the next statement after the switch statement.
Unlike C and C++, cascading between case statements is not allowed—that is, you cannot "crash the party" of another case statement. Each case block must conclude with a transfer of control, such as break, goto, return, or throw. The exception is cases that have no statements, where fallthrough is allowed.
This is sample code for a switch statement:
static void Main() {
    Console.WriteLine("Enter command:");
    string resp = (Console.ReadLine()).ToLower();
    switch (resp) {
        case "a":
            Console.WriteLine("Doing Task A");
            break;
        case "b":
            Console.WriteLine("Doing Task B");
            break;
        case "c":
            Console.WriteLine("Doing Task C");
            break;
        default:
            Console.WriteLine("Bad choice");
            break;
    }
}
Any object, value, or reference type that is convertible to an integral, char, enum, or string type is acceptable as the switch_expression, which is demonstrated in the following code. You are allowed a one-step conversion to one of the acceptable types.
class Employee {
    public Employee(string f_Emplid) {
        m_Emplid = f_Emplid;
    }

    static public implicit operator string(Employee f_this) {
        return f_this.m_Emplid;
    }

    private string m_Emplid;
}

class Starter {
    static void Main() {
        Employee newempl = new Employee("1234");
        switch (newempl) {
            case "1234":
                Console.WriteLine("Employee 1234");
                return;
            case "5678":
                Console.WriteLine("Employee 5678");
                return;
            default:
                Console.WriteLine("Invalid employee");
                return;
        }
    }
}C# has the full repertoire of C-style iterative statements. C# also has a foreach statement. Iterative statements repeat a statement until a condition has been satisfied.
The for statement is designed for structured iteration. The while and do statement iterations are more flexible. The for statement contains three clauses. First is the initializer_clause, where the loop iterators are declared. The scope of an iterator is the for statement and for_statement. Second is the Boolean_expression, which must evaluate to a Boolean type. The expression normally compares the iterator to a stop value. Third, the iterator_expression is executed at each iteration, which is usually responsible for updating the iterator. Each clause is optional and delimited with a semicolon. The for_statement is repeated until the Boolean_expression is false.
The for_statement is repeated zero or more times. If the Boolean_expression is initially false, the for_statement is executed zero times. The syntax of the for statement is as follows:
for (initializer_clause; Boolean_expression; iterator_expression) for_statement
The following is a rather mundane for loop:
static void Main() {
    for (int iCounter = 0; iCounter < 10; ++iCounter) {
        Console.Write(iCounter);
    }
}
Both the initializer_clause and iterator_expression can contain multiple statements delimited by commas, not semicolons. This allows additional flexibility and complexity. Here is an example:
static void Main() {
    for (int iBottom = 1, iTop = 10; iBottom < iTop; ++iBottom, --iTop) {
        Console.WriteLine("{0}x{1} {2}", iBottom, iTop, iBottom * iTop);
    }
}
The while statement, which is an iterative statement, is more free-form than the for statement. The body of the while statement is executed zero or more times; it is executed when the Boolean_expression is true. If the Boolean_expression is initially false, the body is executed zero times.
Typically, the while statement or expression is responsible for altering an iterator or other factors, eventually causing the Boolean_expression to evaluate to false, which ends the loop. Care should be taken to avoid unintended infinite loops.
The syntax for the while statement is as follows:
while (Boolean_expression) body_statement
This is source code for selecting a choice rewritten with a while statement:
static void Main() {
    string resp;
    Console.WriteLine("Enter command ('x' to end):");
    while ((resp=(Console.ReadLine()).ToLower()) != "x") {
        switch (resp) {
        case "a":
            Console.WriteLine("Doing Task A");
            break;
        case "b":
            Console.WriteLine("Doing Task B");
            break;
        default:
            Console.WriteLine("Bad choice");
            break;
        }
    }
}
A do statement is a loop that evaluates the Boolean_expression at the end. This is the reverse of the while statement. The impact is that the body of the do statement is repeated one or more times. The niche for the do statement is when the body must be executed at least once. The iteration of the body continues while the Boolean_expression is true.
Here is the syntax of the do statement:
do body_statement while (Boolean_expression)
Here is sample code of the do statement:
static void Main() {
    string resp;
    do {
        Console.WriteLine("Menu

1 - Task A");
        Console.WriteLine("2 - Task B");
        Console.WriteLine("E - E(xit)");
        resp = (Console.ReadLine()).ToLower();
    }
    while(resp!="e");
}
The foreach statement is a convenient mechanism for automatically iterating elements of a collection. The alternative is manually iterating a collection with an enumerator object obtained with the IEnumerable.GetEnumerator method. All collections implement the IEnumerable interface. The foreach statement is unquestionably simpler.
This is the syntax of the foreach statement:
foreach (type variable in collection) body_statement
The foreach statement iterates the elements of the collection. As each element is enumerated, the variable is assigned the current element, and the body of the foreach statement is executed. The scope of the variable is the foreach statement. When the collection is fully iterated, the iteration stops.
The variable type should be related to the type of objects contained in the collection. In addition, the variable is read-only. Even using the variable in a context that implies change, such as passing the variable as a ref function parameter, is an error.
This code iterates an array of numbers:
static void Main() {
    string [] numbers={ "uno", "dos", "tres",
        "quatro", "cinco"};
    foreach (string number in numbers) {
        Console.WriteLine(number);
    }
}
The break statement forces a premature exit of a loop or switch. Control is transferred to the statement after the loop or switch. In a switch block, the break prevents fallthrough between switch_labels. For an iterative statement, a break stops the iteration unconditionally and exits the loop. If the switch or iterative statement is nested, only the nearest loop is exited.
The continue statement transfers control to the end of a loop where execution of the loop is allowed to continue. The Boolean_expression of the iterative statement then determines whether the iteration continues.
This is sample code of the break statement:
static void Main() {
    string resp;
    while(true) {
        Console.WriteLine("Menu

1 - Task A");
        Console.WriteLine("2 - Task B");
        Console.WriteLine("E - E(xit)");
        resp = (Console.ReadLine()).ToLower();
        if (resp == "e") {
             break;
        }
    }
}