
Now that we’ve looked at setup issues, it’s time to get into concrete programming details. This section is a tutorial that introduces CGI coding one step at a time—from simple, noninteractive scripts to larger programs that utilize all the common web page user input devices (what we called widgets in the Tkinter GUI chapters in Part III).
Along the way, we’ll also explore the core ideas behind server-side scripting. We’ll move slowly at first, to learn all the basics; the next chapter will use the ideas presented here to build up larger and more realistic web site examples. For now, let’s work through a simple CGI tutorial, with just enough HTML thrown in to write basic server-side scripts.
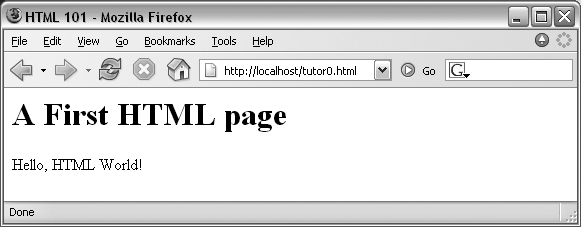
As mentioned, CGI scripts are intimately bound up with HTML, so let’s start with a simple HTML page. The file tutor0.html, shown in Example 16-2, defines a bona fide, fully functional web page—a text file containing HTML code, which specifies the structure and contents of a simple web page.
Example 16-2. PP3EInternetWeb utor0.html
<HTML>
<TITLE>HTML 101</TITLE>
<BODY>
<H1>A First HTML page</H1>
<P>Hello, HTML World!</P>
</BODY></HTML>
If you point your favorite web browser to the Internet address of this file, you should see a page like that shown in Figure 16-2. This figure shows the Firefox browser at work on the address http://localhost/tutor0.html (type this into your browser’s address field), and it assumes that the local web browser described in the prior section is running; other browsers render the page similarly. Since this is a static HTML file, you’ll get the same result if you simply click on the file’s icon on most platforms.
To truly understand how this little file does its work, you need to know something about HTML syntax, Internet addresses, and file permission rules. Let’s take a quick first look at each of these topics before we move on to the next example.
I promised that I wouldn’t teach much HTML in this
book, but you need to know enough to make sense of examples. In
short, HTML is a descriptive markup language, based on
tags— items enclosed in <> pairs. Some tags stand alone
(e.g., <HR> specifies a
horizontal rule). Others appear in begin/end pairs in which the
end tag includes an extra slash.
For instance, to specify the text of a level-one header
line, we write HTML code of the form <H1>
text </H1>; the text between the tags
shows up on the web page. Some tags also allow us to specify
options. For example, a tag pair like <A href="
address "> text
</A> specifies a
hyperlink: pressing the link’s text in the
page directs the browser to access the Internet address (URL)
listed in the href
option.
It’s important to keep in mind that HTML is used only to
describe pages: your web browser reads it and translates its
description to a web page with headers, paragraphs, links, and the
like. Notably absent are both layout
information—the browser is responsible for arranging
components on the page—and syntax for programming
logic—there are no if statements, loops, and so on. Also,
Python code is nowhere to be found in Example 16-2; raw HTML is
strictly for defining pages, not for coding programs or specifying
all user interface details.
HTML’s lack of user interface control and programmability is both a strength and a weakness. It’s well suited to describing pages and simple user interfaces at a high level. The browser, not you, handles physically laying out the page on your screen. On the other hand, HTML does not directly support full-blown GUIs and requires us to introduce CGI scripts (and other technologies) to web sites, in order to add dynamic programmability to otherwise static HTML.
Once you write an HTML file, you need to put it somewhere a web browser can reference it. If you are using the locally running Python web server described earlier, this becomes trivial: use a URL of the form http://localhost/file.html to access web pages, and http://localhost/cgi-bin/file.py to name CGI scripts. This is implied by the fact that the web server script serves pages and scripts from the directory in which it is.
On other servers, URLs may be more complex. Like all HTML files, tutor0.html must be stored in a directory on the server machine, from which the resident web server program allows browsers to fetch pages. For example, on the server used for the second edition of this book, the page’s file must be stored in or below the public_html directory of my personal home directory—that is, somewhere in the directory tree rooted at /home/lutz/public_html. The complete Unix pathname of this file on the server is:
/home/lutz/public_html/tutor0.html
This path is different from its PP3EInternetWeb location in the book’s examples distribution, as given in the example file listing’s title. When referencing this file on the client, though, you must specify its Internet address, sometimes called a URL, instead. The following URL was used to load the remote page from the server:
http://starship.python.net/~lutz/tutor0.html
The server maps this URL to the Unix pathname automatically. In general, URL strings like this one are composed as the concatenation of multiple parts:
- Protocol name:
http The protocol part of this URL tells the browser to communicate with the HTTP (i.e., web) server program on the server machine, using the HTTP message protocol. URLs used in browsers can also name different protocols—for example,
ftp://to reference a file managed by the FTP protocol and server,file://to reference a file on the local machine,telnetto start a Telnet client session, and so on.- Server machine name and port:
starship.python.net A URL also names the target server machine’s domain name or Internet Protocol (IP) address following the protocol type. Here, we list the domain name of the server machine where the examples are installed; the machine name listed is used to open a socket to talk to the server. As usual, a machine name of
localhost(or the equivalent IP address127.0.0.1) here means the server is running on the same machine as the client.Optionally, this part of the URL may also explicitly give the socket port on which the server is listening for connections, following a colon (e.g.,
starship.python.net:8000, or127.0.0.1:80). For HTTP, the socket is usually connected to port number 80, so this is the default if the port is omitted. See Chapter 13 if you need a refresher on machine names and ports.- File path:
~lutz/tutor0.html Finally, the URL gives the path to the desired file on the remote machine. The HTTP web server automatically translates the URL’s file path to the file’s true pathname: on the starship server,
~lutzis automatically translated to the public_html directory in my home directory. When using the Python-coded web server script in Example 16-1, files are mapped to the server’s current working directory instead. URLs typically map to such files, but they can reference other sorts of items as well, and may name an executable CGI script to be run when accessed.- Query parameters (used in later examples)
URLs may also be followed by additional input parameters for CGI programs. When used, they are introduced by a
?and are typically separated by&characters. For instance, a string of the form?name=bob&job=hackerat the end of a URL passes parameters namednameandjobto the CGI script named earlier in the URL, with valuesbobandhacker, respectively. As we’ll discuss later in this chapter when we explore escaping rules, the parameters may sometimes be separated by;characters instead, as in?name=bob;job=hacker, though this form is less common.These values are sometimes called URL query string parameters and are treated the same as form inputs by scripts. Technically speaking, query parameters may have other structures (e.g., unnamed values separated by
+), but we will ignore additional options in this text; more on both parameters and input forms later in this tutorial.
To make sure we have a handle on URL syntax, let’s pick apart another example that we will be using later in this chapter. In the following HTTP protocol URL:
http://localhost:80/cgi-bin/languages.py?language=All
the components uniquely identify a server script to be run as follows:
The server name
localhostmeans the web server is running on the same machine as the client; as explained earlier, this is the configuration we’re using for our examples.Port number 80 gives the socket port on which the web server is listening for connections (port 80 is the default if this part is omitted, so we will usually omit it).
The file path
cgi-bin/languages.pygives the location of the file to be run on the server machine, within the directory where the server looks for referenced files.The query string
?language=Allprovides an input parameter to the referenced scriptlanguages.py, as an alternative to user input in form fields (described later).
Although this covers most URLs you’re likely to encounter in the wild, the full format of URLs is slightly richer:
protocol://networklocation/path;parameters?querystring#fragment
For instance, the fragment part may name a section within
a page (e.g., #part1).
Moreover, each part can have formats of their own, and some are
not used in all protocols. The ;parameters part is omitted for HTTP,
for instance (it gives an explicit file type for FTP), and the
networklocation part may also
specify optional user login parameters for some protocol schemes
(its full format is user:password@host:port for FTP and
Telnet, but just host:port for
HTTP). We used a complex FTP URL in Chapter 14, for example, which
included a username and password, as well as a binary file type
(the server may guess if no type is given):
ftp://lutz:[email protected]/filename;type=i
We’ll ignore additional URL formatting rules here. If you’re
interested in more details, you might start by reading the
urlparse module’s entry in
Python’s library manual, as well as its source code in the Python
standard library. You may also notice that a URL you type to
access a page looks a bit different after the page is fetched
(spaces become + characters,
% characters are added, and so
on). This is simply because browsers must also generally follow
URL escaping (i.e., translation) conventions, which we’ll explore
later in this chapter.
Because browsers remember the prior page’s Internet address, URLs embedded in HTML files can often omit the protocol and server names, as well as the file’s directory path. If missing, the browser simply uses these components’ values from the last page’s address. This minimal syntax works for URLs embedded in hyperlinks and for form actions (we’ll meet forms later in this tutorial). For example, within a page that was fetched from the directory dirpath on the server www.server.com, minimal hyperlinks and form actions such as:
<A HREF="more.html">
<FORM ACTION="next.py"  ...>
are treated exactly as if we had specified a complete URL with explicit server and path components, like the following:
<A HREF="http://www.server.com/dirpath/more.html">
<FORM ACTION="http://www.server.com/dirpath/next.py"  ...>
The first minimal URL refers to the file
more.html on the same server and in the same
directory from which the page containing this hyperlink was
fetched; it is expanded to a complete URL within the browser. URLs
can also employ Unix-style relative path syntax in the file path
component. A hyperlink tag like <A
HREF="../spam.gif">, for instance, names a GIF file
on the server machine and parent directory of the file that
contains this link’s URL.
Why all the fuss about shorter URLs? Besides extending the life of your keyboard and eyesight, the main advantage of such minimal URLs is that they don’t need to be changed if you ever move your pages to a new directory or server—the server and path are inferred when the page is used; they are not hardcoded into its HTML. The flipside of this can be fairly painful: examples that do include explicit site names and pathnames in URLs embedded within HTML code cannot be copied to other servers without source code changes. Scripts and special HTML tags can help here, but editing source code can be error-prone.
The downside of minimal URLs is that they don’t trigger automatic Internet connections when followed offline. This becomes apparent only when you load pages from local files on your computer. For example, we can generally open HTML pages without connecting to the Internet at all by pointing a web browser to a page’s file that lives on the local machine (e.g., by clicking on its file icon). When browsing a page locally like this, following a fully specified URL makes the browser automatically connect to the Internet to fetch the referenced page or script. Minimal URLs, though, are opened on the local machine again; usually, the browser simply displays the referenced page or script’s source code.
The net effect is that minimal URLs are more portable, but they tend to work better when running all pages live on the Internet. To make them easier to work with, the examples in this book will often omit the server and path components in URLs they contain. In this book, to derive a page or script’s true URL from a minimal URL, imagine that the string:
http://localhost/
appears before the filename given by the URL. Your browser will, even if you don’t.
One install pointer before we move on: if you want to use a different server and machine, it may be necessary on some platforms to grant web page files and their directories world-readable permission. That’s because they are loaded by arbitrary people over the Web (often by someone named “nobody,” who we’ll introduce in a moment).
An appropriate chmod
command can be used to change permissions on Unix-like machines.
For instance, a chmod 755
filename shell command usually
suffices; it makes filename readable
and executable by everyone, and writable by you only.[*] These directory and file permission details are
typical, but they can vary from server to server. Be sure to find
out about the local server’s conventions if you upload HTML
files to a remote site.
The HTML file we saw in the prior section is just that—an HTML file, not a CGI script. When referenced by a browser, the remote web server simply sends back the file’s text to produce a new page in the browser. To illustrate the nature of CGI scripts, let’s recode the example as a Python CGI program, as shown in Example 16-3.
Example 16-3. PP3EInternetWebcgi-bin utor0.py
#!/usr/bin/python
#######################################################
# runs on the server, prints HTML to create a new page;
# url=http://localhost/cgi-bin/tutor0.py
#######################################################

print "Content-type: text/html
"
print "<TITLE>CGI 101</TITLE>"
print "<H1>A First CGI script</H1>"
print "<P>Hello, CGI World!</P>"
This file, tutor0.py, makes the same sort
of page as Example 16-2
if you point your browser at it—simply replace .html with .py in the URL, and add the
cgi-bin subdirectory name to the path to yield
its address, http://localhost/cgi-bin/tutor0.py.
But this time it’s a very different kind of animal—it is an executable program that is run on the server in response to your access request. It’s also a completely legal Python program, in which the page’s HTML is printed dynamically, instead of being precoded in a static file. In fact, little is CGI-specific about this Python program; if run from the system command line, it simply prints HTML instead of generating a browser page:
C:...PP3EInternetWebcgi-bin>python tutor0.py
Content-type: text/html

<TITLE>CGI 101</TITLE>
<H1>A First CGI script</H1>
<P>Hello, CGI World!</P>
When run by the HTTP server program on a web server machine, however, the standard output stream is tied to a socket read by the browser on the client machine. In this context, all the output is sent across the Internet to your browser. As such, it must be formatted per the browser’s expectations.
In particular, when the script’s output reaches your browser, the first printed line is interpreted as a header, describing the text that follows. There can be more than one header line in the printed response, but there must always be a blank line between the headers and the start of the HTML code (or other data).
In this script, the first header line tells the browser that
the rest of the transmission is HTML text (text/html), and the newline character
(
) at the end of the first
print statement generates an
extra line feed in addition to the one that the print statement generates itself. The net
effect is to insert a blank line after the header line. The rest of
this program’s output is standard HTML and is used by the browser to
generate a web page on a client, exactly as if the HTML lived in a
static HTML file on the server.[*]
CGI scripts are accessed just like HTML files: you either type the full URL of this script into your browser’s address field, or click on the tutor0.py link line in the examples root page of Figure 16-1 (which follows a minimal hyperlink that resolves to the script’s full URL). Figure 16-3 shows the result page generated if you point your browser at this script.

If you are running the local web server described at the start of this chapter, no extra installation steps are required to make this example work, and you can safely skip most of this section. If you want to put CGI scripts on another server, though, there are a few pragmatic details you may need to know about. This section provides a brief overview of common CGI configuration details for reference.
Like HTML files, CGI scripts are simple text files that you can either create on your local machine and upload to the server by FTP, or write with a text editor running directly on the server machine (perhaps using a Telnet client). However, because CGI scripts are run as programs, they have some unique installation requirements that differ from simple HTML files. In particular, they usually must be stored and named specially, and they must be configured as programs that are executable by arbitrary users. Depending on your needs, CGI scripts also may require help finding imported modules and may need to be converted to the server platform’s text file format after being uploaded. Let’s look at each install constraint in more depth:
- Directory and filename conventions
First, CGI scripts need to be placed in a directory that your web server recognizes as a program directory, and they need to be given a name that your server recognizes as a CGI script. In the local web server we’re using in this chapter, scripts need to be placed in a special cgi-bin subdirectory and be named with a .py extension. On the server used for this book’s second edition, CGI scripts instead were stored in the user’s public_html directory just like HTML files, but they required a filename ending in a .cgi, not a .py. Some servers may allow other suffixes and program directories; this varies widely and can sometimes be configured per server or per user.
- Execution conventions
Because they must be executed by the web server on behalf of arbitrary users on the Web, CGI script files may also need to be given executable file permissions to mark them as programs, and be made executable by others. Again, a shell command
chmod 0755filenamedoes the trick on most servers.Under some servers, CGI scripts also need the special
#!line at the top, to identify the Python interpreter that runs the file’s code. The text after the#!in the first line simply gives the directory path to the Python executable on your server machine. See Chapter 3 for more details on this special first line, and be sure to check your server’s conventions for more details on non-Unix platforms.Some servers may expect this line, even outside Unix. Most of the CGI scripts in this book include the
#!line just in case they will ever be run on Unix-like platforms; under our locally running web server on Windows, this first line is simply ignored as a Python comment.One subtlety worth noting: as we saw earlier in the book, the special first line in executable text files can normally contain either a hardcoded path to the Python interpreter (e.g., #!/usr/bin/python) or an invocation of the
envprogram (e.g., #!/usr/bin/env python), which deduces where Python lives from environment variable settings (i.e., your$PATH). Theenvtrick is less useful in CGI scripts, though, because their environment settings are those of the user “nobody” (not your own), as explained in the next paragraph.- Module search path configuration (optional)
Some HTTP servers may run CGI scripts with the username “nobody” for security reasons (this limits the user’s access to the server machine). That’s why files you publish on the Web must have special permission settings that make them accessible to other users. It also means that some CGI scripts can’t rely on the Python module search path to be configured in any particular way. As we’ve seen, the module path is normally initialized from the user’s
PYTHONPATHsetting and .pth files, plus defaults. But because CGI scripts are run by the user “nobody,”PYTHONPATHmay be arbitrary when a CGI script runs.Before you puzzle over this too hard, you should know that this is often not a concern in practice. Because Python usually searches the current directory for imported modules by default, this is not an issue if all of your scripts and any modules and packages they use are stored in your web directory. But if the module lives elsewhere, you may need to modify the
sys.pathlist in your scripts to adjust the search path manually before imports—for instance, withsys.path.append(dirname)calls, index assignments, and so on.- End-of-line conventions (optional)
On some Unix (and Linux) servers, you might also have to make sure that your script text files follow the Unix end-of-line convention (
- Unbuffered output streams (optional)
Under some servers, the
printstatement may buffer its output. If you have a long-running CGI script, to avoid making the user wait to see results, you may wish to manually flush your printed text (callsys.stdout.flush( )) or run your Python scripts in unbuffered mode. Recall from Chapter 5 that you can make streams unbuffered by running with the-ucommand-line flag or by setting yourPYTHONUNBUFFEREDenvironment variable to a nonempty value.To use
-uin the CGI world, try using a first line like#!/usr/bin/python -u. In typical usage, output buffering is not usually a factor. On some servers and clients, this may be a resolution for empty reply pages, or premature end-of-script header errors—the client may time out before the buffered output stream is sent (though more commonly, these cases reflect genuine program errors in your script).
This installation process may sound a bit complex at first glance, but much of it is server-dependent, and it’s not bad once you’ve worked through it on your own. It’s only a concern at install time and can usually be automated to some extent with Python scripts run on the server. To summarize, most Python CGI scripts are text files of Python code, which:
Are named according to your web server’s conventions (e.g., file.py)
Are stored in a directory recognized by your web server (e.g., cgi-bin/)
Are given executable file permissions if required (e.g.,
chmod 755 file.py)May require the special
#!pythonpathline at the top for some serversConfigure
sys.pathonly if needed to see modules in other directoriesUse Unix end-of-line conventions, if your server rejects DOS format
Flush output buffers if required, or to send portions of the reply periodically
Even if you must use a server machine configured by someone else, most of the machine’s conventions should be easy to root out during a normal debugging cycle. As usual, you should consult the conventions for any machine to which you plan to copy these example files.
One last install pointer: even though Python doesn’t have to be installed on any clients in the context of a server-side web application, it does have to exist on the server machine where your CGI scripts are expected to run. If you’re running your own server with either the webserver.py script we met earlier, or an open source server such as Apache, this is a nonissue.
But if you are using a web server that you did not configure
yourself, you must be sure that Python lives on that machine.
Moreover, you need to find where it is on that machine so that you
can specify its path in the #!
line at the top of your script. If you are not sure if or where
Python lives on your server machine, here are some tips:
Especially on Unix systems, you should first assume that Python lives in a standard place (e.g., /usr/local/bin/python): type
pythonin a shell window and see if it works. Chances are that Python already lives on such machines. If you have Telnet access on your server, a Unixfindcommand starting at /usr may help.If your server runs Linux, you’re probably set to go. Python ships as a standard part of Linux distributions these days, and many web sites and Internet Service Providers (ISPs) run the Linux operating system; at such sites, Python probably already lives at /usr/bin/python.
In other environments where you cannot control the server machine yourself, it may be harder to obtain access to an already installed Python. If so, you can relocate your site to a server that does have Python installed, talk your ISP into installing Python on the machine you’re trying to use, or install Python on the server machine yourself.
If your ISP is unsympathetic to your need for Python and you are willing to relocate your site to one that is, you can find lists of Python-friendly ISPs by searching http://www.python.org. And if you choose to install Python on your server machine yourself, be sure to check out the freeze tool shipped with the Python source distribution (in the Tools directory). With freeze, you can create a single executable program file that contains the entire Python interpreter, as well as all the standard library modules. Such a frozen interpreter can be uploaded to your web account by FTP in a single step, and it won’t require a full-blown Python installation on the server. Also see the public domain Installer and Py2Exe systems, which can similarly produce a frozen Python binary.
Let’s get back to writing server-side code. As anyone
who’s ever surfed the Web knows, web pages usually consist of more
than simple text. Example
16-4 is a Python CGI script that prints an <IMG> HTML tag in its output to
produce a graphic image in the client browser. This example isn’t
very Python-specific, but note that just as for simple HTML files,
the image file (ppsmall.gif, one level up from
the script file) lives on and is downloaded from the server machine
when the browser interprets the output of this script to render the
reply page.
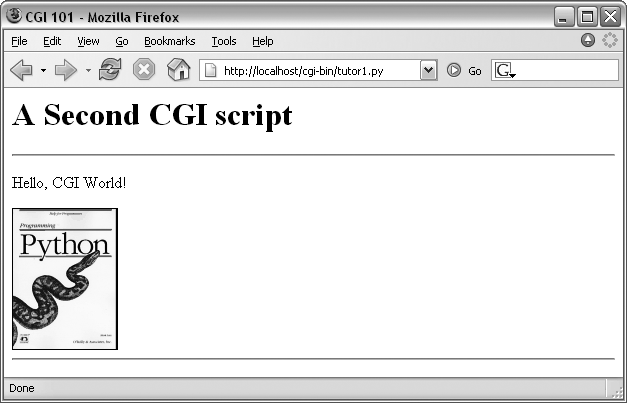
Example 16-4. PP3EInternetWebcgi-bin utor1.py
#!/usr/bin/python

text = """Content-type: text/html

<TITLE>CGI 101</TITLE>
<H1>A Second CGI script</H1>
<HR>
<P>Hello, CGI World!</P>
<IMG src="../ppsmall.gif" BORDER=1 ALT=[image]>
<HR>
"""

print text
Notice the use of the triple-quoted string block here; the
entire HTML string is sent to the browser in one fell swoop, with
the print statement at the end.
Be sure that the blank line between the Content-type header and the
first HTML is truly blank in the string (it may fail in some
browsers if you have any spaces or tabs on that line). If both
client and server are functional, a page that looks like Figure 16-4 will be generated
when this script is referenced and run.
So far, our CGI scripts have been putting out canned HTML that could have just as easily been stored in an HTML file. But because CGI scripts are executable programs, they can also be used to generate HTML on the fly, dynamically—even, possibly, in response to a particular set of user inputs sent to the script. That’s the whole purpose of CGI scripts, after all. Let’s start using this to better advantage now, and write a Python script that builds up response HTML programmatically, listed in Example 16-5.
Example 16-5. PP3EInternetWebcgi-bin utor2.py
#!/usr/bin/python

print """Content-type: text/html

<TITLE>CGI 101</TITLE>
<H1>A Third CGI script</H1>
<HR>
<P>Hello, CGI World!</P>

<table border=1>
"""

for i in range(5):
    print "<tr>"
    for j in range(4):
        print "<td>%d.%d</td>" % (i, j)
    print "</tr>"

print """
</table>
<HR>
"""
Despite all the tags, this really is Python code—the
tutor2.py script uses triple-quoted strings to
embed blocks of HTML again. But this time, the script also uses
nested Python for loops to
dynamically generate part of the HTML that is sent to the browser.
Specifically, it emits HTML to lay out a two-dimensional table in
the middle of a page, as shown in Figure 16-5.
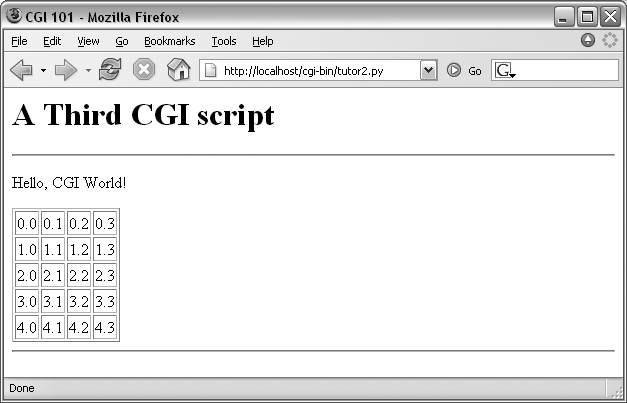
Each row in the table displays a “row.column” pair, as
generated by the executing Python script. If you’re curious how the
generated HTML looks, select your browser’s View Source option after
you’ve accessed this page. It’s a single HTML page composed of the
HTML generated by the first print
in the script, then the for
loops, and finally the last print. In other words, the concatenation
of this script’s output is an HTML document with headers.
The script in Example 16-5 generates HTML
table tags. Again, we’re not out to learn HTML here, but we’ll
take a quick look just so that you can make sense of this book’s
examples. Tables are declared by the text between <table> and </table> tags in HTML. Typically,
a table’s text in turn declares the contents of each table row
between <tr> and </tr> tags and each column within
a row between <td> and
</td> tags. The loops in
our script build up HTML to declare five rows of four columns each
by printing the appropriate tags, with the current row and column
number as column values.
For instance, here is part of the script’s output, defining the first two rows (to see the full output, run the script standalone from a system command line, or select your browser’s View Source option):
<table border=1>
<tr>
<td>0.0</td>
<td>0.1</td>
<td>0.2</td>
<td>0.3</td>
</tr>
<tr>
<td>1.0</td>
<td>1.1</td>
<td>1.2</td>
<td>1.3</td>
</tr>
. . .
</table>
Other table tags and options let us specify a row title
(<th>), layout borders,
and so on. We’ll use more table syntax to lay out forms in a
uniform fashion later in this tutorial.
CGI scripts are great at generating HTML on the fly like this, but they are also commonly used to implement interaction with a user typing at a web browser. As described earlier in this chapter, web interactions usually involve a two-step process and two distinct web pages: you fill out an input form page and press Submit, and a reply page eventually comes back. In between, a CGI script processes the form input.
That description sounds simple enough, but the process of
collecting user inputs requires an understanding of a special HTML
tag, <form>. Let’s look
at the implementation of a simple web interaction to see
forms at work. First, we need to define a form page for
the user to fill out, as shown in Example 16-6.
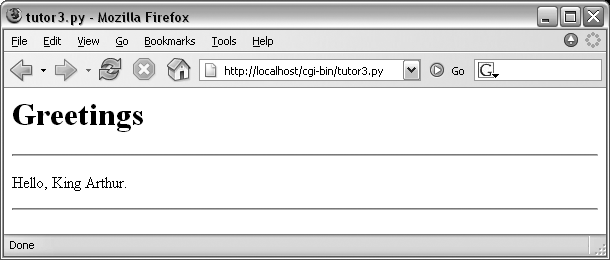
Example 16-6. PP3EInternetWeb utor3.html
<html>
<title>CGI 101</title>
<body>
<H1>A first user interaction: forms</H1>
<hr><form method=POST action="http://localhost/cgi-bin/tutor3.py">
    <P><B>Enter your name:</B>
    <P><input type=text name=user>
    <P><input type=submit>
</form>
</body></html>
tutor3.html is a simple HTML file, not
a CGI script (though its contents could be printed from a script
as well). When this file is accessed, all the text between its
<form> and </form> tags generates the input fields and Submit button shown
in Figure 16-6.

We won’t go into all the details behind coding HTML forms, but a few highlights are worth underscoring. The following occurs within a form’s HTML code:
- Form handler action
The form’s
actionoption gives the URL of a CGI script that will be invoked to process submitted form data. This is the link from a form to its handler program—in this case, a program called tutor3.py in the cgi-bin subdirectory of the locally running server’s working directory. Theactionoption is the equivalent ofcommandoptions in Tkinter buttons—it’s where a callback handler (here, a remote handler script) is registered to the browser and server.- Input fields
Input controls are specified with nested
<input>tags. In this example, input tags have two key options. Thetypeoption accepts values such astextfor text fields andsubmitfor a Submit button (which sends data to the server and is labeled “Submit Query” by default). Thenameoption is the hook used to identify the entered value by key, once all the form data reaches the server. For instance, the server-side CGI script we’ll see in a moment uses the stringuseras a key to get the data typed into this form’s text field.As we’ll see in later examples, other input tag options can specify initial values (
value=X), display-only mode (readonly), and so on. As we’ll also see later, other inputtypeoption values may transmit hidden data that embeds state information in pages (type=hidden), reinitializes fields (type=reset), or makes multiple-choice buttons (type=checkbox).- Submission method:
getandpost Forms also include a
methodoption to specify the encoding style to be used to send data over a socket to the target server machine. Here, we use thepoststyle, which contacts the server and then ships it a stream of user input data in a separate transmission over the socket.An alternative
getstyle ships input information to the server in a single transmission step by appending user inputs to the query string at the end of the URL used to invoke the script, usually after a?character. Query parameters were introduced earlier when we met URLs; we will put them to use later in this section.With
get, inputs typically show up on the server in environment variables or as arguments in the command line used to start the script. Withpost, they must be read from standard input and decoded. Because thegetmethod appends inputs to URLs, it allows users to bookmark actions with parameters for later submission (e.g., a link to a retail site, together with the name of a particular item);postis very generally meant for sending data that is to be submitted once (e.g., comment text).The
getmethod is usually considered more efficient, but it may be subject to length limits in the operating system and is less secure (parameters may be recorded in server logs, for instance).postcan handle larger inputs and may be more secure in some scenarios, but it requires an extra transmission. Luckily, Python’scgimodule transparently handles either encoding style, so our CGI scripts don’t need to know or care which is used.
Notice that the action URL in this example’s form spells out the full address for illustration. Because the browser remembers where the enclosing HTML page came from, it works the same with just the script’s filename, as shown in Example 16-7.
Example 16-7. PP3EInternetWeb utor3-minimal.html
<html>
<title>CGI 101</title>
<body>
<H1>A first user interaction: forms</H1>
<hr><form method=POST action="cgi-bin/tutor3.py">
    <P><B>Enter your name:</B>
    <P><input type=text name=user>
    <P><input type=submit>
</form>
</body></html>
It may help to remember that URLs embedded in form action tags and hyperlinks are directions to the browser first, not to the script. The tutor3.py script itself doesn’t care which URL form is used to trigger it—minimal or complete. In fact, all parts of a URL through the script filename (and up to URL query parameters) are used in the conversation between browser and HTTP server, before a CGI script is ever spawned. As long as the browser knows which server to contact, the URL will work.
On the other hand, URLs submitted outside of a page (e.g.,
typed into a browser’s address field or sent to Python’s urllib module) usually must be
completely specified, because there is no notion of a prior
page.
So far, we’ve created only a static page with an
input field. But the Submit button on this page is loaded to work
magic. When pressed, it triggers the possibly remote program whose
URL is listed in the form’s action option, and passes this program
the input data typed by the user, according to the form’s method encoding style option. On the
server, a Python script is started to handle the form’s input data
while the user waits for a reply on the client, as shown in Example 16-8.
Example 16-8. PP3EInternetWebcgi-bin utor3.py
#!/usr/bin/python
#######################################################
# runs on the server, reads form input, prints HTML;
# url=http://server-name/cgi-bin/tutor3.py
#######################################################

import cgi
form = cgi.FieldStorage( )            # parse form data
print "Content-type: text/html"        # plus blank line

html = """
<TITLE>tutor3.py</TITLE>
<H1>Greetings</H1>
<HR>
<P>%s</P>
<HR>"""

if not form.has_key('user'):
    print html % "Who are you?"
else:
    print html % ("Hello, %s." % form['user'].value)
As before, this Python CGI script prints HTML to generate a
response page in the client’s browser. But this script does a bit
more: it also uses the standard cgi module to parse the input data
entered by the user on the prior web page (see Figure 16-6).
Luckily, this is automatic in Python: a call to the standard
library cgi module’s FieldStorage class automatically does
all the work of extracting form data from the input stream and
environment variables, regardless of how that data was passed—in a
post style stream or in
get style parameters appended
to the URL. Inputs sent in both styles look the same to Python
scripts.
Scripts should call cgi.FieldStorage only once and before
accessing any field values. When it is called, we get back an
object that looks like a dictionary—user input fields from the
form (or URL) show up as values of keys in this object. For
example, in the script, form['user'] is an object whose value attribute is a string containing
the text typed into the form’s text field. If you flip back to the
form page’s HTML, you’ll notice that the input field’s name option was user—the name in the form’s HTML has
become a key we use to fetch the input’s value from a dictionary.
The object returned by FieldStorage supports other dictionary
operations, too—for instance, the has_key method may be used to check
whether a field is present in the input data.
Before exiting, this script prints HTML to produce a result
page that echoes back what the user typed into the form. Two
string-formatting expressions (%) are used to insert the input text
into a reply string, and the reply string into the triple-quoted
HTML string block. The body of the script’s output looks like
this:
<TITLE>tutor3.py</TITLE>
<H1>Greetings</H1>
<HR>
<P>Hello, King Arthur.</P>
<HR>
In a browser, the output is rendered into a page like the one in Figure 16-7.
Notice that the URL address of the script that
generated this page shows up at the top of the browser. We didn’t
type this URL itself—it came from the action tag of the prior page’s form HTML. However, nothing is stopping
us from typing the script’s URL explicitly in our browser’s
address field to invoke the script, just as we did for our earlier
CGI script and HTML file examples.
But there’s a catch here: where does the input field’s value
come from if there is no form page? That is, if we type the CGI
script’s URL ourselves, how does the input field get filled in?
Earlier, when we talked about URL formats, I mentioned that the
get encoding scheme tacks input
parameters onto the end of URLs. When we type script addresses
explicitly, we can also append input values on the end of URLs,
where they serve the same purpose as <input> fields in forms. Moreover,
the Python cgi module makes URL
and form inputs look identical to scripts.
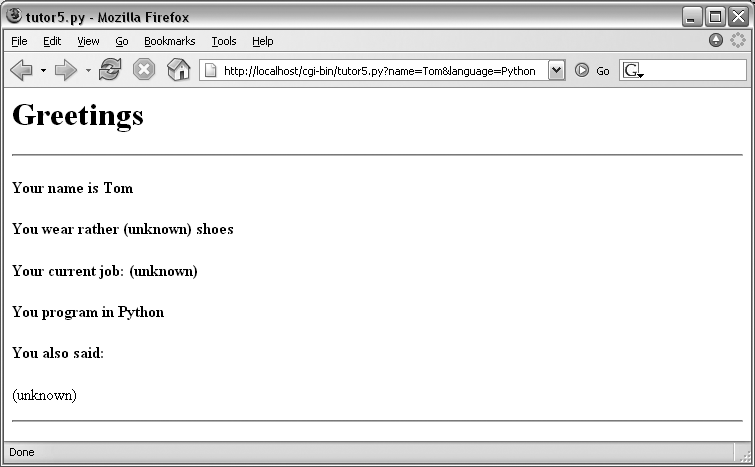
For instance, we can skip filling out the input form page completely, and directly invoke our tutor3.py script by visiting a URL of this form (type this in your browser’s address field):
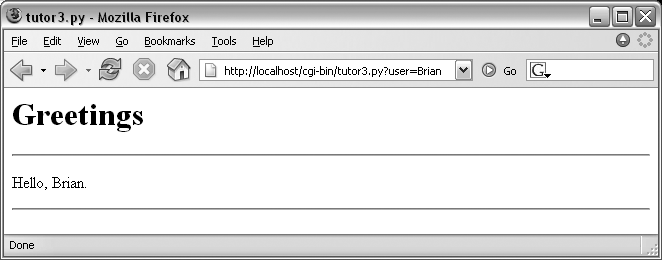
http://localhost/cgi-bin/tutor3.py?user=Brian
In this URL, a value for the input named user is specified explicitly, as if the
user had filled out the input page. When called this way, the only
constraint is that the parameter name user must match the name expected by the
script (and hardcoded in the form’s HTML). We use just one
parameter here, but in general, URL parameters are typically
introduced with a ? and are
followed by one or more name=value assignments, separated by
& characters if there is
more than one. Figure
16-8 shows the response page we get after typing a URL with
explicit inputs.
In fact, HTML forms that specify the get encoding style also cause inputs to
be added to URLs this way. Try changing Example 16-6 to use method=GET, and submit the form—the name
input in the form shows up as a query parameter in the reply page
address field, just like the URL we manually entered in Figure 16-8. Forms can use
the post or get style. Manually typed URLs with
parameters use get.
Generally, any CGI script can be invoked either by filling out and submitting a form page or by passing inputs at the end of a URL. Although hand-coding parameters in URLs can become difficult for scripts that expect many complex parameters, other programs can automate the construction process.
When CGI scripts are invoked with explicit input parameters this way, it’s not too difficult to see their similarity to functions, albeit ones that live remotely on the Net. Passing data to scripts in URLs is similar to keyword arguments in Python functions, both operationally and syntactically. In fact, in Chapter 18 we will meet a system called Zope that makes the relationship between URLs and Python function calls even more literal (URLs become more direct function calls).
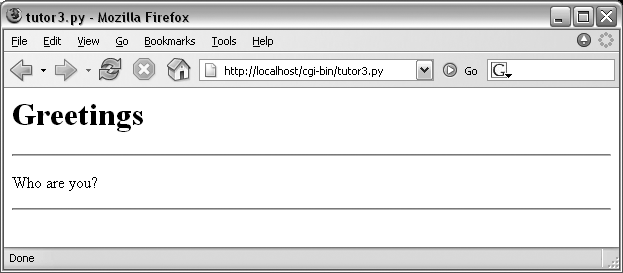
Incidentally, if you clear out the name input field in the
form input page (i.e., make it empty) and press Submit, the
user name field becomes empty.
More accurately, the browser may not send this field along with
the form data at all, even though it is listed in the form layout
HTML. The CGI script detects such a missing field with the
dictionary has_key method and
produces the page captured in Figure 16-9 in
response.
In general, CGI scripts must check to see whether any inputs
are missing, partly because they might not be typed by a user in
the form, but also because there may be no form at all—input
fields might not be tacked onto the end of an explicitly typed
URL. For instance, if we type the script’s URL without any
parameters at all—by omitting the text from the ? and beyond, and visiting http://localhost/cgi-bin/tutor3.py with an
explicitly entered URL—we get this same error response page. Since
we can invoke any CGI through a form or URL, scripts must
anticipate both scenarios.
Once we understand how to send inputs to forms as query
string parameters at the end of URLs like this, the Python
urllib module we met in Chapters 2 and 14 becomes even more useful.
Recall that this module allows us to fetch the reply generated for
any URL address. When the URL names a simple HTML file, we simply
download its contents. But when it names a CGI script, the effect
is to run the remote script and fetch its output.
For example, we can trigger the script in Example 16-8 directly,
without either going through the tutor3.html web page or typing a URL
in a browser’s address field:
C:Python24>python>>>from urllib import urlopen>>>reply = urlopen('http://localhost/cgi-bin/tutor3.py?user=Brian').read( )>>>print reply<TITLE>tutor3.py</TITLE> <H1>Greetings</H1> <HR> <P>Hello, Brian.</P> <HR> >>>url = 'http://localhost/cgi-bin/tutor3.py'>>>conn = urlopen(url)>>>reply = conn.read( )>>>print reply<TITLE>tutor3.py</TITLE> <H1>Greetings</H1> <HR> <P>Who are you?</P> <HR>
Recall from Chapter 14
that urllib.urlopen gives us a
file object connected to the generated reply stream. Reading this
file’s output returns the HTML that would normally be intercepted
by a web browser and rendered into a reply page.
When fetched directly, the HTML reply can be parsed with
Python text processing tools (e.g., string methods like split and find, the re pattern-matching module, or the
htmllib HTML parsing module).
Extracting text from the reply this way is sometimes informally
called screen scraping—a way to use web site
content in other programs. Screen scraping is an alternative to
more complex web services frameworks, though a brittle one: small
changes in the page’s format can often break scrapers that rely on
it. The reply text can also be simply inspected—urllib allows us to test CGI scripts
from the Python interactive prompt or other scripts, instead of a
browser.
More generally, this technique allows us to use a
server-side script as a sort of function call. For instance, a
client-side GUI can call the CGI script and parse the generated
reply page. Similarly, a CGI script that updates a database may be
invoked programmatically with urllib, outside the context of an input
form page. This also opens the door to automated regression
testing of CGI scripts—we can invoke scripts on any remote
machine, and compare their reply text to the expected
output.[*] We’ll see urllib
in action again in later examples.
Before we move on, here are a few advanced urllib usage notes. First, this module
also supports proxies, alternative transmission modes, and more.
For instance, proxies are supported transparently with environment
variables or system settings, or by passing in an extra argument.
Moreover, although it normally doesn’t make a difference to Python
scripts, it is possible to send parameters in both the get and the put submission modes described earlier
with urllib. The get mode, with parameters in the query
string at the end of a URL as shown in the prior listing, is used
by default. To invoke post,
pass parameters in as a separate argument:
>>>from urllib import urlopen, urlencode>>>params = urlencode({'user': 'Brian'})>>>params'user=Brian' >>> >>>print urlopen('http://localhost/cgi-bin/tutor3.py', params).read( )<TITLE>tutor3.py</TITLE> <H1>Greetings</H1> <HR> <P>Hello, Brian.</P> <HR>
Finally, if your web application depends on client-side
cookies (discussed later), see also the newer module, urllib2. This module provides the same
file-like urlopen interface for
opening and reading from a URL, but it uses the cookielib module to automatically store
cookies locally, and later return them to the server. It also
supports redirection, authentication, and more; both URL modules
also support secure HTTP transmissions. See the Python library
manual for details. We’ll explore both cookies and urllib2 later in this chapter, and
introduce secure HTTP in the next.
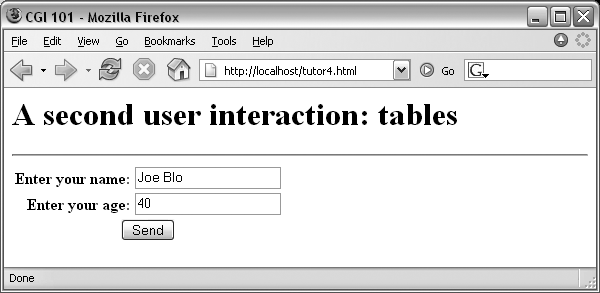
Now let’s move on to something a bit more realistic. In most CGI applications, input pages are composed of multiple fields. When there is more than one, input labels and fields are typically laid out in a table, to give the form a well-structured appearance. The HTML file in Example 16-9 defines a form with two input fields.
Example 16-9. PP3EInternetWeb utor4.html
<html>
<title>CGI 101</title>
<body>
<H1>A second user interaction: tables
</H1>
<hr>
<form method=POST action="cgi-bin/tutor4.py">
  <table>
    <TR>
      <TH align=right>Enter your name:
      <TD><input type=text name=user>
    <TR>
      <TH align=right>Enter your age:
      <TD><input type=text name=age>
    <TR>
      <TD colspan=2 align=center>
      <input type=submit value="Send">
  </table>
</form>
</body></html>
The <TH> tag defines
a column like <TD>, but
also tags it as a header column, which generally means it is
rendered in a bold font. By placing the input fields and labels in a
table like this, we get an input page like that shown in Figure 16-10. Labels and
inputs are automatically lined up vertically in columns, much as
they were by the Tkinter GUI geometry managers we met earlier in
this book.
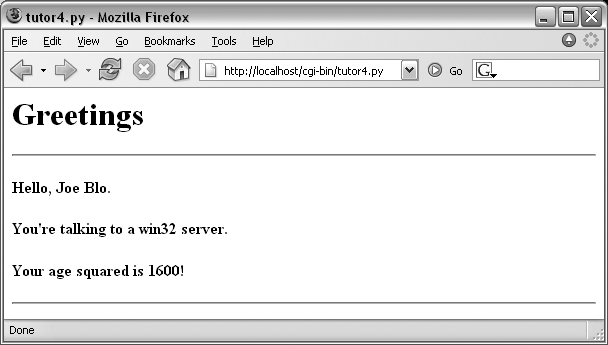
When this form’s Submit button (labeled “Send” by the page’s HTML) is pressed, it causes the script in Example 16-10 to be executed on the server machine, with the inputs typed by the user.
Example 16-10. PP3EInternetWebcgi-bin utor4.py
#!/usr/bin/python ####################################################### # runs on the server, reads form input, prints HTML; # URL http://server-name/cgi-bin/tutor4.py ####################################################### import cgi, syssys.stderr = sys.stdout# errors to browser form = cgi.FieldStorage( ) # parse form data print "Content-type: text/html " # plus blank line# class dummy:# def _ _init_ _(self, s): self.value = s# form = {'user': dummy('bob'), 'age':dummy('10')}html = """ <TITLE>tutor4.py</TITLE> <H1>Greetings</H1> <HR> <H4>%s</H4> <H4>%s</H4> <H4>%s</H4> <HR>""" if not form.has_key('user'): line1 = "Who are you?" else: line1 = "Hello, %s." % form['user'].value line2 = "You're talking to a %s server." % sys.platform line3 = "" if form.has_key('age'): try:line3 = "Your age squared is %d!" % (int(form['age'].value) ** 2)except: line3 = "Sorry, I can't compute %s ** 2." % form['age'].value print html % (line1, line2, line3)
The table layout comes from the HTML file, not from this Python CGI script. In fact, this script doesn’t do much new—it uses string formatting to plug input values into the response page’s HTML triple-quoted template string as before, this time with one line per input field. When this script is run by submitting the input form page, its output produces the new reply page shown in Figure 16-11.
As usual, we can pass parameters to this CGI script at the end
of a URL, too. Figure
16-12 shows the page we get when passing a user and age explicitly in this URL:
http://localhost/cgi-bin/tutor4.py?user=Joe+Blow&age=30
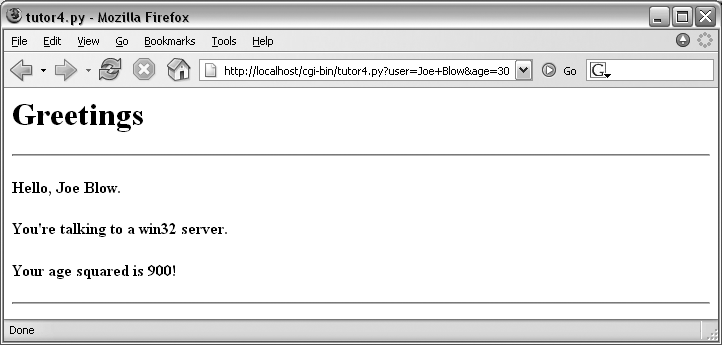
Notice that we have two parameters after the ? this time; we separate them with
&. Also note that we’ve
specified a blank space in the user value with +. This is a common URL encoding
convention. On the server side, the + is automatically replaced with a space
again. It’s also part of the standard escape rule for URL strings,
which we’ll revisit later.
Although Example 16-10 doesn’t introduce much that is new about CGI itself, it does highlight a few new coding tricks worth noting, especially regarding CGI script debugging and security. Let’s take a quick look.
Just for fun, the script echoes back the name of the
server platform by fetching sys.platform along with the square of
the age input field. Notice
that the age input’s value must
be converted to an integer with the built-in int function; in the CGI world, all
inputs arrive as strings. We could also convert to an integer with
the built-in eval function.
Conversion (and other) errors are trapped gracefully in a try statement to yield an error line,
instead of letting our script die.
Warning
You should never use eval to convert strings that were sent
over the Internet, like the age field in this example, unless you
can be absolutely sure that the string does not contain even
potentially malicious code. For instance, if this example were
available on the general Internet, it’s not impossible that
someone could type a value into the age field (or append an age parameter to the URL) with a value
like os.system('rm *'). Given
the appropriate context and process permissions, when passed to
eval, such a string might
delete all the files in your server script directory!
Unless you run CGI scripts in processes with limited
permissions and machine access, strings read off the Web can be
dangerous to run as code in CGI scripting. You should never pass
them to dynamic coding tools like eval and exec, or to tools that run arbitrary
shell commands such as os.popen and os.system, unless you can be sure that
they are safe. Always use simpler tools for numeric conversion
like int and float, which recognize only
numbers.
Errors happen, even in the brave new world of the Internet. Generally speaking, debugging CGI scripts can be much more difficult than debugging programs that run on your local machine. Not only do errors occur on a remote machine, but scripts generally won’t run without the context implied by the CGI model. The script in Example 16-10 demonstrates the following two common debugging tricks:
- Error message trapping
This script assigns
sys.stderrtosys.stdoutso that Python error messages wind up being displayed in the response page in the browser. Normally, Python error messages are written tostderr, which generally causes them to show up in the web server’s console window or logfile. To route them to the browser, we must makestderrreference the same file object asstdout(which is connected to the browser in CGI scripts). If we don’t do this assignment, Python errors, including program errors in our script, never show up in the browser.- Test case mock-up
The
dummyclass definition, commented out in this final version, was used to debug the script before it was installed on the Net. Besides not seeingstderrmessages by default, CGI scripts also assume an enclosing context that does not exist if they are tested outside the CGI environment. For instance, if run from the system command line, this script has no form input data. Uncomment this code to test from the system command line. Thedummyclass masquerades as a parsed form field object, andformis assigned a dictionary containing two form field objects. The net effect is thatformwill be plug-and-play compatible with the result of acgi.FieldStoragecall. As usual in Python, object interfaces, not datatypes, are all we must adhere to.
Here are a few general tips for debugging your server-side CGI scripts:
- Run the script from the command line
It probably won’t generate HTML as is, but running it standalone will detect any syntax errors in your code. Recall that a Python command line can run source code files regardless of their extension: for example,
python somescript.cgiworks fine.- Assign
sys.stderrtosys.stdoutas early as possible in your script This will generally make the text of Python error messages and stack dumps appear in your client browser when accessing the script, instead of the web server’s console window or logs. Short of wading through server logs, or manual exception handling, this may be the only way to see the text of error messages after your script aborts.
- Mock up inputs to simulate the enclosing CGI context
For instance, define classes that mimic the CGI inputs interface (as done with the
dummyclass in this script) so that you can view the script’s output for various test cases by running it from the system command line.[*] Setting environment variables to mimic form or URL inputs sometimes helps too (we’ll see how later in this chapter).- Call utilities to display CGI context in the browser
The CGI module includes utility functions that send a formatted dump of CGI environment variables and input values to the browser, to view in a reply page. For instance,
cgi.print_form(form)prints all the input parameters sent from the client, andcgi.test( )prints environment variables, the form, the directory, and more. Sometimes this is enough to resolve connection or input problems. We’ll use some of these in the mailer case study in the next chapter.- Show exceptions you catch, print tracebacks
If you catch an exception that Python raises, the Python error message won’t be printed to
stderr(that is normal behavior). In such cases, it’s up to your script to display the exception’s name and value in the response page; exception details are available in the built-insysmodule, fromsys.exc_info( ). In addition, Python’stracebackmodule can be used to manually generate stack traces on your reply page for errors; tracebacks show source-code lines active when an exception occurred. We’ll use this later in the error page in PyMailCGI (Chapter 17).- Add debugging prints
You can always insert tracing
printstatements in your code, just as in normal Python programs. Be sure you print the content-type header line first, though, or your prints may not show up on the reply page. In the worst case, you can also generate debugging and trace messages by opening and writing to a local text file on the server; provided you access that file later, this avoids having to format the trace messages according to HTML reply stream conventions.- Run it live
Of course, once your script is at least half working, your best bet is likely to start running it live on the server, with real inputs coming from a browser. Running a server locally on your machine, as we’re doing in this chapter, can help by making changes go faster as you test.
So far, we’ve been typing inputs into text fields. HTML forms support a handful of input controls (what we’d call widgets in the traditional GUI world) for collecting user inputs. Let’s look at a CGI program that shows all the common input controls at once. As usual, we define both an HTML file to lay out the form page and a Python CGI script to process its inputs and generate a response. The HTML file is presented in Example 16-11.
Example 16-11. PP3EInternetWebcgi-bin utor5a.html
<HTML><TITLE>CGI 101</TITLE>
<BODY>
<H1>Common input devices</H1>
<HR>
<FORM method=POST action="cgi-bin/tutor5.py">
  <H3>Please complete the following form and click Send</H3>
  <P><TABLE>
    <TR>
      <TH align=right>Name:
      <TD><input type=text name=name>
    <TR>
      <TH align=right>Shoe size:
      <TD><table>
      <td><input type=radio name=shoesize value=small>Small
      <td><input type=radio name=shoesize value=medium>Medium
      <td><input type=radio name=shoesize value=large>Large
      </table>
    <TR>
      <TH align=right>Occupation:
      <TD><select name=job>
        <option>Developer
        <option>Manager
        <option>Student
        <option>Evangelist
        <option>Other
      </select>
    <TR>
      <TH align=right>Political affiliations:
      <TD><table>
      <td><input type=checkbox name=language value=Python>Pythonista
      <td><input type=checkbox name=language value=Perl>Perlmonger
      <td><input type=checkbox name=language value=Tcl>Tcler
      </table>
    <TR>
      <TH align=right>Comments:
      <TD><textarea name=comment cols=30 rows=2>Enter text here</textarea>
    <TR>
      <TD colspan=2 align=center>
      <input type=submit value="Send">
  </TABLE>
</FORM>
<HR>
</BODY></HTML>
When rendered by a browser, the page in Figure 16-13 appears.
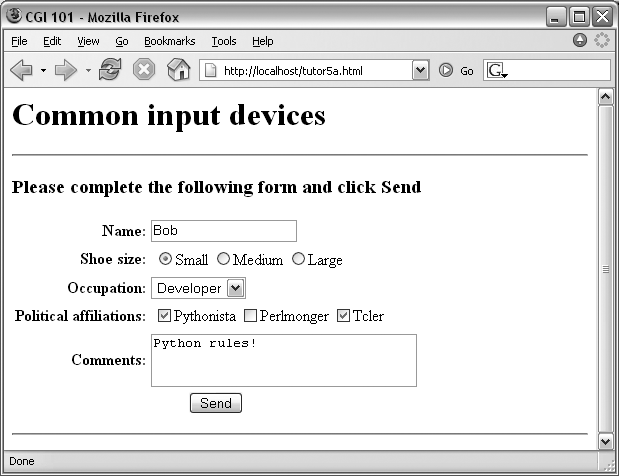
This page contains a simple text field as before, but it also
has radio buttons, a pull-down selection list, a set of
multiple-choice checkbuttons, and a multiple-line text input area.
All have a name option in the
HTML file, which identifies their selected value in the data sent
from client to server. When we fill out this form and click the Send
submit button, the script in Example 16-12 runs on the
server to process all the input data typed or selected in the
form.
Example 16-12. PP3EInternetWebcgi-bin utor5.py
#!/usr/bin/python
#######################################################
# runs on the server, reads form input, prints HTML
#######################################################
import cgi, sys
form = cgi.FieldStorage( ) # parse form data
print "Content-type: text/html" # plus blank line
html = """
<TITLE>tutor5.py</TITLE>
<H1>Greetings</H1>
<HR>
<H4>Your name is %(name)s</H4>
<H4>You wear rather %(shoesize)s shoes</H4>
<H4>Your current job: %(job)s</H4>
<H4>You program in %(language)s</H4>
<H4>You also said:</H4>
<P>%(comment)s</P>
<HR>"""
data = {}
for field in ('name', 'shoesize', 'job', 'language', 'comment'):
if not form.has_key(field):
data[field] = '(unknown)'
else:
if type(form[field]) != list:
data[field] = form[field].value
else:
values = [x.value for x in form[field]]
data[field] = ' and '.join(values)
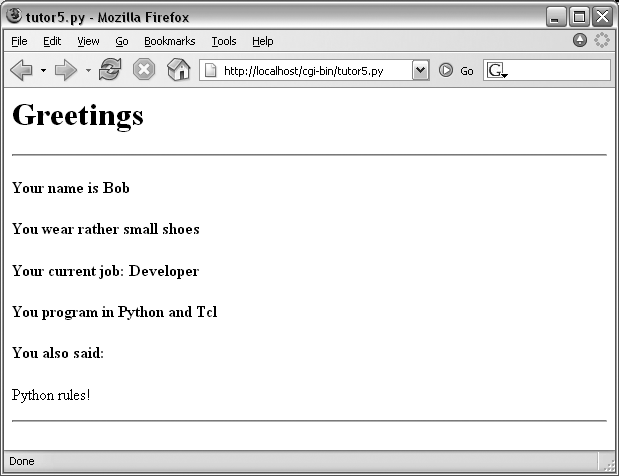
print html % dataThis Python script doesn’t do much; it mostly just copies form
field information into a dictionary called data so that it can be easily inserted
into the triple-quoted response template string. A few of its
techniques merit explanation:
- Field validation
As usual, we need to check all expected fields to see whether they really are present in the input data, using the dictionary
has_keymethod. Any or all of the input fields may be missing if they weren’t entered on the form or appended to an explicit URL.- String formatting
We’re using dictionary key references in the format string this time—recall that
%(name)smeans pull out the value for the keynamein the data dictionary and perform a to-string conversion on its value.- Multiple-choice fields
We’re also testing the type of all the expected fields’ values to see whether they arrive as a list rather than the usual string. Values of multiple-choice input controls, like the
languagechoice field in this input page, are returned fromcgi.FieldStorageas a list of objects withvalueattributes, rather than a simple single object with avalue.This script copies simple field values to the dictionary verbatim, but it uses a list comprehension to collect the value fields of multiple-choice selections, and the string
joinmethod to construct a single string with anandinserted between each selection value (e.g.,Python and Tcl). The script’s list comprehension is equivalent to the callmap(lambda x: x.value, form[field]).[*]
When the form page is filled out and submitted, the script creates the response shown in Figure 16-14—essentially just a formatted echo of what was sent.
Suppose that you’ve written a system like that in the prior section, and your users, clients, and significant other start complaining that the input form is difficult to read. Don’t worry. Because the CGI model naturally separates the user interface (the HTML input page definition) from the processing logic (the CGI script), it’s completely painless to change the form’s layout. Simply modify the HTML file; there’s no need to change the CGI code at all. For instance, Example 16-13 contains a new definition of the input that uses tables a bit differently to provide a nicer layout with borders.
Example 16-13. PP3EInternetWeb utor5b.html
<HTML><TITLE>CGI 101</TITLE>
<BODY>
<H1>Common input devices: alternative layout</H1>
<P>Use the same tutor5.py server side script, but change the
layout of the form itself.  Notice the separation of user interface
and processing logic here; the CGI script is independent of the
HTML used to interact with the user/client.</P><HR>

<FORM method=POST action="cgi-bin/tutor5.py">
  <H3>Please complete the following form and click Submit</H3>
  <P><TABLE border cellpadding=3>
    <TR>
      <TH align=right>Name:
      <TD><input type=text name=name>
    <TR>
      <TH align=right>Shoe size:
      <TD><input type=radio name=shoesize value=small>Small
          <input type=radio name=shoesize value=medium>Medium
          <input type=radio name=shoesize value=large>Large
    <TR>
      <TH align=right>Occupation:
      <TD><select name=job>
        <option>Developer
        <option>Manager
        <option>Student
        <option>Evangelist
        <option>Other
      </select>
    <TR>
      <TH align=right>Political affiliations:
      <TD><P><input type=checkbox name=language value=Python>Pythonista
          <P><input type=checkbox name=language value=Perl>Perlmonger
          <P><input type=checkbox name=language value=Tcl>Tcler
    <TR>
      <TH align=right>Comments:
      <TD><textarea name=comment cols=30 rows=2>Enter spam here</textarea>
    <TR>
      <TD colspan=2 align=center>
      <input type=submit value="Submit">
      <input type=reset  value="Reset">
  </TABLE>
</FORM>
</BODY></HTML>
When we visit this alternative page with a browser, we get the interface shown in Figure 16-15.
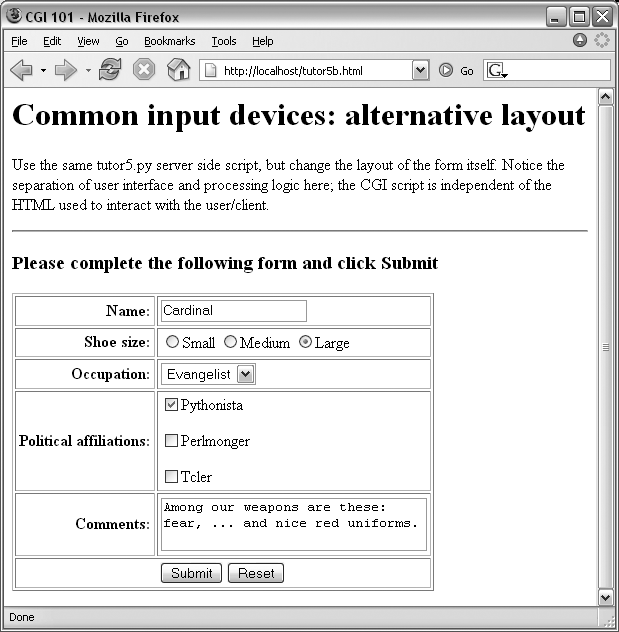
Now, before you go blind trying to detect the differences in
this and the prior HTML file, I should note that the HTML
differences that produce this page are much less important than the
fact that the action fields in
these two pages’ forms reference identical URLs. Pressing this
version’s Submit button triggers the exact same and totally
unchanged Python CGI script again, tutor5.py
(Example 16-12).
That is, scripts are completely independent of both the transmission mode (URL query parameters of form fields) and the layout of the user interface used to send them information. Changes in the response page require changing the script, of course, because the HTML of the reply page is still embedded in the CGI script. But we can change the input page’s HTML as much as we like without affecting the server-side Python code. Figure 16-16 shows the response page produced by the script this time around.
In fact, this illustrates an important point in the design of larger web sites: if we are careful to keep the HTML and script code separate, we get a useful division of display and logic—each part can be worked on independently, by people with different skill sets. Web page designers, for example, can work on the display layout, while programmers can code business logic.
Although this section’s example is fairly small, it already
benefits from this separation for the input page. In some cases,
the separation is harder to accomplish, because our example
scripts embed the HTML of reply pages. With just a little more
work, though, we can usually split the reply HTML off into
separate files that can also be developed independently of the
script’s logic. The html string
in tutor5.py (Example 16-12), for
instance, might be stored in a text file and loaded by the script
when run.
In larger systems, tools such as server-side HTML templating languages help make the division of display and logic even easier to achieve. The Zope and Python Server Pages examples we’ll meet in Chapter 18, for instance, promote the separation of display and logic by providing reply page description languages that are expanded to include portions generated by separate Python program logic. In a sense, server-side templating languages embed Python in HTML—the opposite of CGI scripts that embed HTML in Python—and may provide a cleaner division of labor, provided the Python code is separate components. See Chapter 18 for more details. Similar techniques can be used for separation of layout and login in the GUIs we studied earlier in this book, but they also usually require larger frameworks or models to achieve.
Earlier, we passed parameters to CGI scripts by
listing them at the end of a URL typed into the browser’s address
field—in the query string parameters part of the URL, after the
?. But there’s nothing sacred
about the browser’s address field. In particular, nothing is
stopping us from using the same URL syntax in hyperlinks that we hardcode or generate in web
page definitions.
For example, the web page from Example 16-14 defines three
hyperlinks (the text between the <A> and </A> tags), which trigger our
original tutor5.py script again (Example 16-12), but with three
different precoded sets of parameters.
Example 16-14. PP3EInternetWeb utor5c.html
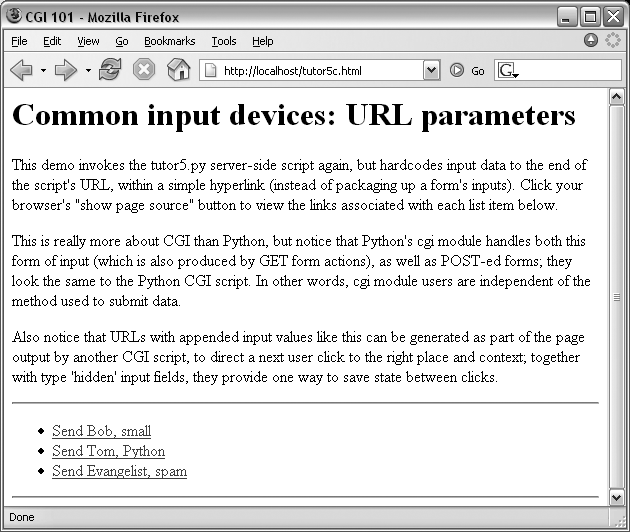
<HTML><TITLE>CGI 101</TITLE>
<BODY>
<H1>Common input devices: URL parameters</H1>

<P>This demo invokes the tutor5.py server-side script again,
but hardcodes input data to the end of the script's URL,
within a simple hyperlink (instead of packaging up a form's
inputs).  Click your browser's "show page source" button
to view the links associated with each list item below.

<P>This is really more about CGI than Python, but notice that
Python's cgi module handles both this form of input (which is
also produced by GET form actions), as well as POST-ed forms;
they look the same to the Python CGI script.  In other words,
cgi module users are independent of the method used to submit
data.

<P>Also notice that URLs with appended input values like this
can be generated as part of the page output by another CGI script,
to direct a next user click to the right place and context; together
with type 'hidden' input fields, they provide one way to
save state between clicks.
</P><HR>

<UL>
<LI><A href="cgi-bin/tutor5.py?name=Bob&shoesize=small">Send Bob, small</A>
<LI><A href="cgi-bin/tutor5.py?name=Tom&language=Python">Send Tom, Python</A>

<LI><A href="http://localhost/cgi-bin/tutor5.py?job=Evangelist&comment=spam">
Send Evangelist, spam</A>
</UL>

<HR></BODY></HTML>
This static HTML file defines three hyperlinks—the first two are minimal and the third is fully specified, but all work similarly (again, the target script doesn’t care). When we visit this file’s URL, we see the page shown in Figure 16-17. It’s mostly just a page for launching canned calls to the CGI script.
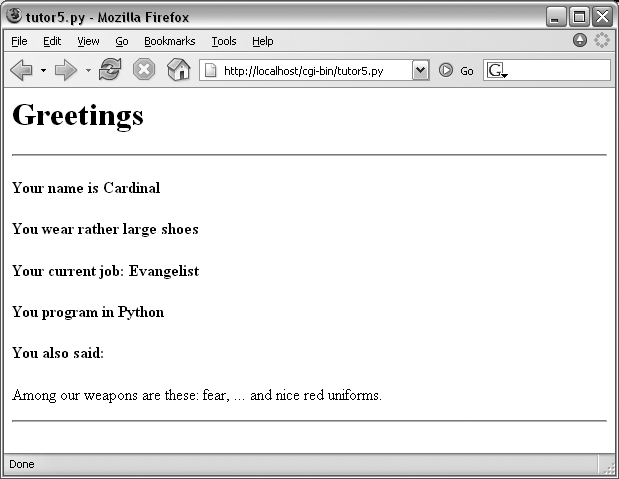
Clicking on this page’s second link creates the response page
in Figure 16-18. This
link invokes the CGI script, with the name parameter set to “Tom” and the
language parameter set to
“Python,” simply because those parameters and values are hardcoded
in the URL listed in the HTML for the second hyperlink. As such,
hyperlinks with parameters like this are sometimes known as
stateful links—they automatically direct the
next script’s operation. The net effect is exactly as if we had
manually typed the line shown at the top of the browser in Figure 16-18.
Notice that many fields are missing here; the
tutor5.py script is smart enough to detect and
handle missing fields and generate an unknown message in the reply page. It’s
also worth pointing out that we’re reusing the Python CGI script
again. The script itself is completely independent of both the user
interface format of the submission page, as well as the technique
used to invoke it—from a submitted form or a hardcoded URL with
query parameters. By separating such user interface details from
processing logic, CGI scripts become reusable software components,
at least within the context of the CGI environment.
The query parameters in the URLs embedded in Example 16-14 were hardcoded in the page’s HTML. But such URLs can also be generated automatically by a CGI script as part of a reply page in order to provide inputs to the script that implements a next step in user interaction. They are a simple way for web-based applications to “remember” things for the duration of a session. Hidden form fields, up next, serve some of the same purposes.
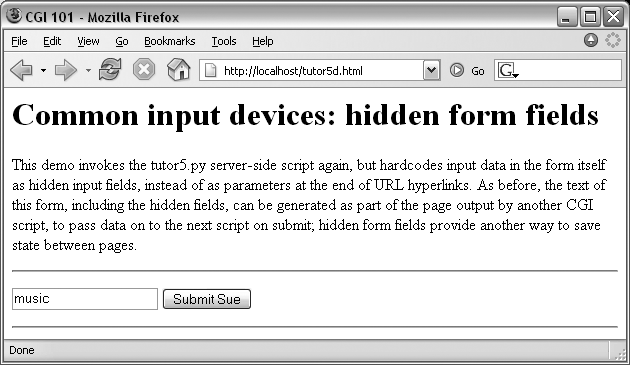
Similar in spirit to the prior section, inputs for scripts can also be hardcoded in a page’s HTML as hidden input fields. Such fields are not displayed in the page, but are transmitted back to the server when the form is submitted. Example 16-15, for instance, allows a job field to be entered, but fills in name and language parameters automatically as hidden input fields.
Example 16-15. PP3EInternetWeb utor5d.html
<HTML><TITLE>CGI 101</TITLE>
<BODY>
<H1>Common input devices: hidden form fields</H1>

<P>This demo invokes the tutor5.py server-side script again,
but hardcodes input data in the form itself as hidden input
fields, instead of as parameters at the end of URL hyperlinks.
As before, the text of this form, including the hidden fields,
can be generated as part of the page output by another CGI
script, to pass data on to the next script on submit; hidden
form fields provide another way to save state between pages.
</P><HR><p>

<form>
<form method=post action="cgi-bin/tutor5.py">
    <input type=hidden name=name     value=Sue>
    <input type=hidden name=language value=Python>
    <input type=text   name=job      value="Enter job">
    <input type=submit value="Submit Sue">
</form>
</p><HR></BODY></HTML>
When Example 16-15 is opened in a browser, we get the input page in Figure 16-19.
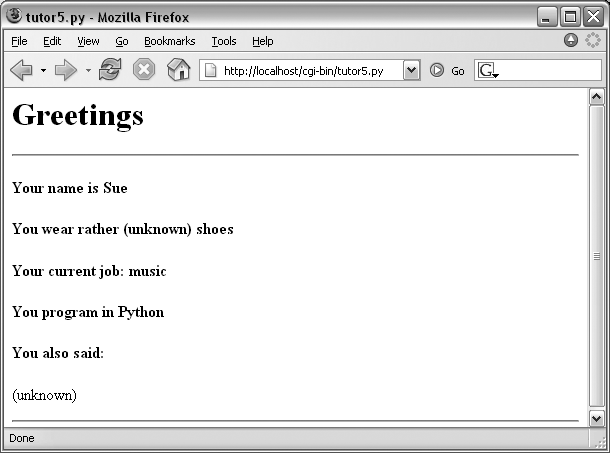
When submitting, we trigger our original tutor5.py script once again (Example 16-12), but some of the inputs have been provided for us as hidden fields. The reply page is captured in Figure 16-20.
Here again, we’ve hardcoded and embedded the inputs in the page’s HTML, but such fields can also be generated on the fly as part of the reply from a CGI script. When they are, they serve as inputs for the next page, and so are a sort of memory. To fully understand how and why this is necessary, we need to next take a short diversion into state retention alternatives.
[*] These are not necessarily magic numbers. On Unix
machines, mode 755 is a bit mask. The first 7 simply means
that you (the file’s owner) can read, write, and execute the
file (7 in binary is 111—each bit enables an access mode). The
two 5s (binary 101) say that everyone else (your group and
others) can read and execute (but not write) the file. See
your system’s manpage on the chmod command for more
details.
[*] Notice that the script does not generate the enclosing
<HEAD> and <BODY> tags included in the
static HTML file of the prior section. As mentioned in Chapter 2, strictly speaking, it
should—HTML without such tags is technically invalid. But
because all commonly used browsers simply ignore the omission,
we’ll take some liberties with HTML syntax in this book. If you
need to care about such things, consult HTML references for more
formal details.
[*] If your job description includes extensive testing of server-side scripts, you may also want to explore Twill, a relatively new Python-based system that provides a little language for scripting the client-side interface to web applications. Search the Web for details.
[*] This technique isn’t unique to CGI scripts, by the
way. In Chapter
15, we’ll meet systems that embed Python code
inside HTML. There is no good way to test such code
outside the context of the enclosing system without
extracting the embedded Python code (perhaps by using
the htmllib HTML
parser that comes with Python) and running it with a
passed-in mock-up of the API that it will eventually
use.
[*] Two forward references are worth noting here. Besides simple strings and lists, later we’ll see a third type of form input object, returned for fields that specify file uploads. The script in this example should really also escape the echoed text inserted into the HTML reply to be robust, lest it contain HTML operators. We will discuss escapes in detail later.