
As you might expect, there are a variety of ways to code
the gui1 example. For instance, if
you want to make all your Tkinter imports more explicit in your
script, grab the whole module and prefix all of its names with the
module’s name, as in Example
8-3.
Example 8-3. PP3EGuiIntrogui1b.py—import versus from
import Tkinter
widget = Tkinter.Label(None, text='Hello GUI world!')
widget.pack( )
widget.mainloop( )
That will probably get tedious in realistic examples,
though—Tkinter exports dozens of widget classes and constants that
show up all over Python GUI scripts. In fact, it is usually easier to
use a * to import everything from
the Tkinter module by name in one shot. This is demonstrated in Example 8-4.
Example 8-4. PP3EGuiIntrogui1c.py—roots, sides, pack in place
from Tkinter import *
root = Tk( )
Label(root, text='Hello GUI world!').pack(side=TOP)
root.mainloop( )
The Tkinter module goes out of its way to export only what we
really need, so it’s one of the few for which the * import form is relatively safe to
apply.[*] The TOP constant in
the pack call here, for instance,
is one of those many names exported by the Tkinter module. It’s simply a variable name
(TOP="top") preassigned in Tkconstants, a module automatically loaded
by Tkinter.
When widgets are packed, we can specify which side of their
parent they should be attached to—TOP, BOTTOM, LEFT, or RIGHT. If no side option is sent to pack (as in prior examples), a widget is
attached to its parent’s TOP by
default. In general, larger Tkinter GUIs can be constructed as sets of
rectangles, attached to the appropriate sides of other, enclosing
rectangles. As we’ll see later, Tkinter arranges widgets in a
rectangle according to both their packing order and their side attachment options. When widgets are
gridded, they are assigned row and column numbers instead. None of
this will become very meaningful, though, until we have more than one
widget in a window, so let’s move on.
Notice that this version calls the pack method right away after creating the
label, without assigning it a variable. If we don’t need to save a
widget, we can pack it in place like this to eliminate a statement.
We’ll use this form when a widget is attached to a larger structure
and never again referenced. This can be tricky if you assign the
pack result, though, but I’ll
postpone an explanation of why until we’ve covered a few more
basics.
We also use a Tk widget class
instance, instead of None, as the
parent here. Tk represents the main
(“root”) window of the program—the one that starts when the program
does. Tk is also used as the
default parent widget, both when we don’t pass any parent to other
widget calls and when we pass the parent as None. In other words, widgets are simply
attached to the main program window by default. This script just makes
this default behavior explicit by making and passing the Tk object itself. In Chapter 9, we’ll see that Toplevel widgets are typically used to
generate new pop-up windows that operate independently of the
program’s main window.
In Tkinter, some widget methods are exported as functions, and this lets us shave Example 8-5 to just three lines of code.
Example 8-5. PP3EGuiIntrogui1d.py—a minimal version
from Tkinter import *
Label(text='Hello GUI world!').pack( )
mainloop( )
The Tkinter mainloop can be
called with or without a widget (i.e., as a function or method). We
didn’t pass Label a parent argument
in this version either: it simply defaults to None when omitted (which in turn defaults to
Tk). But relying on that default is
less useful once we start building larger displays. Things such as
labels are more typically attached to other widget containers.
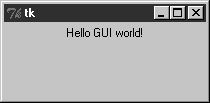
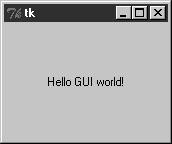
Top-level windows, such as the one built by all of the coding variants we have seen thus far, can normally be resized by the user; simply drag out the window with your mouse. Figure 8-4 shows how our window looks when it is expanded.
This isn’t very good—the label stays attached to the top of
the parent window instead of staying in the middle on expansion—but
it’s easy to improve on this with a pair of pack options, demonstrated in Example 8-6.
Example 8-6. PP3EGuiIntrogui1e.py—expansion
from Tkinter import *
Label(text='Hello GUI world!').pack(expand=YES, fill=BOTH)
mainloop( )
When widgets are packed, we can specify whether a widget
should expand to take up all available space, and if so, how it
should stretch to fill that space. By default, widgets are not
expanded when their parent is. But in this script, the names
YES and BOTH (imported from the Tkinter module)
specify that the label should grow along with its parent, the main
window. It does so in Figure
8-5.
Technically, the packer geometry manager assigns a size to
each widget in a display based on what it contains (text string
lengths, etc.). By default, a widget can occupy only its allocated
space and is no bigger than its assigned size. The expand and fill options let us be more specific about
such things:
expand=YESoptionAsks the packer to expand the allocated space for the widget in general into any unclaimed space in the widget’s parent.
filloptionCan be used to stretch the widget to occupy all of its allocated space.
Combinations of these two options produce different layout and
resizing effects, some of which become meaningful only when there
are multiple widgets in a window. For example, using expand without fill centers the widget in the expanded
space, and the fill option can
specify vertical stretching only (fill=Y), horizontal stretching only
(fill=X), or both (fill=BOTH). By providing these constraints
and attachment sides for all widgets in a GUI, we can control the
layout in fairly precise terms. In later chapters, we’ll find that
the grid geometry manager uses a
different resizing protocol entirely.
All of this can be confusing the first time you hear it, and
we’ll return to this later. But if you’re not sure what an expand and fill combination will do, simply try it
out—this is Python, after all. For now, remember that the
combination of expand=YES and
fill=BOTH is perhaps the most
common setting; it means “expand my space allocation to occupy all
available space, and stretch me to fill the expanded space in both
directions.” For our “Hello World” example, the net result is that
the label grows as the window is expanded, and so is always
centered.
So far, we’ve been telling Tkinter what to display on our
label by passing its text as a keyword argument in label constructor
calls. It turns out that there are two other ways to specify widget
configuration options. In Example 8-7, the text option of the label is set after it
is constructed, by assigning to the widget’s text key. Widget objects overload index
operations such that options are also available as mapping keys,
much like a dictionary.
Example 8-7. PP3EGuiIntroguif.py—option keys
from Tkinter import *
widget = Label( )
widget['text'] = 'Hello GUI world!'
widget.pack(side=TOP)
mainloop( )
More commonly, widget options can be set after construction by
calling the widget config method,
as in Example 8-8.
Example 8-8. PP3EGuiIntrogui1g.py—config and titles
from Tkinter import *
root = Tk( )
widget = Label(root)
widget.config(text='Hello GUI world!')
widget.pack(side=TOP, expand=YES, fill=BOTH)
root.title('gui1g.py')
root.mainloop( )
The config method (which
can also be called by its synonym, configure) can be called at any time after
construction to change the appearance of a widget on the fly. For
instance, we could call this label’s config method again later in the script to
change the text that it displays; watch for such dynamic
reconfigurations in later examples in this part of the book.
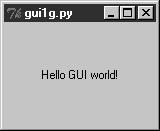
Notice that this version also calls a root.title method; this call sets the
label that appears at the top of the window, as pictured in Figure 8-6. In general terms,
top-level windows like the Tk
root here export window-manager interfaces—i.e., things
that have to do with the border around the window, not its
contents.
Just for fun, this version also centers the label upon resizes
by setting the expand and
fill pack options. In fact, this
version makes just about everything explicit, and is more
representative of how labels are often coded in full-blown
interfaces; their parents, expansion policies, and attachments are
usually spelled out rather than defaulted.
Finally, if you are a minimalist and you’re nostalgic for old Python code, you can also program this “Hello World” example as in Example 8-9.
Example 8-9. PP3EGuiIntrogui1-old.py—dictionary calls
from Tkinter import *
Label(None, {'text': 'Hello GUI world!', Pack: {'side': 'top'}}).mainloop( )
This makes the window in just two lines, albeit gruesome ones!
This scheme relies on an old coding style that was widely used until
Python 1.3 that passed configuration options in a dictionary instead
of keyword arguments.[*] In this scheme, packer options can be sent as values
of the key Pack (a class in the
Tkinter module).
The dictionary call scheme still works and you may see it in
old Python code, but please don’t do this. Use keywords to pass
options, and use explicit pack
method calls in your Tkinter scripts instead. In fact, the only
reason I didn’t cut this example completely is that dictionaries can
still be useful if you want to compute and pass a set of options
dynamically. On the other hand, the built-in apply function (and newer func (*pargs, **kargs) syntax) now also
allows you to pass an explicit dictionary of keyword arguments in
its third argument slot, so there’s no compelling reason to ever use
the pre-1.3 Tkinter dictionary call form at all.
In gui1c.py (shown in Example 8-4), I started packing labels without assigning them to names. This works, and it is an entirely valid coding style; but because it tends to confuse beginners at first glance, I need to explain why it works in more detail here.
In Tkinter, Python class objects correspond to real objects displayed on a screen; we make the Python object to make a screen object, and we call the Python object’s methods to configure that screen object. Because of this correspondence, the lifetime of the Python object must generally correspond to the lifetime of the corresponding object on the screen.
Luckily, Python scripts don’t usually have to care about managing object lifetimes. In fact, they do not normally need to maintain a reference to widget objects created along the way at all unless they plan to reconfigure those objects later. For instance, it’s common in Tkinter programming to pack a widget immediately after creating it if no further reference to the widget is required:
Label(text='hi').pack( ) # OK
This expression is evaluated left to right, as usual. It
creates a new label and then immediately calls the new object’s
pack method to arrange it in the
display. Notice, though, that the Python Label object is temporary in this
expression; because it is not assigned to a name, it would normally
be garbage collected (destroyed and reclaimed) by Python immediately
after running its pack
method.
However, because Tkinter emits Tk calls when objects are
constructed, the label will be drawn on the display as expected,
even though we haven’t held onto the corresponding Python object in
our script. In fact, Tkinter internally cross-links widget objects
into a long-lived tree used to represent the display, so the
Label object made during this
statement actually is retained, even if not by our code.[*]
In other words, your scripts don’t generally have to care about widget object lifetimes, and it’s OK to make widgets and pack them immediately in the same statement. But that does not mean that it’s OK to say something like this:
widget = Label(text='hi').pack( ) # wrong!...use widget...This statement almost seems like it should assign a newly
packed label to widget, but it
does not do this. In fact, it’s really a notorious Tkinter
beginner’s mistake. The widget pack method packs the widget but does not
return the widget thus packed. Really, pack returns the Python object None; after such a statement, widget will be a reference to None, and any further widget operations
through that name will fail. For instance, the following fails too
for the same reason:
Label(text='hi').pack().mainloop( ) # wrong!
Since pack returns None, asking for its mainloop attribute generates an exception
(as it should). If you really want to both pack a widget and retain
a reference to it, say this instead:
widget = Label(text='hi')                      # OK too
widget.pack( )...use widget...
This form is a bit more verbose but is less tricky than packing a widget in the same statement that creates it, and it allows you to hold onto the widget for later processing. On the other hand, scripts that compose layouts often add widgets once and for all when they are created, and never need to reconfigure them later; assigning to long-lived names in such programs is pointless and unnecessary.[*]
[*] If you study the file Tkinter.py in the
Python source library, you’ll notice that top-level module names
not meant for export start with a single underscore. Python never
copies over such names when a module is accessed with the * form of the from statement.
[*] In fact, Python’s pass-by-name keyword arguments were
first introduced to help clean up Tkinter calls such as this
one. Internally, keyword arguments really are passed as a
dictionary (which can be collected with the **name argument form in a def header), so the two schemes are
similar in implementation. But they vary widely in the number of
characters you need to type and debug.
[*] Ex-Tcl programmers in the audience may be interested to
know that, at least at the time I was writing this footnote,
Python not only builds the widget tree internally, but uses it
to automatically generate widget pathname strings coded manually
in Tcl/Tk (e.g., .panel.row.cmd). Python uses the
addresses of widget class objects to fill in the path components
and records pathnames in the widget tree. A label attached to a
container, for instance, might have an assigned name such as
.8220096.8219408 inside
Tkinter. You don’t have to care, though. Simply make and link
widget objects by passing parents, and let Python manage
pathname details based on the object tree. See the end of this
chapter for more on Tk/Tkinter mappings.
[*] In Chapter 9, we’ll meet two exceptions to this rule. Scripts must manually retain a reference to image objects because the underlying image data is discarded if the Python image object is garbage collected. Tkinter variable class objects temporarily unset an associated Tk variable if reclaimed, but this is uncommon and less harmful.