
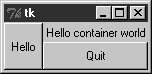
It’s time to start building user interfaces with more than one widget. Example 8-17 makes the window shown in Figure 8-14.
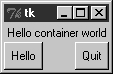
This example makes a Frame
widget (another Tkinter class) and attaches three other widget objects
to it, a Label and two Buttons, by passing the Frame as their first argument. In Tkinter
terms, we say that the Frame
becomes a parent to the other three widgets. Both buttons on this
display trigger callbacks:
Pressing the Hello button triggers the
greetingfunction defined within this file, which prints tostdoutagain.Pressing the Quit button calls the standard Tkinter
quitmethod, inherited bywinfrom theFrameclass (Frame.quithas the same effect as theTk.quitwe used earlier).
Here is the stdout text that
shows up on Hello button presses, wherever this script’s standard
streams may be:
C:...PP3EGuiIntro>python gui4.py
Hello stdout world!...
Hello stdout world!...
Hello stdout world!...
Hello stdout world!...
The notion of attaching widgets to containers turns out to be at the core of layouts in Tkinter. Before we go into more detail on that topic, though, let’s get small.
Earlier, we saw how to make widgets expand along with
their parent window, by passing expand and fill options to the pack geometry manager. Now that we have a
window with more than one widget, I can let you in on one of the
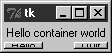
more useful secrets in the packer. As a rule, widgets packed first
are clipped last when a window is shrunk. That is, the order in
which you pack items determines which items will be cut out of the
display if it is made too small. Widgets packed later are cut out
first. For example, Figure
8-15 shows what happens when the gui4 window is shrunk
interactively.
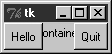
Try reordering the label and button lines in the script and
see what happens when the window shrinks; the first one packed is
always the last to go away. For instance, if the label is packed
last, Figure 8-16 shows
that it is clipped first, even though it is attached to the top:
side attachments and packing
order both impact the overall layout, but only packing order matters
when windows shrink.
Tkinter keeps track of the packing order internally to make
this work. Scripts can plan ahead for shrinkage by calling pack methods of more important widgets
first. For instance, on the upcoming Tkinter tour, we’ll meet code
that builds menus and toolbars at the top and bottom of the window;
to make sure these are lost last as a window is shrunk, they are
packed first, before the application components in the middle.
Similarly, displays that include scroll bars normally pack them
before the items they scroll (e.g., text, lists) so that the scroll
bars remain as the window shrinks.
In larger terms, the critical innovation in this
example is its use of frames: Frame widgets are just containers for
other widgets, and so give rise to the notion of GUIs as widget
hierarchies, or trees. Here, win
serves as an enclosing window for the other three widgets. In
general, though, by attaching widgets to frames, and frames to other frames, we can build
up arbitrary GUI layouts. Simply divide the user interface into a
set of increasingly smaller rectangles, implement each as a Tkinter
Frame, and attach basic widgets
to the frame in the desired screen position.
In this script, when you specify win in the first argument to the Label and Button constructors, Tkinter attaches them
to the Frame (they become
children of the win parent).
win itself is attached to the
default top-level window, since we didn’t pass a parent to the
Frame constructor. When we ask
win to run itself (by calling
mainloop), Tkinter draws all the
widgets in the tree we’ve built.
The three child widgets also provide pack options now: the side arguments tell which part of the
containing frame (i.e., win) to
attach the new widget to. The label hooks onto the top, and the
buttons attach to the sides. TOP,
LEFT, and RIGHT are all preassigned string variables
imported from Tkinter. Arranging widgets is a bit subtler than
simply giving a side, though, but we need to take a quick detour
into packer geometry management details to see why.
When a widget tree is displayed, child widgets appear inside
their parents and are arranged according to their order of packing
and their packing options. Because of this, the order in which
widgets are packed not only gives their clipping order, but also
determines how their side
settings play out in the generated display.
Here’s how the packer’s layout system works:
The packer starts out with an available space cavity that includes the entire parent container (e.g., the whole
Frameor top-level window).As each widget is packed on a side, that widget is given the entire requested side in the remaining space cavity, and the space cavity is shrunk.
Later pack requests are given an entire side of what is left, after earlier pack requests have shrunk the cavity.
After widgets are given cavity space,
expanddivides any space left, andfillandanchorstretch and position widgets within their assigned space.
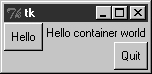
For instance, if you recode the gui4 child widget creation logic like
this:
Button(win, text='Hello', command=greeting).pack(side=LEFT)
Label(win,  text='Hello container world').pack(side=TOP)
Button(win, text='Quit',  command=win.quit).pack(side=RIGHT)
you will wind up with the very different display in Figure 8-17, even though you’ve moved the label code only one line down in the source file (contrast with Figure 8-14).
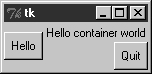
Despite its side setting,
the label does not get the entire top of the window now, and you
have to think in terms of shrinking cavities to
understand why. Because the Hello button is packed first, it is
given the entire LEFT side of the
Frame. Next, the label is given
the entire TOP side of what is
left. Finally, the Quit button gets the RIGHT side of the remainder—a rectangle to
the right of the Hello button and under the label. When this window
shrinks, widgets are clipped in reverse order of their packing: the
Quit button disappears first, followed by the label.[*] In the original version of this example, the label
spans the entire top side just because it is the first one packed,
not because of its side
option.
Beyond all of this, the fill option we met earlier can be used to
stretch the widget to occupy all the space in the cavity side it has
been given, and any cavity space left after all packing is evenly
allocated among widgets with the expand=YES we saw before. For example,
coding this way creates the window in Figure 8-18:
Button(win, text='Hello', command=greeting).pack(side=LEFT,fill=Y) Label(win, text='Hello container world').pack(side=TOP) Button(win, text='Quit', command=win.quit).pack(side=RIGHT,expand=YES, fill=X)
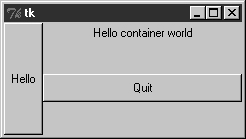
To make all of these grow along with their window, though, we also need to make the container frame expandable; widgets expand beyond their initial packer arrangement only if all of their parents expand too:
win = Frame( )
win.pack(side=TOP,expand=YES, fill=BOTH)
Button(win, text='Hello', command=greeting).pack(side=LEFT, fill=Y)
Label(win,  text='Hello container world').pack(side=TOP)
Button(win, text='Quit', command=win.quit).pack(side=RIGHT, expand=YES,fill=X)
When this code runs, the Frame is assigned the entire top side of
its parent as before (that is, the top parcel of the root window);
but because it is now marked to expand into unused space in its
parent and to fill that space both ways, it and all of its attached
children expand along with the window. Figure 8-19 shows how.
And as if that isn’t flexible enough, the packer also
allows widgets to be positioned within their allocated space with an
anchor option, instead of filling
that space with a fill. The
anchor option accepts Tkinter
constants identifying all eight points of the compass (N, NE,
NW, S, etc.) and CENTER as its value (e.g., anchor=NW). It instructs the packer to
position the widget at the desired position within its allocated
space, if the space allocated for the widget is larger than the
space needed to display the widget.
The default anchor is CENTER, so widgets show up in the middle
of their space (the cavity side they were given) unless they are
positioned with anchor or
stretched with fill. To
demonstrate, change gui4 to use
this sort of code:
Button(win, text='Hello', command=greeting).pack(side=LEFT,anchor=N)
Label(win,  text='Hello container world').pack(side=TOP)
Button(win, text='Quit',  command=win.quit).pack(side=RIGHT)
The only thing new here is that the Hello button is anchored
to the north side of its space allocation. Because this button was
packed first, it got the entire left side of the parent frame. This
is more space than is needed to show the button, so it shows up in
the middle of that side by default, as in Figure 8-17 (i.e., anchored to
the center). Setting the anchor to N moves it to the top of its side, as
shown in Figure
8-20.
Keep in mind that fill and
anchor are applied after a widget
has been allocated cavity side space by its side, packing order, and expand extra space request. By playing
with packing orders, sides, fills, and anchors, you can generate
lots of layout and clipping effects, and you should take a few
moments to experiment with alternatives if you haven’t already. In
the original version of this example, for instance, the label spans
the entire top side just because it is the first packed.
As we’ll see later, frames can be nested in other frames too in order to make more complex layouts. In fact, because each parent container is a distinct space cavity, this provides a sort of escape mechanism for the packer cavity algorithm: to better control where a set of widgets show up, simply pack them within a nested subframe and attach the frame as a package to a larger container. A row of push buttons, for example, might be easier laid out in a frame of its own than if mixed with other widgets in the display directly.
Finally, also keep in mind that the widget tree created by
these examples is really an implicit one; Tkinter internally records
the relationships implied by passed parent widget arguments. In OOP
terms, this is a composition relationship—the Frame contains a Label and Buttons; let’s look at
inheritance relationships next.
[*] Technically, the packing steps are just rerun again after a window resize. But since this means that there won’t be enough space left for widgets packed last when the window shrinks, it is as if widgets packed first are clipped last.