Chapter 20. Python/C Integration
“I Am Lost at C”
Throughout this book, our programs have all been written in Python code. We have used interfaces to services outside Python, and we’ve coded reusable tools in the Python language, but all our work has been done in Python itself. Despite our programs’ scale and utility, they’ve been Python through and through.
For many programmers and scripters, this mode makes perfect sense. In fact, such standalone programming is one of the main ways people apply Python. As we’ve seen, Python comes with batteries included—interfaces to system tools, Internet protocols, GUIs, data storage, and much more is already available. Moreover, most custom tasks we’re likely to encounter have prebuilt solutions in the open source world; the PIL system, for example, allows us to process images in tkinter GUIs by simply running a self-installer.
But for some systems, Python’s ability to integrate with components written in (or compatible with) the C programming language is a crucial feature. In fact, Python’s role as an extension and interface language in larger systems is one of the reasons for its popularity and why it is often called a “scripting” language in the first place. Its design supports hybrid systems that mix components written in a variety of programming languages. Because different languages have different strengths, being able to pick and choose on a component-by-component basis is a powerful concept. You can add Python to the mix anywhere you need a flexible and comparatively easy-to-use language tool, without sacrificing raw speed where it matters.
Compiled languages such as C and C++ are optimized for speed of execution, but are complex to program—for developers, and especially for end users who need to tailor programs. Because Python is optimized for speed of development, using Python scripts to control or customize software components written in C or C++ can yield more flexible systems, quicker execution, and faster development modes. For example, moving selected components of a pure Python program to C can optimize program performance. Moreover, systems designed to delegate customizations to Python code don’t need to be shipped with full source code and don’t require end users to learn complex or proprietary languages.
In this last technical chapter of this book, we’re going to take a brief look at tools for interfacing with C-language components, and discuss both Python’s ability to be used as an embedded language tool in other systems, and its interfaces for extending Python scripts with new modules implemented in C-compatible languages. We’ll also briefly explore other integration techniques that are less C specific, such as Jython.
Notice that I said “brief” in the preceding paragraph. Because not all Python programmers need to master this topic, because it requires studying C language code and makefiles, and because this is the final chapter of an already in-depth book, this chapter omits details that are readily available in both Python’s standard manual set, and the source code of Python itself. Instead, here we’ll take a quick look at a handful of basic examples to help get you started in this domain, and hint at the possibilities they imply for Python systems.
Extending and Embedding
Before we get to any code, I want to start out by defining what we mean by “integration” here. Although that term can be interpreted almost as widely as “object,” our focus in this chapter is on tight integration—where control is transferred between languages by a simple, direct, and fast in-process function call. Although it is also possible to link components of an application less directly using IPC and networking tools such as sockets and pipes that we explored earlier in the book, we are interested in this part of the book in more direct and efficient techniques.
When you mix Python with components written in C (or other compiled languages), either Python or C can be “on top.” Because of that, there are two distinct integration modes and two distinct APIs:
- The extending interface
For running compiled C library code from Python programs
- The embedding interface
For running Python code from compiled C programs
Extending generally has three main roles: to optimize programs—recoding parts of a program in C is a last-resort performance boost; to leverage existing libraries—opening them up for use in Python code extends their reach; and to allow Python programs to do things not directly supported by the language—Python code cannot normally access devices at absolute memory addresses, for instance, but can call C functions that do. For example, the NumPy package for Python is largely an instance of extending at work: by integrating optimized numeric libraries, it turns Python into a flexible and efficient system for numeric programming that some compare to Matlab.
Embedding typically takes the role of customization—by running user-configurable Python code, a system can be modified without shipping or building its full source code. For instance, some programs provide a Python customization layer that can be used to modify the program on site by modifying Python code. Embedding is also sometimes used to route events to Python-coded callback handlers. Python GUI toolkits, for example, usually employ embedding in some fashion to dispatch user events.
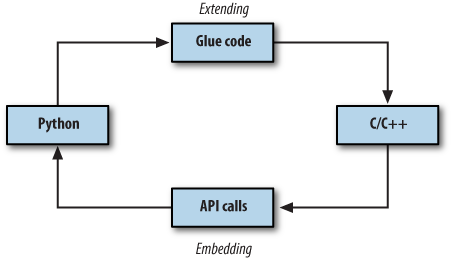
Figure 20-1 sketches this traditional dual-mode integration model. In extending, control passes from Python through a glue layer on its way to C code. In embedding, C code processes Python objects and runs Python code by calling Python C API functions. Because Python is “on top” in extending, it defines a fixed integration structure, which can be automated with tools such as SWIG—a code generator we’ll meet in this chapter, which produces glue code required to wrap C and C++ libraries. Because Python is subordinate in embedding, it instead provides a set of API tools which C programs employ as needed.
In some models, things are not as clear-cut. For example,
under the ctypes module
discussed later, Python scripts make library calls rather than
employing C glue code. In systems such as Cython (and its Pyrex predecessor), things are more different still—C libraries are produced from
combinations of Python and C code. And in Jython and IronPython,
the model is similar, but Java and C# components
replace the C language, and the integration is largely automated. We
will meet such alternative systems later in this chapter. For now,
our focus is on traditional Python/C integration models.
This chapter introduces extending first, and then moves on to explore the basics of embedding. Although we will study these topics in isolation, keep in mind that many systems combine the two techniques. For instance, embedded Python code run from C can also import and call linked-in C extensions to interface with the enclosing application. And in callback-based systems, C libraries initially accessed through extending interfaces may later use embedding techniques to run Python callback handlers on events.
For example, when we created buttons with Python’s tkinter GUI library earlier in the book, we called out to a C library through the extending API. When our GUI’s user later clicked those buttons, the GUI C library caught the event and routed it to our Python functions with embedding. Although most of the details are hidden to Python code, control jumps often and freely between languages in such systems. Python has an open and reentrant architecture that lets you mix languages arbitrarily.
Note
For additional Python/C integration examples beyond this book, see the Python source code itself; its Modules and Objects directories are a wealth of code resources. Most of the Python built-ins we have used in this book—from simple things such as integers and strings to more advanced tools such as files, system calls, tkinter, and DBM files—are built with the same structures we’ll introduce here. Their utilization of integration APIs can be studied in Python’s source code distribution as models for extensions of your own.
In addition, Python’s Extending and Embedding and Python/C API manuals are reasonably complete, and provide supplemental information to the presentation here. If you plan to do integration, you should consider browsing these as a next step. For example, the manuals go into additional details about C extension types, C extensions in threaded programs, and multiple interpreters in embedded programs, which we will largely bypass here.
Extending Python in C: Overview
Because Python itself is coded in C today, compiled Python extensions can be coded in any language that is C compatible in terms of call stacks and linking. That includes C, but also C++ with appropriate “extern C” declarations (which are automatically provided in Python header files). Regardless of the implementation language, the compiled Python extensions language can take two forms:
- C modules
Libraries of tools that look and feel like Python module files to their clients
- C types
Multiple instance objects that behave like standard built-in types and classes
Generally, C extension modules are used to implement flat function libraries, and they wind up appearing as importable modules to Python code (hence their name). C extension types are used to code objects that generate multiple instances, carry per-instance state information, and may optionally support expression operators just like Python classes. C extension types can do anything that built-in types and Python-coded classes can: method calls, addition, indexing, slicing, and so on.
To make the interface work, both C modules and types must provide a layer of “glue” code that translates calls and data between the two languages. This layer registers C-coded operations with the Python interpreter as C function pointers. In all cases, the C layer is responsible for converting arguments passed from Python to C form and for converting results from C to Python form. Python scripts simply import C extensions and use them as though they were really coded in Python. Because C code does all the translation work, the interface is very seamless and simple in Python scripts.
C modules and types are also responsible for communicating errors back to Python, detecting errors raised by Python API calls, and managing garbage-collector reference counters on objects retained by the C layer indefinitely—Python objects held by your C code won’t be garbage-collected as long as you make sure their reference counts don’t fall to zero. Once coded, C modules and types may be linked to Python either statically (by rebuilding Python) or dynamically (when first imported). Thereafter, the C extension becomes another toolkit available for use in Python scripts.
A Simple C Extension Module
At least that’s the short story; C modules require C code, and C types require more of it than we can reasonably present in this chapter. Although this book can’t teach you C development skills if you don’t already have them, we need to turn to some code to make this domain more concrete. Because C modules are simpler, and because C types generally export a C module with an instance constructor function, let’s start off by exploring the basics of C module coding with a quick example.
As mentioned, when you add new or existing C components to
Python in the traditional integration model, you need to code an
interface (“glue”) logic layer in C that handles cross-language
dispatching and data translation. The C source file in Example 20-1 shows how to code one by
hand. It implements a simple C extension module named hello for use in Python scripts, with a
function named message that simply
returns its input string argument with extra text prepended. Python
scripts will call this function as usual, but this one is coded in C,
not in Python.
/********************************************************************
 * A simple C extension module for Python, called "hello"; compile
 * this into a ".so" on python path, import and call hello.message;
 ********************************************************************/

#include <Python.h>
#include <string.h>

/* module functions */
static PyObject *                                 /* returns object */
message(PyObject *self, PyObject *args)           /* self unused in modules */
{                                                 /* args from Python call */
    char *fromPython, result[1024];
    if (! PyArg_Parse(args, "(s)", &fromPython))  /* convert Python -> C */
        return NULL;                              /* null=raise exception */
    else {
        strcpy(result, "Hello, ");                /* build up C string */
        strcat(result, fromPython);               /* add passed Python string */
        return Py_BuildValue("s", result);        /* convert C -> Python */
    }
}

/* registration table  */
static PyMethodDef hello_methods[] = {
    {"message",  message, METH_VARARGS, "func doc"},    /* name, &func, fmt, doc */
    {NULL, NULL, 0, NULL}                               /* end of table marker */
};

/* module definition structure */
static struct PyModuleDef hellomodule = {
   PyModuleDef_HEAD_INIT,
   "hello",         /* name of module */
   "mod doc",       /* module documentation, may be NULL */
   −1,              /* size of per-interpreter module state, −1=in global vars */
   hello_methods    /* link to methods table */
};

/* module initializer */
PyMODINIT_FUNC
PyInit_hello()                         /* called on first import */
{                                      /* name matters if loaded dynamically */
    return PyModule_Create(&hellomodule);
}
This C module has a 4-part standard structure described by its
comments, which all C modules follow, and which has changed noticeably
in Python 3.X. Ultimately, Python code will call this C file’s
message function, passing in a
string object and getting back a new string object. First, though, it
has to be somehow linked into the Python interpreter. To use this C
file in a Python script, compile it into a dynamically loadable object
file (e.g., hello.so on Linux,
hello.dll under Cygwin on Windows) with a makefile like the one listed
in Example 20-2, and drop the
resulting object file into a directory listed on your module import
search path exactly as though it were a .py or
.pyc file.
#############################################################
# Compile hello.c into a shareable object file on Cygwin,
# to be loaded dynamically when first imported by Python.
#############################################################

PYLIB = /usr/local/bin
PYINC = /usr/local/include/python3.1

hello.dll: hello.c
        gcc hello.c -g -I$(PYINC) -shared -L$(PYLIB) -lpython3.1 -o hello.dll

clean:
        rm -f hello.dll core
This is a Cygwin makefile that uses gcc to compile our C code on Windows; other platforms are
analogous but will vary. As we learned in Chapter 5, Cygwin provides a Unix-like
environment and libraries on Windows. To work along with the examples
here, either install Cygwin on your Windows platform, or change the
makefiles listed per your compiler and platform requirements. Be sure
to include the path to Python’s install directory with -I flags to access Python include (a.k.a.
header) files, as well as the path to the Python binary library file
with -L flags, if needed; mine
point to Python 3.1’s location
on my laptop after building it from its source. Also note that you’ll
need tabs for the indentation in makefile rules if a cut-and-paste
from an ebook substituted or dropped spaces.
Now, to use the makefile in Example 20-2 to build the extension
module in Example 20-1, simply
type a standard make command at
your shell (the Cygwin shell is used here, and I add a line break for
clarity):
.../PP4E/Integrate/Extend/Hello$ make -f makefile.hello
gcc hello.c -g -I/usr/local/include/python3.1 -shared
               -L/usr/local/bin -lpython3.1 -o hello.dll
This generates a shareable object file—a
.dll under Cygwin on Windows. When compiled this
way, Python automatically loads and links the C module when it is
first imported by a Python script. At import time, the
.dll binary library file will be located in a
directory on the Python import search path, just like a
.py file. Because Python always searches the
current working directory on imports, this chapter’s examples will run
from the directory you compile them in (.) without any file copies or
moves. In larger systems, you will generally place compiled extensions
in a directory listed in PYTHONPATH
or .pth files instead, or use Python’s
distutils to install them in the site-packages
subdirectory of the standard library.
Finally, to call the C function from a Python program, simply
import the module hello and call
its hello.message function with a
string; you’ll get back a normal Python string:
.../PP4E/Integrate/Extend/Hello$python>>>import hello# import a C module >>>hello.message('world')# call a C function 'Hello, world' >>>hello.message('extending')'Hello, extending'
And that’s it—you’ve just called an integrated C module’s function from Python. The most important thing to notice here is that the C function looks exactly as if it were coded in Python. Python callers send and receive normal string objects from the call; the Python interpreter handles routing calls to the C function, and the C function itself handles Python/C data conversion chores.
In fact, there is little to distinguish hello as a C extension module at all, apart
from its filename. Python code imports the module and fetches its
attributes as if it had been written in Python. C extension modules
even respond to dir calls as usual
and have the standard module and filename attributes, though the
filename doesn’t end in a .py or
.pyc this time around—the only obvious way you
can tell it’s a C library:
>>>dir(hello)# C module attributes ['__doc__', '__file__', '__name__', '__package__', 'message'] >>>hello.__name__, hello.__file__('hello', 'hello.dll') >>>hello.message# a C function object <built-in function message> >>>hello# a C module object <module 'hello' from 'hello.dll'> >>>hello.__doc__# docstrings in C code 'mod doc' >>>hello.message.__doc__'func doc' >>>hello.message()# errors work too TypeError: argument must be sequence of length 1, not 0
Like any module in Python, you can also access the C extension from a script file. The Python file in Example 20-3, for instance, imports and uses the C extension module in Example 20-1.
"import and use a C extension library module"

import hello
print(hello.message('C'))
print(hello.message('module ' + hello.__file__))

for i in range(3):
    reply = hello.message(str(i))
    print(reply)
Run this script as any other—when the script first imports the
module hello, Python automatically
finds the C module’s .dll object file in a
directory on the module search path and links it into the process
dynamically. All of this script’s output represents strings returned
from the C function in the file hello.c:
.../PP4E/Integrate/Extend/Hello$ python hellouse.py
Hello, C
Hello, module /cygdrive/c/.../PP4E/Integrate/Extend/Hello/hello.dll
Hello, 0
Hello, 1
Hello, 2
See Python’s manuals for more details on the code in our C module, as well as tips for compilation and linkage. Of note, as an alternative to makefiles, also see the disthello.py and disthello-alt.py files in the examples package. Here’s a quick peek at the source code of the first of these:
# to build: python disthello.py build
# resulting dll shows up in build subdir

from distutils.core import setup, Extension
setup(ext_modules=[Extension('hello', ['hello.c'])])
This is a Python script that specifies compilation of the C
extension using tools in the distutils package—a
standard part of Python that is used to build, install, and distribute
Python extensions coded in Python or C. distutil’s larger goal is automated and
portable builds and installs for distributed packages, but it also
knows how to build C extensions portably. Systems generally include a
setup.py which installs in
site-packages of the standard library.
Regrettably, distutils is also too
large to have survived the cleaver applied to this chapter’s material;
see its two manuals in Python’s manuals set for more details.
The SWIG Integration Code Generator
As you can probably tell, manual coding of C extensions can become fairly involved (this is almost inevitable in C language work). I’ve introduced the basics in this chapter thus far so that you understand the underlying structure. But today, C extensions are usually better and more easily implemented with a tool that generates all the required integration glue code automatically. There are a variety of such tools for use in the Python world, including SIP, SWIG, and Boost.Python; we’ll explore alternatives at the end of this chapter. Among these, the SWIG system is widely used by Python developers.
SWIG—the Simplified Wrapper and Interface Generator, is an open source system created by Dave Beazley and now developed by its community, much like Python. It uses C and C++ type declarations to generate complete C extension modules that integrate existing libraries for use in Python scripts. The generated C (and C++) extension modules are complete: they automatically handle data conversion, error protocols, reference-count management, and more.
That is, SWIG is a program that automatically generates all the glue code needed to plug C and C++ components into Python programs; simply run SWIG, compile its output, and your extension work is done. You still have to manage compilation and linking details, but the rest of the C extension task is largely performed by SWIG.
A Simple SWIG Example
To use SWIG, instead of writing the C code in the prior section, write the C function you want to use from Python without any Python integration logic at all, as though it is to be used from C alone. For instance, Example 20-4 is a recoding of Example 20-1 as a straight C function.
/*********************************************************************
 * A simple C library file, with a single function, "message",
 * which is to be made available for use in Python programs.
 * There is nothing about Python here--this C function can be
 * called from a C program, as well as Python (with glue code).
 *********************************************************************/

#include <string.h>
#include <hellolib.h>

static char result[1024];                /* this isn't exported */

char *
message(char *label)                     /* this is exported */
{
    strcpy(result, "Hello, ");           /* build up C string */
    strcat(result, label);               /* add passed-in label */
    return result;                       /* return a temporary */
}
While you’re at it, define the usual C header file to declare the function externally, as shown in Example 20-5. This is probably overkill for such a small example, but it will prove a point.
/********************************************************************
 * Define hellolib.c exports to the C namespace, not to Python
 * programs--the latter is defined by a method registration
 * table in a Python extension module's code, not by this .h;
 ********************************************************************/

extern char *message(char *label);
Now, instead of all the Python extension glue code shown in the prior sections, simply write a SWIG type declarations input file, as in Example 20-6.
/******************************************************
 * Swig module description file, for a C lib file.
 * Generate by saying "swig -python hellolib.i".
 ******************************************************/

%module hellowrap

%{
#include <hellolib.h>
%}

extern char *message(char*);    /* or: %include "../HelloLib/hellolib.h"   */
                                /* or: %include hellolib.h, and use -I arg */
This file spells out the C function’s type signature. In
general, SWIG scans files containing ANSI C and C++ declarations.
Its input file can take the form of an interface description file
(usually with a .i suffix) or a C/C++ header or
source file. Interface files like this one are the most common input
form; they can contain comments in C or C++ format, type declarations just
like standard header files, and SWIG directives that all start with
%. For example:
%moduleSets the module’s name as known to Python importers.
%{...%}Encloses code added to generated wrapper file verbatim.
externstatementsDeclare exports in normal ANSI C/C++ syntax.
%includeMakes SWIG scan another file (
-Iflags give search paths).
In this example, SWIG could also be made to read the hellolib.h header file of Example 20-5 directly. But one of the advantages of writing special SWIG input files like hellolib.i is that you can pick and choose which functions are wrapped and exported to Python, and you may use directives to gain more control over the generation process.
SWIG is a utility program that you run from your build scripts; it is not a programming language, so there is not much more to show here. Simply add a step to your makefile that runs SWIG and compile its output to be linked with Python. Example 20-7 shows one way to do it on Cygwin.
##################################################################
# Use SWIG to integrate hellolib.c for use in Python programs on
# Cygwin.  The DLL must have a leading "_" in its name in current
# SWIG (>1.3.13) because also makes a .py without "_" in its name.
##################################################################

PYLIB = /usr/local/bin
PYINC = /usr/local/include/python3.1
CLIB  = ../HelloLib
SWIG  = /cygdrive/c/temp/swigwin-2.0.0/swig

# the library plus its wrapper
_hellowrap.dll: hellolib_wrap.o $(CLIB)/hellolib.o
        gcc -shared hellolib_wrap.o $(CLIB)/hellolib.o
                       -L$(PYLIB) -lpython3.1 -o $@

# generated wrapper module code
hellolib_wrap.o: hellolib_wrap.c $(CLIB)/hellolib.h
        gcc hellolib_wrap.c -g -I$(CLIB) -I$(PYINC) -c -o $@

hellolib_wrap.c: hellolib.i
        $(SWIG) -python -I$(CLIB) hellolib.i

# C library code (in another directory)
$(CLIB)/hellolib.o: $(CLIB)/hellolib.c $(CLIB)/hellolib.h
        gcc $(CLIB)/hellolib.c -g -I$(CLIB) -c -o $(CLIB)/hellolib.o

clean:
        rm -f *.dll *.o *.pyc core
force:
        rm -f *.dll *.o *.pyc core hellolib_wrap.c hellowrap.py
When run on the hellolib.i input file by this makefile, SWIG generates two files:
- hellolib_wrap.c
The generated C extension module glue code file.
- hellowrap.py
A Python module that imports the generated C extension module.
The former is named for the input file, and the latter per the
%module directive. Really, SWIG
generates two modules today: it uses a
combination of Python and C code to achieve the
integration. Scripts ultimately import the generated Python module
file, which internally imports the generated and compiled C module.
You can wade through this generated code in the book’s examples
distribution if you are so inclined, but it is prone to change over
time and is too generalized to be simple.
To build the C module, the makefile runs SWIG to generate the glue code; compiles its output; compiles the original C library code if needed; and then combines the result with the compiled wrapper to produce _hellowrap.dll, the DLL which hellowrap.py will expect to find when imported by a Python script:
.../PP4E/Integrate/Extend/Swig$dirhellolib.i makefile.hellolib-swig .../PP4E/Integrate/Extend/Swig$make -f makefile.hellolib-swig/cygdrive/c/temp/swigwin-2.0.0/swig -python -I../HelloLib hellolib.i gcc hellolib_wrap.c -g -I../HelloLib -I/usr/local/include/python3.1 -c -o hellolib_wrap.o gcc ../HelloLib/hellolib.c -g -I../HelloLib -c -o ../HelloLib/hellolib.o gcc -shared hellolib_wrap.o ../HelloLib/hellolib.o -L/usr/local/bin -lpython3.1 -o _hellowrap.dll .../PP4E/Integrate/Extend/Swig$dir_hellowrap.dll hellolib_wrap.c hellowrap.py hellolib.i hellolib_wrap.o makefile.hellolib-swig
The result is a dynamically loaded C extension module file ready to be imported by Python code. Like all modules, _hellowrap.dll must, along with hellowrap.py, be placed in a directory on your Python module search path (the directory where you compile will suffice if you run Python there too). Notice that the .dll file must be built with a leading underscore in its name; this is required because SWIG also created the .py file of the same name without the underscore—if named the same, only one could be imported, and we need both (scripts import the .py which in turn imports the .dll internally).
As usual in C development, you may have to barter with the makefile to get it to work on your system. Once you’ve run the makefile, though, you are finished. The generated C module is used exactly like the manually coded version shown before, except that SWIG has taken care of the complicated parts automatically. Function calls in our Python code are routed through the generated SWIG layer, to the C code in Example 20-4, and back again; with SWIG, this all “just works”:
.../PP4E/Integrate/Extend/Swig$python>>>import hellowrap# import glue + library file >>>hellowrap.message('swig world')# cwd always searched on imports 'Hello, swig world' >>>hellowrap.__file__'hellowrap.py' >>>dir(hellowrap)['__builtins__', '__doc__', '__file__', '__name__', '_hellowrap', ... 'message'] >>>hellowrap._hellowrap<module '_hellowrap' from '_hellowrap.dll'>
In other words, once you learn how to use SWIG, you can often largely forget the details behind integration coding. In fact, SWIG is so adept at generating Python glue code that it’s usually easier and less error prone to code C extensions for Python as purely C- or C++-based libraries first, and later add them to Python by running their header files through SWIG, as demonstrated here.
We’ve mostly just scratched the SWIG surface here, and there’s more for you to learn about it from its Python-specific manual—available with SWIG at http://www.swig.org. Although its examples in this book are simple, SWIG is powerful enough to integrate libraries as complex as Windows extensions and commonly used graphics APIs such as OpenGL. We’ll apply it again later in this chapter, and explore its “shadow class” model for wrapping C++ classes too. For now, let’s move on to a more useful extension example.
Wrapping C Environment Calls
Our next example is a C extension module that integrates the
standard C library’s getenv and
putenv shell environment variable
calls for use in Python scripts. Example 20-8 is a C file that
achieves this goal in a hand-coded, manual fashion.
/******************************************************************
 * A C extension module for Python, called "cenviron".  Wraps the
 * C library's getenv/putenv routines for use in Python programs.
 ******************************************************************/

#include <Python.h>
#include <stdlib.h>
#include <string.h>

/***********************/
/* 1) module functions */
/***********************/

static PyObject *                                   /* returns object */
wrap_getenv(PyObject *self, PyObject *args)         /* self not used */
{                                                   /* args from python */
    char *varName, *varValue;
    PyObject *returnObj = NULL;                         /* null=exception */

    if (PyArg_Parse(args, "(s)", &varName)) {           /* Python -> C */
        varValue = getenv(varName);                     /* call C getenv */
        if (varValue != NULL)
            returnObj = Py_BuildValue("s", varValue);   /* C -> Python */
        else
            PyErr_SetString(PyExc_SystemError, "Error calling getenv");
    }
    return returnObj;
}

static PyObject *
wrap_putenv(PyObject *self, PyObject *args)
{
    char *varName, *varValue, *varAssign;
    PyObject *returnObj = NULL;

    if (PyArg_Parse(args, "(ss)", &varName, &varValue))
    {
        varAssign = malloc(strlen(varName) + strlen(varValue) + 2);
        sprintf(varAssign, "%s=%s", varName, varValue);
        if (putenv(varAssign) == 0) {
            Py_INCREF(Py_None);                   /* C call success */
            returnObj = Py_None;                  /* reference None */
        }
        else
            PyErr_SetString(PyExc_SystemError, "Error calling putenv");
    }
    return returnObj;
}

/**************************/
/* 2) registration table  */
/**************************/

static PyMethodDef cenviron_methods[] = {
    {"getenv",  wrap_getenv, METH_VARARGS, "getenv doc"},  /* name, &func,... */
    {"putenv",  wrap_putenv, METH_VARARGS, "putenv doc"},  /* name, &func,... */
    {NULL, NULL, 0, NULL}                                  /* end of table marker */
};

/*************************/
/* 3) module definition  */
/*************************/

static struct PyModuleDef cenvironmodule = {
   PyModuleDef_HEAD_INIT,
   "cenviron",        /* name of module */
   "cenviron doc",    /* module documentation, may be NULL */
   −1,                /* size of per-interpreter module state, −1=in global vars */
   cenviron_methods   /* link to methods table */
};

/*************************/
/* 4) module initializer */
/*************************/

PyMODINIT_FUNC
PyInit_cenviron()                      /* called on first import */
{                                      /* name matters if loaded dynamically */
    return PyModule_Create(&cenvironmodule);
}
Though demonstrative, this example is arguably less useful now
than it was in the first edition of this book—as we learned in Part II, not only can you fetch shell
environment variables by indexing the os.environ table,
but assigning to a key in this table automatically calls C’s putenv to export the new setting to the C
code layer in the process. That is, os.environ['key'] fetches the value of the
shell variable 'key', and os.environ['key']=value assigns a
variable both in Python and in C.
The second action—pushing assignments out to C—was added to
Python releases after the first edition of this book was published.
Besides illustrating additional extension coding techniques, though,
this example still serves a practical purpose: even today, changes
made to shell variables by the C code linked into a Python process are
not picked up when you index os.environ in Python code. That is, once
your program starts, os.environ
reflects only subsequent changes made by Python code in the
process.
Moreover, although Python now has both a putenv and a getenv call in its os module, their integration seems
incomplete. Changes to os.environ
call os.putenv, but direct calls to os.putenv do not update os.environ, so the two can become out of
sync. And os.getenv today simply
translates to an os.environ fetch,
and hence will not pick up environment changes made in the process
outside of Python code after startup time. This may rarely, if ever,
be an issue for you, but this C extension module is not completely
without purpose; to truly interface environment variables with
linked-in C code, we need to call the C library routines directly (at
least until Python changes this model
again!).
The cenviron.c C file in Example 20-8 creates a Python
module called cenviron that does a
bit more than the prior examples—it exports two functions, sets some
exception descriptions explicitly, and makes a reference count call
for the Python None object (it’s
not created anew, so we need to add a reference before passing it to
Python). As before, to add this code to Python, compile and link into
an object file; the Cygwin makefile in Example 20-9 builds the C source
code for dynamic binding on imports.
##################################################################
# Compile cenviron.c into cenviron.dll--a shareable object file
# on Cygwin, which is loaded dynamically when first imported.
##################################################################

PYLIB = /usr/local/bin
PYINC = /usr/local/include/python3.1

cenviron.dll: cenviron.c
        gcc cenviron.c -g -I$(PYINC) -shared  -L$(PYLIB) -lpython3.1 -o $@

clean:
        rm -f *.pyc cenviron.dll
To build, type make -f
makefile.cenviron at your shell. To run, make sure the
resulting .dll file is in a directory on Python’s
module path (the current working directory works too):
.../PP4E/Integrate/Extend/Cenviron$python>>>import cenviron>>>cenviron.getenv('USER')# like os.environ[key] but refetched 'mark' >>>cenviron.putenv('USER', 'gilligan')# like os.environ[key]=value >>>cenviron.getenv('USER')# C sees the changes too 'gilligan'
As before, cenviron is a bona
fide Python module object after it is imported, with all the usual
attached information, and errors are raised and reported correctly on
errors:
>>>dir(cenviron)['__doc__', '__file__', '__name__', '__packge__', 'getenv', 'putenv'] >>>cenviron.__file__'cenviron.dll' >>>cenviron.__name__'cenviron' >>>cenviron.getenv<built-in function getenv> >>>cenviron<module 'cenviron' from 'cenviron.dll'> >>>cenviron.getenv('HOME')'/home/mark' >>>cenviron.getenv('NONESUCH')SystemError: Error calling getenv
Here is an example of the problem this
module addresses (but you have to pretend that some of these calls are
made by linked-in C code, not by Python; I changed USER in the shell
prior to this session with an export command):
.../PP4E/Integrate/Extend/Cenviron$python>>>import os>>>os.environ['USER']# initialized from the shell 'skipper' >>>from cenviron import getenv, putenv# direct C library call access >>>getenv('USER')'skipper' >>>putenv('USER', 'gilligan')# changes for C but not Python >>>getenv('USER')'gilligan' >>>os.environ['USER']# oops--does not fetch values again 'skipper' >>>os.getenv('USER')# ditto 'skipper'
Adding Wrapper Classes to Flat Libraries
As is, the C extension module exports a function-based
interface, but it’s easy to wrap its functions in Python code that
makes the interface look any way you like. For instance, Example 20-10 makes the functions
accessible by dictionary indexing and integrates with the os.environ object—it guarantees that the
object will stay in sync with fetches and changes made by calling
our C extension functions.
import os
from cenviron import getenv, putenv       # get C module's methods

class EnvMapping:                         # wrap in a Python class
    def __setitem__(self, key, value):
        os.environ[key] = value           # on writes: Env[key]=value
        putenv(key, value)                # put in os.environ too

    def __getitem__(self, key):
        value = getenv(key)               # on reads: Env[key]
        os.environ[key] = value           # integrity check
        return value

Env = EnvMapping()                        # make one instance
To use this module, clients may import its Env object using
Env['var'] dictionary syntax to
refer to environment variables. Example 20-11 goes a step further
and exports the functions as qualified attribute names rather than
as calls or keys—variables are referenced with Env.var attribute syntax.
import os
from cenviron import getenv, putenv       # get C module's methods

class EnvWrapper:                         # wrap in a Python class
    def __setattr__(self, name, value):
        os.environ[name] = value          # on writes: Env.name=value
        putenv(name, value)               # put in os.environ too

    def __getattr__(self, name):
        value = getenv(name)              # on reads: Env.name
        os.environ[name] = value          # integrity check
        return value

Env = EnvWrapper()                        # make one instance
The following shows our Python wrappers running atop our C extension module’s functions to access environment variables. The main point to notice here is that you can graft many different sorts of interface models on top of extension functions by providing Python wrappers in addition to C extensions:
>>>from envmap import Env>>>Env['USER']'skipper' >>>Env['USER'] = 'professor'>>>Env['USER']'professor' >>> >>>from envattr import Env>>>Env.USER'professor' >>>Env.USER = 'gilligan'>>>Env.USER'gilligan'
Wrapping C Environment Calls with SWIG
You can manually code extension modules like we just did, but you don’t necessarily have to. Because this example really just wraps functions that already exist in standard C libraries, the entire cenviron.c C code file in Example 20-8 can be replaced with a simple SWIG input file that looks like Example 20-12.
/***************************************************************
 * Swig module description file, to generate all Python wrapper
 * code for C lib getenv/putenv calls: "swig -python environ.i".
 ***************************************************************/

%module environ

extern char * getenv(const char *varname);
extern int    putenv(char *assignment);
And you’re done. Well, almost; you still need to run this file through SWIG and compile its output. As before, simply add a SWIG step to your makefile and compile its output file into a shareable object for dynamic linking, and you’re in business. Example 20-13 is a Cygwin makefile that does the job.
# build environ extension from SWIG generated code

PYLIB = /usr/local/bin
PYINC = /usr/local/include/python3.1
SWIG  = /cygdrive/c/temp/swigwin-2.0.0/swig

_environ.dll: environ_wrap.c
        gcc environ_wrap.c -g -I$(PYINC) -L$(PYLIB) -lpython3.1 -shared -o $@

environ_wrap.c: environ.i
        $(SWIG) -python environ.i

clean:
        rm -f *.o *.dll *.pyc core environ_wrap.c environ.py
When run on environ.i, SWIG generates two files and two modules—environ.py (the Python interface module we import) and environ_wrap.c (the lower-level glue code module file we compile into _environ.dll to be imported by the .py). Because the functions being wrapped here live in standard linked-in C libraries, there is nothing to combine with the generated code; this makefile simply runs SWIG and compiles the wrapper file into a C extension module, ready to be imported:
.../PP4E/Integrate/Extend/Swig/Environ$ make -f makefile.environ-swig
/cygdrive/c/temp/swigwin-2.0.0/swig -python environ.i
gcc environ_wrap.c -g -I/usr/local/include/python3.1 -L/usr/local/bin -lpython3.1
    -shared -o _environ.dll
And now you’re really done. The resulting C extension module is linked when imported, and it’s used as before (except that SWIG handled all the gory bits):
.../PP4E/Integrate/Extend/Swig/Environ$ls_environ.dll environ.i environ.py environ_wrap.c makefile.environ-swig .../PP4E/Integrate/Extend/Swig/Environ$python>>>import environ>>>environ.getenv('USER')'gilligan' >>>environ.__name__, environ.__file__, environ('environ', 'environ.py', <module 'environ' from 'environ.py'>) >>>dir(environ)[ ... '_environ', 'getenv', 'putenv' ... ]
Note
If you look closely, you may notice that I didn’t call
putenv this time. It turns out
there’s good cause: the C library’s putenv wants a string of the form
“USER=Gilligan” to be passed, which becomes part of the
environment. In C code, this means we must create a new piece of
memory to pass in; we used malloc in Example 20-8 to satisfy this
constraint. However, there’s no simple and direct way to guarantee
this on the Python side of the fence. In a prior Python release,
it was apparently sufficient to hold on to the string passed to
putenv in a temporary Python
variable, but this no longer works with Python 3.X and/or SWIG
2.0. A fix may require either a custom C function or SWIG’s
typemaps which allow its handling of data translations to be
customized. In the interest of space, we’ll leave addressing this
as suggested exercise; see SWIG for details.
Wrapping C++ Classes with SWIG
So far in this chapter, we’ve been dealing with C extension modules—flat function libraries. To implement multiple-instance objects in C, you need to code a C extension type, not a module. Like Python classes, C types generate multiple-instance objects and can overload (i.e., intercept and implement) Python expression operators and type operations. C types can also support subclassing just like Python classes, largely because the type/class distinction has largely evaporated in Python 3.X.
You can see what C types look like in Python’s own source library tree; look for the Objects directory there. The code required for a C type can be large—it defines instance creation, named methods, operator implementations, an iterator type, and so on, and links all these together with tables—but is largely boilerplate code that is structurally the same for most types.
You can code new object types in C manually like this, and in some applications, this approach may make sense. But you don’t necessarily have to—because SWIG knows how to generate glue code for C++ classes, you can instead automatically generate all the C extension and wrapper class code required to integrate such an object, simply by running SWIG over an appropriate class declaration. The wrapped C++ class provides a multiple-instance datatype much like the C extension type, but it can be substantially simpler for you to code because SWIG handles language integration details.
Here’s how—given a C++ class declaration and special command-line settings, SWIG generates the following:
A C++-coded Python extension module with accessor functions that interface with the C++ class’s methods and members
A Python-coded module with a wrapper class (called a “shadow” or “proxy” class in SWIG-speak) that interfaces with the C++ class accessor functions module
As we did earlier, to use SWIG in this domain, write and debug your class as though it would be used only from C++. Then, simply run SWIG in your makefile to scan the C++ class declaration and compile and link its output. The end result is that by importing the shadow class in your Python scripts, you can utilize C++ classes as though they were really coded in Python. Not only can Python programs make and use instances of the C++ class, they can also customize it by subclassing the generated shadow class.
A Simple C++ Extension Class
To see how this works, we need a C++ class. To illustrate, let’s code
one to be used in Python scripts. You have to understand C++ to make
sense of this section, of course, and SWIG supports advanced C++
tools (including templates and overloaded functions and operators),
but I’ll keep this example simple for illustration. The following
C++ files define a Number class
with four methods (add, sub, square, and display), a data member (data), and a constructor and destructor.
Example 20-14 shows the
header file.
class Number
{
public:
    Number(int start);             // constructor
    ~Number();                     // destructor
    void add(int value);           // update data member
    void sub(int value);
    int  square();                 // return a value
    void display();                // print data member
    int data;
};
Example 20-15 is the
C++ class’s implementation file; most methods print a message when
called to trace class operations. Notice how this uses printf instead of C++’s cout; this once resolved an output overlap
issue when mixing C++ cout with
Python 2.X standard output streams on Cygwin. It’s probably a moot
point today—because Python 3.X’s output system and buffering might
mix with C++’s arbitrarily, C++ should generally flush the output
stream (with fflush(stdout) or
cout<<flush) if it prints
intermixed text that doesn’t end in a newline. Obscure but true when
disparate language systems are mixed.
///////////////////////////////////////////////////////////////
// implement a C++ class, to be used from Python code or not;
// caveat: cout and print usually both work, but I ran into a
// c++/py output overlap issue on Cygwin that prompted printf
///////////////////////////////////////////////////////////////

#include "number.h"
#include "stdio.h"                       // versus #include "iostream.h"

Number::Number(int start) {
    data = start;                        // python print goes to stdout
    printf("Number: %d
", data);        // or: cout << "Number: " << data << endl;
}

Number::~Number() {
    printf("~Number: %d
", data);
}

void Number::add(int value) {
    data += value;
    printf("add %d
", value);
}

void Number::sub(int value) {
    data -= value;
    printf("sub %d
", value);
}

int Number::square() {
    return data * data;       // if print label, fflush(stdout) or cout << flush
}

void Number::display() {
    printf("Number=%d
", data);
}
So that you can compare languages, the following is how this
class is used in a C++ program. Example 20-16 makes a Number object, calls its methods, and
fetches and sets its data attribute directly (C++ distinguishes
between “members” and “methods,” while they’re usually both called
“attributes” in Python).
#include "iostream.h"
#include "number.h"

main()
{
    Number *num;
    int res, val;

    num = new Number(1);            // make a C++ class instance
    num->add(4);                    // call its methods
    num->display();
    num->sub(2);
    num->display();

    res = num->square();                     // method return value
    cout << "square: " << res << endl;

    num->data = 99;                          // set C++ data member
    val = num->data;                         // fetch C++ data member
    cout << "data:   " << val << endl;
    cout << "data+1: " << val + 1 << endl;

    num->display();
    cout << num << endl;            // print raw instance ptr
    delete num;                     // run destructor
}
You can use the g++
command-line C++ compiler program to compile and run this code
on Cygwin (it’s the same on Linux). If you don’t use a
similar system, you’ll have to extrapolate; there are far too many
C++ compiler differences to list here. Type the compile command
directly or use the cxxtest
target in this example directory’s makefile shown ahead, and then
run the purely C++ program created:
.../PP4E/Integrate/Extend/Swig/Shadow$make -f makefile.number-swig cxxtestg++ main.cxx number.cxx -Wno-deprecated .../PP4E/Integrate/Extend/Swig/Shadow$./a.exeNumber: 1 add 4 Number=5 sub 2 Number=3 square: 9 data: 99 data+1: 100 Number=99 0xe502c0 ~Number: 99
Wrapping the C++ Class with SWIG
But enough C++: let’s get back to Python. To use the C++
Number class of the preceding
section in Python scripts, you need to code or generate a glue logic
layer between the two languages, just as in prior C extension
examples. To generate that layer automatically, write a SWIG input
file like the one shown in Example 20-17.
/********************************************************
 * Swig module description file for wrapping a C++ class.
 * Generate by running "swig -c++ -python number.i".
 * The C++ module is generated in file number_wrap.cxx;
 * module 'number' refers to the number.py shadow class.
 ********************************************************/

%module number

%{
#include "number.h"
%}

%include number.h
This interface file simply directs SWIG to read the C++ class’s type signature information from the %-included number.h header file. SWIG uses the class declaration to generate two different Python modules again:
number_wrap.cxxA C++ extension module with class accessor functions
number.pyA Python shadow class module that wraps accessor functions
The former must be compiled into a binary library. The latter imports and uses the former’s compiled form and is the file that Python scripts ultimately import. As for simple functions, SWIG achieves the integration with a combination of Python and C++ code.
After running SWIG, the Cygwin makefile shown in Example 20-18 combines the generated number_wrap.cxx C++ wrapper code module with the C++ class implementation file to create a _number.dll—a dynamically loaded extension module that must be in a directory on your Python module search path when imported from a Python script, along with the generated number.py (all files are in the same current working directory here).
As before, the compiled C extension module must be named with
a leading underscore in SWIG today: _number.dll, following a Python
convention, rather than the other formats used by earlier releases.
The shadow class module number.py internally imports _number.dll. Be sure to use a -c++ command-line argument for SWIG; an
older -shadow argument is no longer needed
to create the wrapper class in addition to the lower-level
functional interface module, as this is enabled by default.
###########################################################################
# Use SWIG to integrate the number.h C++ class for use in Python programs.
# Update: name "_number.dll" matters, because shadow class imports _number.
# Update: the "-shadow" swig command line arg is deprecated (on by default).
# Update: swig no longer creates a .doc file to rm here (ancient history).
###########################################################################

PYLIB = /usr/local/bin
PYINC = /usr/local/include/python3.1
SWIG  = /cygdrive/c/temp/swigwin-2.0.0/swig

all: _number.dll number.py

# wrapper + real class
_number.dll: number_wrap.o number.o
        g++ -shared number_wrap.o number.o -L$(PYLIB) -lpython3.1 -o $@

# generated class wrapper module(s)
number_wrap.o: number_wrap.cxx number.h
        g++ number_wrap.cxx -c -g -I$(PYINC)

number_wrap.cxx: number.i
        $(SWIG) -c++ -python number.i

number.py: number.i
        $(SWIG) -c++ -python number.i

# wrapped C++ class code
number.o: number.cxx number.h
        g++ number.cxx -c -g -Wno-deprecated

# non Python test
cxxtest:
        g++ main.cxx number.cxx -Wno-deprecated

clean:
        rm -f *.pyc *.o *.dll core a.exe
force:
        rm -f *.pyc *.o *.dll core a.exe number_wrap.cxx number.py
As usual, run this makefile to generate and compile the necessary glue code into an extension module that can be imported by Python programs:
.../PP4E/Integrate/Extend/Swig/Shadow$make -f makefile.number-swig/cygdrive/c/temp/swigwin-2.0.0/swig -c++ -python number.i g++ number_wrap.cxx -c -g -I/usr/local/include/python3.1 g++ number.cxx -c -g -Wno-deprecated g++ -shared number_wrap.o number.o -L/usr/local/bin -lpython3.1 -o _number.dll .../PP4E/Integrate/Extend/Swig/Shadow$ls_number.dll makefile.number-swig number.i number_wrap.cxx a.exe number.cxx number.o number_wrap.o main.cxx number.h number.py
Using the C++ Class in Python
Once the glue code is generated and compiled, Python scripts can access the C++ class as though it were coded in Python. In fact, it is—the imported number.py shadow class which runs on top of the extension module is generated Python code. Example 20-19 repeats the main.cxx file’s class tests. Here, though, the C++ class is being utilized from the Python programming language—an arguably amazing feat, but the code is remarkably natural on the Python side of the fence.
"""
use C++ class in Python code (c++ module + py shadow class)
this script runs the same tests as the main.cxx C++ file
"""

from number import Number         # imports .py C++ shadow class module

num = Number(1)                   # make a C++ class object in Python
num.add(4)                        # call its methods from Python
num.display()                     # num saves the C++ 'this' pointer
num.sub(2)
num.display()

res = num.square()                # converted C++ int return value
print('square: ', res)

num.data = 99                     # set C++ data member, generated __setattr__
val = num.data                    # get C++ data member, generated __getattr__
print('data:   ', val)            # returns a normal Python integer object
print('data+1: ', val + 1)

num.display()
print(num)                        # runs repr in shadow/proxy class
del num                           # runs C++ destructor automatically
Because the C++ class and its wrappers are automatically loaded when imported by the number.py shadow class module, you run this script like any other:
.../PP4E/Integrate/Extend/Swig/Shadow$ python main.py
Number: 1
add 4
Number=5
sub 2
Number=3
square:  9
data:    99
data+1:  100
Number=99
<number.Number; proxy of <Swig Object of type 'Number *' at 0x7ff4bb48> >
~Number: 99
Much of this output is coming from the C++ class’s methods and is largely the same as the main.cxx results shown in Example 20-16 (less the instance output format—it’s a Python shadow class instance now).
Using the low-level extension module
SWIG implements integrations as a C++/Python combination, but you can always use the generated accessor functions module if you want to, as in Example 20-20. This version runs the C++ extension module directly without the shadow class, to demonstrate how the shadow class maps calls back to C++.
"""
run similar tests to main.cxx and main.py
but use low-level C accessor function interface
"""

from _number import *           # c++ extension module wrapper

num = new_Number(1)
Number_add(num, 4)              # pass C++ 'this' pointer explicitly
Number_display(num)             # use accessor functions in the C module
Number_sub(num, 2)
Number_display(num)
print(Number_square(num))

Number_data_set(num, 99)
print(Number_data_get(num))
Number_display(num)
print(num)
delete_Number(num)
This script generates essentially the same output as main.py, but it’s been slightly simplified, and the C++ class instance is something lower level than the proxy class here:
.../PP4E/Integrate/Extend/Swig/Shadow$ python main_low.py
Number: 1
add 4
Number=5
sub 2
Number=3
9
99
Number=99
_6025aa00_p_Number
~Number: 99
Subclassing the C++ class in Python
Using the extension module directly works, but there is no
obvious advantage to moving from the shadow class to functions
here. By using the shadow class, you get both an object-based
interface to C++ and a customizable Python object. For instance,
the Python module shown in Example 20-21 extends the C++
class, adding an extra print
call statement to the C++ add
method and defining a brand-new mul method. Because the shadow class is
pure Python, this works naturally.
"sublass C++ class in Python (generated shadow class)"

from number import Number                # import shadow class

class MyNumber(Number):
    def add(self, other):                # extend method
        print('in Python add...')
        Number.add(self, other)
    def mul(self, other):                # add new method
        print('in Python mul...')
        self.data = self.data * other

num = MyNumber(1)               # same tests as main.cxx, main.py
num.add(4)                      # using Python subclass of shadow class
num.display()                   # add() is specialized in Python
num.sub(2)
num.display()
print(num.square())

num.data = 99
print(num.data)
num.display()

num.mul(2)                      # mul() is implemented in Python
num.display()
print(num)                      # repr from shadow superclass
del num
Now we get extra messages out of add calls, and mul changes the C++ class’s data member
automatically when it assigns self.data—the Python code extends the
C++ code:
.../PP4E/Integrate/Extend/Swig/Shadow$ python main_subclass.py
Number: 1
in Python add...
add 4
Number=5
sub 2
Number=3
9
99
Number=99
in Python mul...
Number=198
<__main__.MyNumber; proxy of <Swig Object of type 'Number *' at 0x7ff4baa0> >
~Number: 198
In other words, SWIG makes it easy to use C++ class libraries as base classes in your Python scripts. Among other things, this allows us to leverage existing C++ class libraries in Python scripts and optimize by coding parts of class hierarchies in C++ when needed. We can do much the same with C extension types today since types are classes (and vice versa), but wrapping C++ classes with SWIG is often much simpler.
Exploring the wrappers interactively
As usual, you can import the C++ class interactively to experiment with it some more—besides demonstrating a few more salient properties here, this technique allows us to test wrapped C++ classes at the Python interactive prompt:
.../PP4E/Integrate/Extend/Swig/Shadow$python>>>import _number>>>_number.__file__# the C++ class plus generated glue module '_number.dll' >>>import number# the generated Python shadow class module >>>number.__file__'number.py' >>>x = number.Number(2)# make a C++ class instance in Python Number: 2 >>>y = number.Number(4)# make another C++ object Number: 4 >>>x, y(<number.Number; proxy of <Swig Object of type 'Number *' at 0x7ff4bcf8> >, <number.Number; proxy of <Swig Object of type 'Number *' at 0x7ff4b998> >) >>>x.display()# call C++ method (like C++ x->display()) Number=2 >>>x.add(y.data)# fetch C++ data member, call C++ method add 4 >>>x.display()Number=6 >>>y.data = x.data + y.data + 32# set C++ data member >>>y.display()# y records the C++ this pointer Number=42 >>>y.square()# method with return value 1764 >>>t = y.square()>>>t, type(t)# type is class in Python 3.X (1764, <class 'int'>)
Naturally, this example uses a small C++ class to underscore the basics, but even at this level, the seamlessness of the Python-to-C++ integration we get from SWIG is astonishing. Python code uses C++ members and methods as though they are Python code. Moreover, this integration transparency still applies once we step up to more realistic C++ class libraries.
So what’s the catch? Nothing much, really, but if you start using SWIG in earnest, the biggest downside may be that SWIG cannot handle every feature of C++ today. If your classes use some esoteric C++ tools (and there are many), you may need to handcode simplified class type declarations for SWIG instead of running SWIG over the original class header files. SWIG development is ongoing, so you should consult the SWIG manuals and website for more details on these and other topics.
In return for any such trade-offs, though, SWIG can completely obviate the need to code glue layers to access C and C++ libraries from Python scripts. If you have ever coded such layers by hand in the past, you already know that this can be a very big win.
If you do go the handcoded route, though, consult Python’s standard extension manuals for more details on both API calls used in this chapter, as well as additional extension tools we don’t have space to cover in this text. C extensions can run the gamut from short SWIG input files to code that is staunchly wedded to the internals of the Python interpreter; as a rule of thumb, the former survives the ravages of time much better than the latter.
Other Extending Tools
In closing the extending topic, I should mention that there are alternatives to SWIG, many of which have a loyal user base of their own. This section briefly introduces some of the more popular tools in this domain today; as usual, search the Web for more details on these and others. Like SWIG, all of the following began life as third-party tools installed separately, though Python 2.5 and later incorporates the ctypes extension as a standard library module.
- SIP
Just as a sip is a smaller swig in the drinking world, so too is the SIP system a lighter alternative to SWIG in the Python world (in fact, it was named on purpose for the joke). According to its web page, SIP makes it easy to create Python bindings for C and C++ libraries. Originally developed to create the PyQt Python bindings for the Qt toolkit, it can be used to create bindings for any C or C++ library. SIP includes a code generator and a Python support module.
Much like SWIG, the code generator processes a set of specification files and generates C or C++ code, which is compiled to create the bindings extension module. The SIP Python module provides support functions to the automatically generated code. Unlike SWIG, SIP is specifically designed just for bringing together Python and C/C++. SWIG also generates wrappers for many other scripting languages, and so is viewed by some as a more complex project.
- ctypes
The ctypes system is a foreign function interface (FFI) module for Python. It allows Python scripts to access and call compiled functions in a binary library file directly and dynamically, by writing dispatch code in Python itself, instead of generating or writing the integration C wrapper code we’ve studied in this chapter. That is, library glue code is written in pure Python instead of C. The main advantage is that you don’t need C code or a C build system to access C functions from a Python script. The disadvantage is potential speed loss on dispatch, though this depends upon the alternative measured.
According to its documentation, ctypes allows Python to call functions exposed from DLLs and shared libraries and has facilities to create, access, and manipulate complex C datatypes in Python. It is also possible to implement C callback functions in pure Python, and an experimental ctypes code generator feature allows automatic creation of library wrappers from C header files. ctypes works on Windows, Mac OS X, Linux, Solaris, FreeBSD, and OpenBSD. It may run on additional systems, provided that the
libffipackage it employs is supported. For Windows, ctypes contains a ctypes.com package, which allows Python code to call and implement custom COM interfaces. See Python’s library manuals for more on the ctypes functionality included in the standard library.- Boost.Python
The Boost.Python system is a C++ library that enables seamless interoperability between C++ and the Python programming language through an IDL-like model. Using it, developers generally write a small amount of C++ wrapper code to create a shared library for use in Python scripts. Boost.Python handles references, callbacks, type mappings, and cleanup tasks. Because it is designed to wrap C++ interfaces nonintrusively, C++ code need not be changed to be wrapped. Like other tools, this makes the system useful for wrapping existing libraries, as well as developing new extensions from scratch.
Writing interface code for large libraries can be more involved than the code generation approaches of SWIG and SIP, but it’s easier than manually wrapping libraries and may afford greater control than a fully automated wrapping tool. In addition, the Py++ and older Pyste systems provide Boost.Python code generators, in which users specify classes and functions to be exported using a simple interface file. Both use GCC-XML to parse all the headers and extract the necessary information to generate C++ code.
- Cython (and Pyrex)
Cython, a successor to the Pyrex system, is a language specifically for writing Python extension modules. It lets you write files that mix Python code and C datatypes as you wish, and compiles the combination into a C extension for Python. In principle, developers need not deal with the Python/C API at all, because Cython takes care of things such as error-checking and reference counts automatically.
Technically, Cython is a distinct language that is Python-like, with extensions for mixing in C datatype declarations and C function calls. However, almost any Python code is also valid Cython code. The Cython compiler converts Python code into C code, which makes calls to the Python/C API. In this aspect, Cython is similar to the now much older Python2C conversion project. By combining Python and C code, Cython offers a different approach than the generation or coding of integration code in other systems.
- CXX, weave, and more
The CXX system is roughly a C++ version of Python’s usual C API, which handles reference counters, exception translation, and much of the type checking and cleanup inherent in C++ extensions. As such, CXX lets you focus on the application-specific parts of your code. CXX also exposes parts of the C++ Standard Template Library containers to be compatible with Python sequences.
The weave package allows the inclusion of C/C++ in Python code. It’s part of the SciPy package (http://www.scipy.org) but is also available as a standalone system. A page at http://www.python.org chronicles additional projects in this domain, which we don’t have space to mention here.
- Other languages: Java, C#, FORTRAN, Objective-C, and others
Although we’re focused on C and C++ in this chapter, you’ll also find direct support for mixing Python with other programming languages in the open source world. This includes languages that are compiled to binary form like C, as well as some that are not.
For example, by providing full byte code compilers, the Jython and IronPython systems allow code written in Python to interface with Java and C#/.NET components in a largely seamless fashion. Alternatively, the JPype and Python for .NET projects support Java and C#/.NET integration for normal CPython (the standard C-based implementation of Python) code, without requiring alternative byte code compilers.
Moreover, the f2py and PyFort systems provide integration with FORTRAN code, and other tools provide access to languages such as Delphi and Objective-C. Among these, the PyObjC project aims to provide a bridge between Python and Objective-C; this supports writing Cocoa GUI applications on Mac OS X in Python.
Search the Web for details on other language integration tools. Also look for a wiki page currently at http://www.python.org that lists a large number of other integratable languages, including Prolog, Lisp, TCL, and more.
Because many of these systems support bidirectional control flows—both extending and embedding—we’ll return to this category at the end of this chapter in the context of integration at large. First, though, we need to shift our perspective 180 degrees to explore the other mode of Python/C integration: embedding.
Embedding Python in C: Overview
So far in this chapter, we’ve explored only half of the Python/C integration picture: calling C services from Python. This mode is perhaps the most commonly deployed; it allows programmers to speed up operations by moving them to C and to utilize external libraries by wrapping them in C extension modules and types. But the inverse can be just as useful: calling Python from C. By delegating selected components of an application to embedded Python code, we can open them up to onsite changes without having to ship or rebuild a system’s full code base.
This section tells this other half of the Python/C integration tale. It introduces the Python C interfaces that make it possible for programs written in C-compatible languages to run Python program code. In this mode, Python acts as an embedded control language (what some call a “macro” language). Although embedding is mostly presented in isolation here, keep in mind that Python’s integration support is best viewed as a whole. A system’s structure usually determines an appropriate integration approach: C extensions, embedded code calls, or both. To wrap up, this chapter concludes by discussing a handful of alternative integration platforms such as Jython and IronPython, which offer broad integration possibilities.
The C Embedding API
The first thing you should know about Python’s embedded-call API is that it is less structured than the extension interfaces. Embedding Python in C may require a bit more creativity on your part than extending: you must pick tools from a general collection of calls to implement the Python integration instead of coding to a boilerplate structure. The upside of this loose structure is that programs can combine embedding calls and strategies to build up arbitrary integration architectures.
The lack of a more rigid model for embedding is largely the result of a less clear-cut goal. When extending Python, there is a distinct separation for Python and C responsibilities and a clear structure for the integration. C modules and types are required to fit the Python module/type model by conforming to standard extension structures. This makes the integration seamless for Python clients: C extensions look like Python objects and handle most of the work. It also supports automation tools such as SWIG.
But when Python is embedded, the structure isn’t as obvious; because C is the enclosing level, there is no clear way to know what model the embedded Python code should fit. C may want to run objects fetched from modules, strings fetched from files or parsed out of documents, and so on. Instead of deciding what C can and cannot do, Python provides a collection of general embedding interface tools, which you use and structure according to your embedding goals.
Most of these tools correspond to tools available to Python programs. Table 20-1 lists some of the more common API calls used for embedding, as well as their Python equivalents. In general, if you can figure out how to accomplish your embedding goals in pure Python code, you can probably find C API tools that achieve the same results.
C API call | Python equivalent |
|
|
|
|
|
|
|
|
|
|
|
|
|
|
|
|
|
|
|
|
|
|
|
|
Because embedding relies on API call selection, becoming familiar with the Python C API is fundamental to the embedding task. This chapter presents a handful of representative embedding examples and discusses common API calls, but it does not provide a comprehensive list of all tools in the API. Once you’ve mastered the examples here, you’ll probably need to consult Python’s integration manuals for more details on available calls in this domain. As mentioned previously, Python offers two standard manuals for C/C++ integration programmers: Extending and Embedding, an integration tutorial; and Python/C API, the Python runtime library reference.
You can find the most recent releases of these manuals at http://www.python.org, and possibly installed on your computer alongside Python itself. Beyond this chapter, these manuals are likely to be your best resource for up-to-date and complete Python API tool information.
What Is Embedded Code?
Before we jump into details, let’s get a handle on some of the core ideas in the embedding domain. When this book speaks of “embedded” Python code, it simply means any Python program structure that can be executed from C with a direct in-process function call interface. Generally speaking, embedded Python code can take a variety of forms:
- Code strings
C programs can represent Python programs as character strings and run them as either expressions or statements (much like using the
evalandexecbuilt-in functions in Python).- Callable objects
C programs can load or reference Python callable objects such as functions, methods, and classes, and call them with argument list objects (much like
func(*pargs, *kargs)Python syntax).- Code files
C programs can execute entire Python program files by importing modules and running script files through the API or general system calls (e.g.,
popen).
The Python binary library is usually what is physically embedded and linked in the C program. The actual Python code run from C can come from a wide variety of sources:
Code strings might be loaded from files, obtained from an interactive user at a console or GUI, fetched from persistent databases and shelves, parsed out of HTML or XML files, read over sockets, built or hardcoded in a C program, passed to C extension functions from Python registration code, and so on.
Callable objects might be fetched from Python modules, returned from other Python API calls, passed to C extension functions from Python registration code, and so on.
Code files simply exist as files, modules, and executable scripts in the filesystem.
Registration is a technique commonly used in callback scenarios that we will explore in more detail later in this chapter. But especially for strings of code, there are as many possible sources as there are for C character strings in general. For example, C programs can construct arbitrary Python code dynamically by building and running strings.
Finally, once you have some Python code to run, you need a way to communicate with it: the Python code may need to use inputs passed in from the C layer and may want to generate outputs to communicate results back to C. In fact, embedding generally becomes interesting only when the embedded code has access to the enclosing C layer. Usually, the form of the embedded code suggests its communication media:
Code strings that are Python expressions return an expression result as their output. In addition, both inputs and outputs can take the form of global variables in the namespace in which a code string is run; C may set variables to serve as input, run Python code, and fetch variables as the code’s result. Inputs and outputs can also be passed with exported C extension function calls—Python code may use C module or type interfaces that we met earlier in this chapter to get or set variables in the enclosing C layer. Communications schemes are often combined; for instance, C may preassign global names to objects that export both state and interface functions for use in the embedded Python code.[72]
Callable objects may accept inputs as function arguments and produce results as function return values. Passed-in mutable arguments (e.g., lists, dictionaries, class instances) can be used as both input and output for the embedded code—changes made in Python are retained in objects held by C. Objects can also make use of the global variable and C extension functions interface techniques described for strings to communicate with C.
Code files can communicate with most of the same techniques as code strings; when run as separate programs, files can also employ Inter-Process Communication (IPC) techniques.
Naturally, all embedded code forms can also communicate with C using general system-level tools: files, sockets, pipes, and so on. These techniques are generally less direct and slower, though. Here, we are still interested in in-process function call integration.
Basic Embedding Techniques
As you can probably tell from the preceding overview, there is much flexibility in the embedding domain. To illustrate common embedding techniques in action, this section presents a handful of short C programs that run Python code in one form or another. Most of these examples will make use of the simple Python module file shown in Example 20-22.
"""
#############################################################
C code runs Python code in this module in embedded mode.
Such a file can be changed without changing the C layer.
This is just standard Python code (C handles conversions).
Must be on the Python module search path if imported by C.
C can also run code in standard library modules like string.
#############################################################
"""

message = 'The meaning of life...'

def transform(input):
    input = input.replace('life', 'Python')
    return input.upper()
If you know any Python at all, you probably know that this file defines a string and a function; the function returns whatever it is passed with string substitution and uppercase conversions applied. It’s easy to use from Python:
.../PP4E/Integrate/Embed/Basics$python>>>import usermod# import a module >>>usermod.message# fetch a string 'The meaning of life...' >>>usermod.transform(usermod.message)# call a function 'THE MEANING OF PYTHON...'
With a little Python API wizardry, it’s not much more difficult to use this module the same way in C.
Running Simple Code Strings
Perhaps the simplest way to run Python code from C is by calling the
PyRun_SimpleString API function.
With it, C programs can execute Python programs represented as C
character string arrays. This call is also very limited: all code
runs in the same namespace (the module __main__), the code strings must be Python
statements (not expressions), and there is no direct way to
communicate inputs or outputs with the Python code run.
Still, it’s a simple place to start. Moreover, when augmented with an imported C extension module that the embedded Python code can use to communicate with the enclosing C layer, this technique can satisfy many embedding goals. To demonstrate the basics, the C program in Example 20-23 runs Python code to accomplish the same results as the Python interactive session listed in the prior section.
/*******************************************************
 * simple code strings: C acts like the interactive
 * prompt, code runs in __main__, no output sent to C;
 *******************************************************/

#include <Python.h>    /* standard API def */

main() {
    printf("embed-simple
");
    Py_Initialize();
    PyRun_SimpleString("import usermod");                /* load .py file */
    PyRun_SimpleString("print(usermod.message)");        /* on Python path */
    PyRun_SimpleString("x = usermod.message");           /* compile and run */
    PyRun_SimpleString("print(usermod.transform(x))");
    Py_Finalize();
}
The first thing you should notice here is that when Python is
embedded, C programs always call Py_Initialize to initialize linked-in
Python libraries before using any other API functions and normally
call Py_Finalize to shut the
interpreter down.
The rest of this code is straightforward—C submits hardcoded
strings to Python that are roughly what we typed interactively. In
fact, we could concatenate all the Python code strings here with
characters between, and submit
it once as a single string. Internally, PyRun_SimpleString invokes the Python compiler and interpreter to run the strings
sent from C; as usual, the Python compiler is always available in
systems that contain Python.
Compiling and running
To build a standalone executable from this C source file, you need to link its compiled form with the Python library file. In this chapter, “library” usually means the binary library file that is generated when Python is compiled, not the Python source code standard library.
Today, everything in Python that you need in C is compiled
into a single Python library file when the interpreter is built
(e.g., libpython3.1.dll on Cygwin). The
program’s main function comes
from your C code, and depending on your platform and the
extensions installed in your Python, you may also need to link any
external libraries referenced by the Python library.
Assuming no extra extension libraries are needed, Example 20-24 is a minimal makefile for building the C program in Example 20-23 under Cygwin on Windows. Again, makefile details vary per platform, but see Python manuals for hints. This makefile uses the Python include-files path to find Python.h in the compile step and adds the Python library file to the final link step to make API calls available to the C program.
# a Cygwin makefile that builds a C executable that embeds
# Python, assuming no external module libs must be linked in;
# uses Python header files, links in the Python lib file;
# both may be in other dirs (e.g., /usr) in your install;

PYLIB = /usr/local/bin
PYINC = /usr/local/include/python3.1

embed-simple: embed-simple.o
        gcc embed-simple.o -L$(PYLIB) -lpython3.1 -g -o embed-simple

embed-simple.o: embed-simple.c
        gcc embed-simple.c -c -g -I$(PYINC)
To build a program with this file, launch make on it as usual (as before, make
sure indentation in rules is tabs in your copy of this
makefile):
.../PP4E/Integrate/Embed/Basics$ make -f makefile.1
gcc embed-simple.c -c -g -I/usr/local/include/python3.1
gcc embed-simple.o -L/usr/local/bin -lpython3.1 -g -o embed-simple
Things may not be quite this simple in practice, though, at least not without some coaxing. The makefile in Example 20-25 is the one I actually used to build all of this section’s C programs on Cygwin.
# cygwin makefile to build all 5 basic embedding examples at once

PYLIB = /usr/local/bin
PYINC = /usr/local/include/python3.1

BASICS = embed-simple.exe
         embed-string.exe
         embed-object.exe
         embed-dict.exe
         embed-bytecode.exe

all:    $(BASICS)

embed%.exe: embed%.o
        gcc embed$*.o -L$(PYLIB) -lpython3.1 -g -o $@

embed%.o: embed%.c
        gcc embed$*.c -c -g -I$(PYINC)

clean:
        rm -f *.o *.pyc $(BASICS) core
On some platforms, you may need to also link in other libraries because the Python library file used may have been built with external dependencies enabled and required. In fact, you may have to link in arbitrarily many more externals for your Python library, and frankly, chasing down all the linker dependencies can be tedious. Required libraries may vary per platform and Python install, so there isn’t a lot of advice I can offer to make this process simple (this is C, after all). The standard C development techniques will apply.
One hint here: if you’re going to do much embedding work and you run into external dependency issues, on some platforms you might want to build Python on your machine from its source with all unnecessary extensions disabled in its build configuration files (see the Python source package for details). This produces a Python library with minimal external requirements, which may links more easily.
Once you’ve gotten the makefile to work, run it to build all of this section’s C programs at once with Python libraries linked in:
.../PP4E/Integrate/Embed/Basics$make -f makefile.basics cleanrm -f *.o *.pyc embed-simple.exe embed-string.exe embed-object.exe embed-dict.exe embed-bytecode.exe core .../PP4E/Integrate/Embed/Basics$make -f makefile.basicsgcc embed-simple.c -c -g -I/usr/local/include/python3.1 gcc embed-simple.o -L/usr/local/bin -lpython3.1 -g -o embed-simple.exe gcc embed-string.c -c -g -I/usr/local/include/python3.1 gcc embed-string.o -L/usr/local/bin -lpython3.1 -g -o embed-string.exe gcc embed-object.c -c -g -I/usr/local/include/python3.1 gcc embed-object.o -L/usr/local/bin -lpython3.1 -g -o embed-object.exe gcc embed-dict.c -c -g -I/usr/local/include/python3.1 gcc embed-dict.o -L/usr/local/bin -lpython3.1 -g -o embed-dict.exe gcc embed-bytecode.c -c -g -I/usr/local/include/python3.1 gcc embed-bytecode.o -L/usr/local/bin -lpython3.1 -g -o embed-bytecode.exe rm embed-dict.o embed-object.o embed-simple.o embed-bytecode.o embed-string.o
After building with either makefile, you can run the resulting C program as usual:
.../PP4E/Integrate/Embed/Basics$ ./embed-simple
embed-simple
The meaning of life...
THE MEANING OF PYTHON...
Most of this output is produced by Python print statements sent from C to the
linked-in Python library. It’s as if C has become an interactive
Python programmer.
Naturally, strings of Python code run by C probably would not be hardcoded in a C program file like this. They might instead be loaded from a text file or GUI, extracted from HTML or XML files, fetched from a persistent database or socket, and so on. With such external sources, the Python code strings that are run from C could be changed arbitrarily without having to recompile the C program that runs them. They may even be changed on site, and by end users of a system. To make the most of code strings, though, we need to move on to more flexible API tools.
Note
Pragmatic details: Under Python 3.1
and Cygwin on Windows, I had to first set my PYTHONPATH to include the current
directory in order to run the embedding examples, with the shell
command export PYTHONPATH=..
I also had to use the shell command ./embed-simple to execute the program
because . was also not on my
system path setting and isn’t
initially when you install Cygwin.
Your mileage may vary; but if you have trouble, try
running the embedded Python commands import sys and print sys.path from C to see what
Python’s path looks like, and take a look at the
Python/C API manual for more on path
configuration for embedded applications.
Running Code Strings with Results and Namespaces
Example 20-26 uses the following API calls to run code strings that return expression results back to C:
Py_InitializePyImport_ImportModulePyModule_GetDictPyRun_StringPyObject_SetAttrStringPyArg_Parse
The import calls are used to fetch the namespace of the
usermod module listed in Example 20-22 so that code
strings can be run there directly and will have access to names
defined in that module without qualifications. Py_Import_ImportModule is like a Python
import statement, but the
imported module object is returned to C; it is not assigned to a
Python variable name. As a result, it’s probably more similar to the
Python __import__ built-in
function.
The PyRun_String call is
the one that actually runs code here, though. It takes a code
string, a parser mode flag, and dictionary object pointers to serve
as the global and local namespaces for running the code string. The
mode flag can be Py_eval_input to
run an expression or Py_file_input to run a statement; when
running an expression, the result of evaluating the expression is
returned from this call (it comes back as a PyObject* object pointer). The two
namespace dictionary pointer arguments allow you to distinguish
global and local scopes, but they are typically passed the same
dictionary such that code runs in a single namespace.
/* code-strings with results and namespaces */

#include <Python.h>

main() {
    char *cstr;
    PyObject *pstr, *pmod, *pdict;
    printf("embed-string
");
    Py_Initialize();

    /* get usermod.message */
    pmod  = PyImport_ImportModule("usermod");
    pdict = PyModule_GetDict(pmod);
    pstr  = PyRun_String("message", Py_eval_input, pdict, pdict);

    /* convert to C */
    PyArg_Parse(pstr, "s", &cstr);
    printf("%s
", cstr);

    /* assign usermod.X */
    PyObject_SetAttrString(pmod, "X", pstr);

    /* print usermod.transform(X) */
    (void) PyRun_String("print(transform(X))", Py_file_input, pdict, pdict);
    Py_DECREF(pmod);
    Py_DECREF(pstr);
    Py_Finalize();
}
When compiled and run, this file produces the same result as its predecessor:
.../PP4E/Integrate/Embed/Basics$ ./embed-string
embed-string
The meaning of life...
THE MEANING OF PYTHON...
However, very different work goes into producing this output.
This time, C fetches, converts, and prints the value of the Python
module’s message attribute
directly by running a string expression and assigning a global
variable (X) within the module’s
namespace to serve as input for a Python print statement string.
Because the string execution call in this version lets you specify namespaces, you can better partition the embedded code your system runs—each grouping can have a distinct namespace to avoid overwriting other groups’ variables. And because this call returns a result, you can better communicate with the embedded code; expression results are outputs, and assignments to globals in the namespace in which code runs can serve as inputs.
Before we move on, I need to explain three coding issues here.
First, this program also decrements the reference count on objects
passed to it from Python, using the Py_DECREF call described in Python’s C API
manuals. These calls are not strictly needed here (the objects’
space is reclaimed when the programs exits anyhow), but they
demonstrate how embedding interfaces must manage reference counts
when Python passes object ownership to C. If this was a function
called from a larger system, for instance, you would generally want
to decrement the count to allow Python to reclaim the objects.
Second, in a realistic program, you should generally test the return values of all the API calls in this program immediately to detect errors (e.g., import failure). Error tests are omitted in this section’s example to keep the code simple, but they should be included in your programs to make them more robust.
And third, there is a related function that lets you run
entire files of code, but it is not
demonstrated in this chapter: PyRun_File. Because you can always load a
file’s text and run it as a single code string with PyRun_String, the PyRun_File call’s main advantage is to
avoid allocating memory for file content. In such multiline code
strings, the
character
terminates lines and indentation group blocks as usual.
Calling Python Objects
The last two sections dealt with running strings of code, but it’s easy for C programs to deal in terms of Python objects, too. Example 20-27 accomplishes the same task as Examples 20-23 and 20-26, but it uses other API tools to interact with objects in the Python module directly:
We used both of the data conversion functions earlier in this
chapter in extension modules. The PyEval_CallObject call in this version of
the example is the key point here: it runs the imported function
with a tuple of arguments, much like the Python func(*args) call syntax. The Python
function’s return value comes back to C as a PyObject*, a generic Python object
pointer.
/* fetch and call objects in modules */

#include <Python.h>

main() {
    char *cstr;
    PyObject *pstr, *pmod, *pfunc, *pargs;
    printf("embed-object
");
    Py_Initialize();

    /* get usermod.message */
    pmod = PyImport_ImportModule("usermod");
    pstr = PyObject_GetAttrString(pmod, "message");

    /* convert string to C */
    PyArg_Parse(pstr, "s", &cstr);
    printf("%s
", cstr);
    Py_DECREF(pstr);

    /* call usermod.transform(usermod.message) */
    pfunc = PyObject_GetAttrString(pmod, "transform");
    pargs = Py_BuildValue("(s)", cstr);
    pstr  = PyEval_CallObject(pfunc, pargs);
    PyArg_Parse(pstr, "s", &cstr);
    printf("%s
", cstr);

    /* free owned objects */
    Py_DECREF(pmod);
    Py_DECREF(pstr);
    Py_DECREF(pfunc);        /* not really needed in main() */
    Py_DECREF(pargs);        /* since all memory goes away  */
    Py_Finalize();
}
When compiled and run, the result is the same again:
.../PP4E/Integrate/Embed/Basics$ ./embed-object
embed-object
The meaning of life...
THE MEANING OF PYTHON...
However, this output is generated by C this time—first, by
fetching the Python module’s message attribute value, and then by
fetching and calling the module’s transform function object directly and
printing its return value that is sent back to C. Input to the
transform function is a function
argument here, not a preset global variable. Notice that message is fetched as a module attribute
this time, instead of by running its name as a code string; as this
shows, there is often more than one way to accomplish the same goals
with different API calls.
Running functions in modules like this is a simple way to structure embedding; code in the module file can be changed arbitrarily without having to recompile the C program that runs it. It also provides a direct communication model: inputs and outputs to Python code can take the form of function arguments and return values.
Running Strings in Dictionaries
When we used PyRun_String
earlier to run expressions with results, code was executed in the
namespace of an existing Python module. Sometimes, though, it’s more
convenient to create a brand-new namespace for running code strings
that is independent of any existing module files. The C file in
Example 20-28 shows how;
the new namespace is created as a new Python dictionary object, and
a handful of new API calls are employed in the process:
The main trick here is the new dictionary. Inputs and outputs
for the embedded code strings are mapped to this dictionary by
passing it as the code’s namespace dictionaries in the PyRun_String call. The net effect is that
the C program in Example 20-28 works just like
this Python code:
>>>d = {}>>>d['Y'] = 2>>>exec('X = 99', d, d)>>>exec('X = X + Y', d, d)>>>print(d['X'])101
But here, each Python operation is replaced by a C API call.
/* make a new dictionary for code string namespace */

#include <Python.h>

main() {
    int cval;
    PyObject *pdict, *pval;
    printf("embed-dict
");
    Py_Initialize();

    /* make a new namespace */
    pdict = PyDict_New();
    PyDict_SetItemString(pdict, "__builtins__", PyEval_GetBuiltins());

    PyDict_SetItemString(pdict, "Y", PyLong_FromLong(2));  /* dict['Y'] = 2   */
    PyRun_String("X = 99",  Py_file_input, pdict, pdict);  /* run statements  */
    PyRun_String("X = X+Y", Py_file_input, pdict, pdict);  /* same X and Y    */
    pval = PyDict_GetItemString(pdict, "X");               /* fetch dict['X'] */

    PyArg_Parse(pval, "i", &cval);                         /* convert to C */
    printf("%d
", cval);                                  /* result=101 */
    Py_DECREF(pdict);
    Py_Finalize();
}
When compiled and run, this C program creates this sort of output, tailored for this use case:
.../PP4E/Integrate/Embed/Basics$ ./embed-dict
embed-dict
101
The output is different this time: it reflects the value of
the Python variable X assigned by
the embedded Python code strings and fetched by C. In general, C can
fetch module attributes either by calling PyObject_GetAttrString with the module or
by using PyDict_GetItemString to
index the module’s attribute dictionary (expression strings work,
too, but they are less direct). Here, there is no module at all, so
dictionary indexing is used to access the code’s namespace in
C.
Besides allowing you to partition code string namespaces
independent of any Python module files on the underlying system,
this scheme provides a natural communication mechanism. Values that
are stored in the new dictionary before code is run serve as inputs,
and names assigned by the embedded code can later be fetched out of
the dictionary to serve as code outputs. For instance, the variable
Y in the second string run refers
to a name set to 2 by C; X is
assigned by the Python code and fetched later by C code as the
printed result.
There is one subtlety in this
embedding mode: dictionaries that serve as namespaces for running
code are generally required to have a __builtins__ link to the built-in scope
searched last for name lookups, set with code of this form:
PyDict_SetItemString(pdict, "__builtins__", PyEval_GetBuiltins());
This is esoteric, and it is normally handled by Python
internally for modules and built-ins like the exec function. For raw dictionaries used
as namespaces, though, we are responsible for setting the link
manually if we expect to reference built-in names. This still holds
true in Python 3.X.
Precompiling Strings to Bytecode
Finally, when you call Python function objects from C, you are actually running the already compiled bytecode associated with the object (e.g., a function body), normally created when the enclosing module is imported. When running strings, Python must compile the string before running it. Because compilation is a slow process, this can be a substantial overhead if you run a code string more than once. Instead, precompile the string to a bytecode object to be run later, using the API calls illustrated in Example 20-29:
The first of these takes the mode flag that is normally passed
to PyRun_String, as well as a
second string argument that is used only in error messages. The
second takes two namespace dictionaries. These two API calls are
used in Example 20-29 to
compile and execute three strings of Python code in turn.
/* precompile code strings to bytecode objects */

#include <Python.h>
#include <compile.h>
#include <eval.h>

main() {
    int i;
    char *cval;
    PyObject *pcode1, *pcode2, *pcode3, *presult, *pdict;
    char *codestr1, *codestr2, *codestr3;
    printf("embed-bytecode
");

    Py_Initialize();
    codestr1 = "import usermod
print(usermod.message)";    /* statements */
    codestr2 = "usermod.transform(usermod.message)";        /* expression */
    codestr3 = "print('%d:%d' % (X, X ** 2), end=' ')";     /* use input X */

    /* make new namespace dictionary */
    pdict = PyDict_New();
    if (pdict == NULL) return −1;
    PyDict_SetItemString(pdict, "__builtins__", PyEval_GetBuiltins());

    /* precompile strings of code to bytecode objects */
    pcode1 = Py_CompileString(codestr1, "<embed>", Py_file_input);
    pcode2 = Py_CompileString(codestr2, "<embed>", Py_eval_input);
    pcode3 = Py_CompileString(codestr3, "<embed>", Py_file_input);

    /* run compiled bytecode in namespace dict */
    if (pcode1 && pcode2 && pcode3) {
        (void)    PyEval_EvalCode((PyCodeObject *)pcode1, pdict, pdict);
        presult = PyEval_EvalCode((PyCodeObject *)pcode2, pdict, pdict);
        PyArg_Parse(presult, "s", &cval);
        printf("%s
", cval);
        Py_DECREF(presult);

        /* rerun code object repeatedly */
        for (i = 0; i <= 10; i++) {
            PyDict_SetItemString(pdict, "X", PyLong_FromLong(i));
            (void) PyEval_EvalCode((PyCodeObject *)pcode3, pdict, pdict);
        }
        printf("
");
    }
    /* free referenced objects */
    Py_XDECREF(pdict);
    Py_XDECREF(pcode1);
    Py_XDECREF(pcode2);
    Py_XDECREF(pcode3);
    Py_Finalize();
}
This program combines a variety of techniques that we’ve already seen. The namespace in which the compiled code strings run, for instance, is a newly created dictionary (not an existing module object), and inputs for code strings are passed as preset variables in the namespace. When built and executed, the first part of the output is similar to previous examples in this section, but the last line represents running the same precompiled code string 11 times:
.../PP4E/Integrate/Embed/Basics$ embed-bytecode
embed-bytecode
The meaning of life...
THE MEANING OF PYTHON...

0:0 1:1 2:4 3:9 4:16 5:25 6:36 7:49 8:64 9:81 10:100
If your system executes Python code strings multiple times, it is a major speedup to precompile to bytecode in this fashion. This step is not required in other contexts that invoke callable Python objects—including the common embedding use case presented in the next section.
Registering Callback Handler Objects
In the embedding examples thus far, C has been running and calling Python code from a standard main program flow of control. Things are not always so simple, though; in some cases, programs are modeled on an event-driven architecture in which code is executed only in response to some sort of event. The event might be an end user clicking a button in a GUI, the operating system delivering a signal, or simply software running an action associated with an entry in a table.
In any event (pun accidental), program code in such an architecture is typically structured as callback handlers—units of code invoked by event-processing dispatch logic. It’s easy to use embedded Python code to implement callback handlers in such a system; in fact, the event-processing layer can simply use the embedded-call API tools we saw earlier in this chapter to run Python handlers.
The only new trick in this model is how to make the C layer know what code should be run for each event. Handlers must somehow be registered to C to associate them with future events. In general, there is a wide variety of ways to achieve this code/event association. For instance, C programs can:
Fetch and call functions by event name from one or more module files
Fetch and run code strings associated with event names in a database
Extract and run code associated with event tags in HTML or XML
Run Python code that calls back to C to tell it what should be run
And so on. Really, any place you can associate objects or
strings with identifiers is a potential callback registration
mechanism. Some of these techniques have advantages all their own. For
instance, callbacks fetched from module files support dynamic
reloading (imp.reload works on
modules but does not update objects held directly). And none of the
first three schemes require users to code special Python programs that
do nothing but register handlers to be run later.
It is perhaps more common, though, to register callback handlers with the last approach—letting Python code register handlers with C by calling back to C through extension interfaces. Although this scheme is not without trade-offs, it can provide a natural and direct model in scenarios where callbacks are associated with a large number of objects.
For instance, consider a GUI constructed by building a tree of widget objects in Python scripts. If each widget object in the tree can have an associated event handler, it may be easier to register handlers by simply calling methods of widgets in the tree. Associating handlers with widget objects in a separate structure such as a module file or an XML file requires extra cross-reference work to keep the handlers in sync with the tree.
In fact, if you’re looking for a more realistic example of Python callback handlers, consider the tkinter GUI system we’ve used extensively in this book. tkinter uses both extending and embedding. Its extending interface (widget objects) is used to register Python callback handlers, which are later run with embedding interfaces in response to GUI events. You can study tkinter’s implementation in the Python source distribution for more details; its Tk library interface logic makes it a somewhat challenging read, but the basic model it employs is straightforward.
Registration Implementation
This section’s C and Python files demonstrate the coding techniques used to implement explicitly registered callback handlers. First, the C file in Example 20-30 implements interfaces for registering Python handlers, as well as code to run those handlers in response to later events:
- Event router
The
Route_Eventfunction responds to an event by calling a Python function object previously passed from Python to C.- Callback registration
The
Register_Handlerfunction saves a passed-in Python function object pointer in a C global variable. Python scripts callRegister_Handlerthrough a simplecregisterC extension module created by this file.- Event trigger
To simulate real-world events, the
Trigger_Eventfunction can be called from Python through the generated C module to trigger an event.
In other words, this example uses both the embedding and the extending interfaces we’ve already met to register and invoke Python event handler code. Study Example 20-30 for more on its operation.
#include <Python.h>
#include <stdlib.h>

/***********************************************/
/* 1) code to route events to Python object    */
/* note that we could run strings here instead */
/***********************************************/

static PyObject *Handler = NULL;     /* keep Python object in C */

void Route_Event(char *label, int count)
{
    char *cres;
    PyObject *args, *pres;

    /* call Python handler */
    args = Py_BuildValue("(si)", label, count);   /* make arg-list */
    pres = PyEval_CallObject(Handler, args);      /* apply: run a call */
    Py_DECREF(args);                              /* add error checks */

    if (pres != NULL) {
        /* use and decref handler result */
        PyArg_Parse(pres, "s", &cres);
        printf("%s
", cres);
        Py_DECREF(pres);
    }
}

/*****************************************************/
/* 2) python extension module to register handlers   */
/* python imports this module to set handler objects */
/*****************************************************/

static PyObject *
Register_Handler(PyObject *self, PyObject *args)
{
    /* save Python callable object */
    Py_XDECREF(Handler);                 /* called before? */
    PyArg_Parse(args, "(O)", &Handler);  /* one argument */
    Py_XINCREF(Handler);                 /* add a reference */
    Py_INCREF(Py_None);                  /* return 'None': success */
    return Py_None;
}

static PyObject *
Trigger_Event(PyObject *self, PyObject *args)
{
    /* let Python simulate event caught by C */
    static count = 0;
    Route_Event("spam", count++);
    Py_INCREF(Py_None);
    return Py_None;
}

static PyMethodDef cregister_methods[] = {
    {"setHandler",    Register_Handler, METH_VARARGS, ""},  /* name, &func,... */
    {"triggerEvent",  Trigger_Event,    METH_VARARGS, ""},
    {NULL, NULL, 0, NULL}                                   /* end of table */
};

static struct PyModuleDef cregistermodule = {
   PyModuleDef_HEAD_INIT,
   "cregister",       /* name of module */
   "cregister mod",   /* module documentation, may be NULL */
   −1,                /* size of per-interpreter module state, −1=in global vars */
   cregister_methods  /* link to methods table */
};

PyMODINIT_FUNC
PyInit_cregister()                      /* called on first import */
{
    return PyModule_Create(&cregistermodule);
}
Ultimately, this C file is an extension module for Python, not
a standalone C program that embeds Python (though C could just as
well be on top). To compile it into a dynamically loaded module
file, run the makefile in Example 20-31 on Cygwin (and use
something similar on other platforms). As we learned earlier in this
chapter, the resulting cregister.dll file will
be loaded when first imported by a Python script if it is placed in
a directory on Python’s module search path (e.g., in . or PYTHONPATH settings).
######################################################################
# Cygwin makefile that builds cregister.dll. a dynamically loaded
# C extension module (shareable), which is imported by register.py
######################################################################

PYLIB = /usr/local/bin
PYINC = /usr/local/include/python3.1

CMODS = cregister.dll

all: $(CMODS)

cregister.dll: cregister.c
        gcc cregister.c -g -I$(PYINC) -shared -L$(PYLIB) -lpython3.1 -o $@

clean:
        rm -f *.pyc $(CMODS)
Now that we have a C extension module set to register and dispatch Python handlers, all we need are some Python handlers. The Python module shown in Example 20-32 defines two callback handler functions and imports the C extension module to register handlers and trigger events.
"""
#########################################################################
in Python, register for and handle event callbacks from the C language;
compile and link the C code, and launch this with 'python register.py'
#########################################################################
"""

####################################
# C calls these Python functions;
# handle an event, return a result
####################################

def callback1(label, count):
    return 'callback1 => %s number %i' % (label, count)

def callback2(label, count):
    return 'callback2 => ' +  label * count

#######################################
# Python calls a C extension module
# to register handlers, trigger events
#######################################

import cregister

print('
Test1:')
cregister.setHandler(callback1)      # register callback function
for i in range(3):
    cregister.triggerEvent()         # simulate events caught by C layer

print('
Test2:')
cregister.setHandler(callback2)
for i in range(3):
    cregister.triggerEvent()         # routes these events to callback2
That’s it—the Python/C callback integration is set to go. To kick off the system, run the Python script; it registers one handler function, forces three events to be triggered, and then changes the event handler and does it again:
.../PP4E/Integrate/Embed/Regist$make -f makefile.registgcc cregister.c -g -I/usr/local/include/python3.1 -shared -L/usr/local/bin -lpython3.1 -o cregister.dll .../PP4E/Integrate/Embed/Regist$python register.pyTest1: callback1 => spam number 0 callback1 => spam number 1 callback1 => spam number 2 Test2: callback2 => spamspamspam callback2 => spamspamspamspam callback2 => spamspamspamspamspam
This output is printed by the C event router function, but its content is the return values of the handler functions in the Python module. Actually, something pretty wild is going on under the hood. When Python forces an event to trigger, control flows between languages like this:
From Python to the C event router function
From the C event router function to the Python handler function
Back to the C event router function (where the output is printed)
And finally back to the Python script
That is, we jump from Python to C to Python and back again. Along the way, control passes through both extending and embedding interfaces. When the Python callback handler is running, two Python levels are active, and one C level in the middle. Luckily, this just works; Python’s API is reentrant, so you don’t need to be concerned about having multiple Python interpreter levels active at the same time. Each level runs different code and operates independently.
Trace through this example’s output and code for more illumination. Here, we’re moving on to the last quick example we have time and space to explore—in the name of symmetry, using Python classes from C.
Using Python Classes in C
Earlier in this chapter, we learned how to use C++ classes in Python by wrapping them with SWIG. But what about going the other way—using Python classes from other languages? It turns out that this is really just a matter of applying interfaces already shown.
Recall that Python scripts generate class instance objects by calling class objects as though they were functions. To do this from C (or C++), simply follow the same steps: import a class from a module, build an arguments tuple, and call it to generate an instance using the same C API tools you use to call Python functions. Once you’ve got an instance, you can fetch its attributes and methods with the same tools you use to fetch globals out of a module. Callables and attributes work the same everywhere they live.
To illustrate how this works in practice, Example 20-33 defines a simple Python class in a module that we can utilize from C.
# call this class from C to make objects

class klass:
    def method(self, x, y):
        return "brave %s %s" % (x, y)     # run me from C
This is nearly as simple as it gets, but it’s enough to
illustrate the basics. As usual, make sure that this module is on your
Python search path (e.g., in the current directory, or one listed on
your PYTHONPATH setting), or else
the import call to access it from C will fail, just as it would in a
Python script. As you surely know if you’ve gotten this far in this
book, you can make always use of this Python class from a Python
program as follows:
...PP4EIntegrateEmbedPyclass$python>>>import module# import the file >>>object = module.klass()# make class instance >>>result = object.method('sir', 'robin')# call class method >>>print(result)brave sir robin
This is fairly easy stuff in Python. You can do all of these operations in C, too, but it takes a bit more code. The C file in Example 20-34 implements these steps by arranging calls to the appropriate Python API tools.
#include <Python.h>
#include <stdio.h>

main() {
  /* run objects with low-level calls */
  char *arg1="sir", *arg2="robin", *cstr;
  PyObject *pmod, *pclass, *pargs, *pinst, *pmeth, *pres;

  /* instance = module.klass() */
  Py_Initialize();
  pmod   = PyImport_ImportModule("module");         /* fetch module */
  pclass = PyObject_GetAttrString(pmod, "klass");   /* fetch module.class */
  Py_DECREF(pmod);

  pargs  = Py_BuildValue("()");
  pinst  = PyEval_CallObject(pclass, pargs);        /* call class() */
  Py_DECREF(pclass);
  Py_DECREF(pargs);

  /* result = instance.method(x,y) */
  pmeth  = PyObject_GetAttrString(pinst, "method"); /* fetch bound method */
  Py_DECREF(pinst);
  pargs  = Py_BuildValue("(ss)", arg1, arg2);       /* convert to Python */
  pres   = PyEval_CallObject(pmeth, pargs);         /* call method(x,y) */
  Py_DECREF(pmeth);
  Py_DECREF(pargs);

  PyArg_Parse(pres, "s", &cstr);                    /* convert to C */
  printf("%s
", cstr);
  Py_DECREF(pres);
}
Step through this source file for more details; it’s mostly a matter of figuring out how you would accomplish the task in Python, and then calling equivalent C functions in the Python API. To build this source into a C executable program, run the makefile in this file’s directory in the book examples package (it’s analogous to makefiles we’ve already seen, so we’ll omit it here). After compiling, run it as you would any other C program:
.../PP4E/Integrate/Embed/Pyclass$ ./objects
brave sir robin
This output might seem anticlimactic, but it actually reflects the return values sent back to C by the Python class method in file module.py. C did a lot of work to get this little string—it imported the module, fetched the class, made an instance, and fetched and called the instance method with a tuple of arguments, performing data conversions and reference count management every step of the way. In return for all the work, C gets to use the techniques shown in this file to reuse any Python class.
Of course, this example could be more complex in practice. As
mentioned earlier, you generally need to check the return value of
every Python API call to make sure it didn’t fail. The module import
call in this C code, for instance, can fail easily if the module isn’t
on the search path; if you don’t trap the NULL pointer result, your program will
almost certainly crash when it tries to use the pointer (at least
eventually). Example 20-35 is
a recoding of Example 20-34
with full error-checking; it’s big, but it’s robust.
#include <Python.h>
#include <stdio.h>
#define error(msg) do { printf("%s
", msg); exit(1); } while (1)

main() {
  /* run objects with low-level calls and full error checking */
  char *arg1="sir", *arg2="robin", *cstr;
  PyObject *pmod, *pclass, *pargs, *pinst, *pmeth, *pres;

  /* instance = module.klass() */
  Py_Initialize();
  pmod = PyImport_ImportModule("module");           /* fetch module */
  if (pmod == NULL)
      error("Can't load module");

  pclass = PyObject_GetAttrString(pmod, "klass");   /* fetch module.class */
  Py_DECREF(pmod);
  if (pclass == NULL)
      error("Can't get module.klass");

  pargs = Py_BuildValue("()");
  if (pargs == NULL) {
      Py_DECREF(pclass);
      error("Can't build arguments list");
  }
  pinst = PyEval_CallObject(pclass, pargs);         /* call class() */
  Py_DECREF(pclass);
  Py_DECREF(pargs);
  if (pinst == NULL)
      error("Error calling module.klass()");

  /* result = instance.method(x,y) */
  pmeth  = PyObject_GetAttrString(pinst, "method"); /* fetch bound method */
  Py_DECREF(pinst);
  if (pmeth == NULL)
      error("Can't fetch klass.method");

  pargs = Py_BuildValue("(ss)", arg1, arg2);        /* convert to Python */
  if (pargs == NULL) {
      Py_DECREF(pmeth);
      error("Can't build arguments list");
  }
  pres = PyEval_CallObject(pmeth, pargs);           /* call method(x,y) */
  Py_DECREF(pmeth);
  Py_DECREF(pargs);
  if (pres == NULL)
      error("Error calling klass.method");

  if (!PyArg_Parse(pres, "s", &cstr))               /* convert to C */
     error("Can't convert klass.method result");
  printf("%s
", cstr);
  Py_DECREF(pres);
}
These 53 lines of C code (not counting its makefile) achieve the same results as the 4 lines of interactive Python we ran earlier—not exactly a stellar result from a developer productivity perspective! Nevertheless, the model it uses allows C and C++ to leverage Python in the same way that Python can employ C and C++. As I’ll discuss in this book’s conclusion in a moment, such combinations can often be more powerful than their individual parts.
Other Integration Topics
In this chapter, the term integration has largely meant mixing Python with components written in C or C++ (or other C-compatible languages) in extending and embedding modes. But from a broader perspective, integration also includes any other technology that lets us mix Python components into larger, heterogeneous systems. To wrap up this chapter, this last section briefly summarizes a handful of commonly used integration technologies beyond the C API tools we’ve explored.
- Jython: Java integration
We first met Jython in Chapter 12 and it was discussed earlier in this chapter in the context of extending. Really, though, Jython is a broader integration platform. Jython compiles Python code to Java bytecode for execution on the JVM. The resulting Java-based system directly supports two kinds of integration:
Extending: Jython uses Java’s reflection API to allow Python programs to call out to Java class libraries automatically. The Java reflection API provides Java type information at runtime and serves the same purpose as the glue code we’ve generated to plug C libraries into Python in this part of the book. In Jython, however, this runtime type information allows largely automated resolution of Java calls in Python scripts—no glue code has to be written or generated.
Embedding: Jython also provides a Java
PythonInterpreterclass API that allows Java programs to run Python code in a namespace, much like the C API tools we’ve used to run Python code strings from C programs. In addition, because Jython implements all Python objects as instances of a JavaPyObjectclass, it is straightforward for the Java layer that encloses embedded Python code to process Python objects.
In other words, Jython allows Python to be both extended and embedded in Java, much like the C integration strategies we’ve seen in this part of the book. By adding a simpler scripting language to Java applications, Jython serves many of the same roles as the C integration tools we’ve studied.
On the downside, Jython tends to lag behind CPython developments, and its reliance on Java class libraries and execution environments introduces Java dependencies that may be a factor in some Python-oriented development scenarios. Nevertheless, Jython provides a remarkably seamless integration model and serves as an ideal scripting language for Java applications. For more on Jython, check it out online at http://www.jython.org and search the Web at large.
- IronPython: C#/.NET integration
Also mentioned earlier, IronPython does for C#/.NET what Jython does for Java (and in fact shares a common inventor)—it provides seamless integration between Python code and software components written for the .NET framework, as well as its Mono implementation on Linux. Like Jython, IronPython compiles Python source code to the .NET system’s bytecode format and runs programs on the system’s runtime engine. As a result, integration with external components is similarly seamless. Also like Jython, the net effect is to turn Python into an easy-to-use scripting language for C#/.NET-based applications and a general-purpose rapid development tool that complements C#. For more details on IronPython, visit http://www.ironpython.org or your friendly neighborhood search engine.
- COM integration on Windows
COM defines a standard and language-neutral object model with which components written in a variety of programming languages may integrate and communicate. Python’s PyWin32 Windows extension package allows Python programs to implement both server and client in the COM interface model. As such, it provides an automated way to integrate Python programs with programs written in other COM-aware languages such as Visual Basic. Python scripts can also use COM calls to script Microsoft applications such as Word and Excel, because these systems register COM object interfaces. On the other hand, COM implies a level of dispatch indirection overhead and is not as platform agnostic as other approaches listed here. For more information on COM support and other Windows extensions, see the Web and refer to O’Reilly’s Python Programming on Win32, by Mark Hammond and Andy Robinson.
- CORBA integration
There is also much open source support for using Python in the context of a CORBA-based application. CORBA stands for the Common Object Request Broker; it’s a language-neutral way to distribute systems among communicating components, which speak through an object model architecture. As such, it represents another way to integrate Python components into a larger system. Python’s CORBA support includes public domain systems such OmniORB. Like COM, CORBA is a large system—too large for us to even scratch the surface in this text. For more details, search the Web.
- Other languages
As we discussed at the end of our extending coverage, you’ll also find direct support for mixing Python with other languages, including FORTRAN, Objective-C, and others. Many support both extending (calling out to the integrated languages) as well as embedding (handling calls from the integrated language). See the prior discussion and the Web for more details. Some observers might also include the emerging pyjamas system in this category—by compiling Python code to JavaScript code, it allows Python programs to access AJAX and web browser–based APIs in the context of the Rich Internet Applications discussed earlier in this book; see Chapters 7, 12, and 16.
- Network-based integration protocols
Finally, there is also support in the Python world for Internet-based data transport protocols, including SOAP, and XML-RPC. By routing calls across networks such systems support distributed architectures, and give rise to the notion of web services. XML-RPC is supported by a standard library module in Python, but search the Web for more details on these protocols.
As you can see, there are many options in the integration domain. Perhaps the best parting advice I can give you is simply that different tools are meant for different tasks. C extension modules and types are ideal at optimizing systems and integrating libraries, but frameworks offer other ways to integrate components—Jython and IronPython for using Java and .NETs, COM for reusing and publishing objects on Windows, XML-RPC for distributed services, and so on. As always, the best tools for your programs will almost certainly be the best tools for your programs.
[72] For a concrete example, consider the discussion of server-side templating languages in the Internet part of this book. Such systems usually fetch Python code embedded in an HTML web page file, assign global variables in a namespace to objects that give access to the web browser’s environment, and run the Python code in the namespace where the objects were assigned. I worked on a project where we did something similar, but Python code was embedded in XML documents, and objects that were preassigned to globals in the code’s namespace represented widgets in a GUI. At the bottom, it was simply Python code embedded in and run by C code.