
This section introduces three widget types: the Checkbutton (a multiple-choice input
widget), the Radiobutton (a
single-choice device), and the Scale (sometimes known as a “slider”). All
are variations on a theme and are somewhat related to simple buttons,
so we’ll explore them as a group here. To make these widgets more fun
to play with, we’ll reuse the dialogTable module shown in Example 9-8 to provide callbacks
for widget selections (callbacks pop up dialog boxes). Along the way,
we’ll also use the Tkinter variables we just met to communicate with
these widgets’ state settings.
The Checkbutton and
Radiobutton widgets are designed
to be associated with Tkinter variables: clicking the button changes
the value of the variable, and setting the variable changes the
state of the button to which it is linked. In fact, Tkinter
variables are central to the operation of these widgets:
A collection of
Checkbuttons implements a multiple-choice interface by assigning each button a variable of its own.A collection of
Radiobuttons imposes a mutually exclusive single-choice model by giving each button a unique value and the same Tkinter variable.
Both kinds of buttons provide both command and variable options. The command option lets you register a
callback to be run immediately on button-press events, much like
normal Button widgets. But by
associating a Tkinter variable with the variable option, you can also fetch or
change widget state at any time by fetching or changing the value of
the widget’s associated variable.
Since it’s a bit simpler than the others, let’s start with the
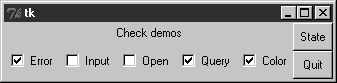
Tkinter Checkbutton. Example 9-22 creates the set of
five captured in Figure
9-26. To make this more useful, it also adds a button that
dumps the current state of all Checkbuttons and attaches an instance of
the Quitter button we built earlier in the tour.
Example 9-22. PP3EGuiTourdemoCheck.py
from Tkinter import *             # get base widget set
from dialogTable import demos     # get canned dialogs
from quitter import Quitter       # attach a quitter object to "me"

class Demo(Frame):
    def _ _init_ _(self, parent=None, **args):
        Frame._ _init_ _(self, parent, args)
        self.pack( )
        self.tools( )
        Label(self, text="Check demos").pack( )
        self.vars = []
        for key in demos.keys( ):
            var = IntVar( )
            Checkbutton(self,
                        text=key,
                        variable=var,
                        command=demos[key]).pack(side=LEFT)
            self.vars.append(var)
    def report(self):
        for var in self.vars:
            print var.get( ),   # current toggle settings: 1 or 0
        print
    def tools(self):
        frm = Frame(self)
        frm.pack(side=RIGHT)
        Button(frm, text='State', command=self.report).pack(fill=X)
        Quitter(frm).pack(fill=X)

if _ _name_ _ == '_ _main_ _': Demo().mainloop( )
In terms of program code, check buttons resemble normal
buttons; they are even packed within a container widget.
Operationally, though, they are a bit different. As you can probably
tell from this figure (and can better tell by running this live), a
check button works as a toggle—pressing one changes its state from
off to on (from deselected to selected); or from on to off again.
When a check button is selected, it has a checked display, and its
associated IntVar variable has a
value of 1; when deselected, its
display is empty, and its IntVar
has a value of 0.
To simulate an enclosing application, the State button in this
display triggers the script’s report method to display the current
values of all five toggles on the stdout stream. Here is the output after a
few clicks:
C:...PP3EGuiTour>python demoCheck.py
0 0 0 0 0
1 0 0 0 0
1 0 1 0 0
1 0 1 1 0
1 0 0 1 0
1 0 0 1 1
Really, these are the values of the five Tkinter variables
associated with the Checkbuttons
with variable options, but they
give the buttons’ values when queried. This script associates
IntVar variables with each
Checkbutton in this display,
since they are 0 or 1 binary indicators. StringVars will work here too, although
their get methods would return
strings '0' or '1' (not integers), and their initial
state would be an empty string (not the integer 0).
This widget’s command
option lets you register a callback to be run each time the button
is pressed. To illustrate, this script registers a standard dialog
demo call as a handler for each of the Checkbuttons: pressing a button changes
the toggle’s state but also pops up one of the dialog windows we
visited earlier in this tour.
Interestingly, you can run the report method interactively too. When
working this way, widgets pop up as lines are typed, and are fully
active, even without calling mainloop:
C:...PP3EGuiTour>python>>>from demoCheck import Demo>>>d = Demo( )>>>d.report( )0 0 0 0 0 >>>d.report( )1 0 0 0 0 >>>d.report( )1 0 0 1 1
When I first studied this widget, my initial reaction was: Why do we need Tkinter variables here at all when we can register button-press callbacks? Linked variables may seem superfluous at first glance, but they simplify some GUI chores. Instead of asking you to accept this blindly, though, let me explain why.
Keep in mind that a Checkbutton’s command callback will be run on every
press, whether the press toggles the check button to a selected or
a deselected state. Because of that, if you want to run an action
immediately when a check button is pressed, you will generally
want to check the button’s current value in the callback handler.
Because there is no check button “get” method for fetching values,
you usually need to interrogate an associated variable to see if
the button is on or off.
Moreover, some GUIs simply let users set check buttons
without running command
callbacks at all and fetch button settings at some later point in
the program. In such a scenario, variables serve to automatically
keep track of button settings. The demoCheck script’s report method represents this latter
approach.
Of course, you could manually keep track of each button’s
state in press callback handlers, too. Example
9-23 keeps its own list of state toggles and updates it
manually on command press
callbacks.
Example 9-23. PP3EGuiTourdemo-check-manual.py
# check buttons, the hard way (without variables)

from Tkinter import *
states = []
def onPress(i):                        # keep track of states
    states[i] = not states[i]          # changes 0->1, 1->0

root = Tk( )
for i in range(10):
    chk = Checkbutton(root, text=str(i), command=(lambda i=i: onPress(i)) )
    chk.pack(side=LEFT)
    states.append(0)
root.mainloop( )
print states                           # show all states on exit
The lambda here passes along the pressed button’s index in
the states list. Otherwise, we
would need a separate callback function for each button. Here
again, we need to use a default argument to pass the loop variable
into the lambda, or the loop variable will be its value on the
last loop iteration for all 10 of the generated functions (each
press would update the tenth item in the list; see Chapter 8 for background details).
When run, this script makes the 10-check button display in Figure 9-27.

Manually maintained state toggles are updated on every
button press and are printed when the GUI exits (technically, when
the mainloop call
returns):
C:...PP3EGuiTour>python demo-check-manual.py
[0, 0, 1, 0, 1, 0, 0, 0, 1, 0]
This works, and it isn’t too horribly difficult to manage manually. But linked Tkinter variables make this task noticeably easier, especially if you don’t need to process check button states until some time in the future. This is illustrated in Example 9-24.
Example 9-24. PP3EGuiTourdemo-check-auto.py
# check buttons, the easy way

from Tkinter import *
root = Tk( )
states = []
for i in range(10):
    var = IntVar( )
    chk = Checkbutton(root, text=str(i), variable=var)
    chk.pack(side=LEFT)
    states.append(var)
root.mainloop( )                                # let Tkinter keep track
print map((lambda var: var.get( )), states)     # show all states on exit
This looks and works the same way, but there is no command button-press callback handler at
all, because toggle state is tracked by Tkinter
automatically:
C:...PP3EGuiTour>python demo-check-auto.py
[0, 0, 1, 0, 0, 0, 1, 0, 0, 0]
The point here is that you don’t necessarily have to link
variables with check buttons, but your GUI life will be simpler if
you do. The bound-method map call in this code, by the way, is
equivalent to both the unbound-method form map (IntVar.get, states), as well as the
list comprehension [var.get( ) for var in
states] (the form that seems clearest to you may very
well depend upon your shoe size).
Radio buttons are toggles too, but they are generally
used in groups: just like the mechanical station selector
pushbuttons on radios of times gone by, pressing one Radiobutton widget in a group
automatically deselects the one pressed last. In other words, at
most, only one can be selected at one time. In Tkinter, associating
all radio buttons in a group with unique values and the same
variable guarantees that, at most, only one can ever be selected at
a given time.
Like check buttons and normal buttons, radio buttons support a
command option for registering a
callback to handle presses immediately. Like check buttons, radio
buttons also have a variable
attribute for associating single-selection buttons in a group and
fetching the current selection at arbitrary times.
In addition, radio buttons have a value attribute that lets you tell Tkinter
what value the button’s associated variable should have when the
button is selected. Because more than one radio button is associated
with the same variable, you need to be explicit about each button’s
value (it’s not just a 1 or 0 toggle scenario). Example 9-25 demonstrates radio
button basics.
Example 9-25. PP3EGuiTourdemoRadio.py
from Tkinter import *                # get base widget set
from dialogTable import demos        # button callback handlers
from quitter import Quitter          # attach a quit object to "me"

class Demo(Frame):
    def _ _init_ _(self, parent=None):
        Frame._ _init_ _(self, parent)
        self.pack( )
        Label(self, text="Radio demos").pack(side=TOP)
        self.var = StringVar( )
        for (key, value) in demos.items( ):
            Radiobutton(self, text=key,
                              command=self.onPress,
                              variable=self.var,
                              value=key).pack(anchor=NW)
        Button(self, text='State', command=self.report).pack(fill=X)
        Quitter(self).pack(fill=X)
    def onPress(self):
        pick = self.var.get( )
        print 'you pressed', pick
        print 'result:', demos[pick]( )
    def report(self):
        print self.var.get( )

if _ _name_ _ == '_ _main_ _': Demo().mainloop( )
Figure 9-28 shows
what this script generates when run. Pressing any of this window’s
radio buttons triggers its command handler, pops up one of the
standard dialog boxes we met earlier, and automatically deselects
the button previously pressed. Like check buttons, radio buttons are
packed; this script packs them to the top to arrange them
vertically, and then anchors each on the northwest corner of its
allocated space so that they align well.
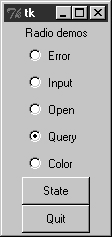
Like the check button demo script, this one also puts up a
State button to run the class’s report method and to show the current
radio state (the button selected). Unlike the check button demo,
this script also prints the return values of dialog demo calls that
are run as its buttons are pressed. Here is what the stdout stream looks like after a few
presses and state dumps; states are shown in bold:
C:...PP3EGuiTour>python demoRadio.pyyou pressed Input result: 3.14Inputyou pressed Open result: C:/PP2ndEd/examples/PP3E/Gui/Tour/demoRadio.pyOpenyou pressed Query result: yesQuery
So, why variables here? For one thing, radio
buttons also have no “get” widget method to fetch the
selection in the future. More importantly, in radio button groups,
the value and variable settings turn out to be the
whole basis of single-choice behavior. In fact, to make radio
buttons work normally at all, it’s crucial that they are all
associated with the same Tkinter variable and have distinct value
settings. To truly understand why, though, you need to know a bit
more about how radio buttons and variables do their stuff.
We’ve already seen that changing a widget changes its associated Tkinter variable, and vice versa. But it’s also true that changing a variable in any way automatically changes every widget it is associated with. In the world of radio buttons, pressing a button sets a shared variable, which in turn impacts other buttons associated with that variable. Assuming that all buttons have distinct values, this works as you expect it to work. When a button press changes the shared variable to the pressed button’s value, all other buttons are deselected, simply because the variable has been changed to a value not their own.
This ripple effect is a bit subtle, but it might help to know that within a group of radio buttons sharing the same variable, if you assign a set of buttons the same value, the entire set will be selected if any one of them is pressed. Consider Example 9-26 and Figure 9-29, for instance; because radio buttons 0, 3, 6, and 9 have value 0 (the remainder of division by 3), all are selected if any are selected.

Example 9-26. PP3EGuiTourdemo-radio-multi.py
# see what happens when some buttons have same value

from Tkinter import *
root = Tk( )
var = StringVar( )
for i in range(10):
    rad = Radiobutton(root, text=str(i), variable=var, value=str(i % 3))
    rad.pack(side=LEFT)
root.mainloop( )
If you press 1, 4, or 7 now, all three of these are
selected, and any existing selections are cleared (they don’t have
the value “1”). That’s not normally what you want, so be sure to
give each button the same variable but a unique value if you want
radio buttons to work as expected. In the demoRadio script, for instance, the name
of the demo provides a naturally unique value for each
button.
In Example
9-27, too, you could implement a single-selection model
without variables, by manually selecting and deselecting widgets
in the group, in a callback handler of your own. On each press
event, for example, you could issue deselect calls for every widget object
in the group and select the one
pressed.
Example 9-27. PP3EGuiTourdemo-radio-manual.py
# radio buttons,
 the hard way (without variables)
# note that deselect for radio buttons simply sets the button's
# associated value to a null string, so we either need to still
# give buttons unique values, or use checkbuttons here instead;

from Tkinter import *
state = ''
buttons = []

def onPress(i):
    global state
    state = i
    for btn in buttons:
        btn.deselect( )
    buttons[i].select( )

root = Tk( )
for i in range(10):
    rad = Radiobutton(root, text=str(i),
                            value=str(i), command=(lambda i=i: onPress(i)) )
    rad.pack(side=LEFT)
    buttons.append(rad)
root.mainloop( )
print state               # show state on exit
This works. It creates a 10-radio button window that looks just like the one in Figure 9-29 but implements a single-choice radio-style interface, with current state available in a global Python variable printed on script exit. By associating Tkinter variables and unique values, though, you can let Tkinter do all this work for you, as shown in Example 9-28.
Example 9-28. PP3EGuiTourdemo-radio-auto.py
# radio buttons, the easy way

from Tkinter import *
root = Tk( )                     # IntVars work too
var  = IntVar()                   # state = var.get( )
for i in range(10):
    rad = Radiobutton(root, text=str(i), value=i, variable=var)
    rad.pack(side=LEFT)
root.mainloop( )
print var.get( )                 # show state on exit
This works the same way, but it is a lot less to type and
debug. Notice that this script associates the buttons with an
IntVar, the integer type
sibling of StringVar; as long
as button values are unique, integers work fine for radio buttons
too.
One minor word of caution: you should generally hold
onto the Tkinter variable object used to link radio buttons for as
long as the radio buttons are displayed. Assign it to a module
global variable, store it in a long-lived data structure, or save
it as an attribute of a long-lived class object as done by
demoRadio. Just make sure you
retain a reference to it somehow. You will normally fetch state
anyhow, so it’s unlikely that you’ll ever care about what I’m
about to tell you.
But in the current Tkinter, variable classes have a _ _del_ _ destructor that automatically
unsets a generated Tk variable
when the Python object is reclaimed (i.e., garbage collected). The
upshot is that all of your radio buttons may be deselected if the
variable object is collected, at least until the next press resets
the Tk variable to a new value.
Example 9-29 shows one
way to trigger this.
Example 9-29. PP3EGuiTourdemo-radio-clear.py
# hold on to your radio variables (an obscure thing, indeed)

from Tkinter import *
root = Tk( )

def radio1( ):                   # local vars are temporary
    #global tmp                   # making it global fixes the problem
    tmp = IntVar( )
    for i in range(10):
        rad = Radiobutton(root, text=str(i), value=i, variable=tmp)
        rad.pack(side=LEFT)
    tmp.set(5)

radio1( )
root.mainloop( )
This should come up with button 5 selected initially, but it
doesn’t. The variable referenced by local tmp is reclaimed on function exit, the
Tk variable is unset, and the 5
setting is lost (all buttons come up unselected). These radio
buttons work fine, though, once you start pressing them, because
that resets the Tk variable.
Uncommenting the global
statement here makes 5 start out set, as expected.
Of course, this is an atypical example—as coded, there is no
way to know which button is pressed, because the variable isn’t
saved (and command isn’t set).
In fact, this is so obscure that I’ll just refer you to
demo-radio-clear2.py in the book’s examples
distribution for an example that works hard to trigger this oddity
in other ways. You probably won’t care, but you can’t say that I
didn’t warn you if you ever do.
Scales (sometimes called “sliders”) are used to select among a range of numeric values. Moving the scale’s position with mouse drags or clicks moves the widget’s value among a range of integers and triggers Python callbacks if registered.
Like check buttons and radio buttons, scales have both a command option for registering an
event-driven callback handler to be run right away when the scale is
moved, and a variable option for
associating a Tkinter variable that allows the scale’s position to
be fetched and set at arbitrary times. You can process scale settings
when they are made, or let the user pick a setting for later
use.
In addition, scales have a third processing option—get and set methods
that scripts may call to access scale values directly without
associating variables. Because scale command movement callbacks also get the
current scale setting value as an argument, it’s often enough just
to provide a callback for this widget, without resorting to either
linked variables or get/set method calls.
To illustrate the basics, Example 9-30 makes two scales—one horizontal and one vertical—and links them with an associated variable to keep them in sync.
Example 9-30. PP3EGuiTourdemoScale.py
from Tkinter import *                # get base widget set
from dialogTable import demos        # button callback handlers
from quitter import Quitter          # attach a quit frame to me

class Demo(Frame):
    def _ _init_ _(self, parent=None):
        Frame._ _init_ _(self, parent)
        self.pack( )
        Label(self, text="Scale demos").pack( )
        self.var = IntVar( )
        Scale(self, label='Pick demo number',
                    command=self.onMove,                   # catch moves
                    variable=self.var,                     # reflects position
                    from_=0, to=len(demos)-1).pack( )
        Scale(self, label='Pick demo number',
                    command=self.onMove,                   # catch moves
                    variable=self.var,                     # reflects position
                    from_=0, to=len(demos)-1,
                    length=200, tickinterval=1,
                    showvalue=YES, orient='horizontal').pack( )
        Quitter(self).pack(side=RIGHT)
        Button(self, text="Run demo", command=self.onRun).pack(side=LEFT)
        Button(self, text="State",    command=self.report).pack(side=RIGHT)
    def onMove(self, value):
        print 'in onMove', value
    def onRun(self):
        pos = self.var.get( )
        print 'You picked', pos
        pick = demos.keys( )[pos]    # map from position to key
        print demos[pick]( )
    def report(self):
        print self.var.get( )

if _ _name_ _ == '_ _main_ _':
    print demos.keys( )
    Demo().mainloop( )
Besides value access and callback registration, scales have options tailored to the notion of a range of selectable values, most of which are demonstrated in this example’s code:
The
labeloption provides text that appears along with the scale,lengthspecifies an initial size in pixels, andorientspecifies an axis.The
from_andtooptions set the scale range’s minimum and maximum values (note thatfromis a Python reserved word, butfrom_is not).The
tickintervaloption sets the number of units between marks drawn at regular intervals next to the scale (the default means no marks are drawn).The
resolutionoption provides the number of units that the scale’s value jumps on each drag or left mouse click event (defaults to 1).The
showvalueoption can be used to show or hide the scale’s current value next to its slider bar (the defaultshowvalue=YESmeans it is drawn).
Note that scales are also packed in their container, just like other Tkinter widgets. Let’s see how these ideas translate in practice; Figure 9-30 shows the window you get if you run this script live on Windows (you get a similar one on Unix and Mac machines).
For illustration purposes, this window’s State button shows
the scales ' current values, and “Run demo” runs a standard
dialog call as before using the integer value of the scales to index
the demos table. The script also registers a command handler that fires every time
either of the scales is moved, and prints their new positions. Here
is a set of messages sent to stdout after a few moves, demo runs
(italic), and state requests (bold):
C:...PP3EGuiTour>python demoScale.py['Error', 'Input', 'Open', 'Query', 'Color'] in onMove 0 in onMove 0 in onMove 11in onMove 2You picked 2C:/PP2ndEd/examples/PP3E/Gui/Tour/demoScale.pyin onMove 33You picked 3yes
As you can probably tell, scales offer a variety of
ways to process their selections: immediately in move callbacks,
or later by fetching current positions with variables or scale
method calls. In fact, Tkinter variables aren’t needed to program
scales at all—simply register movement callbacks, or call the
scale get method to fetch scale
values on demand, as in the simpler scale example in Example 9-31.
Example 9-31. PP3EGuiTourdemo-scale-simple.py
from Tkinter import *
root = Tk( )
scl = Scale(root, from_=-100, to=100, tickinterval=50, resolution=10)
scl.pack(expand=YES, fill=Y)
def report(): print scl.get( )
Button(root, text='state', command=report).pack(side=RIGHT)
root.mainloop( )
Figure 9-31
shows two instances of this program running on Windows—one
stretched and one not (the scales are packed to grow vertically on
resizes). Its scale displays a range from -100 to 100, uses the
resolution option to adjust the
current position up or down by 10 on every move, and sets the
tickinterval option to show
values next to the scale in increments of 50. When you press the
State button in this script’s window, it calls the scale’s
get method to display the
current setting, without variables or callbacks of any
kind:
C:...PP3EGuiTour>python demo-scale-simple.py
0
60
-70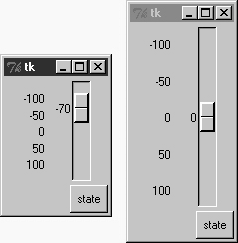
Frankly, the only reason Tkinter variables are used in the
demoScale script at all is to
synchronize scales. To make the demo interesting, this script
associates the same Tkinter variable object with both scales. As
we learned in the last section, changing a widget changes its
variable, but changing a variable also changes all the widgets it
is associated with. In the world of sliders, moving the slide
updates that variable, which in turn might update other widgets
associated with the same variable. Because this script links one
variable with two scales, it keeps them automatically in sync:
moving one scale moves the other too, because the shared variable
is changed in the process and so updates the other scale as a side
effect.
Linking scales like this may or may not be typical of your
applications (and borders on deep magic), but it’s a powerful tool
once you get your mind around it. By linking multiple widgets on a display with Tkinter
variables, you can keep them automatically in sync, without making
manual adjustments in callback handlers. On the other hand, the
synchronization could be implemented without a shared variable at
all by calling one scale’s set
method from a move callback handler of the other. I’ll leave such
a manual mutation as a suggested exercise, though. One person’s
deep magic might be another’s evil hack.