
Node.js is an Open Source Platform which is used for the server page execution of JavaScript. The core of Node.js forms the in C/C++ written and therefore fast JavaScript implementation V8, which compiles the JavaScript code before the execution in native machine code.
Besides that, Node.js covers integrated modules , e.g., the HTTP module, in order to host a web server. Further modules can be installed with the ‘every day used’ npm package manager.
The asynchronous architecture of JavaScript makes a parallel processing of, for example, Client connections or database accesses.
With Node.js (short: Node), it’s possible to provide high-performance network and particularly Web applications, which can communicate with the Web browser (with the assistance of a WebSocket connection) even in real time. Since modern Web browsers—just like Node—use JavaScript, code can be delivered to both sides and partly used together. However, it is important to note, that now you must only know one programming language in order to provide the entire Web application.
Elementary in JavaScript
This text assumes that you can read JavaScript halfway fluently. Even if this is the case, it can be that some examples are nevertheless more complex. Usually it is because of callback methods that the code appears unclear.
Read the following example attentively:
1 function action(v) {2 console.log(v);3 }45 function execute(value, callback) {6 callback(value);7 }89 execute("Hallo Node", action);
Here, a function is agreed upon (line 1) which later (line 9) is used as a callback function of the actual work function (line 5). Thus, functions can be agreed upon, basically implementing options. This is very often used in Node, e.g., with evaluating a request, where the callback takes place, if the request was received, and the method parameter reached via the request values.
Since JavaScript has in each case only one thread it is different than in other programming languages) the use of asynchronous procedures is enormously important. Otherwise, a call could block all the following calls. Asynchrony becomes controllable by the use of callback functions .
Installation and Configuration
This section shows the basic configuration and the structure of a first Node environment. That also includes the use of the package manager.
Configuration in package.json
Every Node application contains a file with the name package.json. Thus, the project can be configured. The file extensions that it concerns are an object in the JSON style. JSON stands for JavaScript Object Notation and can be simply processed by JavaScript.
Here is an example of how such a file can look:
1 {2 "name": "book-exampleproject",3 "version": "1.0.0",4 "description": "This is a project with book examples.",5 "main": "server.js",6 "repository": {7 "type": "git",8 "url": "https://github.com/joergisageek/nodejs-samples"9 },10 "dependencies": {11 "express": "latest",12 "mongoose": "latest"13 },14 "author": "Joerg Krause",15 "license": "MIT",16 "homepage": "http://www.joergkrause.de"17 }
Pay attention to subordinated objects, such as dependencies or repository. In each case, the name of the features can be seen on the left; on the right, the data. These can also be objects. This goes on until scalar types are used, like character strings or numbers.
Actually, not everything is needed here. The simplest file could also look as follows:
1 {2 "name": "book-exampleproject",3 "main": "server.js"4 }
Thus the project has a name and it has a starting file—the re-entry point for the JavaScript interpreter. With server.js the processing of the project begins.
Initialize the Node Application
The following section first shows how you make the structure of the application on the command line of a Linux system. In the inspection examples, and for making the screen photos, Ubuntu was used. However, it should require for every *nix-system a comparable operational sequence.
Subsequently, the most important steps for a Windows system and a Visual Studio 2015 are shown.
Approach under Linux
As already described, Node starts the application over the instructions in the file package.json. So that nothing runs wrongly, there is an npm command that creates the file npm init. In order to start with a new Node application, you need to proceed as follows:
Produce a folder: mkdir book-project.
Change into this folder: cd book-project.
Initialize the project: npm init.
You can leave the interactively queried parameters unchanged the first time. Designate only the starting file in server.js. The Node application is now ready for launch—even if not much meaningful happens yet—and can be started.
Start a Node Application
In principle, the start takes place via call of the executable file node (Linux) and/or node.exe (Windows). The script runs and ends immediately again. The program is terminated. If it is to run permanently, this must be programmed in server.js accordingly. If the script runs and you want to terminate it on the command line, use the key combination ‘CTRL + C’. In practice, as already described, you’ll use npm for the start if you are using Linux. Under Windows with Visual Studio F5, (Debug ➤ Start Debugging) is the simplest way to start locally.
Automatic Restart
When it comes to changes, these should be examined as simply as possible. Thus the program must be first stopped and started again—what a annoying procedure! However, that can be automated, as changes at a file are supervised.
The npm package nodemon supplies this function. Install this first globally:
npm install -g nodemonThen, don’t start with ‘node’, but with ‘nodemon’:
nodemon server.jsnode server.js
Alternatively, npm can be used in the current folder:
npm startSince at this moment server.js does not exist, an error message will occur.
![]() ‘npm start’ versus ‘node server.js’
‘npm start’ versus ‘node server.js’
!> When a starting script is agreed upon in the file package.json, then you can start it with npm start. If no starting script exists, then Node implements internally node server.js. server.js is here the exemplarily used application script. The starting script is important (in order to settle actions before the execution) as an example to translate LESS files in CSS or for transpiling TypeScript into JavaScript. To that extent, you’re always on the safe side with npm start.
Approach under Windows
This section presupposes that you installed Visual Studio 2015. Most functions for Node and the accesses to the Repositories are already finished and/or present.
 Path length
The functions with Visual Studio are very simple and comfortable. Above all, the Debugger is a genuine assistance. Unfortunately, Windows still has a delimitation of the path length on 260 characters. Many under Linux-provided packages use deep path structures. You should start with a master path like D:Apps or C:Dev and in no case with the default path of Visual Studio, which is already about 100 characters. Keep the project names as short as possible.
A new simple Node project is produced with the Blank Node.js Web Application.
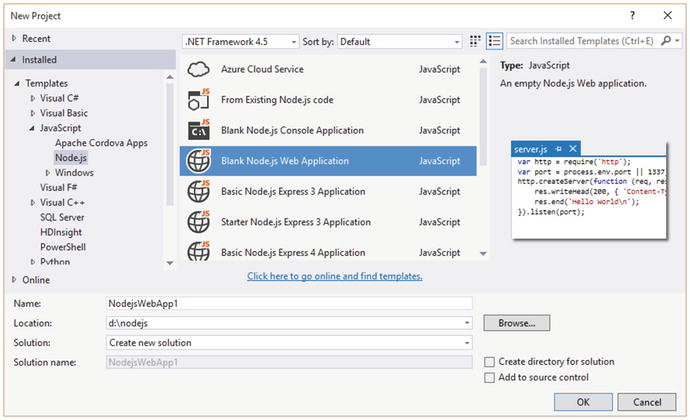
Figure 3-1. Node.js Project template
As already described, Node starts the application over the instructions in the file package.json. This file is already present in the new project. As a starting file you should use server.js. The Node application is now already ready to launch—even if not much happens yet—and can be started. As always, simply press F5. Node starts in a console and the browsers open with the output “Hello World”. This output was produced by the project template.
In the further process of the text, the procedure for Visual Studio is not shown each time, but uses the command line version for Linux. The differences are small and in the following table summarized.
Table 3-1. Differences Linux/Windows
Action | Linux | Windows+VS 2015 |
|---|---|---|
Start | npm start | F5 |
Install package | npm install pkg | Context menu in folder ‘npm’: Install new Package |

Figure 3-2. npm packages with Visual Studio 2015
The first Application
The first application should be particularly simple. The simplest version of the package.json file looks as follows:
1 {2 "name": "book-project",3 "main": "server.js"4 }
Since this configuration refers to server.js, this script will be provided next. So that you see the fact that it functions, it should only produce expenditures by the means of ‘console.log’.
1 console.log('Our first node-Applikation');Start the application as described before.
Packages
Packages extend the functionality of an application. But that’s because Node isn’t just there for Web applications, but also operating system–independent programs and thus server page functions. Also, for a simple project additional packages are needed. Node is very slim and modular. Since Node is has package management npm connected, both programs are used for both use and administration.
Install Packages
In the configuration file package.json dependence of further packages is defined, besides to the application, of course. You can enter the packages manually or leave this to the installation process.
Here is an example, in which the package “Express” with the version “4.8.6” is defined as an additional dependence.
1 {2 "name": "book-project",3 "main": "server.js",4 "dependencies": {5 "express": "∼4.8.6"6 }7 }
The version number was introduced with a tilde ‘∼’. This procedure—the tilde is only one of many possibilities—for its versions serves to strengthen its semantic information. Packages are developed very fast, and with many dependencies it can be difficult to remain both current and operator-safe. The tilde ensures the fact that the most current version in the subordinated cycle is used. The version of the third stage may change, but the second one not. If a package with the version 4.8.7 or 4.8.9 appears, then this is used. However, if 4.9.0 appears, then it is not used. The untested transferred to such a released would be too risky.
 Versions
Versions are indicated in four stages: major, minor, patch, build. The fourth example is “Express,” a main version number which stands stable for a long time and only changes for specific reasons. 8 is the current development cycle. 6 is the patch level. Corrections and smaller adjustments will appear here. The build number is often used only internally and is not distributed at package administrations.
A further method is the installation of packages over the command line—concretely the command line tool (or Command Line Interface, cli)—npm. Usually this is faster and simpler. You must only decide whether the package is made available only locally for only one application or globally for all future projects.
The command reads:
npm install <PaketName> --saveFollow the command in the folder of the application and use the option ‘–save’, then the entry in the file package.json will appear automatically. The package (thus, the files of which it consists) is put down in a folder with the name node_modules.
Now it can occur that you have packages in the file package.json, which are not currently installed. The call of the Repository must still take place. In addition it is sufficient to call the folder, in which the file package.json lies, and do the following :
npm installDependence on further packages dissolves the command itself.
If several pages are to be installed, then these can be indicated in a command (here: express, mongoose and pass):
npm install express mongoose passport --saveThe complete installation of an environment for developing in Node thus only needs a few commands:
npm init initializes a standard environment
package.json configures this environment
npm install loads the necessary packages
Provide a Server Application
Node is a server application. This must be started, so that requests are implemented to be worked on and able to take actions. While with Node very much can be programmed—up to desktop applications—the application of standards is a Web application. There is therefore a library, which takes over basic tasks of a Web application Express. Most examples, which you find on platforms such as Stackoverflow 1, use Express.
 More about Express
Express itself has its own chapter. In the appendix you can find a command overview in addition.
However, the first step in Node should take place without Express, in order to see the simplest example possible. This introduction text emulates consciously some functions of Express, in order to make the totally enclosed functionality understandable.
The simplest Server
Basis of the application are three files:
package.json
server.js
index.html
package.jsonwas already regarded—this configures the application. server.js is the active re-entry point—there the script starts. index.html is a static HTML page, which is exemplarily delivered here.
File: package.json
1 {2 "name": "http-server",3 "main": "server.js"4 }
File: index.html
1 <!DOCTYPE html>2 <html lang="en">3 <head>4 <meta charset="UTF-8">5 <title>The first page</title>6 <style>7 body {8 text-align:center;9 background:#EFEFEF;10 padding-top:50px;11 }12 </style>13 </head>14 <body>1516 <h1>Hello Node!</h1>1718 </body>19 </html>
The file server.jssupplies the active part:
File: server.js
1 var http = require('http');2 var fs = require('fs');3 var port = process.env.port || 1337;45 http.createServer(function (req, res) {6 console.log("Anforderung auf Port 1337")7 res.writeHead(200, {8 'Content-Type': 'text/html',9 'Access-Control-Allow-Origin': '*'10 });11 var read = fs.createReadStream(__dirname + '/index.html');12 read.pipe(res);13 }).listen(port);
Here, the first two components from Node are used: “http” and “fs”. The module “http” serves to program HTTP communication. With “fs” (File System), the access of a file system becomes possible. Therefore, everything is present which needs this program. The file index.htmlcan be read and sent.
Now start the project just as previously. If now, with the help of the browser, a call of the agreed-upon address http://localhost:1337 takes place, the example page appears and on the console the output “requirement on port 1337” appears.
 Port
Port
The port was here completely arbitrarily specified. There is no deeper meaning behind 1337. Take a free port more largely to 1000 for the first tests.
A Server with Express
Why Express has such outstanding importance is shown by the following example. It fulfills the same task with the same example file:
server.js with Express 4
1 var http = require('http');2 var express = require('express');3 var path = require('path');45 var port = process.env.port || 1337;6 var app = express();78 app.get('/', function (req, res) {9 res.sendFile(path.join(__dirname, '/index.html'));10 });1112 app.listen(port);13 console.log('Request with Express on Port 1337.');
For this to function, Express has to be installed first:
npm install express --saveThe advantage here is the abstraction of the HTTP level. You do not have to argue about the intricacies of protocols anymore. You do not have to worry about features of file access either.
Handling Requests
As the example with Express already showed, it mostly revolves around the processing of a specific URL and the determination suitable for such an action. This can take place directly with Node. In the beginning, it is meaningful to understand the mechanism behind it and to go on without complex modules.
Introduction to Routing
The process of passing on is generally called “Routing.” The URL is the “Route.” You will in practice always define several of such routes and give those callbacks, which are named with the suitable URL by which a request takes place. In addition, routes are connected with HTTP verbs, thus the commands possible in HTTP such as GET or POST.
Node makes the function “url.parse” available, in order to determine the components of a URL. In addition, one must certainly know these. The following illustration explains it:
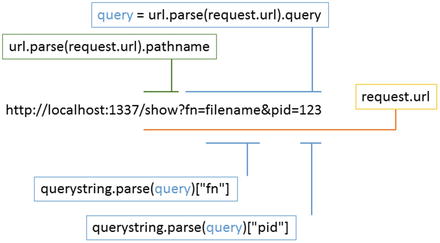
Figure 3-3. Components of a URL
In addition, the server is somewhat differently structured—indeed, as an independent module. You should make that very early, because JavaScript applications become very unclear very fast. The module in this example is called start.js:
Listing 3-1. Simple Server start.js
1 var http = require("http");2 var url = require("url");34 function start() {56 console.log("Starting.");78 function onRequest(request, response) {9 var pathname = url.parse(request.url).pathname;10 console.log("Request for path " + pathname + " received.");11 response.writeHead(200, {12 "Content-Type": "text/plain"13 });14 response.write("The first Server");15 response.end();16 }1718 var port = process.env.port || 1337;19 http.createServer(onRequest).listen(port);20 console.log("Has been started.");2122 }2324 exports.start = start;
Modules are made available over the global instruction “exports.” The internal and the external name do not have to agree. However, it facilitates the maintenance to do this. The file server.jsnow looks as follows:
File: *server.js
1 var server = require('./start');23 server.start();

Figure 3-4. The Server recognizes the Paths
The application is now able to extract the path from the URL of the requesting Client. This is the starting point of the Routing. Typical routes are then:
/index
/logon
/logoff
/show
/show?fn=filename
Now, it is not particularly smart to pack the router logic into the server. Quickly, the logic becomes more complex and then the code very difficult. You also get a better feeling for the way such a router works if you separate the router function .
Create a new JavaScript file with the name router.js. This looks as follows:
File: router.js
1 function route(pathname) {2 console.log("Route for path requested: " + pathname);3 }4 exports.route = route;
This script still contains no functionality. However, first the connection with the first script is to be manufactured. The connection can be made directly or by draws to coupling. As a draft sample, Dependency Injection is used. A procedure with which the caller dependence can be called is injected from the outside.
 Dependency Injection
Read more about coupled architectures in the article by Martin Fowler that can be found here: http://martinfowler.com/articles/injection.html .
Now the new server function, the file server.js:
File: server.js
1 var server = require('./start');2 var router = require('./router');34 server.start(router);
The file start.js, which contains the application core, is still unchanged to a large extent. The new router function is only called, however it still does nothing meaningful except the console output.
Listing 3-2. start.js with Router
1 var http = require("http");2 var url = require("url");34 function start(router) {56 console.log("Startet.");78 function onRequest(request, response) {9 var pathname = url.parse(request.url).pathname;10 router.route(pathname);11 response.writeHead(200, {12 "Content-Type": "text/plain"13 });14 response.write("The first Server");15 response.end();16 }1718 var port = process.env.port || 1337;19 http.createServer(onRequest).listen(port);20 console.log("Was started.");2122 }2324 exports.start = start;
The calls of “require” then look for a suitable module and/or for a file with the indicated name. The exported names can then be called.
That access to “exports ” in the previous script is based on a global module, which always makes Node available.
The function onRequest is hidden in the starting function, so that it remains private. It is then handed over as a callback function to the method “createServer”. If a request arrives, Node will call the method onRequest, in order to begin processing.
Now the application can be started.
Architecture of the Application
Since now different actions for different routes are to be settled, the provided ones must be filled with the necessary logic. As a simple example, the call of a list of files (route /show) and the possibility are suitable to uploading files (route /upload). In addition, the first three methods are provided, which concern the execution:
home: the homepage
show: show the file list and download process of a file
upload: upload a file
Also, this part is made available as separate module.
File:handlers.js
1 function home() {2 console.log("Request 'home' called.");3 }4 function show() {5 console.log("Request 'show' called.");6 }7 function upload() {8 console.log("Request 'upload' called.");9 }10 exports.home = home;11 exports.show = show;12 exports.upload = upload;
The router now gets access to these functions, in order to take action when the route is called. So that the allocation is flexible, the routes are connected with processors over a JavaScript object.
File:server.js
1 var server = require("./start");2 var router = require("./router");3 var requestHandlers = require("./handlers");45 var handler = {};6 handler["/"] = requestHandlers.home;7 handler["/show"] = requestHandlers.show;8 handler["/upload"] = requestHandlers.upload;910 server.start(router.route, handler);
Now if the path is recognized (which originates from the list of the routes), the appropriate method is called. Action and execution are separate. What develops here is by way a kind of middleware (called the Framework), that is most frequently set under Node, but also Express Middleware. If the path /show is thus recognized, the function show()in requestHandlers is called.
Now the actual functionality can be implemented. Node has some reloadable modules , which supply the suitable functions
File:start.js
1 var http = require("http");2 var url = require("url");34 function start(route, handler) {5 function onRequest(request, response) {6 var pathname = url.parse(request.url).pathname;7 if (route(pathname, handler)) {8 response.writeHead(200, {9 "Content-Type": "text/plain"10 });11 response.write("Hello Router");12 response.end();13 } else {14 response.writeHead(404, {15 "Content-Type": "text/plain"16 });17 response.write("404 Not found");18 response.end();19 }20 }21 var port = process.env.port || 1337;22 http.createServer(onRequest).listen(port);23 console.log("Server started.");24 }2526 exports.start = start;
In this script, depending on each call the path will either be handled by the router and then send the regular answer with the HTTP status code 200 or it becomes—if the route was not recognized—the status code 404.
Now router.js extends. The call of the methods of the business logic now happens dynamically and it already exists in elementary error handling.
File:router.js
1 function route(pathname, handler) {2 console.log("Request for " + pathname);3 if (typeof handler[pathname] === 'function') {4 handler[pathname]();5 return true;6 } else {7 console.log("No Method found for " + pathname);8 return null;9 }10 }11 exports.route = route;
Here it will first be seen (line 3), whether a callback function for the appropriate path exists or not. JavaScript returns “undefined” if this is not the case, so that if this is not the case the “else” branch is implemented. If the function exists, it is called (line 4). The function can return something (which must still be implemented) and this return value is handed over later to the server and then sent to the client. Here only ‘true’ is returned, in order to show to the server that everything is correct.

Figure 3-5. Reaction to different Routes
Now you must create the actual functions of the business logic. In addition this must return something, because instead of the static text an output will take place in HTML to the browser.
The third version of the file start.js now shows how this works:
File: start.js
1 var http = require("http");2 var url = require("url");34 function start(route, handler) {5 function onRequest(request, response) {6 var pathname = url.parse(request.url).pathname;7 var content = route(pathname, handler);8 if (content) {9 response.writeHead(200, {10 "Content-Type": "text/plain"11 });12 response.write(content);13 response.end();14 } else {15 response.writeHead(404, {16 "Content-Type": "text/plain"17 });18 response.write("404 Not found");19 response.end();20 }21 }22 var port = process.env.port || 1337;23 http.createServer(onRequest).listen(port);24 console.log("Server started.");25 }2627 exports.start = start;
If the middleware functions now return HTML, Node will output this as soon as the suitable path is called. The delivery takes place in line 10, the output at the client at line 12.
The router now gives the values of the called logic functions back (line 4):
Datei: File.js
1 function route(pathname, handler) {2 console.log("Request for " + pathname);3 if (typeof handler[pathname] === 'function') {4 return handler[pathname]();5 } else {6 console.log("No Method found for " + pathname);7 return null;8 }9 }10 exports.route = route;
The business logic in handler.jsshould return something now instead of the expenditures to the browser invisible console:
File: handlers.js
1 function home() {2 return "Request 'home' called.";3 }4 function show() {5 return "Request 'show' called.";6 }7 function upload() {8 return "Request 'upload' called.";9 }10 exports.home = home;11 exports.show = show;12 exports.upload = upload;
So far, this functions and can be used. However, in the example we work with files. This can be problematic if the operations last for a while. Node is like each JavaScript implementation is single-threaded; thus, in each case only one request can be worked on. During high reading, this can lead to a bottleneck. Requirements should therefore always be treated asynchronously. While the server on the hard disk looks with the help of the operating system for files, Node can work on further requirements. Certainly, the file function must return to it immediately and a further callback function is necessary.
Synchronous and Asynchronous Calls
One differentiates here between synchronous and asynchronous calls. Synchronous calls do not block Node. Asynchronous, however, do. It is “best practice” in JavaScript to always program asynchronously.
The example uses file access functions , which Node makes available over the module “fs” (File System). The functions are asynchronous according to standard and, only if necessary, also synchronously usable.
Excerpt of handlers.js(synchronously)
1 var fs = require('fs');23 function home() {4 return fs.readFileSync('views/home.html');5 }
So that the programming won’t become excessively complex, it would be best to pass on the requirements in asynchronously working logic. Thus response object is handed over and the call of “write” and “end” now takes place over there.
File:start.js
1 var http = require("http");2 var url = require("url");34 function start(route, handler) {5 function onRequest(request, response) {6 var pathname = url.parse(request.url).pathname;7 var content = route(pathname, handler, response);8 if (!content) {9 response.writeHead(404, {10 "Content-Type": "text/plain"11 });12 response.write("404 Not found");13 response.end();14 }15 }16 var port = process.env.port || 1337;17 http.createServer(onRequest).listen(port);18 console.log("Server started.");19 }2021 exports.start = start;
The actual output was passed on to the logic (line 7). Only the case of an error is still treated here.
The logic begins with the abstraction over the router, which can be steered by the inversely connected configuration from the outside. The return of the output takes place with the call of the function in line 4 of the file router.js.
File: router.js
1 function route(pathname, handler, response) {2 console.log("Request for " + pathname);3 if (typeof handler[pathname] === 'function') {4 return handler[pathname](response);5 } else {6 console.log("No Method found for " + pathname);7 return null;8 }9 }10 exports.route = route;
In the file handlers.js, the call is now made asynchronously and the answer is provided via callback function. The module “fs” (File System) is doing good work by sending these to the browser.
Cutout of handlers.js(asynchronously)
1 var fs = require('fs');23 function home(response) {4 fs.readFile('views/home.html', function (err, data) {5 response.writeHead(200, {6 "Content-Type": "text/html"7 });8 response.write(data);9 response.end();10 });11 return true;12 }
Dynamic HTML
Without Template System, much HTML must be provided manually. Sometimes it is enough, but the following example also shows why Template Engines such as Pug are so famous.
The following extension assumes a folder with the name files exists. The function shows of the business logic is used in order to show all files in this folder.
Cutout of handlers.js(asynchronously)
1 var fs = require('fs');23 function show(response) {4 fs.readdir('files', function (err, list) {5 response.writeHead(200, { "Content-Type": "text/html" });6 var html = '<html><head></head>' +7 '<body><h1>File Manager</h1>';8 if (list.length) {9 html += "<ul>";10 for (i = 0; i < list.length; i++) {11 html += '<li><a href="/show?fn=' +12 list[i] + '">' +13 list[i] + '</a></li>';14 }15 html += "</ul>";16 } else {17 html += '<h2>No files found</h2>';18 }19 html += '</body></html>';20 response.write(html);21 response.end();22 });23 return true;24 }
Here the folder with ‘fs.readdir’ is read and a list of hyperlinks is created, one for each file. Now the files must arrive in the folder.
Sending HTML Files
First change the HTML file which is to be sent to the browser, as shown subsequently.
File: views/home.html
1 <html>2 <head>3 <meta http-equiv="Content-Type"4 content="text/html; charset=UTF-8" />5 </head>6 <body>7 <h1>File Manager</h1>8 <a href="/show">Show all Files</a>910 <form action="/upload" method="post">11 <input type="file" />12 <input type="submit" value="Upload file" />13 </form>14 </body>15 </html>
Now the logic already is able to load an HTML page from the hard disk and send it to the browser. In addition, it can show all files.
As coding (encoding), UTF-8 was selected here.
 UTF-8
UTF-8
Nowadays, all browsers support UTF-8 and the coding of special characters and umlauts are thereby absolutely possible. The “old” HTML entities such as & uum; for “ü” are obsolete. HTML 5 permits the information to the coding in minutes over the head field Content-Type or in the HTML head on one of the following Meta tags:
<meta charset="utf-8" /> <meta http-equiv="Content-Type" ‘ content=”text/html; charset=utf-8” />’
The information is to that extent somewhat irritating, since the character set (charset) is originally Unicode and this character set is then coded by the means of UTF-8. As developer you must only know that you send HTML pages as UTF-8 and then the suitable head field.
In the last example, the function upload is missing for the completion. Transferring files takes place together with other form data with the help of HTTP verb POST. Sending settles the browser if a form is used. The next step consists first of recognizing and limiting the verbs.
Restriction of Verbs
The already shown Code functions, however Node reacts to all HTTP verbs. That is critical in practice, because unreasonable ways are opened into the application. The restriction thus consists of reacting only to GET and/or POST.
POST is only needed, in order to transport data from the browser to the server. The server thus receives all other requests only with GET.
File: handlers.js
1 var fs = require('fs');23 function home(request, response) {4 if (request.method !== 'GET') {5 response.writeHead("405");6 response.end();7 }8 fs.readFile('views/home.html', function (err, data) {9 response.writeHead(200, { "Content-Type": "text/html" });10 response.write(data);11 response.end();12 });13 return true;14 }15 function show(request, response) {16 if (request.method !== 'GET') {17 response.writeHead("405");18 response.end();19 }20 fs.readdir('files', function (err, list) {21 response.writeHead(200, { "Content-Type": "text/html" });22 var html = '<html><head></head>' +23 '<body><h1>File Manager</h1>';24 if (list.length) {25 html += "<ul>";26 for (i = 0; i < list.length; i++) {27 html += '<li><a href="/show?fn=' + list[i] + '">' + list[i]28 +29 '</a></li>';30 }31 html += "</ul>";32 } else {33 html += '<h2>No files found</h2>';34 }35 html += '</body></html>';36 response.write(html);37 response.end();38 });39 return true;40 }41 function upload(request, response) {42 if (request.method !== 'POST') {43 response.writeHead("405");44 response.end();45 }46 return true;47 }48 exports.home = home;49 exports.show = show;50 exports.upload = upload;
Since the requested verb stands in the requirement request, this parameter must also be handed over. In the file start.js line 7 now looks as follows:
var content = route(pathname, handler, request, response);In the file router.js this now looks as follows:
File: router.js
1 function route(pathname, handler, request, response) {2 console.log("Anforderung für " + pathname);3 if (typeof handler[pathname] === 'function') {4 return handler[pathname](request, response);5 } else {6 console.log("No method found " + pathname);7 return null;8 }9 }10 exports.route = route;
Handling Form Data
On the lowest level, the form data are passed on as simple byte sequence. Since still no helpful libraries are in use here, the processing must take place. It is up to the server to prepare the data. Before the method upload is called, the data should already be present.
The “request” object makes some events available in order to be able to react to data. The delivery of request already takes place in the preceding step, so that only few changes are necessary. The events “data” are usable here, when the data arrives, and “end” if no more data is present.
1 request.addListener("data", function(chunk) {2 // Daten empfangen3 });4 request.addListener("end", function() {5 // Keine Daten mehr6 });
The event “data” is called several times . You must collect the data and then completely hand it over to the appropriate method. To handlers.js the parameter postData is introduced, so that—if available—the data is to be handed over. Now only the file start.js must be extended, thus the data can be evaluated, and router.js is used to pass on functions.
File: start.js
1 var http = require("http");2 var url = require("url");34 function start(route, handler) {5 function onRequest(request, response) {6 var pathname = url.parse(request.url).pathname;7 var content;8 var postData = '';9 request.setEncoding("utf8");10 if (request.method === 'POST') {11 request.addListener("data", function (chunk) {12 postData += chunk;13 });14 request.addListener("end", function () {15 content = route(handler, pathname,16 request, response, postData);17 });18 } else {19 content = route(handler, pathname, response);20 }21 var content = route(pathname, handler,22 request, response);2324 if (!content) {25 response.writeHead(404, {26 "Content-Type": "text/plain"27 });28 response.write("404 Not found");29 response.end();30 }31 }32 var port = process.env.port || 1337;33 http.createServer(onRequest).listen(port);34 console.log("Server gestartet.");35 }3637 exports.start = start;
In line 5 a variable is defined, which takes up the form data. Starting from line 12 the two event working methods follow, in which the data is collected. If no more data follows, then the call of the router and thus the call of the suitable method takes place in line 16. If no data is present (for example with GET), then the router method is called directly.
File: router.js
1 function route(pathname, handler,2 request, response, postData) {3 console.log("Request for " + pathname);4 if (typeof handler[pathname] === 'function') {5 return handler[pathname](request, response, postData);6 } else {7 console.log("No method found for " + pathname);8 return null;9 }10 }11 exports.route = route;
The value in postData is simply handed through. If it is “zero” or “undefined,” then this JavaScript is also passed on. An error handling is not necessary here.
Processing Form Data
Form data is processed in HTTP in different ways. The simplest case is simple form fields. Then the data is located in form of a chain of parts of keys in the requirement:
Name=Joerg+Krause&Age=52&Formula=a+%2B+b+%3D%3D+13%25%21However, if files are uploaded, these are often binary and must be coded accordingly. The receiver must now know how to provide the original binary format from the coded data. In addition, there is the MIME standard (Multipurpose Internet Mail Extensions). Originally this was developed in order to embed pictures in e-mails.
 POST and MIME
A very comprehensive representation about POST can be found on Wikipedia 2. Likewise, a lot of information is to be found about MIME 3. The examples from this section originate from these Wikipedia articles.
With Mime the coding of a file then looks as follows:
1 MIME-Version: 1.02 Content-Type: multipart/mixed; boundary=frontier34 This is a message with multiple parts in MIME format.5 --frontier6 Content-Type: text/plain78 This is the body of the message.9 --frontier10 Content-Type: application/octet-stream11 Content-Transfer-Encoding: base641213 PGh0bWw+CiAgPGhlYWQ+CiAgPC9oZWFkPgogIDxib2R5PgogICAgPHA+VGhpcyBpcyB014 aGUg15 Ym9keSBvZiB0aGUgbWVzc2FnZS48L3A+CiAgPC9ib2R5Pgo8L2h0bWw+Cg==16 --frontier--
Both representations suggest that the processing of form data is not trivial, particularly since the examples show only a small part of the possibilities. It is at this time necessary to go back to further npm library stuff. A good start is the library formidable.
Install formidable first. Make it optionally also available globally (Option ‘-g’), in order to use it in other projects:
npm install formidable@latest --save -gA file arriving via POST can be received thereby as follows:
1 var formidable = require('formidable'),2 http = require('http'),3 util = require('util');45 http.createServer(function(req, res) {6 if (req.url == '/upload' && req.method === 'POST') {7 // Parser8 var form = new formidable.IncomingForm();910 form.parse(req, function(err, fields, files) {11 res.writeHead(200, {'content-type': 'text/plain'});12 res.write('Dateien: ');13 res.end(files.length);14 });1516 return;17 }1819 // Formular20 res.writeHead(200, {'content-type': 'text/html'});21 res.end(22 '<form action="/upload" enctype="multipart/form-data" ' +23 'method="post">'+24 '<input type="text" name="title"><br>'+25 '<input type="file" name="upload" multiple="multiple">'+26 '<br /><input type="submit" value="Upload">'+27 '</form>'28 );29 }).listen(8080);
The organization of the form is important here. In line 19 is “enctype=multipart/form-data”. With this attribute, coding is caused after MIME. Now another input element is needed that the file on the hard disk of the user selects (line 21). The method “parse” will then examine the files and make them available (line 10).
The processing method parse returns two objects, files and fields. In it, the files and other fields of the form are to be found. The structure looks as follows:
1 fields: { title: 'Hello World' }23 files: {4 upload: {5 size: 1558,6 path: '/tmp/1c747974a27a6292743669e91f29350b',7 name: 'us-flag.png',8 type: 'image/png',9 lastModifiedDate: Tue, 21 Jun 2011 07:02:41 GMT,10 _writeStream: [Object],11 length: [Getter],12 filename: [Getter],13 mime: [Getter]14 }15 }16 }
The information path is interesting. This is the temporary place where the files were, for a start, put down. From there it can now—if all other basic conditions fit—be copied into the application folder.
Handling Querystring
The indicator method should serve to offer the files for downloading. In addition, a parameter is handed over: the file name. The delivery of data into HTTP by the means of URL is made by the part after the question mark, the Querystring. Also for the processing of the data there’s a specific module in Node:
var querystring = require("querystring")A separate installation of the module is not necessary. Because of its outstanding importance, it is always available. In the application, the links are then produced dynamically for the files and embedded in the existing HTML. The file names hang as parameters on the links in the form of fn=filename. The Querystring must be examined thus for the field fn.
The call of the data then looks as follows:
querystring.parse(request.url.querystring).fnThe result is the file name or “undefined,” if the parameter was not found. The finished show function now looks as follows:
File: handlers.js
1 var fs = require("fs");23 function home(response, postData) {4 // Unchanged5 }6 function show(response, postData) {7 if (response.Method !== 'GET') {8 response.write("405 Method not allowed");9 }10 console.log("Request 'show' called.");1112 response.write();13 response.end();14 }15 function upload(response, postData) {16 // unchanged17 }18 exports.home = home;19 exports.show = show;20 exports.upload = upload;
The Querystring is in request. This object is already passed on. However, it is meaningful to dissolve the distinction between data from GET and from POST and work only with data. That can take place in the previous layer outside of the logic, so that all methods of the business logic profit from it. The two verbs are mutually exclusive; conflicts will therefore never occur. The server thereby supplies either the data over “form.parse” or over “querystring.parse”. In both cases it concerns a JavaScript object.
The complete Application
With this code the application can be finished. The components are:
an HTML page, which serves as home page and for the announcement of all files. On this page is also the form for uploads
the server, which receives requirements, prepares and hands them over to the router
the router, which recognizes the paths:
/home back to the homepage
/show for downloading a file
/upload for uploading a file
a small business logic, which processes and makes the data available
Practically each Web application is similarly developed, although much more complex. The primitive internal structure of Node leads the direct access to enormous performance and is nearly boundless. However, you are well advised as developer, with the bases of protocols and elementary techniques, to argue with computer science (HTTP, MIME, coding with UTF-8, etc.).
Here the finished program, consisting of:
server.js
start.js
router.js
handler.js
home.html
On the main system the folder files must still be configured, so that the process under which Node is implemented can (and only there) have rights for writing, so that uploading the files functions.
The finished program still uses another Node library: mime. It serves the determination of the correct content-type head fields when downloading the files. Install it as follows:
npm install mime --saveThe Application server.js
The application starts in the file server.js. Here the other modules are merged. In relation to the previous versions, the agreement of the routes is not only because of the names but also because of the suitable HTTP verb bind. Thus the individual, repetitive inquiry of the method is no longer necessary.
File: server.js
1 var server = require("./start");2 var router = require("./router");3 var requestHandlers = require("./handlers");45 var handler = {};6 handler[["/", 'GET']] = requestHandlers.home;7 handler[["/show", 'GET']] = requestHandlers.show;8 handler[["/upload", 'POST']] = requestHandlers.upload;910 server.start(router.route, handler);
The Starting Script start.js
The function start itself is accordingly extended. On the one hand, the method of execution is shifted into the new function execute, since it is needed several times. The business logic worries again about sending the data. Only if this fails, the generic error 400 Bad Request is sent.
 Bad Request
Often one thinks too long and hard about which HTTP code is suitable for announcing errors to the client. That is not worth the trouble. The user can begin in the long run with no message and see meaning in it. It will always be discussed with a general error page. Concrete errors are rather dangerous, because if rather than a regular user attacks the server, each error message referring to further attack potential multiplies. The generic error 400 Bad Request does not state anything, except that the action failed.
In the script some modules are used. http, url and querystring are internally available in Node. formidable has been additionally installed via npm. In the method onRequest, the path for Routing is determined and the Querystring is extracted (line 16). At POST, the evaluating of the form data takes place.
 POST and Querystring
Theoretically, a POST requirement can also have data in the Querystring. Such mixtures may not be a good idea, but the general inquiry of Querystring data is correct.
From the data the dataobject will be created, so that form data, Querystring data, and uploaded files can be handed over to the business logic.
File: start.js
1 var http = require("http");2 var url = require("url");3 var formidable = require("formidable");4 var querystring = require("querystring");56 function start(route, handler) {78 function execute(pathname, handler, request, response, data) {9 var content = route(pathname, handler,10 request, response, data);11 if (!content) {12 response.writeHead(400, {13 "Content-Type": "text/plain"14 });15 response.write("400 Bad request");16 response.end();17 }18 }1920 function onRequest(request, response) {21 var pathname = url.parse(request.url).pathname;22 var query = url.parse(request.url).query;23 if (request.method === 'POST') {24 var form = new formidable.IncomingForm();25 form.parse(request, function (err, fields, files) {26 if (err) {27 console.error(err.message);28 return;29 }30 var data = { fields: fields, files: files };31 execute(pathname, handler, request, response, data);32 });33 }34 if (request.method === 'GET') {35 var data = {36 fields: querystring.parse(query)37 };38 execute(pathname, handler, request, response, data);39 }40 }41 var port = process.env.port || 1337;42 http.createServer(onRequest).listen(port);43 console.log("Server gestartet.");44 }4546 exports.start = start;
Nothing changed on the server itself . This part corresponds to the previous examples.
The Routing Functions router.js
The router is unchanged to a large extent. The only adjustment concerns the use of the path and HTTP verb with the choice of the required method in case of any array: “[pathname, method]”. Only the answer response is handed over, because the implementing methods should send their data themselves, and the determined data of the requirement. So the requirement does not have to be passed on any longer.
File: router.js
1 function route(pathname, handler, request, response, data) {2 console.log("Request for " + pathname);3 var method = request.method;4 if (typeof handler[[pathname, method]] === 'function') {5 return handler[[pathname, method]](response, data);6 } else {7 console.log("No action found for " + pathname +8 " and method " + method);9 return null;10 }11 }12 exports.route = route;
The Business Logic handler.js
The business logic covers the three methods, which “do something”:
home: call of the home page with the form for uploading
show: display of all uploaded files or downloading of a file
upload: uploading a file and transferring it to show
File: handler.js (home)
1 var fs = require('fs');2 var path = require('path');3 var mime = require('mime');45 function home(response, data) {6 fs.readFile('views/home.html', function (err, data) {7 response.writeHead(200, { "Content-Type": "text/html" });8 response.write(data);9 response.end();10 });11 return true;12 }
Here the HTML file is asynchronously read and then supplied to the client.
There are two actions in show. First, the parameter 'fn' is checked. If there is a filename within, the file will be read synchronously and delivered for download. If there is no such parameter, an HTML page will be created dynamically, that shows all files in the folder as hyperlinks. The download will be controlled by special header fields that you can create using response.setHeader.
Now sending the files uses response.end. That’s a conjunction of write and end. The setting ‘binary’ is mandatory, otherwise Node would try to treat the content as plain text and encode the content as UTF-8. That would destroy any binary content, such as images.
Datei:handler.js (show)
1 function show(response, data) {2 // Herunterladen3 if (data.fields && data.fields['fn']) {4 var name = data.fields['fn'];5 var file = path.join(__dirname, '/files', name);6 var mimeType = mime.lookup(file);7 response.setHeader('Content-disposition',8 'attachment; filename=' + name);9 response.setHeader('Content-type', mimeType);10 var filedata = fs.readFileSync(file, 'binary');11 response.end(filedata, 'binary');12 return true;13 }14 // Show all15 fs.readdir('files', function (err, list) {16 response.writeHead(200, { "Content-Type": "text/html" });17 var html = '<html><head></head>' +18 '<body><h1>File Manager</h1>';19 if (list.length) {20 html += "<ul>";21 for (i = 0; i < list.length; i++) {22 html += '<li><a href="/show?fn=' + list[i] + '">' +23 list[i] + '</a></li>';24 }25 html += "</ul>";26 } else {27 html += '<h2>No files found</h2>';28 }29 html += '</body></html>';30 response.write(html);31 response.end();32 });33 return true;34 }
The third part is the function for uploading. Even that is based on parameters, particularly the field “fn” from the HTML form. The copy function is using copyFile, which uses Streams and is particularly efficient. The function is programmed asynchronously and informs the callers about the callback function callback, if the action is final. The function uploadcontinues to lead to the summary page show, so that the user can inform himself about the success of the action.
File: handler.js (upload)
1 function upload(response, data) {2 // Upload3 var temp = data.files['fn'].path;4 var name = data.files['fn'].name;5 copyFile(temp, path.join('./files', name), function (err) {6 if (err) {7 console.log(err);8 return false;9 } else {10 // Dateiliste anzeigen11 return show(response, data);12 }13 });14 return true;15 }1617 function copyFile(source, target, callback) {18 var rd = fs.createReadStream(source);19 rd.on('error', function (err) { callback(err); });20 var wr = fs.createWriteStream(target);21 wr.on('error', function (err) { callback(err); });22 wr.on('finish', function () { callback(); });23 rd.pipe(wr);24 }2526 exports.home = home;27 exports.show = show;28 exports.upload = upload;
The data in “data.files[fn]” offers far more than only name and path. So information can be made here about the type of file, the file size and the date.
 Server versus Client Upload
The version presented here uses so-called server uploading. The client may send everything. The server stores the data in a temporary listing and then makes it available. The server script then decides what happens with the data. That has the disadvantage that the user possibly transfers large or inadmissible files, he experiences a long waiting time, and then gets an error message. Client page upload functions can be programmed in JavaScript in the browser and then transfer only if it is meaningful and promising. This is not dealt with here.
Template of the HTML Page home.html
As the latter, the form page shall be presented again. This serves to branch out to the page with the list of the files and it contains the form for uploading.
File: home.html
1 <html>2 <head>3 <meta http-equiv="Content-Type"4 content="text/html; charset=UTF-8" />5 </head>6 <body>7 <h1>Dateimanager</h1>8 <a href="/show">Zeige alle Dateien</a>9 <hr />10 <form action="/upload" method="post"11 enctype="multipart/form-data">12 <input type="file" name="fn" />13 <input type="submit" value="Upload file" />14 </form>15 </body>16 </html>
Pay attention to the names of the input element “file” name=“fn”.
This name must agree with the value used in the code “fn”. Important is also the following attribute:
enctype="multipart/form-data"This permits the coding of the files for the transmission with HTTP. If you would like to process only form data, but no files, then you omit the attribute.
Summary
This chapter showed a first, compact introduction to Node. As far as possible, no additional libraries were inserted such as Express or Template Engines such as Pug. Refer to the further chapters to read more about Express and Pug and how they simplify your life as a developer. Since Node is quite simple, some actions, which are due to protocol HTTP, had to be programmed. But there are naturally many finished solutions. The next chapter will concentrate on overviews, documentation and the most important modules of Node which will be presented, with which first applications can be developed.