
THE PROGRAMS THAT HAVE BEEN ILLUSTRATED throughout this book have all been very small and relatively simple. Unfortunately, the programs that you will have to develop to solve your particular problems will probably be neither as small nor as simple. Learning the proper techniques for dealing with such programs is the topic of this chapter. As you will see, C provides all the features necessary for the efficient development of large programs. In addition, you can use several utility programs—which are briefly mentioned in this chapter—that make working with large projects easier.
In every program that you’ve seen so far, it was assumed that the entire program was entered into a single file—presumably via some text editor, such as emacs, vim, or some Windows-based editor—and then compiled and executed. In this single file, all the functions that the program used were included—except, of course, for the system functions, such as printf and scanf. Standard header files such as <stdio.h> and <stdbool.h> were also included for definitions and function declarations. This approach works fine when dealing with small programs—that is, programs that contain up to 100 statements or so. However, when you start dealing with larger programs, this approach no longer suffices. As the number of statements in the program increases, so does the time it takes to edit the program and to subsequently recompile it. Not only that, large programming applications frequently require the efforts of more than one programmer. Having everyone work on the same source file, or even on their own copy of the same source file, is unmanageable.
C supports the notion of modular programming in that it does not require that all the statements for a particular program be contained in a single file. This means that you can enter your code for a particular module into one file, for another module into a different file, and so on. Here, the term module refers either to a single function or to a number of related functions that you choose to group logically.
If you’re working with a windows-based project management tool, such as Metrowerks’ CodeWarrior, Microsoft Visual Studio, or Apple’s Xcode, then working with multiple source files is easy. You simply have to identify the particular files that belong to the project on which you are working, and the software handles the rest for you. The next section describes how to work with multiple files if you’re not using such a tool, also known as an Integrated Development Environment (IDE). That is, the next section assumes you are compiling programs from the command line by directly issuing gcc or cc commands, for example.
Suppose you have conceptually divided your program into three modules and have entered the statements for the first module into a file called mod1.c, the statements for the second module into a file called mod2.c, and the statements for your main routine into the file main.c. To tell the system that these three modules actually belong to the same program, you simply include the names of all three files when you enter the command to compile the program. For example, using gcc, the command
$ gcc mod1.c mod2.c main.c –o dbtesthas the effect of separately compiling the code contained in mod1.c, mod2.c, and main.c. Errors discovered in mod1.c, mod2.c, and main.c are separately identified by the compiler. For example, if the gcc compiler gives output that looks like this:
mod2.c:10: mod2.c: In function 'foo':
mod2.c:10: error: 'i' undeclared (first use in this function)
mod2.c:10: error: (Each undeclared identifier is reported only once
mod2.c:10: error: for each function it appears in.)
then the compiler indicates that mod2.c has an error at line 10, which is in the function foo. Because no messages are displayed for mod1.c and main.c, no errors are found compiling those modules.
Typically, if there are errors discovered in a module, you have to edit the module to correct the mistakes.[1] In this case, because an error was discovered only inside mod2.c, you have to edit only this file to fix the mistake. You can then tell the C compiler to recompile your modules after the correction has been made:
$ gcc mod1.c mod2.c main.c –o dbtest
$
Because no error message was reported, the executable was placed in the file dbtest.
Normally, the compiler generates intermediate object files for each source file that it compiles. The compiler places the resulting object code from compiling mod.c into the file mod.o by default. (Most Windows compilers work similarly, only they might place the resulting object code into .obj files instead of .o files.) Typically, these intermediate object files are automatically deleted after the compilation process ends. Some C compilers (and, historically, the standard Unix C compiler) keep these object files around and do not delete them when you compile more than one file at a time. This fact can be used to your advantage for recompiling a program after making a change to only one or several of your modules. So in the previous example, because mod1.c and main.c had no compiler errors, the corresponding .o files—mod1.o and main.o—would still be around after the gcc command completed. Replacing the c from the filename mod.c with an o tells the C compiler to use the object file that was produced the last time mod.c was compiled. So, the following command line could be used with a compiler (in this case, cc) that does not delete the object code files:
$ cc mod1.o mod2.c main.o –o dbtestSo, not only do you not have to reedit mod1.c and main.c if no errors are discovered by the compiler, but you also don’t have to recompile them.
If your compiler automatically deletes the intermediate .o files, you can still take advantage of performing incremental compilations by compiling each module separately and using the –c command-line option. This option tells the compiler not to link your file (that is, not to try to produce an executable) and to retain the intermediate object file that it creates. So, typing
$ gcc –c mod2.ccompiles the file mod2.c, placing the resulting executable in the file mod2.o.
So, in general, you can use the following sequence to compile your three-module program dbtest using the incremental compilation technique:
$ gcc –c mod1.c                         Compile mod1.c => mod1.o
$ gcc –c mod2.c                         Compile mod2.c => mod2.o
$ gcc –c main.c                         Compile main.c => main.o
$ gcc mod1.o mod2.o mod3.o –o dbtest    Create executable
The three modules are compiled separately. The previous output shows no errors were detected by the compiler. If any were, the file could be edited and incrementally recompiled. The last line that reads
$ gcc mod1.o mod2.o mod3.olists only object files and no source files. In this case, the object files are just linked together to produce the executable output file dbtest.
If you extend the preceding examples to programs that consist of many modules, you can see how this mechanism of separate compilations can enable you to develop large programs more efficiently. For example, the commands
$ gcc –c legal.c                       Compile legal.c, placing output in legal.o
$ gcc legal.o makemove.o exec.o enumerator.o evaluator.o display.o –o superchess
could be used to compile a program consisting of six modules, in which only the module legal.c needs to be recompiled.
As you’ll see in the last section of this chapter, the process of incremental compilation can be automated by using a tool called make. The IDE tools that were mentioned at the beginning of this chapter invariably have this knowledge of what needs recompilation, and they only recompile files as necessary.
Several methods can be used so that the modules contained in separate files can effectively communicate. If a function from one file needs to call a function contained inside another file, the function call can be made in the normal fashion, and arguments can be passed and returned in the usual way. Of course, in the file that calls the function, you should always make certain to include a prototype declaration so the compiler knows the function’s argument types and the type of the return value. As noted in Chapter 14, “More on Data Types,” in the absence of any information about a function, the compiler assumes it returns an int and converts short or char arguments to ints and float arguments to doubles when the function is called.
It’s important to remember that even though more than one module might be specified to the compiler at the same time on the command line, the compiler compiles each module independently. That means that no knowledge about structure definitions, function return types, or function argument types is shared across module compilations by the compiler. It’s totally up to you to ensure that the compiler has sufficient information about such things to correctly compile each module.
Functions contained in separate files can communicate through external variables, which are effectively an extension to the concept of the global variable discussed in Chapter 8, “Working with Functions.”
An external variable is one whose value can be accessed and changed by another module. Inside the module that wants to access the external variable, the variable is declared in the normal fashion and the keyword extern is placed before the declaration. This signals to the system that a globally defined variable from another file is to be accessed.
Suppose you want to define an int variable called moveNumber, whose value you want to access and possibly modify from within a function contained in another file. In Chapter 8, you learned that if you wrote the statement
int moveNumber = 0;
at the beginning of your program, outside of any function, then its value could be referenced by any function within that program. In such a case, moveNumber was defined as a global variable.
Actually, this same definition of the variable moveNumber also makes its value accessible by functions contained in other files. Specifically, the preceding statement defines the variable moveNumber not just as a global variable, but also as an external global variable. To reference the value of an external global variable from another module, you must declare the variable to be accessed, preceding the declaration with the keyword extern, as follows:
extern int moveNumber;
The value of moveNumber can now be accessed and modified by the module in which the preceding declaration appears. Other modules can also access the value of moveNumber by incorporating a similar extern declaration in the file.
You must obey an important rule when working with external variables. The variable has to be defined in some place among your source files. This is done in one of two ways. The first way is to declare the variable outside of any function, not preceded by the keyword extern, as follows:
int moveNumber;
Here, an initial value can be optionally assigned to the variable, as was shown previously.
The second way to define an external variable is to declare the variable outside of any function, placing the keyword extern in front of the declaration, and explicitly assigning an initial value to it, as follows:
extern int moveNumber = 0;
Note that these two ways are mutually exclusive.
When dealing with external variables, the keyword extern can only be omitted in one spot throughout your source files. If you don’t omit the keyword in any one spot, in exactly one place, you must assign the variable an initial value.
Take a look at a small program example to illustrate the use of external variables. Suppose you type the following code into a file called main.c:
#include <stdio.h>

int  i = 5;

int main (void)
{
    printf ("%i  ", i);

    foo ();

    printf ("%i
", i);

    return 0;
}
The definition of the global variable i in the preceding program makes its value accessible by any module that uses an appropriate extern declaration. Suppose you now type the following statements into a file called foo.c:
extern int i;

void foo (void)
{
    i = 100;
}
Compiling the two modules main.c and foo.c together with a command like
$ gcc main.c foo.cand subsequently executing the program produces the following output at the terminal:
5 100
This output verifies that the function foo is able to access and change the value of the external variable i.
Because the value of the external variable i is referenced inside the function foo, you could have placed the extern declaration of i inside the function itself, as follows:
void foo (void)
{
    extern int  i;

    i = 100;
}
If many functions in the file foo.c need to access the value of i, it is easier to make the extern declaration just once at the front of the file. However, if only one function or a small number of functions need to access this variable, there is something to be said for making separate extern declarations in each such function: It makes the program more organized and isolates the use of the particular variable to those functions that actually use it.
When declaring an external array, it is not necessary to give its size. Thus, the declaration
extern char text[];
enables you to reference a character array text that is defined elsewhere. As with formal parameter arrays, if the external array is multidimensional, all but the first dimension must be specified. Thus, the declaration
extern int matrix[][50];
suffices to declare a two-dimensional external array matrix that contains 50 columns.
You now know that any variable defined outside of a function is not only a global variable, but is also an external variable. Many situations arise in which you want to define a variable to be global but not external. In other words, you want to define a global variable to be local to a particular module (file). It makes sense to want to define a variable this way if no functions other than those contained inside a particular file need access to the particular variable. This can be accomplished in C by defining the variable to be static.
The statement
static int moveNumber = 0;
if made outside of any function, makes the value of moveNumber accessible from any subsequent point in the file in which the definition appears, but not from functions contained in other files.
If you need to define a global variable whose value does not have to be accessed from another file, declare the variable to be static. This is a cleaner approach to programming: The static declaration more accurately reflects the variable’s usage and no conflicts can be created by two modules that unknowingly both use different external global variables of the same name.
As mentioned earlier in this chapter, you can directly call a function defined in another file. Unlike variables, no special mechanisms are required; that is, to call a function contained in another file, you don’t need an extern declaration for that function.
When a function is defined, it can be declared to be extern or static, the former case being the default. A static function can be called only from within the same file as the function appears. So, if you have a function called squareRoot, placing the keyword static before the function header declaration for this function makes it callable only from within the file in which it is defined:
static double  squareRoot (double x)
{
    ...
}
The definition of the squareRoot function effectively becomes local to the file in which it is defined. It cannot be called from outside the file.
The same motivations previously cited for using static variables also apply to the case of static functions.
Figure 15.1 summarizes communication between different modules. Here two modules are depicted, mod1.c and mod2.c.
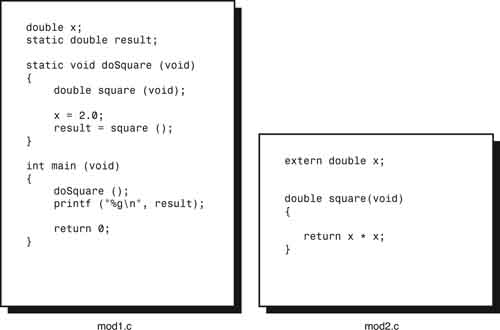
mod1.c defines two functions: doSquare and main. The way things are set up here, main calls doSquare, which in turn calls square. This last function is defined in the module mod2.c.
Because doSquare is declared static, it can only be called from within mod1.c, and by no other module.
mod1.c defines two global variables: x and result, both of type double. x can be accessed by any module that is linked together with mod1.c. On the other hand, the keyword static in front of the definition of result means that it can only be accessed by functions defined inside mod1.c (namely main and doSquare).
When execution begins, the main routine calls doSquare. This function assigns the value 2.0 to the global variable x and then calls the function square. Because square is defined in another source file (inside mod2.c), and because it doesn’t return an int, doSquare properly includes an appropriate declaration at the beginning of the function.
The square function returns as its value the square of the value of the global variable x. Because square wants to access the value of this variable, which is defined in another source file (in mod1.c), an appropriate extern declaration appears in mod2.c (and, in this case, it makes no difference whether the declaration occurs inside or outside the square function).
The value that is returned by square is assigned to the global variable result inside doSquare, which then returns back to main. Inside main, the value of the global variable result is displayed. This example, when run, produces a result of 4.0 at the terminal (because that’s obviously the square of 2.0).
Study the example until you feel comfortable with it. This small—albeit impractical—example illustrates very important concepts about communicating between modules, and it’s necessary that you understand these concepts to work effectively with larger programs.
In Chapter 13, “The Preprocessor,” you were introduced to the concept of the include file. As stated there, you can group all your commonly used definitions inside such a file and then simply include the file in any program that needs to use those definitions. Nowhere is the usefulness of the #include facility greater than in developing programs that have been divided into separate program modules.
If more than one programmer is working on developing a particular program, include files provide a means of standardization: Each programmer is using the same definitions, which have the same values. Furthermore, each programmer is thus spared the time-consuming and error-prone task of typing these definitions into each file that must use them. These last two points are made even stronger when you start placing common structure definitions, external variable declarations, typedef definitions, and function prototype declarations into include files. Various modules of a large programming system invariably deal with common data structures. By centralizing the definition of these data structures into one or more include files, you eliminate the error that is caused by two modules that use different definitions for the same data structure. Furthermore, if a change has to be made to the definition of a particular data structure, it can be done in one place only—inside the include file.
Recall your date structure from Chapter 9, “Working with Structures”; following is an include file that might be similar to one you would set up if you have to work with a lot of dates within different modules. It is also a good example of how to tie together many of the concepts you’ve learned up to this point.
// Header file for working with dates


#include <stdbool.h>


// Enumerated types

enum kMonth { January=1, February, March, April, May, June,
        July, August, September, October, November, December };

enum kDay { Sunday, Monday, Tuesday, Wednesday, Thursday, Friday };


struct  date
{
    enum  kMonth month;
    enum  kDay   day;
    int          year;
};

// Date type
typedef struct date Date;

// Functions that work with dates
Date  dateUpdate (Date today);
int   numberOfDays  (Date  d);
bool  isLeapYear (Date  d);

// Macro to set a date in a structure
#define setDate(s,mm,dd,yy)  s = (Date) {mm, dd, yy}

// External variable reference
extern Date todaysDate;
The header file defines two enumerated data types, kMonth and kDay, and the date structure (and note the use of the enumerated data types); uses typedef to create a type called Date; and declares functions that use this type, a macro to set a date to specific values (using compound literals), and an external variable called todaysDate, that will presumably be set to today’s date (and is defined in one of the source files).
As an example using this header file, the following is a rewritten version of the dateUpdate function from Chapter 9.
#include "date.h"

// Function to calculate tomorrow's date

Date dateUpdate (Date today)
{
    Date  tomorrow;

    if ( today.day != numberOfDays (today) )
        setDate (tomorrow, today.month, today.day + 1, today.year);
    else if ( today.month == December )     // end of year
        setDate (tomorrow, January, 1, today.year + 1);
    else                           // end of month
        setDate (tomorrow, today.month + 1, 1, today.year);

    return tomorrow;
} .As briefly mentioned previously, the IDE can be a powerful tool for working with larger programs. If you still want to work from the command line, there are tools you might want to learn how to use. These tools are not part of the C language. However, they can help speed your development time, which is what it’s all about.
Following is a list of tools you might want to consider when working with larger programs. If you are running Unix, you will find a plethora of commands at your disposal that can also help you in your development efforts. This is just the tip of the iceberg here. Learning how to write programs in a scripting language, such as the Unix shell, can also prove useful when dealing with large numbers of files.
This powerful utility (or its GNU version gnumake) allows you to specify a list of files and their dependencies in a special file known as a Makefile. The make program automatically recompiles files only when necessary. This is based on the modification times of a file. So, if make finds that your source (.c) file is newer than your corresponding object (.o) file, it automatically issues the commands to recompile the source file to create a new object file. You can even specify source files that depend on header files. For example, you can specify that a module called datefuncs.o is dependent on its source file datefunc.c as well as the header file date.h. Then, if you change anything inside the date.h header file, the make utility automatically recompiles the datefuncs.c file. This is based on the simple fact that the header file is newer than the source file.
Following is a simple Makefile that you could use for the three-module example from this chapter. It is assumed here that you’ve placed this file in the same directory as your source files.
$ cat Makefile
SRC = mod1.c mod2.c main.c
OBJ = mod1.o mod2.o main.o
PROG = dbtest

$(PROG): $(OBJ)
        gcc $(OBJ) -o $(PROG)

$(OBJ): $(SRC)
A detailed explanation of how this Makefile works is not provided here. In a nutshell, it defines the set of source files (SRC), the corresponding set of object files (OBJ), the name of the executable (PROG), and some dependencies. The first dependency,
$(PROG): $(OBJ)
says that the executable is dependent on the object files. So, if one or more object files change, the executable needs to be rebuilt. The way to do that is specified on the following gcc command line, which must be typed with a leading tab, as follows:
gcc $(OBJ) -o $(PROG)
The last line of the Makefile,
$(OBJ): $(SRC)
says that each object file depends on its corresponding source file. So, if a source file changes, its corresponding object file must be rebuilt. The make utility has built-in rules that tell it how to do that.
Here’s what happens the first time you run make:
$ make
gcc    -c -o mod1.o mod1.c
gcc    -c -o mod2.o mod2.c
gcc    -c -o main.o main.c
gcc mod1.o mod2.o main.o -o dbtest
$
That’s kind of nice! make compiled each individual source file and then linked the resulting object files to create the executable.
If you instead had an error in mod2.c, here’s what the output from make would have looked like:
$ make
gcc    -c -o mod1.o mod1.c
gcc    -c -o mod2.o mod2.c
mod2.c: In function 'foo2':
mod2.c:3: error: 'i' undeclared (first use in this function)
mod2.c:3: error: (Each undeclared identifier is reported only once
mod2.c:3: error: for each function it appears in.)
make: *** [mod2.o] Error 1
$
Here, make found there was an error in compiling mod2.c and stopped the make process, which is its default action.
If you correct mod2.c and run make again, here’s what happens:
$ make
gcc    -c -o mod2.o mod2.c
gcc    -c -o main.o main.c
gcc mod1.o mod2.o main.o -o dbtest
$
Notice that make didn’t recompile mod1.c. That’s because it knew it didn’t have to. Therein lies the real power and elegance of the make utility.
Even with this simple example, you can use the sample Makefile to start using make for your own programs. Appendix E, “Resources,” tells you where you can turn for more information on this powerful utility.
This is one of several utilities for managing source code. It provides for automatic version-tracking of source code, and keeps track of changes that are made to a module. This allows you to re-create a particular version of a program if needed (either to roll back code or to re-create an older version for customer support, for example). With cvs (which stands for Concurrent Versions System), you “check out” a program (using the cvs command with the checkout option), make your changes to it, and then “check it back in” (using the cvs command with the commit option). This mechanism avoids the potential conflict that can arise if more than one programmer wants to edit the same source file. With cvs, programmers can be at multiple locations and can all work on the same source code over a network.
A wide assortment of commands available under Unix makes large program development easier and more productive. For example, you can use ar to create your own library. This is useful, for example, if you create a bunch of utility functions that you frequently use or want to share. Just as you linked your program with the –lm option whenever you used a routine from the standard math library, so too can you specify your own library at link time, using the option –llib. During the link edit phase, the library is automatically searched to locate functions that you reference from the library. Any such functions are pulled from the library and linked together with your program.
Other commands such as grep and sed are useful for searching for strings in a file or making global changes to a set of files. For example, combined with a little shell programming skills, you can easily use sed to change all occurrences of one particular variable name to another across a set of source files. The grep command simply searches a file or files for a specified string. This is useful for locating a variable or function in a set of source files, or a macro in a set of header files, for example. So the command
$ grep todaysDate main.ccan be used to search the file main.c for all lines containing the string todaysDate. The command
$ grep –n todaysDate *.c *.hsearches all source and header files in the current directory and displays each match preceded by its relative line number within the file (the use of the –n option).You have seen how the C language supports division of your program into smaller modules and incremental and independent compilation of those modules. Header files provide the “glue” between your modules when you use them to specify shared prototype declarations, macros, structure definitions, enumerations, and so on.
If you are using an IDE, managing multiple modules in a program is straightforward. The IDE application keeps track of the files that need to be recompiled when you make changes. If you’re instead using a command-line compiler, like gcc, you either have to keep track of the files that need to be recompiled yourself, or you should resort to a tool such as make to automatically keep track for you. If you are compiling from the command line, you’ll want to look into other tools that can help you search your source files, make global changes to them, and create and maintain program libraries.
[1] The error might be due to a problem with a header file included by that module, for example, which means the header file and not the module would have to be edited.