
Using the Server Classes
Armed with an understanding of sockets, you are now ready to code your own network servers. But before you go out and try to implement an HTTP server, you should see what Python already offers in terms of modules.
Python features a base HTTP server, a simple HTTP server, and a
CGI HTTP server. As for the simple server, the main task is returning
files from the local directory to clients that ask for them over HTTP.
The CGI server is similar, but is prepared to run CGI scripts and equip
them with the environment variables they need, in order to be
interactive with their browser clients. But the most interesting of all
in this area is the BaseHTTPServer.
The BaseHTTPServer
module contains a simple socket server (the HTTPServer class) that accepts HTTP requests.
You can implement a few methods of the BaseHTTPRequestHandler to work with the
request. The advantage to using these two classes is the power it gives
you when working with clients. Instead of simply serving files or
running external CGI programs, you have the ability to interpret URLs
any way you wish, and return anything you like back to the client. If
you’ve ever worked with application servers that offer their own inline
scripting language (i.e. PHP, Cold Fusion, Active Server Pages, etc.)
then you have seen base HTTP servers in practice. When an application
server such as Cold Fusion is running with your web server, your web
server hands over any HTTP request that has a .cfm extension to the Cold Fusion process.
That is, the server does absolutely nothing with the request if it is
marked for Cold Fusion. Cold Fusion is then free to examine the request
and send back the appropriate data after executing any inline code
placed in the file.
In this section, we implement a base HTTP server that can handle
both GET and POST requests. Running on port 2112, all HTTP
traffic sent to port 2112 is completely handled by the server—regardless
of what filename is being requested. In fact there won’t be any files
served at all, but instead there will be a default response that all
browsers receive, regardless of what information is in the URL.
BaseHTTPServer Module Classes
The BaseHTTPServer
module features two classes: the HTTPServer and the BaseHTTPRequestHandler. You’ll likely only
encounter four methods between the two of these classes, as shown in
this section.
The HTTPServer class
constructor takes two arguments: an address tuple (hostname and port),
and a reference to a request handler. The HTTPServer class, once instantiated, has two
modes of operation. You can call serve_forever to handle an infinite number
of clients, or you can call handle_request to handle a single
client.
The BaseHTTPRequestHandler is
a stub class, which you can override for custom functionality. You’ll
likely only override do_GET and
do_POST. These methods are called
whenever a fresh HTTP request has arrived and is asking for either a
GET or POST operation. The request handler does
have some properties that are of considerable importance:
rh.headersA dictionary of header/value pairs.
rh.rfileThe “request” or “read” file descriptor of the socket. This allows you to read data beyond the headers into the server as you would during a
POSToperation.rh.wfileThe “write” file descriptor of the socket. This attribute allows you to send data to the HTTP requestor (back to the client or browser).
rh.pathThe request and path portion of the query string.
rh.commandThe type of HTTP request that is being asked for (
GET,POST,HEAD, orPUT).rh.request_versionA string representing the current HTTP version in use.
rh.client_addressA tuple representing the client address.
Server Core Concepts
The architecture of the base server class is quite
simple. HTTP headers are given to you as a dictionary; beyond that, a
few simple functions exist allowing you to write the different aspects
of an HTTP request back down to the sender. At the core of the classes
are the rfile and wfile members of the BaseHTTPRequestHandler. These two objects
actually allow you to read and write directly from the client
socket.
Instantiating a server class
To instantiate a server and start its operations, you
can use the HTTPServer
constructor. For example:
myServer = HTTPServer(('', 2112), myRequestHandler)
for lp in range(5):
  myServer.handle_request(  )
This code instructs the server to connect to localhost (via the blank line and port
number tuple) and to supply a custom request handler. In addition to
handle_request, the HTTPServer features a serve_forever method that never returns.
The method you choose is really just a matter of preference. Example 8-5, presented later
in this chapter, handles five requests and then exits. When choosing
serve_forever, you are committing
to running the server for a very long time. You will not be able to
interrupt it from the command line. Basically, if you’ve chosen
serve_forever, you need to wire
in a way of stopping your server—either by sending a special command
to it over the network, or by flipping a lock file or other
filesystem switch on the server. Of course, you can always just hunt
down the process and kill it (with a kill -9 on
Unix or a quick trip to the Task Manager on Windows).
Serving a GET
If you are indeed implementing a request handler, it’s
up to you to implement do_GET and
do_POST. A GET operation is easiest, as most of the
information you may need is in the headers.
class myRequestHandler(BaseHTTPRequestHandler):
  def do_GET(self):
For starters, you need to derive your request handler
(myRequestHandler) from the
BaseHTTPServer.BaseHTTPRequestHandler
class. After this first step, you can use some of the methods of the
HTTPServer to send a response
back to the user.
self.send_response(200)
self.send_header("Content-type", "text/html")
self.end_headers(  )
After closing out the headers with a call to end_headers, you can use the write file to send data to the
browser.
self.wfile.write("<html><body>")
self.wfile.write("<b>Hello</b>")
self.wfile.write("</html></body>")
The actual URI requested would be present in the request
handler’s path attribute (self.path in the previous example). You
could use the path information to serve a particular file, or to
invoke a specific method on an object. All other client information
in the headers is held in the headers dictionary.
Serving a POST
Implementing a POST
is a little more intricate, and requires some knowledge of what HTTP
looks like during a POST
operation. The most important difference is that after reading the
browser (or client) headers, the server must figure out how many
bytes to read off the client sockets that constitute a POST. To accomplish this, all POST operations from a browser supply a
Content-length header, from which
the size of the POST is
retrieved.
The basic method calls used when dealing with a post are shown here:
def do_POST(self):

  self.send_response(200)
  self.send_header("Content-type", "text/html")
  self.end_headers(  )

  self.wfile.write("<html><body>")
  self.printBrowserHeaders(  )
  self.wfile.write("<b>Post Data:</b><br>")

  if self.headers.dict.has_key("content-length"):

     content_length = string.atoi(self.headers.dict["content-length"])

     raw_post_data = self.rfile.read(content_length)
     self.wfile.write(raw_post_data)
As you can see, the length of the posted data is kept in the
header named content-length and
is submitted along with the client headers. Of course the value of
content-length must be converted
from a string to an integer before being used in a read operation on the input file.
Building a Complete Server
An example is a great way to learn the steps necessary
for implementing your own server. In Example 8-5, writing the HTTP
response and parsing the input headers for return in HTML are
relegated to function calls so that both the do_GET and do_POST methods can have access to them. The
printBrowserHeaders function simply
iterates through the browser headers and formats them in HTML, writing
them back down the socket:
def printBrowserHeaders(self):
  # iterate through header dictionary and
  # display the name and value of each pair.
  self.wfile.write("<p>Headers: <br>")
  header_keys = self.headers.dict.keys(  )
  for key in header_keys:
    self.wfile.write("<b>" + key + "</b>: ")
    self.wfile.write(self.headers.dict[key] + "<br>")
The printCustomHTTPHeaders
method sends a response code to the browser and closes off the HTTP
headers. If you want to add any additional headers, you should do so
here.
def printCustomHTTPResponse(self, respcode):
  # send back appropriate HTTP code
  self.send_response(respcode)

  # tell them we're sending HTML
  self.send_header("Content-type", "text/html")

  # describe the server software in use!
  self.send_header("Server", "myRequestHandler :-)")

  # close off headers
  self.end_headers(  )
Example 8-5, HTTPServer.py, shows the complete listing of the server, incorporating the techniques presented thus far.
"""
HTTPServer.py - an simple implementation
of the BaseHTTPServer module
"""

from BaseHTTPServer import HTTPServer
from BaseHTTPServer import BaseHTTPRequestHandler
import string

"""
class myRequestHandler - Handles any and all request
    coming in, regardless of path, file, or request
    method (GET/POST)
"""
class myRequestHandler(BaseHTTPRequestHandler):
  """
  do_GET will be called if the browser does a GET
  request.
  """
  def do_GET(self):
    # give them back a 200 OK every time.
    self.printCustomHTTPResponse(200)

    # start HTML output
    self.wfile.write("<html><body>")
    self.wfile.write("<p>Hello, I am a web server, sort of.</p>")
    self.wfile.write("<p>GET string: " + self.path + "</p>")

    # show browser headers
    self.printBrowserHeaders(  )

    # finish off HTML
    self.wfile.write("</html></body>")

  """
  do_POST is called if the browser is POSTing data
  from a form
  """
  def do_POST(self):
    # send back a 200 OK
    self.printCustomHTTPResponse(200)

    # start HTML and show browser headers again
    self.wfile.write("<html><body>")
    self.printBrowserHeaders(  )
    self.wfile.write("<b>Post Data:</b><br>")

    # track down length of the post, so that you
    # can read in the correct number of bytes.  The
    # length of the post is in the browser header
    # named 'content-length'.
    if self.headers.dict.has_key("content-length"):
       # convert content-length from string to int
       content_length = string.atoi(self.headers.dict["content-length"])

       # read in the correct number of bytes from the client
       # connection and send it back to the browser
       raw_post_data = self.rfile.read(content_length)
       self.wfile.write(raw_post_data)

    # finish off HTML
    self.wfile.write("</html></body>")

  """
  printBrowserHeaders - this method prints the HTTP
      headers sent by the client
  """
  def printBrowserHeaders(self):
    # iterate through header dictionary and
    # display the name and value of each pair.
    self.wfile.write("<p>Headers: <br>")
    header_keys = self.headers.dict.keys(  )
    for key in header_keys:
      self.wfile.write("<b>" + key + "</b>: ")
      self.wfile.write(self.headers.dict[key] + "<br>")

  """
  printCustomHTTPResponse - this method takes a response
      code and sends the code and custom headers
      back to the browser
  """
  def printCustomHTTPResponse(self, respcode):
    # send back appropriate HTTP code
    self.send_response(respcode)

    # tell them we're sending HTML
    self.send_header("Content-type", "text/html")

    # describe the server software in use!
    self.send_header("Server", "myRequestHandler :-)")

    # close off headers
    self.end_headers(  )


# start the server on port 2112, requires browser URLs
# to be addressed as http://servername:2112/pathtofile
myServer = HTTPServer(('', 2112), myRequestHandler)

# loop to handle 5 requests
for lp in range(5):
  myServer.handle_request(  )
Running a GET request
To launch your new server, simply supply its name to Python:
C:WINDOWSDesktoporeillypythonxmlc8>python HTTPServer.py
The prompt won’t return, as the server keeps running
until it has handled five requests. When running the server to test
the GET functionality, just
launch your browser and type in the name of your server, plus port
2112 (http://hostname:2112), to get a response.
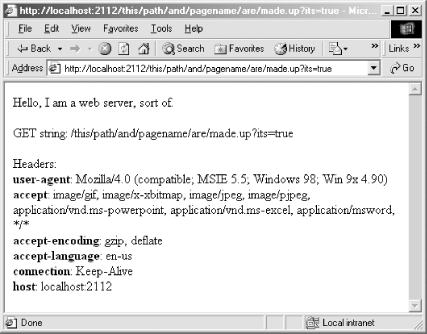
It doesn’t matter which path you use, as it is ignored by the
server. Figure 8-1
shows a browser making a GET
request against the server with an address of
http://localhost:2112/this/path/and/pagename/are/made.up?its=true.
The only critical piece of the URL is the
host:port combination
http://localhost:2112.
Running a POST request
Performing a POST
requires a web form. The simple HTML file testServer.html shown in Example 8-6 should work. It
does not need to be placed on a web server, but rather loaded it in
your browser, just as you would a file. When you press the submit
button, the form tries to POST
its data to your HTTPServer.py
running at port 2112. Example
8-6 shows the markup for testServer.html.
<html>
<body>
<form action="http://localhost:2112/this/part/doesnt/matter" method="POST">
<textarea rows=10 cols=40 name="textdata">
This is some sample data for you to submit
if you like.
</textarea><br>
<input type=submit>
</form>
</body>
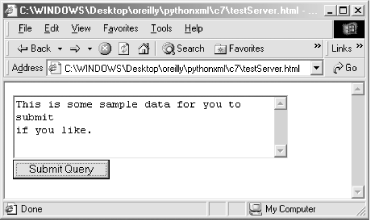
</html>Figure 8-2 shows
the web form from Example
8-6 sitting in your browser with the default text. The
important thing to remember about the web form is that its action attribute points to port 2112,
instead of just port 80.
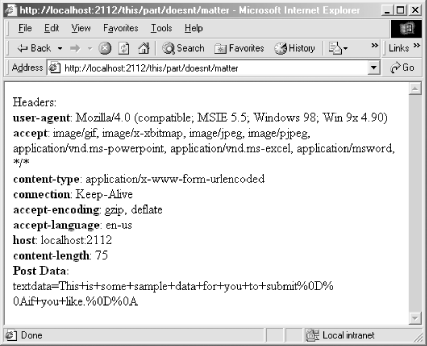
When you submit the form, as with the GET request, the path and filename are
ignored by the server, and instead HTTPServer.py simply uses the rfile to read data in from your request.
The content-length header is sent
by the browser to tell the server how many bytes to attempt to read
from the socket. Figure
8-3 shows the response from the server. It’s similar to the
GET response, but your POST data is also presented, properly
URL-encoded.
In this chapter, we tie together many of the Internet’s subsystems available to you from Python. When writing applications that work with XML in distributed systems, it’s important to understand how the different subsystems work together, beyond just CGI. Having an understanding of how web servers operate, how URLs are encoded and decoded, as well as understanding the nature of threads and sockets and their role in network programming, equips you to glue together distributed systems and XML with a more robust toolbox. XML is still very much a cutting-edge technology, and leveraging it effectively means having an advanced understanding of the distributed network environment in which its used including protocols, sockets, threads, and other APIs. In the next chapter we explore web services and SOAP. Given the nascent SOAP support in Python, the work done in this chapter will serve you well.