
All of the projects from the previous chapters — whether it was a project that accessed files on the file system, interacted with a database, or served pages on a web server — have one thing in common: They didn't work the first time.
It is inevitable as a programmer that you will run into errors in your programs. Fortunately, Python has built-in features to help you discover those "bugs" and take care of them:
The Python debugger (which is actually just another Python module itself) supports setting decision markers called breakpoints and allows you to "step" through code one line at a time. It supports very sophisticated debugging if needed, including providing a stack viewer.
There are several Python automated test frameworks that enable you to build automated tests to test your code. Having automated tests enables you to add functionality and run your tests to verify that you haven't broken anything.
The basic purpose of a debugger is to enable a developer to "walk" through a program as it executes, noticing specific areas where the program breaks, and where it could be modified or optimized to work better.
The Python debugger can be utilized in several different ways:
The pdb module is the Python debugger. You can access it by importing it directly either in a script or in the Python console:
Import pdb
With the debugger module imported, you then have access to many different functions for debugging. This is especially useful if you import the module from Python's interactive interpreter, so let's look at an example of doing that now.
Download the supplemental code from the website for Chapter 10. From that directory, launch the Python interpreter. You'll see a screen like the following:
ActivePython 2.5.1.1 (ActiveState Software Inc.) based on
Python 2.5.1 (r251:54863, May  1 2007, 17:47:05) [MSC v.1310 32 bit (Intel)] on
win32
Type "help", "copyright", "credits" or "license" for more information.
>>>
The first thing to do is to import the Python debugger. Type import pdb and press Enter. You'll get the >>> Python prompt back.
At this point, import the test module created for this example, called pdbtest. Do this by typing import pdbtest and pressing Enter. The screen should now look like the following:
ActivePython 2.5.1.1 (ActiveState Software Inc.) based on
Python 2.5.1 (r251:54863, May  1 2007, 17:47:05) [MSC v.1310 32 bit (Intel)] on
win32
Type "help", "copyright", "credits" or "license" for more information.
>>> import pdb
>>> import pdbtest
>>>
Now the Python debugger does its work. Run the Debugger's run() method by typing the following and pressing Enter:
pdb.run('pdbtest.testfunction()')This will start the debugger and give you the following prompt:
> <string>(1)<module>()
(Pdb)
At this point, the debugger is waiting for you to tell it what to do. The most common commands are as follows:
Step — Tells the debugger to execute only the next line of code, and then stop
Next — Continues execution until the next line in the current function is reached; otherwise, it returns
Return — Continues execution until the current function returns
Continue — Tells the debugger to run the program normally from that point, without pausing
This is just a sampling of the Python debugger commands available—for the complete list of commands, see the official Python documentation at
www.python.org.
If you are running IDLE, there is a menu for debugging features, as shown in Figure 10-1.
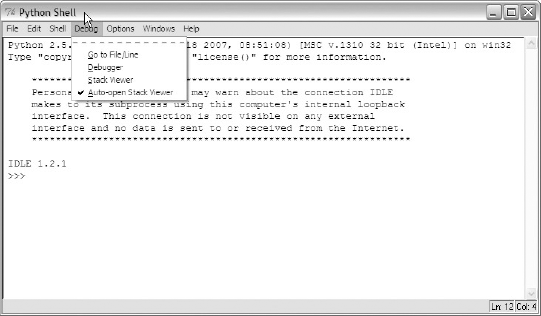
As shown in Figure 10-1, there are several options:
Go to File/Line — Looks around the insertion point for a filename and line number, opens the file, and shows the line
Debugger — Opens a Debugger UI (discussed below) and runs commands in the shell under the debugger
Stack Viewer — Shows the stack viewer for the most recent exception/traceback
Auto-open Stack Viewer — Opens the stack viewer automatically every time there is an exception/traceback
The Debug menu is only available in IDLE from the Python Shell window, not from a window in which you are editing a Python file.
The Debug Control window is shown in Figure 10-2.
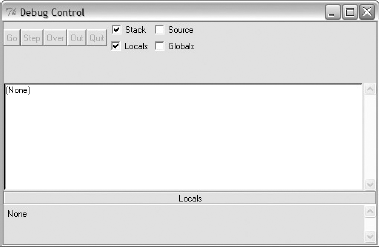
As shown in the figure, this window has several main areas:
Five buttons that enable you to interact with the debugger:
Go — Runs the program without pause
Step — Executes only the next line
Over — Skips the next line
Out — Jumps out of a loop
Quit — Quits the running program (but keeps the debugger running)
Four checkboxes that enable you to select what to monitor:
Stack
Source
Locals
Globals
A message window displaying debugger messages
A Variables area at the bottom (depending on what you chose to monitor)
Let's explore a brief example to show how the debugger works:
From the Python Shell in IDLE, select Debug

In the debugger, select Stack and Globals, and ensure that Source and Locals are deselected.
In the Python Shell, type the following command: name = "jim".
You can use your own name if you like. After doing that, the debugger window should look something like what is shown in Figure 10-3.
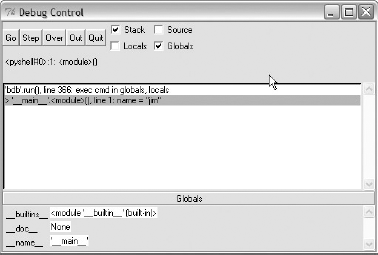
Notice that you don't have your prompt back yet in the Python Shell. That's because the command has not actually been executed yet. Click the Step button. The command is executed and the prompt is back in the Python Shell.
After a program is written, there is a tendency to feel a sense of great accomplishment, to feel like the work is done. This is, however, not true. A program must be tested.
A program is only "done" when it can be verified that it accomplishes two things:
"It does the thing right" — The program must be implemented in the way intended by the program design.
"It does the right thing" — The program, as implemented, must actually solve the problem it was intended to solve.
This may seem redundant, so perhaps it can be illustrated best with an example. Let's say the goal is to have a program that enables users to log in to a website and view information about their local machine, such as user accounts and groups. However, suppose that in designing the program, the information is sent across the network in plain text. The program was implemented in exactly the way intended, but the problem was the intention itself — sending local account information across the Internet in plain text is a bad idea, as it is extremely insecure.
Therefore, by testing, we are verifying not only the implementation, but also the intention.
Unit testing is simply testing a unit of code, rather than testing the entire program. The snapshothelper.py module from Chapter 2 is a good example to look at. Since I am going to refer to it several times in this section, let's look at it now:
import os, pickle, difflib, sys, pprint

def createSnapshot(directory, filename):
    cumulative_directories = []
    cumulative_files = []

    for root, dirs, files in os.walk(directory):
        cumulative_directories = cumulative_directories + dirs
        cumulative_files = cumulative_files + files

    try:
        output = open(filename, 'wb')
        pickle.dump(cumulative_directories, output, −1)
        pickle.dump(cumulative_files, output, −1)
        output.close()
    except:
        print "Problems encounted trying to save snapshot file!"

    raw_input("Press [Enter] to continue...")
    return

def listSnapshots(extension):
    snaplist = []
    filelist = os.listdir(os.curdir)
    for item in filelist:
        if item.find(extension)!= −1:
            snaplist.append(item)

    print '''
    Snapshot list:
    ========================
    '''
    printList(snaplist)

    raw_input("Press [Enter] to continue...")


def compareSnapshots(snapfile1, snapfile2):

    try:
        pkl_file = open(snapfile1, 'rb')
        dirs1 = pickle.load(pkl_file)
files1 = pickle.load(pkl_file)
pkl_file.close()
pk2_file = open(snapfile2, 'rb')
dirs2 = pickle.load(pk2_file)
files2 = pickle.load(pk2_file)
pk2_file.close()
except:
print "Problems encountered accessing snapshot files!"
raw_input("
Press [Enter] to continue...")
return
result_dirs = list(difflib.unified_diff(dirs1, dirs2))
result_files = list(difflib.unified_diff(files1, files2))
added_dirs = []
removed_dirs = []
added_files = []
removed_files = []
for result in result_files:
if result.find("
") == −1:
if result[0] == "+":
resultadd = result.strip('+')
added_files.append(resultadd)
elif result[0] == "-":
resultsubtract = result.strip('-')
removed_files.append(resultsubtract)
for result in result_dirs:
if result.find("
") == −1:
if result[0] == "+":
resultadd = result.strip('+')
added_dirs.append(resultadd)
elif result[0] == "-":
resultsubtract = result.strip('-')
removed_dirs.append(resultsubtract)
print "
Added Directories:
"
printList(added_dirs)
print "
Added Files:
"
printList(added_files)
print "
Removed Directories:
"
printList(removed_dirs)
print "
Removed Files:
"
printList(removed_files)
raw_input("
Press [Enter] to continue...")
def showHelp():
os.system('cls')
print '''
DIRECTORY/FILE COMPARISON TOOL
====================================Welcome to the directory/file snapshot tool. This tool
allows you to create snapshots of a directory/file tree,
list the snapshots you have created in the current directory,
and compare two snapshots, listing any directories and files
added or deleted between the first snapshot and the second.
To run the program follow the following procedure:
1. Create a snapshot
2. List snapshot files
3. Compare snapshots
4. Help (this screen)
5. Exit
'''
raw_input("Press [Enter] to continue...")
def invalidChoice():
print "INVALID CHOICE, TRY AGAIN!"
raw_input("
Press [Enter] to continue...")
return
def printList(list):
fulllist = ""
indexnum = 1
if len(list) > 20:
for item in list:
print " " + item,
if (indexnum)%3 == 0:
print "
"
indexnum = indexnum + 1
else:
for item in list:
print " " + itemThis program could simply be run and verified, but if, for example, you wanted to test just the createSnapshot() function, you would only need to test that portion, or "unit." This is done with a unit test. It involves passing to that unit its needed parameters, and then using some mechanism (such as assertions) to verify that the expected behavior is occurring.
A unique feature of Python is its ability to test specific functions using the interactive interpreter. Using the Python interpreter, you can import a module and run a specific function, passing it values and then using the unittest module to assert that particular conditions are true.
To begin, start the Python interpreter, and then import the snapshothelper.py module with the following command (assuming you are running Python from the directory where you downloaded this chapter's files):
import snaphothelper
Now the function can be run, with parameters you choose. In this case, the createSnapshot() function will be run, passing the directory to create a snapshot of, along with the filename to create:
snapshothelper.createSnapshot('c:\python25', 'python25snap.snp')The function is then run with the parameters specified.
To verify that the file was created, you could use a DOS prompt or Unix terminal, but as long as the Python interpreter is up, let's do it through that.
Import the os module and then type the following in the interpreter window (yes, there's a typo here — type it exactly as shown):
assert 'python25snap.snp1' in os.listdir(os.curdir), "File did not get created"
Did you get an error? Good! Your screen should look like this:
>>> assert 'pythonsnap.snp1' in os.listdir(os.curdir), "File did not get created"
Traceback (most recent call last):
  File "<stdin>", line 1, in <module>
AssertionError: File did not get created
As you can see, the assertion returns a traceback, and prints the error message defined in the assert statement.
Let's try the statement again, this time using the correct filename:
assert 'python25snap.snp' in os.listdir(os.curdir), "File did not get created"
Nothing happened? That's exactly right. If an assertion is true, it simply continues, which in this case means returning the interpreter prompt.
Python comes with a unit testing module out of the box, called unittest, also referred to as PyUnit. It is a Python-language version of the popular JUnit test framework for Java, written by Kent Beck and Erich Gamma.
unittest supports the following:
To accomplish these features, unittest implements several concepts:
Test fixture — This is the "housekeeping" needed to perform associated tests, and any necessary cleanup actions, such as deleting temporary files.
Test case — A test case is the smallest unit of testing. At the most basic level, it consists of executing some code and testing the behavior of the code against a predetermined standard.
Test suite — A test suite is simply a collection. Test suites can be nested, so a suite can contain other suites.
Test runner — A test runner, quite simply, runs tests. It is a component that facilitates the execution of a set of tests and the displaying of results to the user.
As an example, let's build a test for the createSnapshot() method in the snapshothelper.py module. The following paths assume a Windows system, so adjust the directory paths as appropriate if you are on Unix or Linux. Here is what the file (testsnapshothelper.py in the Chapter 10 directory) looks like:
import snapshothelper
import unittest
import os

class TestCreateSnapshot(unittest.TestCase):

    def setUp(self):
        import os
        os.chdir ('c:\snapshots')

    def tearDown(self):
        os.system('del *.snp')

    def testpython25snap(self):
        # make a snapshot of the Python25 directory
        snapshothelper.createSnapshot('c:\python25', 'python25snap.snp')
        assert 'python25snap.snp' in os.listdir(os.curdir), 'Snapshot not created!'

    def testprogramfilesdir(self):
        # make a snapshot of the Python25 directory
        snapshothelper.createSnapshot('c:\program files', 'programfilessnap.snp')
        assert 'programfilessnap.snp' in os.listdir(os.curdir), 'Snapshot not
        created!'

if __name__ == '__main__':
    unittest.main()
The first thing the program does is import the modules it is going to need:
import snapshothelper
import unittest
import os
Next, it initializes a class that is inherited from unittest.TestCase:
class TestCreateSnapshot(unittest.TestCase):
Two special methods are the first methods in the class. The setUp method is run at the beginning of each test method in the class, and the tearDown method is run at the end of each test method:
def setUp(self):
        import os
        os.chdir ('c:\snapshots')

    def tearDown(self):
        os.system('del *.snp')
Next are the test methods. Notice that each test methods begins with the word test. That's not just a naming convention — it tells the TestCase class that the method is a test method, to be run by the test runner.
Consider the first test method:
def testpython25snap(self):
        # make a snapshot of the Python25 directory
        snapshothelper.createSnapshot('c:\python25', 'python25snap.snp')
        assert 'python25snap.snp' in os.listdir(os.curdir), 'Snapshot not created!'
Notice it simply contains code to exercise the function under test, and then an assert statement verifying that the function executed correctly.
The next test method is structured much the same — it is to test that you can create a snapshot for the program files directory, which has a space in the directory name:
def testprogramfilesdir(self):
    # make a snapshot of the Python25 directory
    snapshothelper.createSnapshot('c:\program files', 'programfilessnap.snp')
    assert 'programfilessnap.snp' in os.listdir(os.curdir), 'Snapshot not created!'
Finally, the following lines of code, placed at the bottom of a test module, enable the tests to be run by simply executing the module:
if __name__ == '__main__':
unittest.main()Go ahead and run the example by typing the following from a command prompt at the directory where you downloaded the files for Chapter 10: python testsnapshothelper.py.
You should see errors similar to the following:
EE
======================================================================
ERROR: testprogramfilesdir (__main__.TestCreateSnapshot)
----------------------------------------------------------------------
Traceback (most recent call last):
  File "testsnapshothelper.py", line 9, in setUp
    os.chdir ('c:\snapshots')
WindowsError: [Error 2] The system cannot find the file specified: 'c:\snapshots'

======================================================================
ERROR: testpython25snap (__main__.TestCreateSnapshot)
----------------------------------------------------------------------
Traceback (most recent call last):
File "testsnapshothelper.py", line 9, in setUp
os.chdir ('c:\snapshots')
WindowsError: [Error 2] The system cannot find the file specified: 'c:\snapshots'
----------------------------------------------------------------------
Ran 2 tests in 0.009s
FAILED (errors=2)Ah, we forgot to create the snapshots directory. You can see how the output of errors or failing tests is formatted, to help you troubleshoot the results of the test run.
Create the c:snapshots directory and run the test module again. You'll see the following:
Press [Enter] to continue....
Press [Enter] to continue....
----------------------------------------------------------------------
Ran 2 tests in 18.081s

OK
Note that after each function you were prompted to press Enter. That's not a behavior of the test framework; the function itself does that. The output indicates that all the tests passed, and how long it took to run the tests.
Another option when building a framework for testing Python applications is doctest, a Python module that enables tests to be defined within docstrings as interactive sessions, and then run.
The best way to understand how it works is to look at a simple example, so let's do that now.
This first example shows the simplest way of running a doctest, by embedding docstrings inside a function itself:
def printname(firstname, lastname):
    """Print firstname and lastname

    >>> printname("Jim", "Knowlton")
    Jim Knowlton
>>> printname("John", "Doe")
John Doe
"""
print "%s %s" % (firstname, lastname)
def _test():
import doctest
doctest.testmod()
if __name__ == "__main__":
_test()This program defines a function printname, which takes a first name and a last name as parameters:
def printname(firstname, lastname):
This is followed by a comment (docstring) that shows the expected output of a test, written in the form of an interactive shell session:
"""Print firstname and lastname

    >>> printname("Jim", "Knowlton")
    Jim Knowlton
    >>> printname("John", "Doe")
    John Doe
    """
The next line is the actual functionality of the function, which prints the first name and last name, with a space in between:
print "%s %s" % (firstname, lastname)
The final block of code imports the doctest module and allows the doctests to be run when the module is executed:
def _test():
    import doctest
    doctest.testmod()

if __name__ == "__main__":
_test()This example shows how tests can be defined in a simple text file, separate from the module itself, and run.
The snapshottests.txt text file (simply copied and pasted from an interactive session) is as follows:
>>> def printname(firstname, lastname):
...     print firstname + " " + lastname
...
>>> printname("Jim", "Knowlton")
Jim Knowlton
>>> printname("Bob")
Traceback (most recent call last):
  File "<stdin>", line 1, in <module>
TypeError: printname() takes exactly 2 arguments (1 given)
>>> printname("William", "Jennings", "Bryan")
Traceback (most recent call last):
  File "<stdin>", line 1, in <module>
TypeError: printname() takes exactly 2 arguments (3 given)
>>>
Now let's look at the doctestexample2 module. It's very simple:
import doctest
doctest.testfile("snapshottests.txt")
As you can see, it is simply a matter of creating a text file from a Python interactive session and then creating a script that loads that text file (with the help of the testfile() function).
If the module is run from the command line with a -v option (for verbose), it generates the following output:
Trying:
    def printname(firstname, lastname):
        print firstname + " " + lastname
Expecting nothing
ok
Trying:
    printname("Jim", "Knowlton")
Expecting:
    Jim Knowlton
ok
Trying:
    printname("Bob")
Expecting:
    Traceback (most recent call last):
      File "<stdin>", line 1, in <module>
    TypeError: printname() takes exactly 2 arguments (1 given)
ok
Trying:
    printname("William", "Jennings", "Bryan")
Expecting:
Traceback (most recent call last):
File "<stdin>", line 1, in <module>
TypeError: printname() takes exactly 2 arguments (3 given)
ok
1 items passed all tests:
4 tests in snapshottests.txt
4 tests in 1 items.
4 passed and 0 failed.
Test passed.This chapter wasn't about writing code — it was about making code right. This can often be the most critical phase of software development, where "thinking like the customer" enables robust tests to be developed, and troubleshooting skills can facilitate solving thorny problems. Python provides some great tools to enable developers to effectively perfect their code.
This chapter covered the following main topics:
The Python debugger, including the following:
Importing the
pdbmodule directly through the Python interactive interpreterAccessing the debugger through the IDLE
Python test frameworks, including the following:
unittest(PyTest)doctest
If you've made it all the way through this book, congratulations. You now know how to access files, work with databases, communicate via Internet protocols, access operating system resources, and more — all from a popular, free, open-source, mature, fun programming language. Your work life — and your life in general — may never be the same.