
Have you ever installed a program and wanted to know exactly what was installed? Programs typically include numerous files and directories—in some cases hundreds. It can be difficult to determine what was put on the system. This can especially be important if, for instance, you are verifying an install to ensure that all the directories and files were placed on the system. Conversely, with an uninstall, you want to verify just the opposite—that everything that had been put on the system is now gone.
The File/DirectoryComparison program enables you to create a "snapshot" of your system based on a directory "base" you provide. It will also perform a comparison of two snapshots to show you the differences. This includes items missing from snapshot 1 but in snapshot 2, and items missing in snapshot 2 but present in snapshot 1.
Along the way, you'll learn several valuable things about Python and its features:
How to create and import modules
How to create and call functions
Getting user input and passing the value provided by the user to the program
How to find information related to the Python Standard Library
You can find the program located on the www.wrox.com page for this book. To run it, simply go to a command prompt, and from the directory on your system where the Chapter 2 program files are located, type the following: python snapshot.py.
This will bring up a menu like the one shown here:
DIRECTORY/FILE COMPARISON TOOL
====================================
Please type a number and press enter:

1.  Create a snapshot
2.  List snapshot files
3.  Compare snapshots
4.  Help
5.  Exit
From here, you can create a snapshot, compare two snapshots, view some help text (always a good idea!), or exit the program. The following sections describe each of the program features.
There are two scenarios for which you would create a snapshot:
You haven't created a snapshot yet and want to create one to have a "base" to compare against later.
You have created a snapshot and have run some process (such as an install or uninstall) and want to compare it to the first snapshot you created.
In both cases, the interface is the same. When you type 1 and press Enter to create a snapshot, you are prompted for some information the program needs to create it. First, you'll get the following prompt:
Enter the directory name to create a snapshot of:
This prompt is asking you for the "root" on which to base your snapshot. For instance, if I were installing a program into the normal Windows location (which is C:Program Files), which creates a directory called jimsprogram, for this prompt I would initially type C:Program Files because I want to know anything that was put into that directory. That way, when my program installs, I can see what has been put into there.
After I tell the directory to "snap," I get the following prompt:
Enter the name of the snapshot file to create:
In other words, it is creating a file on disk, with the snapshot. This is not a human-readable file (it's a "Pickle" file—more on that later), but Python will be able to read it and use it to compare snapshots. You can give it any valid filename for your system.
Your snapshot is now created. Pressing Enter will take you back to the menu.
If you type 2 and press Enter, you'll be presented with an option to list the snapshot files in your current directory. Snapshot files can have any valid filename, so you'll be prompted as follows in order for Python to determine how to list the files:
LIST SNAPSHOT FILES
====================================
Enter the file extension for your snapshot files

      (for example, 'snp' if your files end in '.snp'):
After you enter the common extension for your snapshot files, you'll be presented with a list similar to the following (except with your own files listed, of course):
Snapshot list:
    ========================

        ci_directory.snp
        ci_directory2.snp
        doctemp1.snp
        doctemp2.snp
Press [Enter] to continue...
As noted in the preceding sidebar, don't forget to name all your snapshot files with a consistent extension.
Pressing Enter will take you back to the menu.
The real purpose of the program is to compare two snapshots to determine what's changed. You'll do this by typing 3 at the menu and pressing Enter. When you do so, you'll get the following prompt:
Enter the filename of snapshot 1:
Enter the name of the "base" snapshot file (the program looks in the current directory) and press Enter. After you do that, you'll get the following prompt:
Enter the filename of snapshot 2:
Type the name of the second snapshot file and press Enter. You'll then be presented with results similar to the following:
Added Directories:

        new


Added Files:

        jimsworddoc.doc


Removed Directories:

        buildCert


Removed Files:

        !whatsnew.txt
        readme.html
        blueButton.gif
        framed.html
        index.html
        modalPopupTest.html

Press [Enter] to continue...
A few notes about the output:
There are four sections to the output:
Added directories
Added files
Removed directories
Removed files
If any of the sections have more than 20 items, then the results are shown in tabular format, in three columns.
Pressing Enter will take you back to the menu.
If you type 4 and press Enter, you'll get the following help screen:
DIRECTORY/FILE COMPARISON TOOL
       ====================================
       Welcome to the directory/file snapshot tool.  This tool
       allows you to create snapshots of a directory/file tree,
       list the snapshots you have created in the current directory,
       and compare two snapshots, listing any directories and files
       added or deleted between the first snapshot and the second.

       To run the program follow the following procedure:
       1.  Create a snapshot of a file system to monitor.
       2.  Install (or uninstall) a program under test.
       3.  Create another snapshot.
       4.  Compare the snapshots and note the results.
This screen provides a general overview of the program, along with instructions for how to use it. Pressing Enter will take you back to the menu.
Well, this one is probably the simplest to understand. Typing 5 and pressing Enter will exit the program and return you to a system prompt.
So far, you've seen all the options, but how do you really use the program? It involves four basic steps:
Create an initial snapshot.
Let's say you have a program called "Jim's Cool App" (not the most inventive title, but it's 6:00 a.m. after an all-nighter). Suppose also that the program creates a directory in
C:Program FilescalledJimsCoolApp. The first thing you would do is create a snapshot ofC:Program Files(this is before you install your program).Call the snapshot file something meaningful, and probably date it. This example uses
110607-ProgFiles-Base.snp(the current date as I write this).Install your program.
This one's pretty self-explanatory. Make sure you install to the default location, in the most standard way possible.
Create a second snapshot.
At this point you have created a "base" snapshot and installed your program. It's time to create a snapshot post-install. Run the program again, type 1, and press Enter to create a snapshot, again naming it something meaningful, in this case
110607-ProgFiles-JCAInstalled.snp.At this point, if you want to make sure you named your snapshot files correctly, you can choose option 2 from the menu and list snapshot files.
Compare snapshots.
Finally, you're ready to compare snapshots. Type 3 and press Enter from the menu. First enter the name of the initial snapshot file,
110607-ProgFiles-Base.snpin this case. Then, enter the name of the second snapshot file, which was110607-ProgFiles-JCAInstalled.snpin the example above.
You'll now be presented with a list of all the files and directories added with "Jim's Cool App."
Two other possible uses for this program, other than documenting an install, are as follow:
Document an uninstall. In this case, you would just use the "installed" snapshot as your base, and then take another snapshot after uninstalling and compare them to see what was removed. Typically, you would compare the "before install" snapshot to the "after uninstall" snapshot to determine whether the uninstall neglected to delete program artifacts.
If you have a "standard configuration" for a system, you could create a base snapshot with your standard configuration and run the compare after building other systems, to ensure that the list of files and directories is consistent.
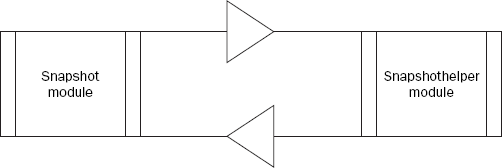
The design of the Directory/File Snapshot program is a simple one: It includes two modules, snapshot and snapshothelper, and no classes. Snapshot is the main program, and snapshothelper contains helper functions to perform various tasks, as shown in Figure 2-1.
As mentioned earlier, the snapshot module is the main program, and the one that users will actually run from the command line. It displays the menu, accepts input from the user based on the menu options, and performs actions based on that selection. Generally, the main "actions" that happen as a result of the user's menu selection happen in the snapshothelper module.
The first place that Python looks for a module when it is imported is in the same directory as the main calling program. If a module has been created that is a "helper" module, then that's the logical place to put it. That's why snapshot and snapshothelper are in the same directory.
Note
If a module is not specific to a particular program, but contains functions and classes you would want to use in many different programs, the best place to put it would be in your Python library directory.
You'll find that this design is quite common—a single "main" program supported by one (or several) "helper" programs that contain classes, functions, or data that provides some kind of service to the calling program. The advantage of this is that it provides abstraction. In other words, you can simply call a function from the main program and as long as it provides what you are asking for, it doesn't matter how it was accomplished. This makes modifying programs much easier. You'll learn more about that later.
Although the main program for this application is in the snapshot module, which displays the menu, accepts the user input, and then calls the appropriate function based on the choice the user made, the functions to actually "do stuff" are not in the snapshot module, but rather in snapshothelper.
For this application, there are two modules, the snapshot module (the main program) and the snapshothelper module.
In addition to being the main program that users will run, the snapshot module also contains the code for displaying the menu and responding to user selections. Table 2-1 shows the function used in the snapshot module.
The snapshothelper module contains the functions that do most of the "heavy lifting" for the program. They essentially provide services, in the form of functions, to the main program when called upon. Table 2-2 describes the functions in the snapshothelper module.
Table 2.2. Table 2-2
Function | Return Type | Description |
|---|---|---|
| none | Takes a directory path and chosen snapshot filename and creates a snapshot of the indicated directory, naming the file the chosen filename |
| none | Takes a chosen snapshot file extension and displays to the user a list of snapshot files in the current directory |
| none | Takes the names of two snapshot files and compares them, outputting to the user a list of all added and removed directories and files between the first snapshot and the second |
| none | Displays to the user a help screen that displays general program information, as well as suggested steps for using the program |
| none | Returns an error if the user enters an invalid choice |
| none | This is a helper function that formats and prints a list of items found. It is used by |
In this section, you'll dive into the details of the code itself. First you'll learn how the snapshot and snapshothelper modules work together, and some principles of design that will help you to architect well-organized, maintainable Python solutions. You'll also look at some specific functions from the Python Standard Library that I've used in this program, and learn how you can use them in your own applications.
The snapshot module, as the main program, is the one users will actually run from the command line. As described previously, it contains the code to display the main menu and make decisions based on which menu option the user chooses.
Here's the code for the entire module. Take a general look at it, and then we'll break down the code section by section.
Note
The following code uses cls to clear the screen because this code was written for a Windows system. If you are running on another operating system, you will need to use whatever command is appropriate to clear the screen.
#=======================================#
#SNAPSHOT.PY                            #
#DIRECTORY/FILE SYSTEM SNAPSHOT PROGRAM #
#BY JAMES O. KNOWLTON, COPYRIGHT 2007   #
#=======================================#

import sys, os, snapshothelper


#MENU
def menu():
    os.system('cls')
    print '''
    DIRECTORY/FILE COMPARISON TOOL
    ====================================
    Please type a number and press enter:

    1.  Create a snapshot
    2.  List snapshot files
    3.  Compare snapshots
    4.  Help
    5.  Exit
    '''
    choice = raw_input("	")
    return choice

#MENU DECISION STRUCTURE
choice = ""
while choice != "5":
    choice = menu()
    if choice == "1":
        os.system('cls')
        print '''CREATE SNAPSHOT
        ===================================='''
        directory = raw_input
                    ("Enter the directory name to create a snapshot of: ")
        filename = raw_input
                   ("Enter the name of the snapshot file to create: ")
        snapshothelper.createSnapshot(directory, filename)
    elif choice == "2":
        os.system('cls')
        print '''
LIST SNAPSHOT FILES
====================================
Enter the file extension for your snapshot files
(for example, 'snp' if your files end in '.snp'):
'''
extension = raw_input(" ")
snapshothelper.listSnapshots(extension)
elif choice == "3":
os.system('cls')
print '''
COMPARE SNAPSHOTS
====================================
'''
snap1 = raw_input("Enter the filename of snapshot 1: ")
snap2 = raw_input("Enter the filename of snapshot 2: ")
snapshothelper.compareSnapshots(snap1, snap2)
elif choice == "4":
snapshothelper.showHelp()
else:
if choice != "5":
snapshothelper.invalidChoice()That's the big picture. The following sections break this down section by section.
This first part is quite simply a program header:
#=======================================# #SNAPSHOT.PY # #DIRECTORY/FILE SYSTEM SNAPSHOT PROGRAM # #BY JAMES O. KNOWLTON, COPYRIGHT 2007 # #=======================================#
When writing any code, including Python, it's always a good idea to create a header, which is just a formatted comment at the top of the source code file, indicating who wrote it, and what it's for. It's likely you are already familiar with this standard practice, but it is included here once to be thorough. From now on, we'll skip over the header in each source file.
In Python, quite often the first line of executable code you'll see in a source file is an import statement:
import sys, os, snapshothelper
In this case, you are importing three modules: the standard modules os and sys, and our helper module snapshothelper. Notice that the module we created is imported in the same way as the modules from the Standard Library (those that are included with Python). In fact, if you navigate to the lib directory under your Python program, you'll actually find os.py and sys.py, which are the python files (modules) you're importing. You can even open them in IDLE and look at them if you're curious.
Make sure that you don't edit these files unless you know what you're doing—otherwise, you could mess something up and the module could become unusable.
We're going to skip over the menu() function for now because it actually makes more sense to do so, to follow the flow of the program.
The first thing the main program does is create a string variable called choice and assign it to nothing:
choice = ""
Although Python is a dynamically typed language (meaning it interprets the data types of members based on their context), variables still have to be assigned some kind of value before they can be used. That's why you have this line—to create memory space for a string variable called choice. If for some reason you want to initialize a variable but don't want to give it an initial value, you can assign it to None, as in the following example:
X = None
Next, you create a while loop that will form the bulk of your decision tree:
while choice != "5":
choice = menu()
if choice == "1":
os.system('cls')
print '''CREATE SNAPSHOT
===================================='''
directory = raw_input
("Enter the directory name to create a snapshot of: ")
filename = raw_input ("Enter the name of the snapshot file to create: ")
snapshothelper.createSnapshot(directory, filename)
elif choice == "2":
os.system('cls')
print '''
LIST SNAPSHOT FILES
        ====================================
        Enter the file extension for your snapshot files
        (for example, 'snp' if your files end in '.snp'):
        '''
        extension = raw_input("		")
        snapshothelper.listSnapshots(extension)
    elif choice == "3":
        os.system('cls')
        print '''
        COMPARE SNAPSHOTS
        ====================================
        '''
        snap1 = raw_input("Enter the filename of snapshot 1: ")
        snap2 = raw_input("Enter the filename of snapshot 2: ")
        snapshothelper.compareSnapshots(snap1, snap2)
    elif choice == "4":
        snapshothelper.showHelp()
    else:
        if choice != "5":
snapshothelper.invalidChoice()The while loop checks for the choice variable being assigned to the string "5".
while choice != "5":
Because the first time through the choice variable is an empty string, the while loop will execute at least once. The first thing it does is assign the variable choice to the return value of the function menu():
choice = menu()
For information on what the
menu()function does and how it does it, see the section on themenu()function.
Once the variable choice has been assigned a value (based on actions taken while the menu() function was run), the program determines what to do based on the user's menu selection. Because there is no case or switch statement in Python, the same functionality is developed through a series of if-elif statements. At the end, there is an else statement, which is the "fallback" option.
If the user enters 1, the program prompts the user to input a snapshot directory and filename for the snapshot file, respectively, and then assigns those values to variables (through the raw_input() function). It then executes the createSnapshot function, which is in the snapshothelper module:
if choice == "1":
        os.system('cls')
        print '''CREATE SNAPSHOT
        ===================================='''
        directory = raw_input
                    ("Enter the directory name to create a snapshot of: ")
        filename = raw_input
                   ("Enter the name of the snapshot file to create: ")
        snapshothelper.createSnapshot(directory, filename)
Notice that the module name has to be entered first, followed by the function name, in dot notation. If a function resides in the same module where it is being called (such as the menu() function in this module), then the module name is not required. The values of the two entered variables are passed to the function as parameters.
If the user enters 2, the program prompts the user for the extension they have used for their snapshot files. This response is assigned to a variable (again through the raw_input command) and the listSnapshots method in snapshothelper is called, passing the snapshot file extension to it:
elif choice == "2":
        os.system('cls')
        print '''
        LIST SNAPSHOT FILES
        ====================================
        Enter the file extension for your snapshot files
        (for example, 'snp' if your files end in '.snp'):
        '''
        extension = raw_input("		")
        snapshothelper.listSnapshots(extension)
If the user enters 3, the user is prompted for the names of the two snapshot files to compare. Then the compareSnapshots function is called, passing the names of the snapshot files as parameters:
elif choice == "3":
        os.system('cls')
        print '''
        COMPARE SNAPSHOTS
        ====================================
        '''
        snap1 = raw_input("Enter the filename of snapshot 1: ")
        snap2 = raw_input("Enter the filename of snapshot 2: ")
        snapshothelper.compareSnapshots(snap1, snap2)
If the user enters 4, the showHelp method in snapshothelper is called, which simply displays the help text.
elif choice == "4":
    snapshothelper.showHelp()
else:
    snapshothelper.invalidChoice()
What if the user enters 5? Well, remember our while loop? It only executes while choice does not equal 5. If the user enters 5, then it breaks out of the loop, and because there is no more code outside the while loop, the programs ends.
Let's now look at the menu() function, as control is passing to it at this point:
#MENU
def menu():
    os.system('cls')
    print '''
    DIRECTORY/FILE COMPARISON TOOL
    ====================================
    Please type a number and press enter:

    1.  Create a snapshot
    2.  List snapshot files
    3.  Compare snapshots
    4.  Help
    5.  Exit
    '''
    choice = raw_input("	")
    return choice
As you can see, the first thing the menu program does is clear the screen by accessing the os.system() function. Remember when we imported the os module? This is why. Importing a module enables you to use its resources. The os module is especially useful, as it gives you access to operating system resources. For example, the os.system() function enables you to run any command you could run at a system prompt (such as cls to clear the screen on a Windows command prompt).
After clearing the screen, print a menu to it. Notice the three single-quote characters used in this print statement ('''). This convention enables you to create a multi-line message and have Python output it exactly as you type it.
As you can see from the menu that's displayed, the user is presented with five options:
Create a snapshot file.
List the snapshot files in the current directory.
Compare snapshots.
Display a help screen.
Exit.
Then the local variable choice is assigned to the output of the raw_input() function. The raw_input() function is a built-in function that has tremendous value. It enables you to prompt the user and then assign what they type (after they press Enter) to a variable. In this case, we're already presenting the menu, so we don't want to put anything in the message of the raw_input() command, but we do want to move the cursor over a bit, so we can insert an escape character for a tab (" ") in the parameter for the prompt. This moves the cursor to where we want it.
The final line of the menu() function returns a value to the code that called it—in this case, returning the string representing the user's selection.
return choice
The snapshothelper module does not have directly executable code of its own—if you ran Python's snapshothelper.py at the command prompt, nothing would happen. What it contains is the functions that are used by the snapshot program to do its work.
The module starts with an import statement to import all the modules it will be using, and then starts into the functions. Let's go through them one at a time.
The createSnapshot() function takes a directory (to create the snapshot for) and a filename (the name of the snapshot file), and creates a snapshot file. Take a look at it in its entirety, and then we'll go through it piece by piece:
def createSnapshot(directory, filename):
    cumulative_directories = []
    cumulative_files = []

    for root, dirs, files in os.walk(directory):
        cumulative_directories = cumulative_directories + dirs
        cumulative_files = cumulative_files + files

    try:
        output = open(filename, 'wb')
        pickle.dump(cumulative_directories, output, −1)
        pickle.dump(cumulative_files, output, −1)
        output.close()
    except:
        print "Problems encounted trying to save snapshot file!"

    raw_input("Press [Enter] to continue...")
    return
The first thing it does is initialize two lists, one to hold a cumulative list of directories and another to hold a cumulative list of files:
cumulative_directories = []
cumulative_files = []
You then iterate through the chosen directory and build a list of all the directories and files found, using the useful os.walk() function:
for root, dirs, files in os.walk(directory):
        cumulative_directories = cumulative_directories + dirs
        cumulative_files = cumulative_files + files
At this point you have two lists—cumulative_directories[] has all the directories found, and cumulative_files[] has all the files found. However, you need some way to persistently store these data structures, in order to be able to refer to them later. The pickle module is the perfect solution. Consider pickles in a jar. They are stored and preserved for later access and use. The same applies here. Because sometimes there are issues saving a file to disk, I decided to put the routine to pickle our lists inside a try/except block, as shown here:
try:
        output = open(filename, 'wb')
        pickle.dump(cumulative_directories, output, −1)
        pickle.dump(cumulative_files, output, −1)
        output.close()
    except:
        print "Problems encounted trying to save snapshot file!"
This way, if there is a problem, the program won't crash. Instead, you'll get a nice error message. As you can see, the pickle routine uses the filename that was entered in the main program in the snapshot module to save the file.
The last bit of code simply prompts the user to press Enter and then returns control to the main program:
raw_input("Press [Enter] to continue...")
returnThe listSnapshot() function lists all the snapshot files in the current directory. It takes in a file extension as a parameter and performs its file search based on that. Here is the code:
def listSnapshots(extension):
    snaplist = []
    filelist = os.listdir(os.curdir)
    for item in filelist:
        if item.find(extension)!= −1:
            snaplist.append(item)

    print '''
    Snapshot list:
    ========================
    '''
    printlist(snaplist)

raw_input("Press [Enter] to continue...")The first thing it does is initialize a couple of values:
snaplist = []
filelist = os.listdir(os.curdir)
snaplist is an (initially) empty list that will hold the list of snapshot files. In the second line of the preceding code, you run the os.listdir to generate a list of files (based on the current directory, thanks to the os.curdir member). You assign the output to a list with the identifier filelist.
You then run a for loop that narrows down the list:
for item in filelist:
        if item.find(extension)!= −1:
            snaplist.append(item)
This for loop iterates through each item in the filelist. It uses the find string method to determine whether the snapshot extension is present. If it is, then the file is added to the list snaplist. After the for loop is done iterating, snaplist contains a list of all the snapshot files.
The next piece of code prints out the snapshot list (for more information on the printList() function, see the corresponding section below):
print '''
Snapshot list:
========================
'''
printList(snaplist)
Control now passes back to the main program.
The compareSnapshots() method is the largest in the program, and probably the most important. It takes the names of the snapshot files to compare from the main program as parameters, compares two snapshots, and then displays the differences between the two:
def compareSnapshots(snapfile1, snapfile2):

    try:
        pkl_file = open(snapfile1, 'rb')
        dirs1 = pickle.load(pkl_file)
        files1 = pickle.load(pkl_file)
        pkl_file.close()

        pk2_file = open(snapfile2, 'rb')
        dirs2 = pickle.load(pk2_file)
        files2 = pickle.load(pk2_file)
        pk2_file.close()
except:
print "Problems encountered accessing snapshot files!"
raw_input("
Press [Enter] to continue...")
return
result_dirs = list(difflib.unified_diff(dirs1, dirs2))
result_files = list(difflib.unified_diff(files1, files2))
added_dirs = []
removed_dirs = []
added_files = []
removed_files = []
for result in result_files:
if result.find("
") == −1:
if result.startswith("+"):
resultadd = result.strip('+')
added_files.append(resultadd)
elif result.startswith("-"):
resultsubtract = result.strip('-')
removed_files.append(resultsubtract)
for result in result_dirs:
if result.find("
") == −1:
if result.startswith("+"):
resultadd = result.strip('+')
added_dirs.append(resultadd)
elif result.startswith("-"):
resultsubtract = result.strip('-')
removed_dirs.append(resultsubtract)
print "
Added Directories:
"
printList(added_dirs)
print "
Added Files:
"
printList(added_files)
print "
Removed Directories:
"
printList(removed_dirs)
print "
Removed Files:
"
printList(removed_files)
raw_input("
Press [Enter] to continue...")Let's look at this section by section. The first thing the snapshot does is open the two snapshot files:
try:
        pkl_file = open(snapfile1, 'rb')
        dirs1 = pickle.load(pkl_file)
        files1 = pickle.load(pkl_file)
        pkl_file.close()
pk2_file = open(snapfile2, 'rb')
dirs2 = pickle.load(pk2_file)
files2 = pickle.load(pk2_file)
pk2_file.close()
except:
print "Problems encountered accessing snapshot files!"
raw_input("
Press [Enter] to continue...")
returnAgain, when dealing with files, it makes sense to encapsulate your code inside a try block. After opening a pickled file, you assign variable names to the data elements stored in the file. That's exactly what we did here. You encapsulated the retrieval of both files inside a single try block for code conciseness. You could have put each one in its own try block if you wanted to provide a more specific error message.
The next thing you do is the actual comparison. You have imported Python's difflib module in order to be able to compare two strings and show differences, so that's what you implement in these next two lines:
result_dirs = list(difflib.unified_diff(dirs1, dirs2))
result_files = list(difflib.unified_diff(files1, files2))
As you can see, you diff the directories and files, respectively, and assign the differences to the lists: result_dirs and result_files.
The next task is to separate the added files and directories from the removed files and directories. The unified_diff() method we accessed in the code appends a plus sign (+) to any files that have been added, and a minus sign (−) to any files that are missing. Based on that flag, you can parse them out:
for result in result_files:
        if result.find("
") == −1:
            if result[0] == "+":
                resultadd = result.strip('+')
                added_files.append(resultadd)
            elif result[0] == "-":
                resultsubtract = result.strip('-')
                removed_files.append(resultsubtract)
    for result in result_dirs:
        if result.find("
") == −1:
            if result[0] == "+":
                resultadd = result.strip('+')
                added_dirs.append(resultadd)
            elif result[0] == "-":
                resultsubtract = result.strip('-')
                removed_dirs.append(resultsubtract)
You basically built two lists based on whether the character found indicates the file (or directory) was added or removed. All that remains is to output the results to the screen:
print "

Added Directories:
"
    printList(added_dirs)
    print "

Added Files:
"
    printList(added_files)
    print "

Removed Directories:
"
    printList(removed_dirs)
    print "

Removed Files:
"
    printList(removed_files)
Control then passes back to the main program.
showHelp() is a very simple function. It simply displays the help screen and returns control back to the main program:
def showHelp():
    os.system('cls')
    print '''
    DIRECTORY/FILE SNAPSHOT TOOL
    ====================================
    Welcome to the directory/file snapshot tool.  This tool
    allows you to create snapshots of a directory/file tree,
    list the snapshots you have created in the current directory,
    and compare two snapshots, listing any directories and files
    added or deleted between the first snapshot and the second.

    To run the program follow the following procedure:
    1.  Create a snapshot
    2.  List snapshot files
    3.  Compare snapshots
    4.  Help (this screen)
    5.  Exit

 '''
As before, it uses the three single-quotes (''') to make it easy to format the display of large blocks of text.
This is simply an error-response function that executes when a user has entered the wrong input at the menu. Error-checking is critically important, so we implemented it here:
def invalidChoice():
    sys.stderr.write("INVALID CHOICE, TRY AGAIN!")
    raw_input("

Press [Enter] to continue...")
    return
The printList() method is just a helper method I created to print lists of items found. I created it because in testing the application, I found that without it the file list was displayed in one column, which is fine if you only have five files in the list, but not so fine if you have five hundred:
def printList(list):
    fulllist = ""
    indexnum = 1

    if len(list) > 20:
        for item in list:
            print "		" + item,
            if (indexnum)%3 == 0:
                print "
"
            indexnum = indexnum + 1
    else:
        for item in list:
            print "	" + item
It takes a list as a parameter. If the list contains more than 20 items, then the list is formatted in three columns. If the list contains 20 items or fewer, then the items appear in a single column.
This program contains three components that could cause potential problems. The following list describes them, including some ideas for how to test them:
The user interface –To test this, you could just go through all the menus, entering both valid and invalid information. You could easily automate this process with PyUnit (covered later in the book).
File I/O–Save files with valid and invalid names, long filenames, and spaces in filenames. Change file permissions on saved files and see what happens.
The actual difference calculation–Use a variety of directories. Try a directory with a lot of files, with long filenames, and so on.
There are several ways this project could be enhanced, including the following:
The user interface, while functional, is somewhat crude. This project could even be created as a GUI application (using
Tkinteror another graphics toolkit).Instead of allowing the snapshot files to be created with any extension, you could enforce a particular extension. That would simplify things (although it would make the program a little less flexible).
You could allow users to "set" a snapshot directory, enabling them to store their snapshot files somewhere other than the location from which the program is run.
You could store properties such as file size, last modified time, or other details in your snapshot file, to make it even more precise.
In this chapter, you learned how to build a very useful tool for comparing two different versions of a directory tree and displaying what has changed. This could be useful in many different contexts, such as software testing and configuration management. You also learned some valuable Python skills:
How to create and import modules
How to create and access functions
How to prompt for user input and make decisions in the program based on what the user chooses
What the Python Standard Library is, and how to get documentation on the modules contained in it