
This is how to place text onto your canvas.
- In a text editor, type the code given in the following code.
- Save this as a file named
text_1.py, inside the directory calledconstragain. - As before, open up an X terminal or DOS window if you are using MS Windows.
- Change directory into
constr- wheretext_1.pyis located. - Type
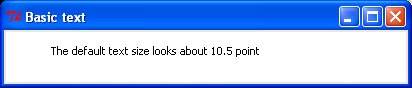
text_1.pyand your program should execute.# text_1.py #>>>>>>>>>> from Tkinter import * root = Tk() root.title('Basic text') cw = 400 # canvas width ch = 50 # canvas height canvas_1 = Canvas(root, width=cw, height=ch, background="white") canvas_1.grid(row=0, column=1) xy = 150, 20 canvas_1.create_text(xy, text=" The default text size looks about 10.5 point") root.mainloop()
The results are given in the following screenshot:
Placing text exactly where you want it on a screen can be tricky because of the way font height and inter-character spacing as well as the text window dimensions all interfere with each other. You will probably have to spend a bit of time experimenting to get your text as you want it.
Text placed onto a canvas offers a useful alternative to the often used print function as a debugging tool. You can send the values of many variables for display onto a canvas and watch their values change.
As will be demonstrated in the chapter on animation, the easiest way of observing the interaction of complex numerical relationships is to animate them in some way.
In a very similar manner to the way attributes are specified for lines and shapes, font type, size, and color are governed by the attributes of the create_text() method.
The instructions used in recipe 1 should be used.
Just use the name 4color_text.py when you write, save, and execute this program.
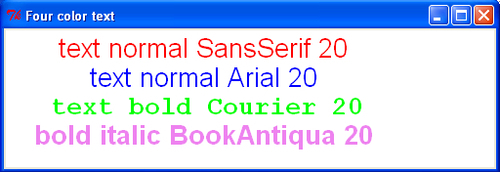
# 4color_text.py
#>>>>>>>>>>>>>>
from Tkinter import *
root = Tk()
root.title('Four color text')
cw = 500 # canvas width
ch = 140 # canvas height
canvas_1 = Canvas(root, width=cw, height=ch, background="white")
canvas_1.grid(row=0, column=1)
xy = 200, 20
canvas_1.create_text(200, 20, text=" text normal SansSerif 20",  fill='red',
width=500, font='SansSerif 20 ')
canvas_1.create_text(200, 50, text=" text normal Arial 20",  fill='blue',
width=500, font='Arial 20 ')
canvas_1.create_text(200, 80, text=" text bold Courier 20",  fill='green',
width=500, font='Courier 20 bold')
canvas_1.create_text(200, 110, text=" bold italic BookAntiqua 20",
fill='violet', width=500, font='Bookantiqua 20 bold')
root.mainloop()
#>>>>>>>>>>>>>>>>>>>>>>>>>>>>>>>>>>>>
The results are given in the following screenshot:
A difficulty in specifying fonts is deciding which fonts are best for your needs. Once you have selected a font, you may discover that your particular operating system does not support that font. Fortunately, the designers of Tkinter made it somewhat bulletproof by causing it to select a suitable default font if the one you specified was not available.
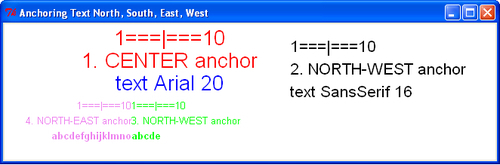
Placement of text north, south, east, west.
We place text on a canvas using the position specifiers that Tkinter has available. Anchor positions, text x, y location, font size, column width, and text justification all interact to control the appearance of text on the page. The following screenshot shows the compass nomenclature used in positioning the text:
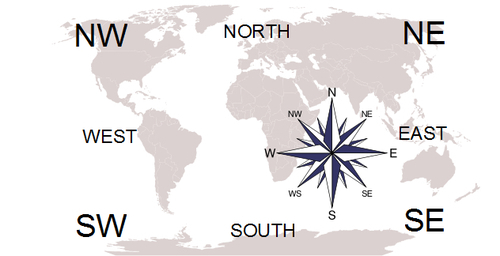
Placing text onto a canvas is tricky until we understand the navigation system that Tkinter uses. Here is how it works. All text goes into an invisible box. The box is like an empty picture frame placed over a nail on a board. The Tkinter canvas is the board and the empty frame is the box that the text we type is going to fit inside. The nail is the x and y location. The empty frame can be moved so that the nail is in the top left-corner (North-West) or the bottom right (South-East) or in the center or the other corners or sides. The following screenshot shows the imaginary frame on the canvas that contains the text:
Execute the code and observe how the various text position specifiers
control the appearance of the text.
# anchor_align_text_1.py
#>>>>>>>>>>>>>>>>>>>>>>>>>>>>>>>>>>>>>
from Tkinter import *
root = Tk()
root.title('Anchoring Text North, South, East, West')
cw = 650 # canvas width
ch = 180 # canvas height
canvas_1 = Canvas(root, width=cw, height=ch, background="white")
canvas_1.grid(row=0, column=1)
orig_x = 220
orig_y = 20
offset_y = 30
# 1. DEFAULT CENTER JUSTIFICATION
# width is maximum line length.
canvas_1.create_text(orig_x, orig_y ,
text="1===|===10", fill='red', width=700, font='SansSerif 20 ')
canvas_1.create_text(orig_x, orig_y + offset_y,
text="1. CENTER anchor", fill='red', width=700, font='SansSerif 20  ')
canvas_1.create_text(orig_x, orig_y + 2 *offset_y,
text="text Arial 20", fill='blue', width=700, font='SansSerif 20 ')
#===================================================================
orig_x = 380
# 2. LEFT JUSTIFICATION
canvas_1.create_text(orig_x, orig_y, text="1===|===10",
fill='black', anchor = NW, width=700, font='SansSerif 16 ')
canvas_1.create_text(orig_x, orig_y + offset_y, text="2. NORTH-WEST  anchor",
fill='black', anchor = NW, width=700, font='SansSerif 16 ')
canvas_1.create_text(orig_x, orig_y + 2 *offset_y, fill='black',
text="text SansSerif 16", anchor = NW, width=700, font='SansSerif  16 ')
#==================================================================
# 3. DEFAULT TOP-LEFT (NW) JUSTIFICATION
orig_x = 170
orig_y = 102
offset_y = 20
canvas_1.create_text(orig_x, orig_y , anchor = NW ,text="1===|===10",
fill='green', width=500, font='SansSerif 10 ')
canvas_1.create_text(orig_x, orig_y + 1 * offset_y, anchor = NW ,
text="3. NORTH-WEST anchor", fill='green', width=500,  font='SansSerif 10 ')
#canvas_1.create_text(orig_x, orig_y + 2 * offset_y, anchor = NW,
#text="abc", fill='green', width=700, font='SansSerif 10 ')
canvas_1.create_text(orig_x, orig_y + 2 * offset_y, anchor = NW,
text="abcde", fill='green', width=500, font='Bookantiqua 10 bold')
#===================================================================
# 4. DEFAULT Top-right (SE) JUSTIFICATION
canvas_1.create_text(orig_x, orig_y , anchor = NE ,
text="1===|===10", fill='violet', width=500, font='SansSerif 10 ')
canvas_1.create_text(orig_x, orig_y + 1 * offset_y, anchor = NE ,
text="4. NORTH-EAST anchor", fill='violet', width=500,  font='SansSerif 10 ')
#canvas_1.create_text(orig_x, orig_y + 2 * offset_y, anchor = NE,
#text="abc",fill='violet', width=700, font='SansSerif 10 ')
canvas_1.create_text(orig_x, orig_y + 2 * offset_y, anchor = NE,
text="abcdefghijklmno", fill='violet', width=500, font='Bookantiqua 10 bold')
root.mainloop()
#>>>>>>>>>>>>>>>>>>>>>>>>>>>>>>>>>>>>
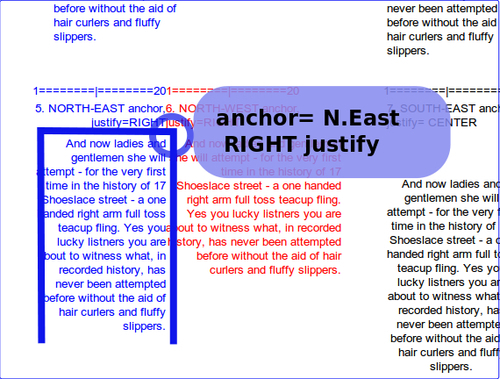
We now concentrate particularly on how the justification of the text in columns interacts with column anchor positions.
The following code contains a paragraph that is much too long to fit onto a single line. This is where we see how the term justify lets us decide whether we want the text to line up to the right of the column or to its left or perhaps even the center. The column width, in pixels, is specified and then the text is made to fit.
Run the following code and observe that the height of the column is only confined by the height of the canvas but the width, anchor position, justification, and font size determine how the text gets laid out on the canvas.
# justify_align_text_1.py
#>>>>>>>>>>>>>>>>>>>>>>>>>>>>>>>>>>>>>
from Tkinter import *
root = Tk()
root.title('North-south-east-west Placement with LEFT and RIGHT  justification of Text')
cw = 850 # canvas width
ch = 720 # canvas height
canvas_1 = Canvas(root, width=cw, height=ch, background="white")
canvas_1.grid(row=0, column=1)
orig_x = 220
orig_y = 20
offset_y = 20
jolly_text = "And now ladies and gentlemen she will attempt - for the very first time in the history of 17 Shoeslace street - a one handed right arm full toss teacup fling. Yes you lucky listners you are about to witness what, in recorded history, has never been attempted before without the aid of hair curlers and fluffy slippers."
# width is maximum line length.
#=================================================================
# 1. Top-left (NE) ANCHOR POINT, no column justification specified.
canvas_1.create_text(orig_x, orig_y + 1 * offset_y, anchor = NE  ,text="1.
NORTH-EAST anchor, no column justification", fill='blue', width=200,  font='Arial 10')
canvas_1.create_text(orig_x, orig_y + 3 * offset_y, anchor = NE,  text=jolly_text,
fill='blue', width=150, font='Arial 10')
#==================================================================
# 2. Top-right (NW) ANCHOR POINT, no column justification specified.
canvas_1.create_text(orig_x, orig_y + 1 * offset_y, anchor = NW  ,text="2.
NORTH-WEST ancho, no column justification", fill='red', width=200,  font='Arial 10')
canvas_1.create_text(orig_x, orig_y + 3 * offset_y, anchor = NW,  text= jolly_text,
fill='red', width=200, font='Arial 10')
#==================================================================
orig_x = 600
canvas_1.create_text(orig_x, orig_y + 1 * offset_y, anchor = NE  ,text="3.
SOUTH-EAST anchor, no column justification",fill='black', width=200,  font='Arial 10')
canvas_1.create_text(orig_x, orig_y + 1 * offset_y, anchor = NW  ,text="4.
SOUTH-WEST anchor, no column justification", fill='#666666',  width=200, font='Arial 10')
#============================================================
orig_x = 600
orig_y = 280
# 3. BOTTOM-LEFT (SW) JUSTIFICATION, no column justification # specified.
canvas_1.create_text(orig_x, orig_y + 2 * offset_y, anchor = SW,  text=jolly_text,
fill='#666666', width=200, font='Arial  10')
#==================================================================
# 4. TOP-RIGHT (SE) ANCHOR POINT, no column justification specified.
canvas_1.create_text(orig_x, orig_y + 2 * offset_y, anchor = SE,  text=jolly_text,
fill='black', width=150, font='Arial 10')
#===================================================================
orig_y = 350
orig_x = 200
# 5. Top-right (NE) ANCHOR POINT, RIGHT column justification # specified.
canvas_1.create_text(orig_x, orig_y + 1 * offset_y, anchor = NE ,  justify=RIGHT,
text="5. NORTH-EAST anchor, justify=RIGHT", fill='blue', width=200,  font='Arial 10 ')
canvas_1.create_text(orig_x, orig_y + 3 * offset_y, anchor = NE,  justify=RIGHT,
text=jolly_text, fill='blue', width=150, font='Arial 10')
#===================================================================
# 6. TOP-LEFT (NW) ANCHOR POINT, RIGHT column justification specified.
canvas_1.create_text(orig_x, orig_y + 1 * offset_y, anchor = NW  ,text="6.
NORTH-WEST anchor, justify=RIGHT", fill='red', width=200,  font='Arial 10 ')
canvas_1.create_text(orig_x, orig_y + 3 * offset_y, anchor = NW,  justify=RIGHT,
text=jolly_text, fill='red', width=200, font='Arial 10')
#===================================================================
orig_x = 600
# Header lines for 7. and 8.
canvas_1.create_text(orig_x, orig_y + 1 * offset_y, anchor = NE  ,text="7.
SOUTH-EAST anchor, justify= CENTER", fill='black', width=160,  font='Arial 10 ')
canvas_1.create_text(orig_x, orig_y + 1 * offset_y, anchor = NW ,  text="8.
SOUTH-WEST anchor, justify= CENTER", fill='#666666', width=200,  font='Arial 10 ')
#==================================================================
orig_y = 600
# 7. TOP-RIGHT (SE) ANCHOR POINT, CENTER column justification # specified.
canvas_1.create_text(orig_x, orig_y + 4 * offset_y, anchor = SE,  justify= CENTER,
text=jolly_text, fill='black', width=150, font='Arial 10')
#===================================================================
# 8. BOTTOM-LEFT (SW) ANCHOR POINT, CENTER column justification # specified.
canvas_1.create_text(orig_x, orig_y + 4 * offset_y, anchor = SW,  justify= CENTER,
text=jolly_text, fill='#666666', width=200, font='Arial 10')
root.mainloop()
#>>>>>>>>>>>>>>>>>>>>>>>>>>>>>>>>>>>>
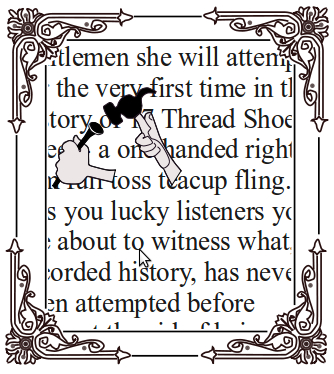
The interaction of column width, anchor position, and justification are complex and the clearest way to explain the results is with annotated pictures of the canvas display resulting from execution. The following screenshot shows Top-right (NE) ANCHOR POINT, no justification specified (default LEFT justification).

The following screenshot shows the Top-right(SE)ANCHOR POINT, no justification specified:
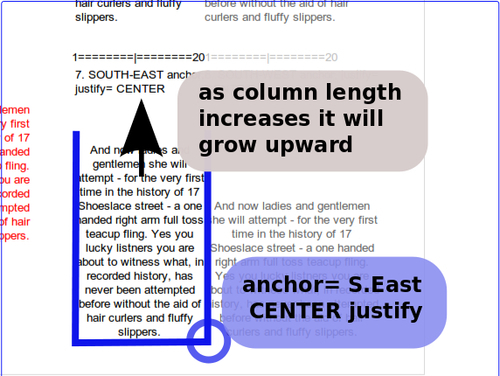
The following screenshot shows the Bottom-right (SE) ANCHOR POINT, CENTER justification specified:
Discover what fonts are available on your particular computer and then print a sample of each in the default size, all in alphabetic order.
One solution to the problem of choosing a suitable font is to conduct a trustworthy procedure to catalog what fonts are available on the platform you are using and print an example of each type onto the screen. This is what the next example does.
The instructions used in recipe 1 should be used.
Just use the name fonts_available.py when you write, save, and execute this program.
# fonts_available.py
# ==================================
from Tkinter import *
import tkFont
root = Tk()
root.title('Fonts available on this Computer')
canvas = Canvas(root, width =930, height=830, background='white')
fonts_available = list( tkFont.families() )
fonts_available.sort()
text_sample = ' : abcdefghij_HIJK_12340'
# list the font names on the system console first.
for this_family in fonts_available :
print this_family
print '============================='
# Show first half on left half of screen .
for i in range(0,len(fonts_available)/2):
print fonts_available[i]
texty = fonts_available[i]
canvas.create_text(50,30 + i*20, text= texty + text_sample,
fill='black', font=(texty,  12), anchor= "w")
# Show second half on right half of screen .
for i in range(len(fonts_available)/2,len(fonts_available)):
print fonts_available[i]
texty = fonts_available[i]
canvas.create_text(500,30 + (i-len(fonts_available)/2 )*20,
text= texty+ text_sample, fill='black',
font=(texty, 12),anchor= "w")
canvas.pack()
root.mainloop()
The results are given in the following screenshot showing all fonts available to Python on a specific operating system.
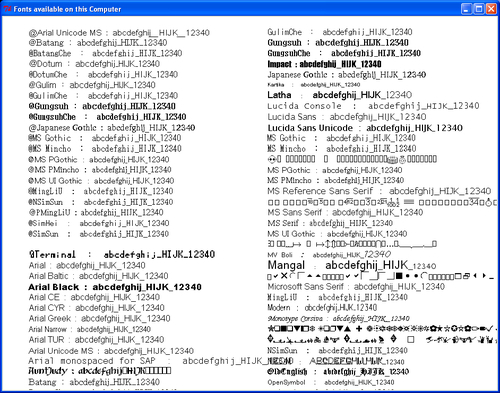
This program is very useful when you want to select pleasing and suitable fonts. Fonts available can vary significantly from platform to platform. So here we make use of the families() method belonging to the tkFont module to put the names of the font families into a list named fonts_available. The list is sorted into alphabetic order using fonts_available.sort().
Finally, two handy things have been used.
Firstly, the list of fonts has been made neat by anchoring the text to the west or left side by use of the anchor= "w" attribute of the create_text method.
Secondly, it is the very useful len() function in len(fonts_available).
This function gives back to you ("returns" in programming parlance) the number of items in a list. It is very handy when defining how many times a for loop iteration should go on for when you have no idea what that number is going to be. In this example we need to write the name of a font and a text sample for each font name in a list that has not yet been discovered when we write the code.