
Draw a five-pointed star using named variables to specify the polygon attributes so that all the points or vertexes or tips of the star are defined with reference to a single start position. We refer to this position as the anchor position.
The instructions used in recipe 1 should be used.
Just use the name star_polygon.py when you write, save, and execute this program.
# star_polygon.py
#>>>>>>>>>>>>
from Tkinter import *
root = Tk()
root.title(Polygon')
cw = 140 # canvas width
ch = 80 # canvas height
canvas_1 = Canvas(root, width=cw, height=ch, background="white")
canvas_1.grid(row=0, column=1)
# blue star, anchored to an anchor point.
x_anchor = 15
y_anchor = 50
canvas_1.create_polygon(x_anchor, y_anchor,
x_anchor + 20, y_anchor - 40,
x_anchor + 30, y_anchor + 10,
x_anchor, y_anchor - 30,
x_anchor + 40, y_anchor - 20,
fill="blue")
root.mainloop()
#>>>>>>>>>>>>>>>>>>>>>>>>>>>>>>>>>>>>>>>>>
The results are given in the next screenshot, a polygon star.
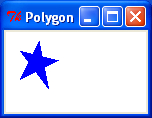
The first position of the star is the point [x_anchor, y_anchor]. All the other points are positive or negative additions to the position of the anchor point. This concept was introduced in the recipes for the three superimposed rectangles. This idea of drawing complicated shapes with reference to a point defined as a pair of named variables is very useful and is used extensively in the second half of this book.
To improve code readability, the pairs of x and y variables defining each point are laid out vertically making use of the line continuation character (backslash).