
Say we want to offer the end user the possibility to locate an address on Google Maps by simply clicking a button next to an address. Run crmcustomize.py and add a new address or edit an existing address. The edit/add screen will look similar to this:
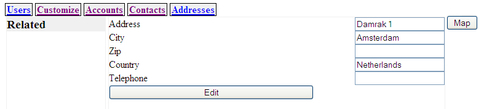
When you click on the Map button, a new window will open, showing a map of that address as long as Google Maps was able to find it.
This functionality was added by the end user without the need to restart the server. Notice that in the opening screen, we have a new menu, Customize. If that menu is selected, we get a familiar looking interface showing a list of customizations added for different entities. If we double-click the one for Address with the Google Maps description, we get an edit screen, as shown in the following illustration:
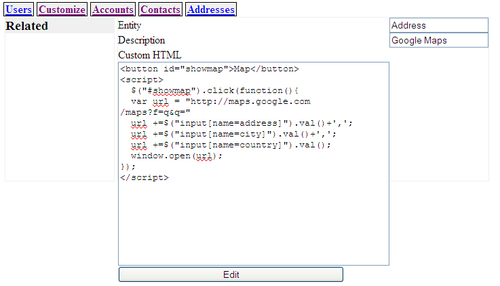
A quick glance will show that the customization itself is simply HTML mixed with some JavaScript that is added to the markup produced by the application each time we open an edit or add screen for an Address entity.
Note
It might not always be a good idea to allow any end user to customize an application. You might want to restrict some or all of the customization options to a subset of end users. Role-based access control is then again a suitable way to administer privileges.
Let's first have a look at the customization itself to get a feel of what can be accomplished. The code consists of a few lines of HTML and an embedded piece of JavaScript:
Chapter10/customization.html
<button id="showmap">Map</button>
<script>
$("#showmap").click(function(){
	var url = "http://maps.google.com/maps?f=q&q="
	url +=$("input[name=address]").val()+',';
	url +=$("input[name=city]").val()+',';
	url +=$("input[name=country]").val();
	window.open(url);
});
</script>
Because our application itself relies on jQuery, any customization code may use this library as well, so after we have defined a suitable button, we add a click handler to this button (highlighted) that constructs a Google Maps URL from the values of several<input> elements that will be present on the edit or add page of an Address, notably address, city, and country. This URL is then passed the window.open() method to open a new screen or tab with the results of this query.
Note
Even better results may be obtained when the Google Maps API is used see http://code.google.com/intl/nl/apis/maps/documentation/javascript.
What do we need to change in our framework to allow for this simple end user customization?
We need several related components to make this work:
- The
Displayclass needs to be adapted to produce the custom code suitable for the instance that is shown. - We need some way of storing the customization in the database together with the rest of the application.
- We need to allow a way to edit these customizations.
Let's look at these requirements in detail. The most important part is a way to store this information. Like we did for role-based access control, we can actually use our framework again; this time by defining a custom class. This custom class will create a DisplayCustomization class and provide access to it for all entities derived from the AbstractEntity class. The changes needed in the entity module are modest (the full code is available in rbacentity.py):
Chapter10/rbacentity.py
class custom:
	def __init__(self,db):
		class CustomEntity(AbstractEntity):
			database=db
		class DisplayCustomization(CustomEntity):
			entity = Attribute(notnull= True,
					displayname = "Entity")
			description = Attribute(displayname = "Description")
			customhtml = Attribute(displayname = "Custom HTML",
						htmlescape=True, displayclass="mb-textarea")
		self.DisplayCustomization = DisplayCustomization
	def getDisplayCustomization(self):
		return self.DisplayCustomization
	def getDisplayCustomHTML(self,entity):
		return "".join(dc.customhtml for dc in self.
DisplayCustomization.list(pattern=[('entity',entity)]))
Now that we have access to this storage for customization, any application can use it, but it also has to provide a way to let the application user edit these customizations. This entails defining a Browse class and adding a link to provide access to it. This is how it was done in the crmcustomize application, shown in the example (relevant changes only, full code available in crmcustomize.py):
Chapter10/crmcustomize.py
...
displaycustom = User._custom().getDisplayCustomization()
class DisplayCustomizationBrowser(Browse):
	edit = Display(displaycustom, edit=True, logon=logon)
	add = Display(displaycustom, add=True, logon=logon)
...
class Root():
	logon = logon
	user = UserBrowser(User)
	account = AccountBrowser(Account,
				columns=Account.columns+[User,Address,Contact])
	contact = ContactBrowser(Contact,
				columns=Contact.columns+[Address,Account])
	address = AddressBrowser(Address)
	displaycustomization = DisplayCustomizationBrowser(displaycustom,
		columns=['entity','description'])
	@cherrypy.expose
	def index(self):
			return Root.logon.index(returnpage='../entities')
	@cherrypy.expose
	def entities(self):
		username = self.logon.checkauth()
		if username is None : raise HTTPRedirect('.')
		user=User.list(pattern=[('name',username)])
		if len(user) < 1 : User(name=username)
		return basepage%'''<div class="navigation">
		<a href="user">Users</a>
		<a href="displaycustomization">Customize</a>
		<a href="http://account">Accounts</a>
		<a href="contact">Contacts</a>
		<a href="http://address">Addresses</a>
		</div><div class="content">
		</div>
		<script src="/browse.js" type="text/javascript"></script>
		'''
The final step is to enhance the display module with the means to retrieve and deliver these customizations. This is done by adding a few lines to the end of the index() method, as shown:
Chapter10/display.py
yield self.entity._custom().getDisplayCustomHTML('*')
yield self.entity._custom().getDisplayCustomHTML(self.entity.__name__)
Retrieving is straightforward enough and we actually retrieve two bits of customization: one for the specific entity we are showing and one for the customization code that is relevant for all entities. The user can add such customization with a special entity name of * (a single asterisk character). By putting the general customizations first in the markup we deliver, it is possible to override anything that is provided for the general case with customizations for the specific entities.
There is a bit of trickery needed elsewhere in the code of the Display class, however. Because the customization code may consist of HTML, including<script> elements containing JavaScript and<style> elements containing CSS, we might run into trouble when we display the forms to edit the customization code as these forms are HTML themselves. We, therefore, need some way to escape this code to prevent the content of the input box from being interpreted as HTML.
This is accomplished in the following way (the relevant changes to the Attribute class are shown):
Chapter10/rbacentity.py
class Attribute:
	def __init__(self,
			unique =False,
			notnull =False,
			default =None,
			affinity =None,
			validate =None,
			displayname =None,
			primary =False,
			displayclass =None,
			htmlescape =False):
			self.unique =unique
			self.notnull =notnull
			self.default =default
			self.affinity=affinity
			self.coldef = (
				affinity+' ' if not affinity is None else '')
				+ ('unique ' if unique else '')
				+ ('not null ' if notnull else '')
				+ ('default %s '%default if not default is None else '')
			self.validate = validate?
			self.displayname = displayname
			self.primary = primary
			self.displayclass = displayclass
			self.htmlescape = htmlescape
The Attribute class provided in the entity module is extended to take an extra htmlescape parameter. If we set this to True, we indicate that the contents of this attribute should be escaped prior to showing it in a page.
The MetaEntity class will have to be extended as well to act upon these new features in the Attribute class:
Chapter10/rbacentity.py
classdict['htmlescape']={ k:v.htmlescape
			for k,v in classdict.items() if type(v) == Attribute}
The MetaEntity class is changed to store any htmlescape attributes in the htmlescape class attribute, a dictionary indexed by the attribute name.
At this point, we can create new entities with attributes marked for escape, but the Display class itself has to act on this information. We therefore add the following lines to the index() method of the Display class:
Chapter10/display.py
val=getattr(e,c)
if self.entity.htmlescape[c] :
		val=escape(val,{'"':'"','
':'
'})
		line='''<input type="text" name="%s"
				value="%s"
				class="%s">'''%(c,val,displayclass)
In the index() method of the Display class, before constructing an<input> element we can now check this htmlescape dictionary to see if we should escape the value of the attribute, and if so, use the escape() function provided in Python's xml.sax.saxutils module to convert any characters that might interfere.
Note
A note of caution:
Allowing people to customize an application with HTML and JavaScript carries an inherent risk. When we developed a wiki application, we restricted the allowed input on pages by scrubbing the input of unwanted HTML. If you are serious about security (and you should be!), you have to think about what you will allow for customizations as well, especially to prevent cross-site scripting (XSS). Check, for example, http://www.owasp.org/ for more on this and other security subjects.