The BeautifulSoup library is a simple yet powerful web scraping library. It has the capability to extract the desired data when provided with an HTML or XML document. It is charged with some superb methods, which help us to perform web scraping tasks effortlessly.
Document parsers aid us in parsing and serializing the semistructured documents that are written using HTML5, lxml, or any other markup language. By default, BeautifulSoup has Python's standard HTMLParser object. If we are dealing with different types of documents, such as HTML5 and lxml, we need to install them explicitly.
In this chapter, our prime focus will be laid only on particular parts of the library, which help us to understand the techniques to develop a practical scraping bot that we will build at the end of this chapter.
Installing BeautifulSoup is pretty straightforward. We can use pip to install it with ease:
$ pip install beautifulsoup4
Whenever we intend to scrape a web resource using BeautifulSoup, we need to create a BeautifulSoup object for it. The following are the commands to do this:
>>> from bs4 import BeautifulSoup
>>> soup = BeautifulSoup(<HTML_DOCUMENT_STRING>)
The BeautifulSoup object parses the given HTML/XML document and converts it into a tree of Python objects, which are discussed in the following sections.
The word "tag" represents an HTML/XML tag in the provided document. Each tag object has a name and a lot of attributes and methods. The following example showcases the way to deal with a tag object:
>>> from bs4 import BeautifulSoup
>>> soup = BeautifulSoup("<h1 id='message'>Hello, Requests!</h1>")
In order to access the type, name, and attributes of the BeautifulSoup object, with soup, that we created in the preceding example, use the following commands:
- For accessing the
tag type:>>> tag = soup.h1 >>> type(tag) <class 'bs4.element.Tag'>
- For accessing the
tag name:>>> tag.name 'h1'
- For accessing the
tagattribute ('id'in the given html string)>>> tag['id'] 'message'
The object that gets created when we intend to scrape a web resource is called a BeautifulSoup object. Put simply, it is the complete document that we are planning to scrape. This can be done using the following commands:
>>> from bs4 import BeautifulSoup
>>> soup = BeautifulSoup("<h1 id='message'>Hello, Requests!</h1>") >>> type(soup)
<class 'bs4.BeautifulSoup'>
As cited in the previous section of Key web scraping tasks, BeautifulSoup always follows those basic tasks in the process of web scraping. We can get to know these tasks in detail with the help of a practical example, using an HTML document. We will be using the following HTML document that is scraping_example.html, as an example through out the chapter:
<!DOCTYPE html>
<html lang="en">
  <head>
    <meta charset="UTF-8" />
    <title>
      Chapter 6 - Web Scrapping with Python Requests and BeatuifulSoup
    </title>
  </head>
  <body>
    <div class="surveys">
      <div class="survey" id="1">
        <p class="question">
          <a href="/surveys/1">Are you from India?</a>
        </p>
        <ul class="responses">
          <li class="response">Yes - <span class="score">21</span>
          </li>
          <li class="response">No - <span class="score">19</span>
          </li>
        </ul>
      </div>
      <div class="survey" id="2">
        <p class="question">
          <a href="/surveys/2">Have you ever seen the rain?</a>
        </p>
        <ul class="responses">
          <li class="response">Yes - <span class="score">40</span>
          </li>
          <li class="response">No - <span class="score">0</span>
          </li>
        </ul>
      </div>
      <div class="survey" id="3">
        <p class="question">
          <a href="/surveys/1">Do you like grapes?</a>
        </p>
        <ul class="responses">
          <li class="response">Yes - <span class="score">34</span>
          </li>
          <li class="response">No - <span class="score">6</span>
          </li>
        </ul>
      </div>
    </div>
  </body>
</html>
To give a crystal clear understanding of the preceding web document, we showcased it as a document tree. The following diagram represents the preceding HTML document:
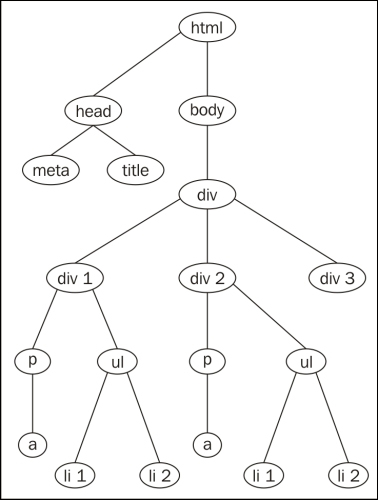
When we create the BeautifulSoup object for the previously shown web document, it will result in a tree of Python objects.
To perform different tasks with the previous document, scraping_example.html, we need to create a BeautifulSoup object. To create it, open the Python shell and run the following commands:
>>> from bs4 import BeautifulSoup
>>> soup = BeautifulSoup(open("scraping_example.html"))
From now, we will use the preceding BeautifulSoup object to execute different tasks. Let's perform the web scraping tasks on the scraping_example.html document and get an overall idea on all the tasks.
To identify the different tags in an HTML/XML document, we need to search the whole document. In similar situations, we can use BeautifulSoup methods such as find, find_all, and so on.
Here is the syntax to search the whole document to identify the tags:
find(name, attributes, recursive, text, **kwargs)name: This is the first occurring tag name that appears in the process of discovery. It can be a string, a regular expression, a list, a function, or the valueTrue.
find_all(name, attributes, recursive, text, limit, **kwargs)name: This is used to access specific types of tags with their name. It can be a string, a regular expression, a list, a function, or the valueTrue.limit: This is the maximum number of results in the output.
The common attributes for the preceding two methods are as follows:
attributes: These are the attributes of an HTML/XML tag.recursive: This takes a Boolean value. If it is set toTrue, theBeautifulSouplibrary checks all the children of a specific tag. Vice versa, if it is set tofalse, theBeautifulSouplibrary checks the child at the next level only.text: This parameter identifies tags that consist of the string content.
Different tasks are involved in navigating the document tree with the Beautifulsoup4 module; they are discussed in the following section.
We can access a particular element's data by moving down in a document. If we consider the document tree in the previous figure, we can access different elements by moving downward from the top element—html.
Every element can be accessed using its tag name. Here is a way to access the contents of the html attribute:
>>> soup.html
<html lang="en">
...
...
</html>
Here are the ways in which we can access the elements of the preceding document tree by navigating down. In order to access the title element, we should go from top to bottom, that is, from html to head and from head to title, as shown in the following command:
>>> soup.html.head.title
<title>Chapter 6 - Web Scraping with Python Requests and BeatuifulSoup</title>
Similarly, you can access the meta element, as shown in the following command:
>>> soup.html.head.meta
<meta charset="utf-8"/>
To access the siblings in a document tree, we should navigate sideways. The BeautifulSoup library provides various tag object properties such as .next_sibling, .previous_sibling, .next_siblings, and .previous_siblings.
If you look at the preceding diagram containing the document tree, the different siblings at different levels of the tree, when navigated sideways, are as follows:
headandbodydiv1,div2, anddiv3
In the document tree, the head tag is the first child of html, and body is the next child of html. In order to access the children of the html tag, we can use its children property:
>>> for child in soup.html.children:
...     print child.name
...
head
body
To access the next sibling of head element we can use .find_next_sibling:
>>> soup.head.find_next_sibling()
<body>
    <div class="surveys">
        .
        .
        .
    </div>
</body>
To access the previous sibling of body, we can use .find_previous_sibling:
>>> soup.body.find_previous_sibling
<head><meta charset="utf-8"/><title>... </title></head>
We can access a particular element's parent by moving toward the top of the document tree. The BeautifulSoup library provides two properties—.parent and .parents—to access the first parent of the tag element and all its ancestors, respectively.
Here is an example:
>>> soup.div.parent.name
'body'

>>> for parent in soup.div.parents:
...     print parent.name
...
body
html
[document]
To access the previously parsed element, we navigate back in the node of a tree, and to access the immediate element that gets parsed next, we navigate forward in the node of a tree. To deal with this, the tag object provides the .find_previous_element and .find_next_element properties, as shown in the following example:
>>> soup.head.find_previous().name
'html'
>>> soup.head.find_next().name
'meta'
The BeautifulSoup library also facilitates us to make changes to the web document according to our requirements. We can alter a tag's properties using its attributes, such as the .name, .string, and .append() method. We can also add new tags and strings to an existing tag with the help of the .new_string() and .new_tag() methods. There are also other methods, such as .insert(), .insert_before(), .insert_after(), and so on, to make various modifications to the document tree.
Here is an example of changing the title tag's .string attribute:
- Before modifying the
titletag the title contents are:>>> soup.title.string u'Chapter 6 - Web Scrapping with Python Requests and BeatuifulSoup'
- This is the way to modify the contents of a
titletag:>>> soup.title.string = 'Web Scrapping with Python Requests and BeatuifulSoup by Balu and Rakhi' - After the modifications the contents of the
tiltetag looks like this:>>> soup.title.string u'Web Scrapping with Python Requests and BeatuifulSoup by Balu and Rakhi'