To create the survey application, we are going to follow an approach which will give you an easy understanding of the ins and outs of the application and also will make this process of developing a joyride.
Our development procedure drives you through the process of getting you introduced to all the functions that the project deals with. And then, we will implement each and every function step-by-step. During the development process we will be following the Model-View-Controller (MVC) design pattern, which is popular for developing web applications.
The main aim of the survey application is to record the number of responses — 'yes', 'no' and 'maybe' - for the created survey questions.
For developing a Flask application, we are following a specific structure to organize the contents of our application. Here is the file structure of the application that we are going to develop:
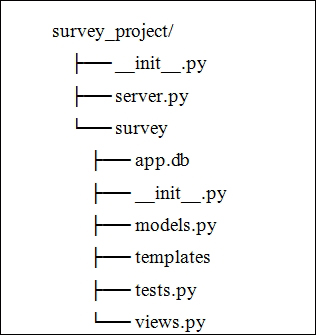
Here is a description of all the files and folders present in our application's file structure:
|
Name of the File/Folder |
Description |
|---|---|
|
|
Initializes our project and adds it to the |
|
|
Invokes the application development server to startup. |
|
|
Initializes our application and brings various components into one place. |
|
|
A |
|
|
Defines the models of our application. |
|
|
A place to put all the |
|
|
A file in which various test cases related to the app are written. |
|
|
In our Survey application, survey_project is the project root. Now, let us create all the files and folders with respect to the above file structure and place the following contents in the survey_project/__init__.py file.
import os
import sys
current_dir = os.path.abspath(os.path.dirname(os.path.dirname(__file__)))
parent_dir = os.path.abspath(os.path.join(current_dir, os.pardir))
sys.path.insert(0, parent_dir)
Now, we will introduce you to all the functions of the survey application. The following is the detailed set of tasks our application is bound to:
- Create survey questions
- View list of all questions
- View a specific question
- Modify a question
- Delete a question
- Up-vote a question
Every question stores information related to a specific survey. The fields that a Question model (a single definitive source of information about the data) contains are as follows:
id: A primary key to identify each question uniquelyquestion_text: Describes the surveynumber_of_yes_votes: Stores the number of'yes'votes pollednumber_of_no_votes: Stores the number of'no'votes pollednumber_of_maybe_votes: Stores the number of'maybe'votes polled
Now, let us start designing the resource holders, what we call URLs, for the previously mentioned tasks. These URLs need specific HTTP methods to communicate with the server.
The following table throws a spotlight on how we are going to design the URLs:
|
Task |
HTTP method |
URL |
|---|---|---|
|
List of all questions |
|
|
|
Create a survey question |
|
|
|
View a specific question |
|
|
|
Modify a question |
|
|
|
Delete a question |
|
|
|
Up-vote a question |
|
|
|
|
| |
|
New question form |
|
|
SQLAlchemy is a Python Object Relational Mapper (ORM) and a query toolkit to interact with various databases. It provides a set of utilities which includes a base class to represent the models and a set of helper classes and functions to represent a database.
Flask-SQLAlchemy is an extension to the Flask framework which adds support to SQLAlchemy.
While defining a model with Flask-SQLAlchemy, we need to keep the following three steps in mind:
- Create a database instance.
- Define a model using the database instance created before.
- Call a method in the database instance to create the tables in the database.
In our application, we do need to create a database instance to store the data. For that, we need to configure the 'SQLALCHEMY_DATABASE_URI' attribute in the WSGI application instance as shown in the following code. This code should be saved in the survey/__init__.py file.
__init__.py
import os

from flask import Flask
from flask.ext.sqlalchemy import SQLAlchemy

BASE_DIR = os.path.abspath(os.path.dirname(__file__))

app = Flask(__name__)
app.config['SQLALCHEMY_DATABASE_URI'] =
    'sqlite:///' + os.path.join(BASE_DIR, 'app.db')
db = SQLAlchemy(app)
In the preceding lines of code, we created a WSGI application instance using the Flask's Flask class and configured the 'SQLALCHEMY_DATABASE_URI' variable. Next, we created a database instance called db which is used to define models and to perform various queries.
In order to store the data related to the survey application in the database, we should define a model called Question. This code lives in survey/models.py file.
models.py
class Question(db.Model):
    id = db.Column(db.Integer, primary_key=True)
    question_text = db.Column(db.String(200))
    number_of_yes_votes = db.Column(db.Integer, default=0)
    number_of_no_votes = db.Column(db.Integer, default=0)
    number_of_maybe_votes = db.Column(db.Integer, default=0)
In the preceding code, we defined the Question model which extends from db.Model. It contains five fields to store the data related to a specific survey:
idquestion_textnumber_of_yes_votesnumber_of_no_votesnumber_of_maybe_votes
Now let us go ahead and add a constructor method, which enables us to set the instance variables for the Question object that we created in the previous lines of code:
class Question(db.Model):
    ...
    ...

    def __init__(self,
                 question_text,
                 number_of_yes_votes=0,
                 number_of_no_votes=0,
                 number_of_maybe_votes=0):

        self.question_text = question_text

        self.number_of_yes_votes = number_of_yes_votes
        self.number_of_maybe_votes = number_of_maybe_votes
        self.number_of_no_votes = number_of_no_votes
The preceding __init__() method takes the Question object and its values as parameters. Then, it will set the instance variables of the object that we passed.
Now, we will create a method called vote() which increments the counter variables for the 'yes', 'no' and 'maybe' votes.
class Question(db.Model):
    ...
    ...

    def vote(self, vote_type):
        if vote_type == 'yes':
            self.number_of_yes_votes += 1
        elif vote_type == 'no':
            self.number_of_no_votes += 1
        elif vote_type == 'maybe':
            self.number_of_maybe_votes += 1
        else:
            raise Exception("Invalid vote type")
In the preceding lines of code, we defined a vote() method, which takes the Question object as its first argument and the vote_type as its second argument. Based on the vote_type ('yes', 'no', or 'maybe'), the corresponding number_of_<vote_type>_votes of the Question object that we passed gets incremented.
Now that we are done with defining the models related to our application using the database instance object called db, we need to create corresponding tables in the databases. For that, we need to call the method create_all(), which is present in the database instance — db.
In our application, we generally call this function before invoking the server defined in runserver.py file.
Now, we have the database models ready. Let us query the data from the database using the SQLAlchemy's ORM. We'll perform the basic create, retrieve, update, and delete (CRUD) operations on our database instance — db.
Before making queries, let us move to our project root directory and fire up the Python console to execute the following commands:
>>> from survey import app, db
>>> from survey.models import Question
Now, let us create a Question object in the database. Creating an object using SQLAlchemy's ORM involves three essential steps as shown in the following code:
>>> question = Question("Are you an American?")
>>> db.session.add(question)
>>> db.session.commit()
We can see that:
- The first step creates a Python object for the model.
- The next step adds the created Python object to the db's session.
- The last step involves committing the object to the database.
Retrieving the objects from the database is very simple using the ORM. The following query retrieves all the objects from the database:
>>> Question.query.all()
[<Question 1 - u'Are you an American?'>]
We can also retrieve a model object from the database using its primary key. If we look at the Question model, we have a primary key with the column name id. Now, let us go ahead and access it.
>>> Question.query.get(1)
<Question 1 - u'Are you an American?'>
It is time to vote a survey. Fetch the object with id value 1 and use its vote() method to increase the number of votes of that choice.
>>> question = Question.query.get(1)
>>> question.number_of_yes_votes
0
>>> question.vote('yes')
>>> db.session.add(question)
>>> db.session.commit()
Let us learn how to delete a record from the database using the db.session.delete() method as shown in the following code:
>>> question = Question.query.get(1)
>>> db.session.delete(question)
>>> db.session.commit()
If you try to access the same object, it will result in the None value.
>>> print Question.query.get(1)
None