Chapter 11. Building GUIs
When informed people consider the duties of a system administrator, building GUI applications probably does not come to mind at all. However, there are times when you will need to build a GUI application, or by building a GUI app your life will be easier than if you didn’t. We’re using GUI in the broad sense here to mean both traditional GUI applications using toolkits such as GTK and QT, as well as web-based applications.
This chapter will focus on PyGTK, curses, and the Django web framework. We’ll start off with the basics of GUI building, then move on to creating a fairly simple application using PyGTK, then the same app using curses and Django. Finally, we’ll show you how Django can, with very little code, work as a fairly polished frontend to a database.
GUI Building Theory
When you write a console utility, you often expect it to run and
complete without user intervention. This is definitely the case
when scripts are run from cron and
at, anyway. But when you write a GUI
utility, you expect that a user will have to provide some input in order
to make things happen and exercise your utility. Think for a moment
about your experiences with GUI applications such as web browsers, email
clients, and word processors. You run the
application somehow. The application performs some sort of
initialization, perhaps loading some configuration and putting itself
into some known state. But then, in general, the application just waits
for the user to do something. Of course, there are examples of
applications executing seemingly on their own, such as Firefox
automatically checking for updates without the explicit request or
consent of the user, but that’s another story.
What is the application waiting for? How does it know what to do when the user does something? The application is waiting for an event to happen. An event is just something that happens within the application, specifically to one of the GUI components such as a button being pressed or a checkbox being selected. And the application “knows” what to do when these events happen because the programmer associated certain events with certain pieces of code. The “pieces of code” that are associated with certain events, are referred to as event handlers. One of the jobs of a GUI toolkit is to call the right event handler when the associated event occurs. To be a little more precise, the GUI toolkit provides an “event loop” that quietly loops around, waits for events to happen, and when they do, it handles them appropriately.
Behavior is event driven. When you code your GUI application, you decide how you want your application to behave when a user does certain things. You set up event handlers that the GUI toolkit calls when the user triggers events.
That describes the behavior of an application, but what about the form? Meaning, how do you get the buttons, text fields, labels, and checkboxes on an application? The answer to this question can vary a bit. There may be a GUI builder for the GUI toolkit that you choose. A GUI builder lays out the various components such as buttons, labels, checkboxes, etc. for a GUI application. For example, if you are working on a Mac and choose to write a Cocoa app, Interface Builder is available to lay the GUI components out for you. Or, if you are using PyGTK on Linux, you can use Glade. Or, if you are using PyQT, you can use QT Designer.
GUI builders can be helpful, but sometimes you may want more
control of your GUI than the builder offers. In those cases, it is not
difficult to lay out a GUI “by hand” by writing a little code. In PyGTK,
each type of GUI component corresponds to a Python class. For example, a
window is an object of the class gtk.Window. And a button is an object of the
class gtk.Button. In order to create
a simple GUI app that has a window and a button, you instantiate objects
of classes gtk.Window and gtk.Button and add the button to the window.
If you want the button to do something when it is clicked, you have to
specify an event handler for the “clicked” event for the button.
Building a Simple PyGTK App
We’ll create a simple piece of code which uses the
already-mentioned gtk.Window and
gtk.Button classes. Following is a
simple GUI application that doesn’t do anything useful except show some
of the basic tenets of GUI programming.
Before being able to run this example or write your own PyGTK app, you’ll have to install PyGTK. This is pretty simple if you’re running a relatively modern Linux distribution. It even looks pretty easy for Windows. If you’re running Ubuntu, it should already be installed. If there isn’t a binary distribution for your platform, you can expect pain. See Example 11-1.
#!/usr/bin/env python

import pygtk
import gtk
import time

class SimpleButtonApp(object):
    """This is a simple PyGTK app that has one window and one button.
    When the button is clicked, it updates the button's label with the current time.
    """

    def __init__(self):
        #the main window of the application
        self.window = gtk.Window(gtk.WINDOW_TOPLEVEL)

        #this is how you "register" an event handler. Basically, this
        #tells the gtk main loop to call self.quit() when the window "emits"
        #the "destroy" signal.
        self.window.connect("destroy", self.quit)

        #a button labeled "Click Me"
        self.button = gtk.Button("Click Me")

        #another registration of an event handler. This time, when the
        #button "emits" the "clicked" signal, the 'update_button_label'
        #method will get called.
        self.button.connect("clicked", self.update_button_label, None)

        #The window is a container. The "add" method puts the button
        #inside the window.
        self.window.add(self.button)

        #This call makes the button visible, but it won't become visible
        #until its container becomes visible as well.
        self.button.show()

        #Makes the container visible
        self.window.show()

    def update_button_label(self, widget, data=None):
        """set the button label to the current time

        This is the handler method for the 'clicked' event of the button
        """
        self.button.set_label(time.asctime())

    def quit(self, widget, data=None):
        """stop the main gtk event loop

        When you close the main window, it will go away, but if you don't
        tell the gtk main event loop to stop running, the application will
        continue to run even though it will look like nothing is really
        happening.
        """
        gtk.main_quit()


    def main(self):
        """start the gtk main event loop"""
        gtk.main()

if __name__ == "__main__":
    s = SimpleButtonApp()
    s.main()
The first thing you probably noticed in this example is that the
main class inherits from object
rather than some GTK class. Creating a GUI application in PyGTK is not
necessarily an object-oriented exercise. You will certainly have to
instantiate objects, but you don’t have to create your own custom
classes. However, for anything more than a trivial example such as what
we are creating, we strongly recommend creating your own custom class.
The main benefit to creating your own class for a GUI application is
that all your GUI components (windows, buttons, checkboxes) wind up all
attached to the same object, which allows easy access to those
components from elsewhere in the application.
Since we chose to create a custom class, the first place to look
to start understanding what is going on is in the constructor (the
__init__() method). In fact, in this
example, you can see what is going on by focusing on the constructor.
This example is pretty well commented, so we won’t duplicate an
explanation of everything here, but we will give a recap. We created two
GUI objects: a gtk.Window and a
gtk.Button. We put the button in the
window, since the window is a container object. We also created event
handlers for the window and the button for the destroy
and clicked events, respectively. If you
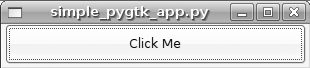
run this code, it will display a window with a button labeled “Click
Me.” Every time you click the button, it will update the button’s label
with the current time. Figures 11-1 and 11-2 are screenshots of the application
before and after clicking the button.
Building an Apache Log Viewer Using PyGTK
Now that we have covered the basics of GUI building in general and of using PyGTK specifically, the following is an example of building something a little more useful with PyGTK; we’re going to walk through creating an Apache logfile viewer. The functionality we are going to include in this application is as follows:
Select and open specified logfile
View line number, remote host, status, and bytes sent at a glance
Sort loglines by line number, remote host, status, or bytes sent
This example builds on the Apache log parsing code that we wrote in Chapter 3. Example 11-2 is the source code for the logfile viewer.
#!/usr/bin/env python

import gtk
from apache_log_parser_regex import dictify_logline

class ApacheLogViewer(object):
    """Apache log file viewer which sorts on various pieces of data"""

    def __init__(self):
        #the main window of the application
        self.window = gtk.Window(gtk.WINDOW_TOPLEVEL)
        self.window.set_size_request(640, 480)
        self.window.maximize()

        #stop event loop on window destroy
        self.window.connect("destroy", self.quit)

        #a VBox is a container that holds other GUI objects primarily for layout
        self.outer_vbox = gtk.VBox()

        #toolbar which contains the open and quit buttons
        self.toolbar = gtk.Toolbar()

        #create open and quit buttons and icons
        #add buttons to toolbar
        #associate buttons with correct handlers
        open_icon = gtk.Image()
        quit_icon = gtk.Image()
        open_icon.set_from_stock(gtk.STOCK_OPEN, gtk.ICON_SIZE_LARGE_TOOLBAR)
        quit_icon.set_from_stock(gtk.STOCK_QUIT, gtk.ICON_SIZE_LARGE_TOOLBAR)
        self.open_button = gtk.ToolButton(icon_widget=open_icon)
        self.quit_button = gtk.ToolButton(icon_widget=quit_icon)
        self.open_button.connect("clicked", self.show_file_chooser)
        self.quit_button.connect("clicked", self.quit)
        self.toolbar.insert(self.open_button, 0)
        self.toolbar.insert(self.quit_button, 1)

        #a control to select which file to open
        self.file_chooser = gtk.FileChooserWidget()
        self.file_chooser.connect("file_activated", self.load_logfile)

        #a ListStore holds data that is tied to a list view
        #this ListStore will store tabular data of the form:
        #line_numer, remote_host, status, bytes_sent, logline
        self.loglines_store = gtk.ListStore(int, str, str, int, str)

        #associate the tree with the data...
        self.loglines_tree = gtk.TreeView(model=self.loglines_store)
        #...and set up the proper columns for it
        self.add_column(self.loglines_tree, 'Line Number', 0)
        self.add_column(self.loglines_tree, 'Remote Host', 1)
        self.add_column(self.loglines_tree, 'Status', 2)
        self.add_column(self.loglines_tree, 'Bytes Sent', 3)
        self.add_column(self.loglines_tree, 'Logline', 4)

        #make the area that holds the apache log scrollable
        self.loglines_window = gtk.ScrolledWindow()

        #pack things together
        self.window.add(self.outer_vbox)
        self.outer_vbox.pack_start(self.toolbar, False, False)
        self.outer_vbox.pack_start(self.file_chooser)
        self.outer_vbox.pack_start(self.loglines_window)
        self.loglines_window.add(self.loglines_tree)

        #make everything visible
        self.window.show_all()
        #but specifically hide the file chooser
        self.file_chooser.hide()

    def add_column(self, tree_view, title, columnId, sortable=True):
        column = gtk.TreeViewColumn(title, gtk.CellRendererText() , text=columnId)
        column.set_resizable(True)
        column.set_sort_column_id(columnId)
        tree_view.append_column(column)

    def show_file_chooser(self, widget, data=None):
        """make the file chooser dialog visible"""
        self.file_chooser.show()

    def load_logfile(self, widget, data=None):
        """load logfile data into tree view"""
        filename = widget.get_filename()
        print "FILE-->", filename
        self.file_chooser.hide()
        self.loglines_store.clear()
        logfile = open(filename, 'r')
        for i, line in enumerate(logfile):
            line_dict = dictify_logline(line)
            self.loglines_store.append([i + 1, line_dict['remote_host'],
                    line_dict['status'], int(line_dict['bytes_sent']), line])
        logfile.close()

    def quit(self, widget, data=None):
        """stop the main gtk event loop"""
        gtk.main_quit()


    def main(self):
        """start the gtk main event loop"""
        gtk.main()

if __name__ == "__main__":
    l = ApacheLogViewer()
    l.main()
In the PyGTK Apache Log Viewer example, the main class, ApacheLogViewer, only derives from object. There is nothing special about our
main object; it just happens to be where we are hanging all of the
pieces and actions of the GUI.
Next, and jumping to the __init__() method, we create a window object.
Something a little different about this example from the previous,
“simple” example is that we specify sizing requirements for this window.
We initially specify that this window should be displayed at 640×480 and
then specify that it should be maximized. Setting the sizing parameters
twice was intentional. 640×480 is a reasonable starting, so this isn’t a
bad default. While 640×480 is a fine size, bigger is better, so we
maximized the window. It turns out that setting 640×480 (or some other
size of your preference) first is probably a good practice. According to
the PyGTK documentation, the window manager may not honor the maximize() request. Also, the user can
unmaximize the window after it is maximized, so you may want to specify
the size when it is unmaximized.
After creating and sizing the window, we create a VBox. This is a “vertical box,” which is simply a container
object. GTK has the concept of using vertical (VBox) and horizontal (HBox) boxes for laying out widgets on a
window. The idea behind these boxes is that you “pack” them with widgets
relative either to their beginning (which is the top for VBoxes and left for HBoxes) or their end. If you don’t know what a
widget is, it’s simply a GUI component such as a button or text box. By
using these boxes, you can lay out the widgets on a window pretty much
any way you can imagine. Since boxes are containers, they can contain
other boxes, so feel free to pack one box into another.
After adding the VBox to the
window, we add the toolbar and tool buttons. The toolbar itself is
another container and provides methods for adding components to itself.
We create the icons for the buttons, create the buttons, and attach the
event handlers to the buttons. Finally, we add the buttons to the
toolbar. Just as with pack_start() on
VBox, we use insert() on the ToolBar to add widgets.
Next, we create a file chooser widget that we use to navigate to the logfile to process and then associate it with an event handler. This part is very straightforward, but we will readdress it in a moment.
After creating the file chooser, we create the list component that
will contain the loglines. This component comes in two pieces: the data
piece (which is a ListStore), and the
piece you interact with (which is a TreeView). We create the data piece first by
defining what data types we want in which columns. Next, we create the
display component and associate the data component with it.
After creating the list component, we create one final container,
a scrollable window, and then pack everything together. We pack the
toolbar, file chooser, and the scrollable window into the VBox we created earlier. We put the list
piece, which will contain the loglines, into the scrollable window so
that if there are more than a handful of lines, we can scroll through
them.
Finally, we make things visible and invisible. We make the main
window visible with the show_all()
call. This call also makes all children visible. Given how we have
created this GUI application, we want the file chooser to be invisible
until we click the “open” button. So, we make the file chooser control
invisible when it is created.
When you launch this application, you can see that it meets our initial requirements. We are able to select and open specified logfiles. Each of the line number, remote host, status, and bytes pieces of data have their own columns in the list control, so we can easily surmise those pieces of data just by glancing at each line. And, we can sort on any of those columns by simply clicking on the corresponding column header.
Building an Apache Log Viewer Using Curses
curses is a library that facilitates the creation of interactive text-based applications. Unlike GUI toolkits, curses does not follow an event handling and callback approach. You are responsible for getting input from the user and then doing something with it, whereas in GTK, the widget handles getting input from the user and the toolkit calls a handler function when an event occurs. Another difference between curses and GUI toolkits is that with GUI toolkits you are adding widgets to some container and letting the toolkit deal with drawing and refreshing the screen. With curses, you are typically painting text directly on the screen.
Example 11-3 is the Apache log viewer again, implemented using the curses module from the Python Standard Library.
#!/usr/bin/env python

"""
curses based Apache log viewer

Usage:

    curses_log_viewer.py logfile

This will start an interactive, keyboard driven log viewing application. Here
are what the various key presses do:

    u/d   - scroll up/down
    t     - go to the top of the log file
    q     - quit
    b/h/s - sort by bytes/hostname/status
    r     - restore to initial sort order

"""

import curses
from apache_log_parser_regex import dictify_logline
import sys
import operator

class CursesLogViewer(object):
    def __init__(self, logfile=None):
        self.screen = curses.initscr()
        self.curr_topline = 0
        self.logfile = logfile
        self.loglines = []

    def page_up(self):
        self.curr_topline = self.curr_topline - (2 * curses.LINES)
        if self.curr_topline < 0:
            self.curr_topline = 0
        self.draw_loglines()

    def page_down(self):
        self.draw_loglines()

    def top(self):
        self.curr_topline = 0
        self.draw_loglines()

    def sortby(self, field):
        #self.loglines = sorted(self.loglines, key=operator.itemgetter(field))
        self.loglines.sort(key=operator.itemgetter(field))
        self.top()

    def set_logfile(self, logfile):
        self.logfile = logfile
        self.load_loglines()

    def load_loglines(self):
        self.loglines = []
        logfile = open(self.logfile, 'r')
        for i, line in enumerate(logfile):
            line_dict = dictify_logline(line)
            self.loglines.append((i + 1, line_dict['remote_host'],
                line_dict['status'], int(line_dict['bytes_sent']), line.rstrip()))
        logfile.close()
        self.draw_loglines()

    def draw_loglines(self):
        self.screen.clear()
        status_col = 4
        bytes_col = 6
        remote_host_col = 16
        status_start = 0
        bytes_start = 4
        remote_host_start = 10
        line_start = 26
        logline_cols = curses.COLS - status_col - bytes_col - remote_host_col - 1
        for i in range(curses.LINES):
            c = self.curr_topline
            try:
                curr_line = self.loglines[c]
            except IndexError:
                break
            self.screen.addstr(i, status_start, str(curr_line[2]))
            self.screen.addstr(i, bytes_start, str(curr_line[3]))
            self.screen.addstr(i, remote_host_start, str(curr_line[1]))
            #self.screen.addstr(i, line_start, str(curr_line[4])[logline_cols])
            self.screen.addstr(i, line_start, str(curr_line[4]), logline_cols)
            self.curr_topline += 1
        self.screen.refresh()

    def main_loop(self, stdscr):
        stdscr.clear()
        self.load_loglines()
        while True:
            c = self.screen.getch()
            try:
                c = chr(c)
            except ValueError:
                continue
            if c == 'd':
                self.page_down()
            elif c == 'u':
                self.page_up()
            elif c == 't':
                self.top()
            elif c == 'b':
                self.sortby(3)
            elif c == 'h':
                self.sortby(1)
            elif c == 's':
                self.sortby(2)
            elif c == 'r':
                self.sortby(0)
            elif c == 'q':
                break

if __name__ == '__main__':
    infile = sys.argv[1]
    c = CursesLogViewer(infile)
    curses.wrapper(c.main_loop)
In Example 11-3, we created a single class, CursesLogViewer, in order to structure our
code. In the constructor, we create a curses screen and initialize a few
variables. We instantiate CursesLogViewer in the “main” of our program
and pass in the logfile that we want to view. We could have set an
option in the application for browsing to a file and selecting it, but
it would have been considerably more effort than the file browser in the
PyGTK implementation of the log viewer. Besides, since users will be at
a shell to run this application, it won’t be abnormal to expect them to
navigate to the file from the command line and pass it in as they start
the application. After instantiating CursesLogViewer, we pass its main_loop() method to the curses function
wrapper(). The curses
function wrapper() sets the terminal
to a state that makes it ready for a curses application to use it, calls
the function, then sets the terminal back to normal before
returning.
The main_loop() method acts as
a rudimentary event loop. It sits waiting for a user to enter input at
the keyboard. When a user enters input, the loop dispatches the proper
method (or at least to the proper behavior). Pressing the
u or d keys will scroll up or
down, respectively, by calling the page_up() or page_down() methods, respectively. The
page_down() method simply calls
draw_loglines(), which paints the
loglines on the terminal, starting with the current top line. As each
line is drawn to the screen, the current top line moves to the next log
line. Since draw_loglines() only
draws as many loglines as will fit on the screen, the next time it is
called, it will start drawing the next log line on the top line of the
screen. So, repeatedly calling draw_loglines() will have the visual effect of
scrolling down through a logfile. The page_up() method will set the current top line
two pages up and then redraw the loglines by calling draw_loglines(). This has the visual effect of
scrolling up through a logfile. The reason that we set the current top
line two pages up in page_up() is
that when we draw a page, the current top line is really at the bottom
of the screen. This is really set this way in anticipation of scrolling down.
The next class of behavior for our application is sorting. We have
built functionality in to sort by hostname, status, and number of bytes
sent in a request. Invoking any of the sort behaviors results in a call
to sortby(). The sortby() method sorts the loglines list for
our CursesLogViewer object on the
specified field, and then calls the top() method. The top() method sets the current top line to the
first line in the loglines list, and then draws the next page of
loglines (which will be the first page).
The final event handler for our application is
quit. The quit method simply
breaks out of the “event loop” and lets the main_loop() method return to the curses
wrapper() function for further
terminal cleanup.
While the number of lines of code for the PyGTK app and the curses app are comparable, the curses app felt like more work. Perhaps it was having to create our own event loop. Or perhaps it was having to, in a sense, create our own widgets. Or perhaps it was “painting” text directly on the terminal screen that made it feel like more work. However, there are times when knowing how to put together a curses app will benefit you.
Figure 11-3 shows the curses log viewer sorting records by bytes transferred.

One improvement we could have made on this application is the ability to reverse the sort order of whichever sort method is currently active. This would be a very simple change to make, but we’ll leave that to the reader. Another improvement would be to view the entire contents of a log line as we scroll past it. This should also be a moderately simple change to make, but we’ll leave it as an exercise for the reader as well.
Web Applications
To say that the Web is huge is an understatement. The Web is teeming with applications that people rely on daily. Why are there so many applications available on the Web? First, a web application is potentially universally accessible. This means that when a web application is deployed, anyone with access to it can just point their browser at a URL and use it. Users don’t have to download and install anything except for the browser (which they likely already have installed) unless you are using browser plug-ins like Flash. The primary appeal of this point is for the user. Second, web applications are potentially unilaterally upgradeable for the whole user base. This means that one party (the owner of the application) can upgrade the entire user base without the other party (the user) having to do anything. This is really only true when you are not relying on features that may not be in the user’s current environment. For example, if your upgrade relies on a feature in a newer version of Flash than what the current user base is required to install, this benefit may fly right out the window. But, when it works, this point is appealing to both parties, although the users are less likely to be as conscious of it. Third, the browser is pretty much a universal deployment platform. There are some cross-browser compatibility issues, but for the most part, if you are not using special plug-ins, a web application that works in one browser on one operating system will mostly work in another browser on another operating system. This point is appealing to both parties as well. Just a little more work on the development side will get the application working in multiple browser environments. And the user enjoys using the application where he chooses.
So how is this relevant for you as a system administrator? All the reasons that we have posited regarding building GUIs in general apply to building web applications. One benefit of web applications for system administrators is that the web application can have access to the filesystem and process table of the machine on which it runs. This particular property of web applications makes a web application an excellent solution for system, application, and user monitoring and reporting mechanisms. And that class of problems is in the domain of the system administrator.
Hopefully, you can see the benefit, though it may be useful for you only occasionally, of building a web application for yourself or your users. But what can you use to build a web application? Since this is a book on Python, we will, of course, recommend a Python solution. But which one? One of the criticisms of Python is that it has as many different web application frameworks as a year has days. At the moment, the four dominant choices are TurboGears, Django, Pylons, and Zope. Each of these four has its own benefits, but we felt that Django fit the subject of this book particularly well.
Django
Django is a full-stack web application framework. It contains a templating system, database connectivity by way of an object-relational mapper, and, of course, Python itself for writing the logic pieces of the application. Related to being a “full stack” framework, Django also follows a Model-View-Template (MVT) approach. This Model-View-Template approach is similar, if not identical, to a common approach called Model-View-Controller (MVC). Both are ways of developing applications so that the pieces of the application are not unnecessarily comingled. The database code is separated into an area referred to in both approaches as the “model.” The business logic is separated into an area referred to as the “view” in MVT and the “controller” in MVC. And the presentation is separated into an area referred to as the “template” in MVT and the “view” in MVC.
Apache Log Viewer Application
In the following example, which consists of several pieces of code, we will create another implementation of the Apache log viewer similar to the PyGTK implementation. Since we are going to be opening logfiles to allow a user to view and sort them, we really won’t need a database, so this example is devoid of any database connectivity. Before we walk through the example code, we will show you how to set up a project and application in Django.
You can download the Django code from http://www.djangoproject.com/. At the time of this
writing, the latest release was 0.96. The recommended version to
install, however, is from the development trunk. Once you’ve
downloaded it, just install with the normal python setup.py install command. After
installation, you will have the Django libraries in your site-packages directory and a script
django-admin.py in your scripts directory. Typically, on *nix
systems, the scripts directory
will be the same directory that your python executable file lives in.
After installing Django, you need to create a project and an
application. Projects contain one or more applications. They also act
as the center for configuration for the overall web application (not
to be confused with the Django application) that you are building.
Django applications are smaller pieces of functionality that can be
reused in different projects. For our Apache log viewing application,
we created a project called “dj_apache” by running django-admin.py startproject dj_apache. This
step created a directory and a handful of files. Example 11-4 is a tree view of the new project.
jmjones@dinkbuntu:~/code$ tree dj_apache
dj_apache
|-- __init__.py
|-- manage.py
|-- settings.py
`-- urls.py

0 directories, 4 files
Now that we have a project, we can give it an application. We
first navigate into the dj_apache
directory, and then create an application with django-admin.py startapp logview. This will
create a logview directory in our
dj_apache directory and a few
files. Example 11-5 is a tree view of all the
files and directories we now have.
jmjones@dinkbuntu:~/tmp$ tree dj_apache/
dj_apache/
|-- __init__.py
|-- logview
|   |-- __init__.py
|   |-- models.py
|   `-- views.py
|-- manage.py
|-- settings.py
`-- urls.py
You can see that the application directory
(logview) contains models.py and views.py. Django follows the MVT convention,
so these files help break the overall application up into its
corresponding components. The file models.py contains the database layout, so
it falls into the model component of the MVT acronym. The views.py contains the logic behind the
application, so it falls into the view component of the
acronym.
That leaves us without the template component of the acronym. The template component contains the presentation layer of the overall application. There are a few ways we can get Django to see our templates, but for Example 11-6, we will create a templates directory under the logview directory.
jmjones@dinkbuntu:~/code$ mkdir dj_apache/logview/templates
jmjones@dinkbuntu:~/code$ tree dj_apache/
dj_apache/
|-- __init__.py
|-- logview
|   |-- __init__.py
|   |-- models.py
|   |-- templates
|   `-- views.py
|-- manage.py
|-- settings.py
`-- urls.py

2 directories, 7 files
Now, we are ready to start fleshing out the application. The
first thing we will do is decide how we want our URLs to work. This is
a pretty basic application, so the URLs will be pretty
straightforward. We want to list the logfiles and view them. Since our
functionality is so simple and limited, we will let
“/” list the logfiles to open and "/viewlog/some_sort_method/some_log_file"
view the specified logfile using the specified sort method. In order
to associate a URL with some activity, we have to update the urls.py file in the project top-level
directory. Example 11-7 is the urls.py for our log viewer
application.
from django.conf.urls.defaults import *

urlpatterns = patterns('',
    (r'^$', 'dj_apache.logview.views.list_files'),
    (r'^viewlog/(?P<sortmethod>.*?)/(?P<filename>.*?)/$',
      'dj_apache.logview.views.view_log'),
)
The URL config file is pretty clear and fairly simple to figure
out. This config file relies heavily on regular expressions to map
URLs that match a given regular expression to a view function that
exactly matches a string. We are mapping the URL
“/” to the function "dj_apache.logview.views.list_files". We are
also mapping all URLs matching the regular expression '^viewlog/(?P<sortmethod>.*?)/(?P<filename>.*?)/$'
to the view function "dj_apache.logview.views.view_log". When a
browser connects to a Django application and sends a request for a
certain resource, Django looks through urls.py for an item whose regular expression
matches the URL, then dispatches the request to the matching view
function.
The source file in Example 11-8 contains both of the view functions for this application along with a utility function.
# Create your views here.

from django.shortcuts import render_to_response

import os
from apache_log_parser_regex import dictify_logline
import operator

log_dir = '/var/log/apache2'

def get_log_dict(logline):
    l = dictify_logline(logline)
    try:
        l['bytes_sent'] = int(l['bytes_sent'])
    except ValueError:
        bytes_sent = 0
    l['logline'] = logline
    return l

def list_files(request):
    file_list = [f for f in os.listdir(log_dir) if
                os.path.isfile(os.path.join(log_dir, f))]
    return render_to_response('list_files.html', {'file_list': file_list})

def view_log(request, sortmethod, filename):
    logfile = open(os.path.join(log_dir, filename), 'r')
    loglines = [get_log_dict(l) for l in logfile]
    logfile.close()
    try:
        loglines.sort(key=operator.itemgetter(sortmethod))
    except KeyError:
        pass
    return render_to_response('view_logfile.html', {'loglines': loglines,
                                                    'filename': filename})
The list_files() function
lists all files in the directory specified by log_dir and passes that list to the list_files.html template. That’s really all
that happens in list_files(). This
function is configurable by changing the value of log_dir. Another option for configuring this
is to put the log directory in the database somehow. If we put the
value of the log directory in the database, we could change the value
without having to restart the application.
The view_log() function
accepts as arguments the sort method and the logfile name. Both of
these parameters were extracted from the URL by way of regular
expression in the urls.py file.
We named the regular expression groups for the sort method and
filename in urls.py, but we didn’t
have to. Arguments are passed into the view function from the URL in
the same sequence that they are found in their respective groups. It
is good practice, though, to use named groups in the URL regular
expression so you can easily tell what parameters you are extracting
from a URL as well as what a URL should look like.
The view_log() function opens
the logfile whose filename comes in from the URL. It then uses the
Apache log parsing library from earlier examples to convert each log
line into a tuple in the format of status, remote
host, bytes_sent, and the
log line itself. Then view_log()
sorts the list of tuples based on the sort method that was passed in
from the URL. Finally, view_log()
passes this list into the view_logfile.html template for
formatting.
The only thing left is to create the templates that we have told
the view functions to render to. In Django, templates can inherit from
other templates, thereby improving code reuse and making it simple to
establish a uniform look and feel among pages. The first template
we’ll build is a template the two other templates will inherit from.
This template will set a common look and feel for the other two
templates in the application. That’s why we are starting with it. This
is base.html. See Example 11-9.
<html>
    <head>
        <title>{% block title %}Apache Logviewer - File Listing{% endblock %}</title>
    </head>
    <body>
        <div><a href="/">Log Directory</a></div>
        {% block content %}Empty Content Block{% endblock %}
    </body>
</html>
This is a very simple base template. It is perhaps the simplest
HTML page you can get. The only items of interest are the two “block”
sections: “content” and “title.” When you define a “block” section in
a parent template, a child template can override the parent block with
its own content. This allows you to set default content on a part of a
page and allow the child template to override that default. The
“title” block allows the child pages to set a value which will show up
in their page’s title tag. The
“content” block is a common convention for updating the “main” section
of a page while allowing the rest of the page to remain
unchanged.
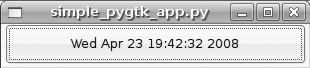
Example 11-10 is a template that will simply list the files in the specified directory.
{% extends "base.html" %}

{% block title %}Apache Logviewer - File Listing{% endblock %}

{% block content %}
<ul>
{% for f in file_list %}
  <li><a href="/viewlog/linesort/{{ f }}/" >{{ f }}</a></li>
{% endfor %}
</ul>
{% endblock %}
Figure 11-4 shows what the file listing page looks like.
In this template, we state that we are extending “base.html.”
This allows us to get everything defined in “base.html” and plug in
code into any defined code blocks and override their behavior. We do
exactly that with the “title” and “content” blocks. In the “content”
block, we loop over a variable file_list that was passed into the template.
For each item in file_list, we
create a link that will result in opening and parsing the
logfile.
The template in Example 11-11 is responsible for creating the pages that the link in the previous Example 11-10 takes the user to. It displays the detail of the specified logfile.
{% extends "base.html" %}
{% block title %}Apache Logviewer - File Viewer{% endblock %}
{% block content %}
<table border="1">
<tr>
<td><a href="/viewlog/status/{{ filename }}/">Status</a></td>
<td><a href="/viewlog/remote_host/{{ filename }}/">Remote Host</a></td>
<td><a href="/viewlog/bytes_sent/{{ filename }}/">Bytes Sent</a></td>
<td><a href="/viewlog/linesort/{{ filename }}/">Line</a></td>
</tr>
{% for l in loglines %}
<tr>
<td>{{ l.status }}</td>
<td>{{ l.remote_host }}</td>
<td>{{ l.bytes_sent }}</td>
<td><pre>{{ l.logline }}</pre></td>
</tr>
{% endfor %}
</table>
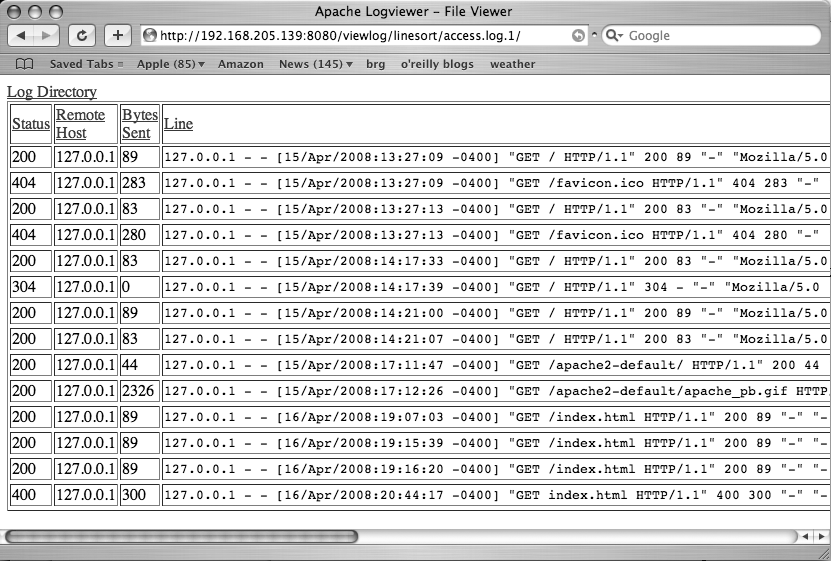
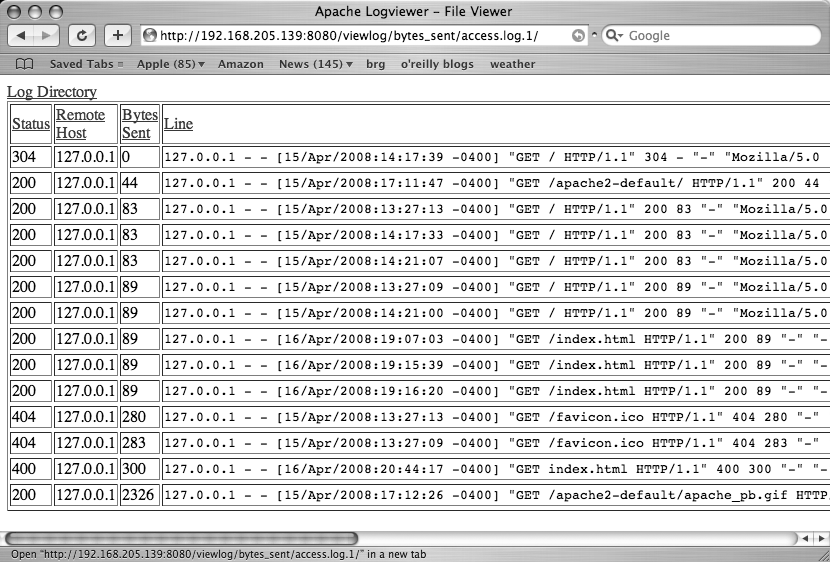
{% endblock %}The template in Example 11-11 inherits from the base template mentioned earlier and creates a table in the “content” area. The table header details the contents of each column: status, remote host, bytes sent, and the log line itself. In addition to detailing the column contents, the header allows users to specify how to sort the logfile. For example, if a user clicks on the “Bytes Sent” column header (which is simply a link), the page will reload and the code in the view will sort the loglines by the “bytes sent” column. Clicking on any column header except for “Line” will sort the loglines by that column in ascending order. Clicking on “Line” will put the loglines back in their original order.
Figure 11-5 shows the application viewed in Line order, and Figure 11-6 shows the application viewed in Bytes Sent order.
This was a very simple web application built using Django. And actually, this is a pretty atypical application as well. Most Django applications are going to be connected to a database of some sort. Improvements that could have been made include sorting all fields in reverse order, filtering loglines based on a specific status code or remote host, filtering loglines based on greater than or less than criteria for bytes sent, combining filters with one another, and putting AJAXy touches on it. Rather than walking through any of those improvements, we’ll just leave that as an exercise for the willing reader.
Simple Database Application
We mentioned that the previous Django example varied from the norm of Django applications in that it did not use a database. While the following example will be more in line with how people are using Django, the focus will be slightly different. When people build a Django application that connects to a database, they often write templates to display data from a database, as well as forms to validate and process user input. This example will show how to create a database model using Django’s object-relational mappers and how to write templates and views to display that data, but the data entry will rely on Django’s built-in admin interface. The purpose of taking this approach is to show you how quickly and easily you can put together a database with a usable frontend to enter and maintain the data.
The application that we are going to walk through creating is an inventory management app for computer systems. Specifically, this application is geared to allow you to add computers to the database with a description of the computer, associate IP addresses with it, state what services are running on it, detail what hardware constitutes the server, and more.
We’ll follow the same steps to create this Django project and application as in the previous Django example. Following are the commands to create the project and the application using the django-admin command-line tool:
jmjones@dinkbuntu:~/code$ django-admin startproject sysmanage
jmjones@dinkbuntu:~/code$ cd sysmanage
jmjones@dinkbuntu:~/code/sysmanage$ django-admin startapp inventory
jmjones@dinkbuntu:~/code/sysmanage$
This created the same sort of directory structure as our Django-based Apache log viewer. Following is a tree view of the directories and files that were created:
jmjones@dinkbuntu:~/code/sysmanage$ cd ../
jmjones@dinkbuntu:~/code$ tree sysmanage/
sysmanage/
|-- __init__.py
|-- inventory
|   |-- __init__.py
|   |-- models.py
|   `-- views.py
|-- manage.py
|-- settings.py
`-- urls.py
After creating the project and app, we need to configure the database we want to connect to. SQLite is a great option, especially if you are testing or developing an app and not rolling it out to production. If more than a few people were going to be hitting the application, we would recommend considering a more robust database such as PostgreSQL. In order to configure the application to use a SQLite database, we change a couple of lines in the settings.py file in the project main directory. Here are the lines we change to configure the database:
DATABASE_ENGINE = 'sqlite3'
DATABASE_NAME = os.path.join(os.path.dirname(__file__), 'dev.db')
We set “sqlite3” as our database engine. The line configuring
the location of the database (the DATABASE_NAME option) does something worth
noting. Rather than specifying an absolute path to the database file,
we configure the database such that it will always be in the same
directory as the settings.py
file. __file__ holds the absolute
path to the settings.py file.
Calling os.path.dirname(__file__)
gives us the directory that the settings.py file is in. Passing the
directory that the file is in and the name of the database file we
want to create to os.path.join()
will give us the absolute path of the database file that is resilient
to the application living in different directories. This is a useful
idiom to get into the habit of using for your settings files.
In addition to configuring our database, we need to include the Django admin interface and our inventory application among the applications for this project. Here is the relevant portion of the settings.py file:
INSTALLED_APPS = (
    'django.contrib.admin',
    'django.contrib.auth',
    'django.contrib.contenttypes',
    'django.contrib.sessions',
    'django.contrib.sites',
    'sysmanage.inventory',
)
We added the django.contrib.admin and sysmanage.inventory to the list of installed
apps. This means that when we tell Django to create the database for
us, it will create tables for all included projects.
Next, we will change the URL mapping so that the this project includes the admin interface. Here is the relevant line from the URL config file:
# Uncomment this for admin:
    (r'^admin/', include('django.contrib.admin.urls')),
The tool that created the urls.py created it with a line to
include the admin interface, but the line needs to be uncommented. You
can see that we have simply removed the # character from the beginning of the line
to include the admin URLs config file.
Now that we have configured a database, added the admin and inventory applications, and added the admin interface to the URLs config file, we are ready to start defining the database schema. In Django, each application has its own schema definition. In each application directory, “inventory” in this case, there is a file named models.py that contains definitions for the tables and columns that your application will use. With Django, as well as many other web frameworks that rely on ORMs, it is possible to create and use a database without having to write a single SQL expression. Django’s ORM turns classes into tables and class attributes into columns on those tables. For example, following is a piece of code that defines a table definition in the configured database (this piece of code is part of the larger example that we’ll get into shortly):
class HardwareComponent(models.Model):
    manufacturer = models.CharField(max_length=50)
    #types include video card, network card...
    type = models.CharField(max_length=50)
    model = models.CharField(max_length=50, blank=True, null=True)
    vendor_part_number = models.CharField(max_length=50, blank=True, null=True)
    description = models.TextField(blank=True, null=True)
Notice that the HardwareComponent class inherits from a
Django model class. This means that the HardwareComponent class is of the Model type and will behave appropriately. We
have given our hardware component a number of attributes: manufacturer, type, model, vendor_part_number, and description. Those attributes are coming
from Django. Not that Django supplies some listing of hardware
manufacturers, but it does provide the CharField type.
This class definition in the inventory application will create an
inventory_hardwarecomponent table
with six columns: id, manufacturer, type, model, vendor_part_number,
and description. This mostly corresponds with the class definition for
the ORM. Actually, it consistently corresponds to
the class definition for the ORM. When you define a model class,
Django will create a corresponding table the name of which is the
application name (lowercased), followed by an underscore, followed by
the lowercased class name. Also, if you do not specify otherwise,
Django will create an id column on
your table that will act as the primary key. Following is the SQL
table creation code that corresponds to the HardwareComponent model:
CREATE TABLE "inventory_hardwarecomponent" (
    "id" integer NOT NULL PRIMARY KEY,
    "manufacturer" varchar(50) NOT NULL,
    "type" varchar(50) NOT NULL,
    "model" varchar(50) NULL,
    "vendor_part_number" varchar(50) NULL,
    "description" text NULL
)
If you ever want to see the SQL that Django uses to create your
database, simply run, in your project directory, python manage.py sql myapp, where myapp corresponds to the name of your
application.
Now that you have been exposed to Django’s ORM, we’ll walk
through creating the database model for our system inventory
application. Example 11-12 is the model.py for the inventory
application.
from django.db import models

# Create your models here.

class OperatingSystem(models.Model):
    name = models.CharField(max_length=50)
    description = models.TextField(blank=True, null=True)

    def __str__(self):
        return self.name

    class Admin:
        pass

class Service(models.Model):
    name = models.CharField(max_length=50)
    description = models.TextField(blank=True, null=True)

    def __str__(self):
        return self.name

    class Admin:
        pass

class HardwareComponent(models.Model):
    manufacturer = models.CharField(max_length=50)
    #types include video card, network card...
    type = models.CharField(max_length=50)
    model = models.CharField(max_length=50, blank=True, null=True)
    vendor_part_number = models.CharField(max_length=50, blank=True, null=True)
    description = models.TextField(blank=True, null=True)

    def __str__(self):
        return self.manufacturer

    class Admin:
        pass

class Server(models.Model):
    name = models.CharField(max_length=50)
    description = models.TextField(blank=True, null=True)
    os = models.ForeignKey(OperatingSystem)
    services = models.ManyToManyField(Service)
    hardware_component = models.ManyToManyField(HardwareComponent)

    def __str__(self):
        return self.name

    class Admin:
        pass

class IPAddress(models.Model):
    address = models.TextField(blank=True, null=True)
    server = models.ForeignKey(Server)

    def __str__(self):
        return self.address

    class Admin:
        pass
We defined five classes for our model: OperatingSystem, Service, HardwareComponent, Server, and IPAddress. The OperatingSystem class
will allow us to define, as needed, different operating systems for
the servers in which we are taking inventory. We defined this class
with a name and description attribute, which is all we
really need. It would be better to create an OperatingSystemVendor class and link to it
from the OperatingSystem class, but
in the interest of simplicity and explicability, we will leave the
vendor relation out of it. Each server will have one operating system.
We will show you that relationship when we get to the Server.
The Service class allows us
to list all potential services that can run on a server. Examples include Apache web
server, Postfix mail server, Bind DNS server, and OpenSSH server. As
with the OperatingSystem class,
this class holds a name and a
description attribute. Each server
may have many services. We will show you how these classes relate to
one another in the Server
class.
The HardwareComponent class
represents a list of all hardware components that our servers may
contain. This will only be interesting if you have either added
hardware to the system your vendor supplied you with or if you built
your own server from individual components. We defined five attributes
for HardwareComponent: manufacturer, type, model, vendor_part_number, and description. As with the vendor for OperatingSystem, we could have created other
classes for the hardware manufacturer and type and created
relationships to them. But, again, for the sake of simplicity, we
chose not to create those relationships.
The Server class is the heart
of this inventory system. Each Server instance
is a single server that we are tracking. Server is where we tie everything together
by establishing relationships to the three previous classes. First of
all, we have given each Server a
name and description attribute. These are identical
to the attributes that we have given the other classes. In order to
link to the other classes, we had to specify what kind of relationship
Server had to them. Each Server will have only one operating system,
so we created a foreign key relationship to OperatingSystem. As virtualization becomes
more common, this type of relationship will make less sense, but for
now, it serves its purpose. A server may have many services running on
it and each type of service may run on many servers, so we created a
many to many relationship between Server and Service. Likewise, each server may have many
hardware components and each type of hardware component may exist on
multiple servers. Therefore, we created another many to many
relationship from Server to
HardwareComponent.
Finally, IPAddress is a
listing of all IP addresses on all servers that we are tracking. We listed this model last
to emphasize the relationship that IP addresses have with servers. We
gave IPAddress one attribute and
one relationship. The address is
the attribute and should by convention be in the
XXX.XXX.XXX.XXX format. We created a foreign key
relationship from IPAddress to
Server because one IP address
should belong to only one server. Yes, again, this is simplistic, but
it serves the purpose of demonstrating how to establish relationships
between data components in Django.
Now we are ready to create the sqlite database file. Running
python manage.py syncdb in your
project directory will create any uncreated tables for all
applications you included in your settings.py file. It will also prompt you
to create a superuser if it creates the auth tables. Following is the
(truncated) output from running python
manage.py syncdb:
jmjones@dinkbuntu:~/code/sysmanage$ python manage.py syncdb
Creating table django_admin_log
Creating table auth_message
. . .
Creating many-to-many tables for Server model
Adding permission 'log entry | Can add log entry'
Adding permission 'log entry | Can change log entry'
Adding permission 'log entry | Can delete log entry'

You just installed Django's auth system, which means you don't have any
superusers defined.
Would you like to create one now? (yes/no): yes
Username (Leave blank to use 'jmjones'): E-mail address: [email protected]
Password:
Password (again): Superuser created successfully.
Adding permission 'message | Can add message'
. . .
Adding permission 'service | Can change service'
Adding permission 'service | Can delete service'
Adding permission 'server | Can add server'
Adding permission 'server | Can change server'
Adding permission 'server | Can delete server'
We are now ready to start the Django development server and explore the admin interface. Following is the command to start the Django development server and the output that command generates:
jmjones@dinkbuntu:~/code/sysmanage$ python manage.py runserver 0.0.0.0:8080
Validating models...
0 errors found

Django version 0.97-pre-SVN-unknown, using settings 'sysmanage.settings'
Development server is running at http://0.0.0.0:8080/
Quit the server with CONTROL-C.
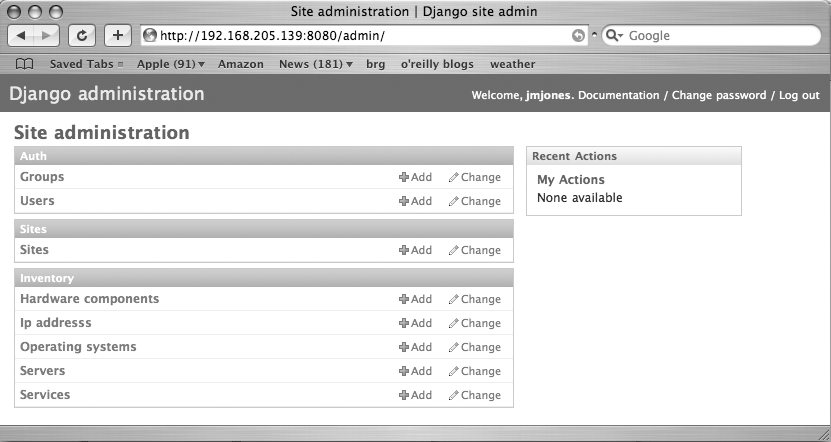
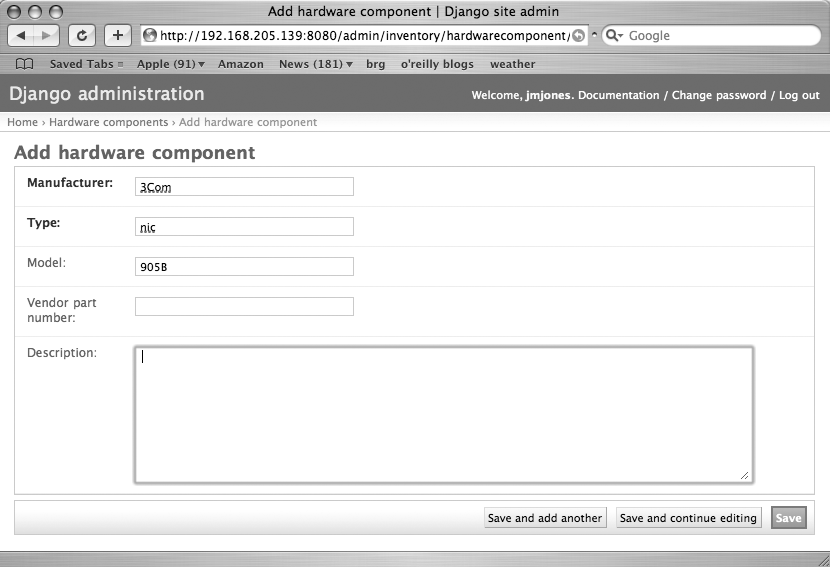
Figure 11-7 shows the login form. Once we log in, we can add servers, hardware, operating systems, and the like. Figure 11-8 shows the Django admin main page and Figure 11-9 shows the “add hardware” form. There is benefit to having a database tool to store and display your data in a consistent, simple, usable manner. Django does a fantastic job of providing a simple, usable interface to a set of data. And if that is all that it did, it would be a useful tool. But that’s just the start of what Django can do. If you can think of a way that a browser can display data, you can very likely get Django to do it. And it is typically not very difficult.

For example, if we wanted one page with every type of operating system, hardware component, service, etc., we could do it. And if we wanted to be able to click on each one of those individual items and display a page containing nothing but servers with those individual characteristics, we could do that, too. And if we wanted to be able to click on each one of those servers in the list and have it display detailed information about the server, we could do that as well. Actually, let’s do that. We’ll use those “suggestions” for requirements that we will go by for this application.
First, Example 11-13 is an updated urls.py.
from django.conf.urls.defaults import *

urlpatterns = patterns('',
    # Example:
    # (r'^sysmanage/', include('sysmanage.foo.urls')),

    # Uncomment this for admin:
    (r'^admin/', include('django.contrib.admin.urls')),
    (r'^$', 'sysmanage.inventory.views.main'),
    (r'^categorized/(?P<category>.*?)/(?P<category_id>.*?)/$',
            'sysmanage.inventory.views.categorized'),
    (r'^server_detail/(?P<server_id>.*?)/$',
            'sysmanage.inventory.views.server_detail'),
)
We added three new lines mapping non-admin URLs to functions. There is really nothing different to see here from what was in the Apache log viewer app. We are mapping regular expressions of URLs to functions and using a little bit of regular expression groupings as well.
The next thing we will do is to add functions to the views module that we declared in the URL
mapping file. Example 11-14 is the views module.
# Create your views here.

from django.shortcuts import render_to_response
import models

def main(request):
    os_list = models.OperatingSystem.objects.all()
    svc_list = models.Service.objects.all()
    hardware_list = models.HardwareComponent.objects.all()
    return render_to_response('main.html', {'os_list': os_list,
            'svc_list': svc_list, 'hardware_list': hardware_list})

def categorized(request, category, category_id):
    category_dict = {'os': 'Operating System',
        'svc': 'Service', 'hw': 'Hardware'}
    if category == 'os':
        server_list = models.Server.objects.filter(os__exact=category_id)
        category_name = models.OperatingSystem.objects.get(id=category_id)
    elif category == 'svc':
        server_list =
            models.Server.objects.filter(services__exact=category_id)
        category_name = models.Service.objects.get(id=category_id)
    elif category == 'hw':
        server_list =
            models.Server.objects.filter(hardware_component__exact=category_id)
        category_name = models.HardwareComponent.objects.get(id=category_id)
    else:
        server_list = []
    return render_to_response('categorized.html', {'server_list': server_list,
        'category': category_dict[category], 'category_name': category_name})

def server_detail(request, server_id):
    server = models.Server.objects.get(id=server_id)
    return render_to_response('server_detail.html', {'server': server})
Just as we added three URL mappings to the urls.py file, so we also added three
functions to the views.py file.
The first is main(). This function
simply takes a list of all the different OSes, hardware components,
and services and passes them into the main.html template.
In Example 11-14, we created a templates directory in the application folder. We will do the same thing here:
jmjones@dinkbuntu:~/code/sysmanage/inventory$ mkdir templates
jmjones@dinkbuntu:~/code/sysmanage/inventory$
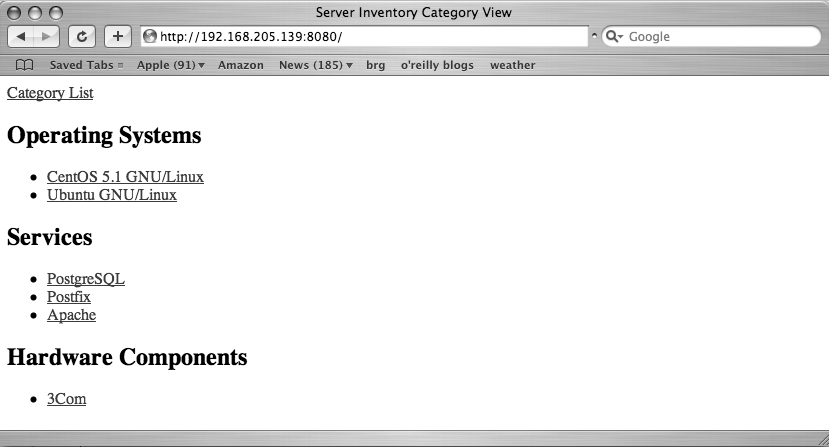
Example 11-15 is the “main.html” template that
the main() view function is passing
data into.
{% extends "base.html" %}

{% block title %}Server Inventory Category View{% endblock %}

{% block content %}
<div>
    <h2>Operating Systems</h2>
    <ul>
    {% for o in os_list %}
      <li><a href="/categorized/os/{{ o.id }}/" >{{ o.name }}</a></li>
    {% endfor %}
    </ul>
</div>
<div>
    <h2>Services</h2>
    <ul>
    {% for s in svc_list %}
      <li><a href="/categorized/svc/{{ s.id }}/" >{{ s.name }}</a></li>
    {% endfor %}
    </ul>
</div>
<div>
    <h2>Hardware Components</h2>
    <ul>
    {% for h in hardware_list %}
      <li><a href="/categorized/hw/{{ h.id }}/" >{{ h.manufacturer }}</a></li>
    {% endfor %}
    </ul>
</div>
{% endblock %}
This template is pretty straightforward. It divides up the page into three parts, one for each category that we want to see. For each category, it itemizes the entries that the category has along with a link to see all servers that have the specified category item.
When a user clicks on one of those links, it will take them to
the next view function, categorized().
The main template passes a category (being one of os for Operating
System, hw for Hardware Component, and svc for Service) and a category ID (i.e., the
specific component that the user clicked on, such as “3Com 905b
Network Card”) into the categorized() view function. The
categorized() function takes these
arguments and retrieves a list of all servers from the database that
have the selected component. After querying the database for the
proper information, the categorized() function passes its
information on to the “categorized.html” template. Example 11-16 shows the contents of the “categorized.html”
template.
{% extends "base.html" %}
{% block title %}Server List{% endblock %}
{% block content %}
<h1>{{ category }}::{{ category_name }}</h1>
<div>
<ul>
{% for s in server_list %}
<li><a href="/server_detail/{{ s.id }}/" >{{ s.name }}</a></li>
{% endfor %}
</ul>
</div>
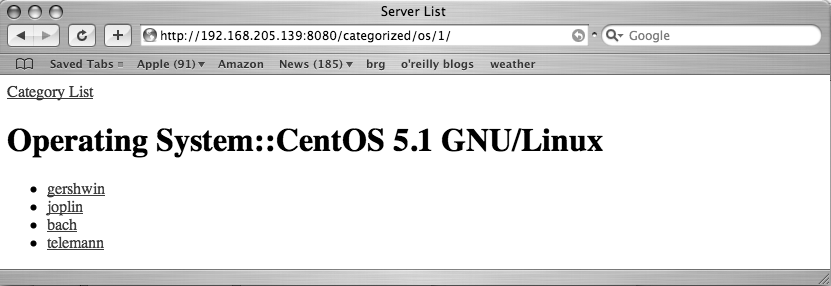
{% endblock %}The “categorized.html” template displays a list of all the
servers that categorized() passed in to it.
The user can then click on a link to individual servers, which
will take her to the server_detail() view function. The server_detail() view function takes a server
id parameter, retrieves data about that server from the database, and
passes that data on to the “server_detail.html” template.
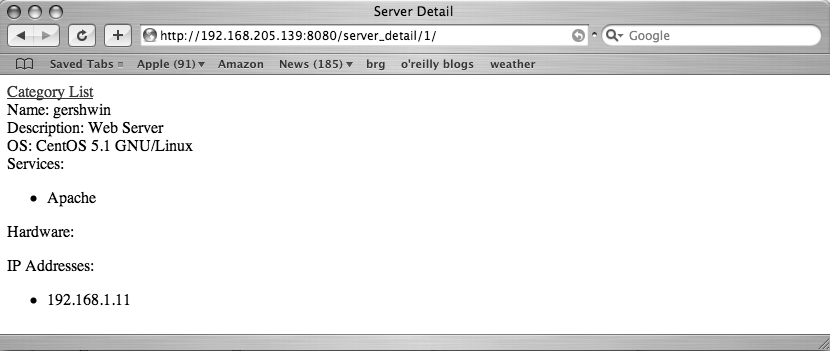
The “server_detail.html” template shown in Example 11-17 is perhaps the longest of the templates, but it is very simple. Its job is to display the individual pieces of data for the server, such as what OS the server is running, what pieces of hardware the server has, what services are running on the server, and what IP addresses the server has.
{% extends "base.html" %}

{% block title %}Server Detail{% endblock %}

{% block content %}
<div>
    Name: {{ server.name }}
</div>
<div>
    Description: {{ server.description }}
</div>
<div>
    OS: {{ server.os.name }}
</div>
<div>
    <div>Services:</div>
    <ul>
    {% for service in server.services.all %}
        <li>{{ service.name }}</li>
    {% endfor %}
    </ul>
</div>
<div>
    <div>Hardware:</div>
    <ul>
    {% for hw in server.hardware_component.all %}
        <li>{{ hw.manufacturer }} {{ hw.type }} {{ hw.model }}</li>
    {% endfor %}
    </ul>
</div>
<div>
    <div>IP Addresses:</div>
    <ul>
    {% for ip in server.ipaddress_set.all %}
        <li>{{ ip.address }}</li>
    {% endfor %}
    </ul>
</div>
{% endblock %}
And that is an example of how to build a pretty simple database application using Django. The admin interface provides a friendly means of populating the database and with just a few more lines of code, we were able to create custom views of sorting and navigating the data, as shown in Figures 11-10, 11-11, and 11-12.
Conclusion
While building GUI applications doesn’t seem to fit the traditional responsibilities of a system administrator, it can prove to be an invaluable skill. Sometimes, you may need to build some simple application for one of your users. Other times, you may need to build a simple application for yourself. Still other times, you may realize that you don’t need it, but it might make some task go along just a little bit more smoothly. Once you’re comfortable building GUI applications, you may be surprised at how often you find yourself building them.