
Hour 20. Developing for the Web with Flask
What You’ll Learn in This Hour:
![]() What we get from the Flask framework
What we get from the Flask framework
![]() How to install the Flask framework
How to install the Flask framework
![]() How to create a Flask app
How to create a Flask app
![]() How to add templates to the app
How to add templates to the app
![]() When to use frameworks in the real world
When to use frameworks in the real world
Making programs on your computer is all well and good, but what if you want to share the results of your programs with others? One way to do this is to write an application that can be used for the Web. Although Python has tools for working with the Internet, it’s probably wiser to start with a framework that takes care of some common tasks for you. In this hour, you’re going to get an introduction to one such framework, called Flask.
What Is Flask?
A framework isn’t a fully functioning program. Rather, it’s a collection of tools that have been brought together for you to use. There are many kinds of frameworks, from ones that help you build games to ones that help you crunch huge amounts of data. Flask is a web framework.
Note: Library Versus Framework
What’s the difference between a library and a framework? At first blush, it seems like they’re very similar, but they’re used in a slightly different manner.
With a library, you are given some tools that do some of the work for you. You provide the structure, and the library does some of the heavy lifting. A framework, however, provides the structure, and you work within it.
Just like buying a toolbox and some wood won’t magically create a desk, installing the Flask framework won’t magically give you a website. This means that Flask has incredible flexibility, though. Sure, you can download a program that will let you make a website by clicking and pointing, but it won’t give you the power you’d have if you coded it yourself.
Here are some of the capabilities Flask brings to the table:
![]() Generating web pages
Generating web pages
![]() Figuring out URLs
Figuring out URLs
![]() Running a web server
Running a web server
![]() Getting information from the user
Getting information from the user
![]() Dealing with uploading files
Dealing with uploading files
![]() Managing errors
Managing errors
![]() Saving errors and other information about what’s going on with your website
Saving errors and other information about what’s going on with your website
![]() Working with other server applications
Working with other server applications
Warning: Don’t Try to Do It All
As someone who (foolishly) tried to do many of these things on her own long ago, I can assure you that you want to let someone else deal with the basic tasks of running a website. This way, you can start doing the cool stuff.
Before we get too deep into Flask, we should go over some vocabulary you’re going to need. Don’t worry: There aren’t too many terms to learn. Taking a moment to look over them will make the rest of this hour much easier to understand:
![]() Server— This is the machine where your application is running. It may be your personal computer, or it may be a machine made specifically for running applications remotely. A website you want to be useable by many people should not be on your personal computer.
Server— This is the machine where your application is running. It may be your personal computer, or it may be a machine made specifically for running applications remotely. A website you want to be useable by many people should not be on your personal computer.
![]() Serve— When a server creates a page and delivers it to your browser, it is said to serve that web page.
Serve— When a server creates a page and delivers it to your browser, it is said to serve that web page.
![]() Web server— This is the application that actually serves web pages. Most web frameworks come with one, but it’s only intended for developing on your personal computer. Others are much more robust and are used when you want to move the web server off of your personal computer and onto an actual server.
Web server— This is the application that actually serves web pages. Most web frameworks come with one, but it’s only intended for developing on your personal computer. Others are much more robust and are used when you want to move the web server off of your personal computer and onto an actual server.
![]() Localhost— When your website is running on your current machine, it’s running on localhost. This term pops up in documentation quite a bit.
Localhost— When your website is running on your current machine, it’s running on localhost. This term pops up in documentation quite a bit.
![]() IP address— Every server and computer has a numerical address assigned to it for networking purposes. The one for localhost is usually 127.0.0.1.
IP address— Every server and computer has a numerical address assigned to it for networking purposes. The one for localhost is usually 127.0.0.1.
Installing Flask
There is no fancy installer for Flask, so much of the installation is going to have to happen in the command line. Don’t worry, though! This is still a fairly simple procedure, and we’re going to make it even easier by installing two additional applications: setuptools and pip.
Setuptools and pip are tools that make installing, upgrading, and uninstalling Python packages much, much easier. Nearly every package available can be installed through one or the other. Having these two applications on your computer will make looking into packages outside of the standard Python library a breeze.
Windows
For Windows, we’re going to follow these steps:
1. Install setuptools.
2. Update your path.
3. Install pip.
4. Install Flask.
Installing setuptools
In order to get started, you’re going to have to install setuptools on your computer. Go to the installation page for setuptools: https://pypi.python.org/pypi/setuptools/0.7.2
There, you’ll need to download a file called ez_setup.py and run it. Once it is finished running, you’ll need to add setuptools to your path.
Updating Your Path
Now, you need to update your path. Just like in Hour 18, “Storing Information in Databases,” where you had to add SQLite to your path, you’re going to have to add a new folder to your path.
Once again, find the dialog that allows you to change your path by searching for “path” in your Start menu. Under the Advanced tab, click Environment Variables. A new dialog will pop up. Select the line that says PATH and click Edit.... At the end of this line, you need to add the following:
;C:Python27Scripts
Note the semicolon at the start of what you’re adding. It’s what separates the different folders that Windows is being told to search. If you accidentally erase the line, click Cancel. If you made the change properly (adding to the end of the existing line), go ahead and click OK.
Before you move on, make sure that setuptools was installed. Open a new command prompt and then type the following:
C:UsersYourName> easy_install
You should get this message:
Error: No urls, filenames, or requirements specified (see --help)
If you see that, the script worked, and you can move on to installing pip.
Installing pip
Open a command prompt and type the following:
C:UsersYourName> easy_install pip
You should see lines of text scroll by, ending with the following:
Finished processing dependencies for pip
This means pip was installed successfully! Test it out by typing the following into the command line:
C:UsersYourName> pip --version
You should see something like this:
pip 1.3.1 from c:python27lib...
This means pip is ready to use, and you can move on to installing Flask.
Installing Flask
You’ll be installing Flask using pip. Open a command prompt and type the following:
C:UsersYourName> pip install flask
You’ll see a bunch of text scroll by. This text should end with the following:
Successfully installed Flask
Cleaning up...
This means that Flask is ready for you to start using!
1. Install setuptools.
2. Update your path.
3. Install pip.
4. Install Flask.
Installing setuptools
In order to get started, you’re going to have to install setuptools on your computer. Happily, someone has written a tool to make this a tiny bit easier. Open up a terminal window and type the following:
$ curl -O http://python-distribute.org/distribute_setup.py
You’ll see something like this:
% Total % Received % Xferd Average Speed Time Time Time Current
Dload Upload Total Spent Left Speed
100 17672 100 17672 0 0 15341 0 0:00:01 0:00:01 --:--:-- 71258
curl is a program that allows you to download files from another place (such as on the Internet or your local network). This file, distribute_setup.py, has now been saved to your computer. Let’s run it. Type the following in your terminal window:
$ python distribute_setup.py
You should see a bunch of text scroll by, ending with something like the following:
Creating /SomePath/lib/python2.7/site-packages/setuptools.pth
This means that setuptools was successfully installed. In order to test it, type the following:
$ easy_install
You should get this message:
error: No urls, filenames, or requirements specified (see --help)
If that’s what you see, you’re ready to move on to installing pip.
Installing pip
Open a terminal window. Type the following (you’ll need to enter the password for your computer, so be ready for that):
$ sudo easy_install pip
You should see lines of text scroll by, ending with the following:
Finished processing dependencies for pip
This means pip was installed successfully! Test it out by typing the following into the command line:
$ pip --version
You should see something like this:
pip 1.3.1 from c:python27lib...
This means pip is ready to use, and you can move on to installing Flask.
Installing Flask
You’ll be installing Flask using pip. Open a command prompt and type the following:
$ sudo pip install flask
You’ll see a bunch of text scroll by. This text should end with the following:
Successfully installed Flask
Cleaning up...
This means that Flask is ready for you to start using!
Making Your First Flask App
Finally, we’re ready to make our first Flask app! Let’s start with one called hello.py. Create a new Python file and enter the following text (we’ll be going over what’s going on here soon):
from flask import Flask
app = Flask(__name__)
@app.route('/')
def hello_world():
return 'Hello World!'
if __name__ == '__main__':
app.run()
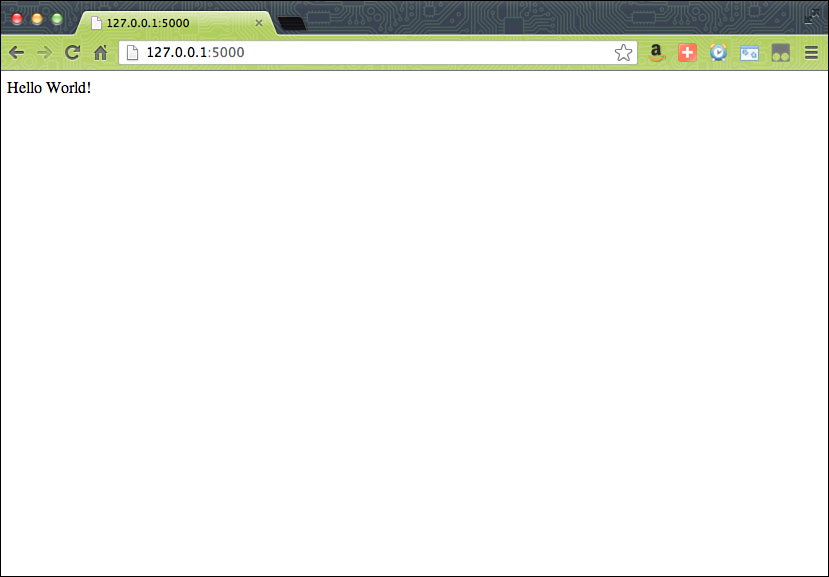
Now, run the file. You should see the following:
* Running on http://127.0.0.1:5000/
Open up your favorite browser and enter this URL into the address bar:
http://127.0.0.1:5000/
You should see a webpage like the one shown in Figure 20.1.
What’s going on here? Let’s go over hello.py, line by line.
First, we have to import and set up Flask:
from flask import Flask
app = Flask(__name__)
The first line should look familiar, but the second is something new. This is a bit of code that is setting our Flask instance and calling it app.
Next, we have this line:
@app.route('/')
We haven’t used the at symbol (@) yet. Here, we’re calling a special kind of function called a decorator. We won’t be going over decorators in this book (they’re more of an advanced topic in the Python world). They can be difficult to understand, but happily they’re easy to use. In this case, we’re telling where we want our page to be served. The forward slash, by itself, means we want it to be served at the root of our URL.
Next, we have a function:
def hello_world():
return 'Hello World!'
This function, paired with the line before it, tells Flask what data we want to send to that page. So, we want to send the text “Hello World!” to the page at the root of our site.
Together, this decorator and function have created something called a view. In Flask, a view is a function that determines how your data is displayed. What data are you sending to a page? How should this data be formatted? These are things the view sets up.
Note that you can still have regular functions in your Flask app. They just won’t produce a web page.
Finally, we have this code:
if __name__ == '__main__':
app.run()
We’re used to seeing something like this at the bottom of most of our files, except we’re calling a main() function we wrote. In this case, we’re calling a Flask function called run().
Though some parts of this program may look a bit strange, we can work our way through most of it with no problem and guess what various parts are doing.
Adding Another View
Let’s add another page. To our hello.py file, add the following view:
@app.route('/test/')
def test_page():
return "This is a test page."
Stop the web server by pressing Control+D, and then start it up again. This time, though, go to http://127.0.0.1:5000/test/. Now, you should see a web page with the following text: “This is a test page.”
Go ahead and create a few new pages. Just remember that each one has to have the path you want sent as a parameter to app.route(), and it has to return something to display.
Adding Variables
You can also add variables to your path! This can be useful for generating dynamic pages based on the URL the user uses.
To add a variable to the path, you’ll need to add a placeholder for a value to go in the path using angle brackets (< >). Let’s add a new view to hello.py:
@app.route('/<name>/')
def name_page(name):
return "Hello, {name}".format(name=name)
Note that we’ve added a parameter to our function and that it’s named the same as the placeholder text being sent to app.route().
Restart the web server (Control+D and run the script again) and then go to http://127.0.0.1:5000/doug in your browser. You should see the following text:
Hello, doug
If you go to http://127.0.0.1:5000/marta, you should see this:
Hello, marta
Feel free to play around sending the function different names before moving on.
Adding Templates
So far, everything has been really plain, and we’ve just sent along a single string to be displayed. Surely we can do more than that, right? We can, but in order to do so, we’re going to need to set up some templates. A template is a kind of file that lets applications or frameworks know how you want your data displayed. Some use their own special mark-up language, whereas others use more common ones.
Flask uses a combination of HTML and something called Jinja. The HTML is concerned with how the page is structured, whereas Jinja’s main job is to insert dynamic information into the page and add some logic, such as for loops or if statements.
Before we create templates, we’re going to have to make a place for them to go. In the same folder as your hello.py script, create a folder called templates. This is where we’re going to store all of our templates.
Using HTML
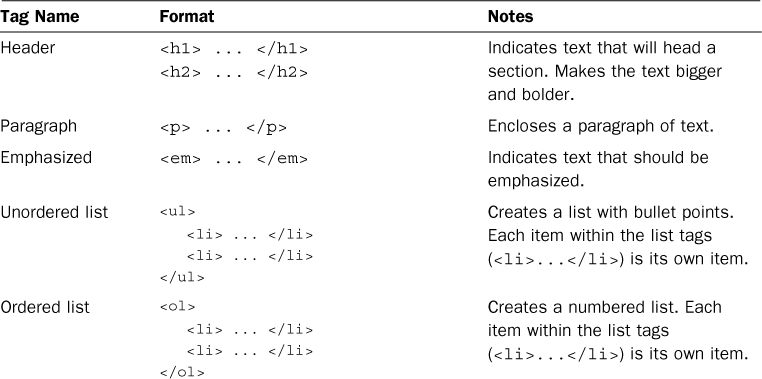
Because we’re going to be using HTML in our templates, now would be a good time to go over how to create HTML. Don’t panic! You’re only learning enough about HTML to do what we need. Although HTML is made up of dozens of elements, you’ll only be learning about three tags: doctype, body, and p.
HTML is made up of tags, which are enclosed by angle brackets (< >) and often come in pairs. In general, a bit of content is going to be enclosed between two tags. The first one looks like this:
<tagname>
This indicates that a chunk of content is starting. The second one looks like this:
</tagname>
This one indicates that the chunk of content has ended.
Note: Closing Tags
Not every HTML tag requires an ending tag. Some, such as the ones used for images, don’t use a closing tag.
Every HTML document starts off with an HTML tag. This tag encloses the entire document and looks like this:
<html>
...
</html>
Everything else we’re going to put in our template will go between those two tags. You should only have one set of HTML tags per page.
The next tag helps define the body of our page. This is where all of our content goes. Body tags look like this:
<body>
...
</body>
You should only ever have one set of body tags per page.
Finally, we have the paragraph tag, which looks like this:
<p>...</p>
It defines a paragraph of content. You can have as many of these as you want per page, but paragraph tags shouldn’t be nested inside each other.
Although there are many more tags, these three will be enough to get us started. Table 20.1 details more useful tags you may want to use. Although the table is extremely incomplete, it should be enough for now.
Making a Template
Let’s put everything together and make a lucky number generator. First, we need to make a basic template. In your templates directory, create a new file called lucky.html and enter this content:
<html>
<body>
<p>Hello there, new user</p>
<p>Here is your lucky number:</p>
<p>5</p>
</body>
</html>
Now, let’s create a new Flask app (our old one was getting a bit crowded) called lucky.py:
from flask import Flask
from flask import render_template
app = Flask(__name__)
@app.route('/')
def lucky():
return render_template('lucky.html')
if __name__ == '__main__':
app.run()
Most of this should look familiar, but notice that we’ve added two things. First, we’re importing something called render_template from Flask. This function allows us to use a template other than the base template that comes with Flask.
Second, rather than returning a string, we’re returning the results of render_template('lucky.html'). This tells Flask to use the lucky.html template when rendering this specific page.
If we bring up our page, we see the following text:
Hello there, new user
Here is your lucky number:
5
It’s the content of our HTML template, but it’s still rather boring. How can we make this more dynamic? Ideally, we’d like our user to get a new lucky number every time the page is reloaded. Otherwise, why would she ever come back?
Adding Dynamic Content with Jinja
In order to add dynamic content, we’re going to use Jinja in our templates. As stated before, Jinja allows us to add logic to our templates as well as create placeholders for data.
A tag in Jinja is enclosed by either double curly brackets ({{ }}) or a curly bracket and a percent sign ({% %}). The first kind is used as a placeholder for data, while the second kind is used for adding in logic and flow control (such as loops).
The most basic variable in Jinja looks like this:
{{ variable_name }}
Note that we put a space before and after the variable name. You don’t have to do that, but it does make your template a bit easier to read. When we render a template, we can send Flask and Jinja the values we want inserted into the variables. Let’s add a variable to lucky.html:
<html>
<body>
<p>Hello there, new user</p>
<p>Here is your lucky number:</p>
<p>{{ lucky_num }}</p>
</body>
</html>
Now that we have a variable in our template, let’s update our lucky() function so that we’re sending a value for lucky_num to display. We do this by adding it as a parameter to the render_template() function:
@app.route('/')
def lucky():
lucky_num = 7
return render_template('lucky.html',
lucky_num=lucky_num)
Now, when we restart our web server and check our web page, we see the following:
Hello there, new user
Here is your lucky number:
7
This still isn’t very dynamic, but it’s a good test to make sure our data is being sent. Let’s make it actually generate random numbers:
from flask import Flask
from flask import render_template
app = Flask(__name__)
from random import randint
@app.route('/')
def lucky():
lucky_num = randint(1, 99)
return render_template('lucky.html',
lucky_num=lucky_num)
if __name__ == '__main__':
app.run()
Now, once we restart our web server, we get a random number every time we load the page.
Adding Logic to Templates
You can also add simple logic to a template by adding Jinja expressions. Jinja expressions look like this:
{% expression %}
...
{% endexpression %}
They may or may not have a closing expression, depending on the type of expression.
Unlike with variables, we can’t make up new expressions. We have to use the ones Jinja gives us. Each follows a specific syntax, just like Python expressions. There are many Jinja expressions, but we’re just going to go over one that should look familiar: if. An if statement in Jinja looks like this:
{% if val %}
...
{% endif %}
You can test to see if a value is zero or empty (so, {% if name %}), or you can check for equality, inequality, or one value being more or less than the other (so {% if name == "Bob" %}).
If the expression is true, anything in between the two tags will be shown. Otherwise, it won’t be added to the page.
Let’s add some logic to our lucky number generator. Let’s say that if the number the user gets is 99, a special message is printed:
<html>
<body>
<p>Hello there, new user</p>
<p>Here is your lucky number:</p>
<p>{{ lucky_num }}</p>
{% if lucky_num == 99 %}
<p>Wow! That's super lucky!</p>
{% endif %}
</body>
</html>
We can restart the web server and reload until we get 99. As soon as we do, the special message “Wow! That’s super lucky!” pops up.
Caution: A Word About Moving to the Web
In this hour, you’ve learned some basics about how to use Python and a web framework to make a dynamic website. Moving your application to a server, though, isn’t always easy. You have security concerns to think about, as well as backing up your website regularly. Even getting your code onto a server properly is something you should learn before attempting this.
This isn’t meant to discourage you. If you’ve gotten to this hour, you’re more than capable of learning about deploying to a server. In Hour 24, “Taking the Next Steps with Python,” we’ll go over some resources for learning more about servers, a family of operating systems called Linux, and something called sandboxing.
Using Frameworks in the Real World
Now that the manager in our restaurant example has something that can create a basic website for him, he has decided to work toward scrapping the restaurant’s static website for something a bit more dynamic. While his head is swimming with ideas, he decides to focus on one suggestion his cook gave him: displaying the special of the day on the website.
First, he creates a simple template for his website, displaying the name of the restaurant, the address, and the special of the day. He puts the special in a variable because he wants that to change based on the day of the week:
<html>
<body>
<h1>Welcome to Paradise Diner</h1>
<p>We're located at 111 Main Street</p>
<p>Today's special is {{special}}.</p>
</body>
</html>
Next, he puts together his Flask application. This one is extremely basic, because he just wants to make sure he has everything in place before moving on:
from flask import Flask
from flask import render_template
import json
app = Flask(__name__)
@app.route('/')
def main_page():
return render_template('base.html',
special="Hamburger")
if __name__ == '__main__':
app.run()
He runs the web server and checks the web page. It looks like everything is coming up fine, so he’s ready to make the page a bit more dynamic.
He looks up how to get the day of the week in Python, and finds out that datetime objects come with a weekday() function that returns a number for the day of the week (0 for Monday, 1 for Tuesday, and so on). He also finds out that the cook is currently storing the specials in a JSON file. Perfect! He can use that.
First, he adds two libraries he’s going to need:
import json
from datetime import datetime
He then creates a function to get all the specials from the JSON file:
def get_specials(filename):
f = open(filename)
specials = json.load(f)
f.close()
return specials
He then updates get_special() to use the loaded specials:
def get_special():
specials = get_specials('specials.json')
today = datetime.now()
DAYS_OF_WEEK = ('monday', 'tuesday', 'wednesday',
'thursday', 'friday', 'saturday', 'sunday')
weekday = DAYS_OF_WEEK[today.weekday()]
return specials[weekday]
Now, when he runs his web server, he gets a web page announcing the special for the day, which happens to be meatloaf with hot sauce.
Note: Learning More About Flask
The Flask community hosts excellent documentation on their website: http://flask.pocoo.org/docs. They cover everything from installation, how to use templates, and how to connect to a database. Their tutorial is well worth running through at least once. In it, you’ll create an app called Flaskr, and you’ll get to see much of the functionality that Flask has to offer.
Summary
During this hour, you learned what a web framework is and how you can use one to make a dynamic website. You installed the web framework Flask, as well as pip and setuptools. Finally, you created a dynamic website using Flask, some Python, and some basic HTML.
Q&A
Q. What other web frameworks are out there?
A. There are tons! Django is a popular one, as well as Pyramid, TurboGears, and web2py. The Python community keeps a list of frameworks at http://wiki.python.org/moin/WebFrameworks.
Q. Where can I learn more about HTML?
A. There’s no shortage of resources with regard to HTML. If you want to learn more, I recommend checking out a beginner’s guide to HTML. Head First HTML and CSS will give a great introduction to not only creating HTML, but making it beautiful. Codecademy also has a free tutorial on HTML at http://www.codecademy.com/tracks/web.
There are also quite a few Sams Teach Yourself in 24 Hours books on HTML and CSS. Sams Teach Yourself HTML and CSS in 24 Hours, by Julie Meloni and Michael Morrison, covers most of the topics you would need to create a well-structured and styled website. It also goes over HTML5, the newest version of HTML.
Workshop
The Workshop contains quiz questions and exercises to help you solidify your understanding of the material covered. Try to answer all questions before looking at the answers that follow.
Quiz
1. What is the difference between a framework and an application?
2. What is a view? How do you define one?
3. What is the function used to create HTML from a template?
Answers
1. A framework brings together a set of tools for you to use to create applications. Applications may come with tools, but they’re already tied together in a larger program.
2. A view is a function in a Flask app that renders a web page. You create one by creating a function and then adding the @app.route() decorator just before the function definition.
3. The function render_template is used to create HTML from a template. It must be imported from Flask.
Exercise
We have the beginning of a restaurant website! Let’s add a bio page. Create three biographies: one for our owner, one for our cook, and one for our waiter. Save them in a JSON file. The path for this page should be '/bios/'. This page should display all three blurbs.