So far we have completed the “Thought Log” application and taken a look at how RJS fits into the Rails framework. Now it is time to examine an example that is a bit more realistic and solves some of the problems that you might actually run into in your own projects. My expenses have been getting out of hand lately, so let's build a simple application to help track them.
First, we'll run the Rails model generator to create the models used throughout this project. The Rails model generator automatically creates stub files for the models and database migrations. Then we'll edit the generated files to add our own functionality.
expenses> ruby script/generate model Project
      exists  app/models/
      exists  test/unit/
      exists  test/fixtures/
      create  app/models/project.rb
      create  test/unit/project_test.rb
      create  test/fixtures/projects.yml
      create  db/migrate
      create  db/migrate/001_create_projects.rb

expenses> ruby script/generate model Expense
      exists  app/models/
      exists  test/unit/
      exists  test/fixtures/
      create  app/models/expense.rb
      create  test/unit/expense_test.rb
      create  test/fixtures/expenses.yml
      exists  db/migrate
      create  db/migrate/002_create_expenses.rb
The generator creates the Project model in
app/models/project.rb and the Expense model in
app/models/expense.rb, along with unit test stubs and
test fixtures. The generator also created two migrations for us:
db/migrate/001_create_projects.rb and
db/migrate/002_create_expenses.rb.
Now that the model generator has created these two new migrations,
we need to add the column definitions that will be used by the models as
attributes. For now we'll only track the name of each project. Open up
db/migrate/001_create_projects.rb and edit it to look
like this:
class CreateProjects < ActiveRecord::Migration
  def self.up
    create_table :projects do |t|
      t.column :name, :string
    end
  end

  def self.down
    drop_table :projects
  end
end
We only added a single line, t.column :name,
:string, to the migration. This line adds the column
name of type String to the
database table projects. Next, define the columns for
the expenses table. Same routine: open up
db/migrate/002_create_expenses.rb and add the columns
project_id, description and
amount.
class CreateExpenses < ActiveRecord::Migration
  def self.up
    create_table :expenses do |t|
      t.column :project_id, :integer
      t.column :description, :string
      t.column :amount, :float
    end
  end

  def self.down
    drop_table :expenses
  end
end
Assuming that the database has already been created and the
database connection has been configured, we can run the migrations. This
will add the tables and columns defined in the two migration files to
the development database configured in
config/database.yml
expenses> rake migrate
Now that the database contains the schema for the Expense Tracker
we can define the relationships between the models. A
Project has many Expense objects,
so add the has_many() relationship to the
Projectapp/models/project.rb.
class Project < ActiveRecord::Base
  has_many :expenses, :dependent => :delete_all
end
We added the :dependent => :delete_all
option to the has_many() call because we don't want
any orphaned expenses lingering around in our database without a
Project. Now define the belongs_to() relationship in
the Expense model. An Expense object
belongs_to() a Project because the Expense contains
the foreign key. Open up
app/models/expense.rb.
class Expense < ActiveRecord::Base
  belongs_to :project
end
Now that the models are defined and the database is ready to go we can move on to the next step─generating and defining the controllers.
Let's generate two controllers. The first controller is for projects and the second is for expenses.
expenses> ruby script/generate controller Projects
      exists  app/controllers/
      exists  app/helpers/
      create  app/views/projects
      exists  test/functional/
      create  app/controllers/projects_controller.rb
      create  test/functional/projects_controller_test.rb
      create  app/helpers/projects_helper.rb

expenses> ruby script/generate controller Expenses
      exists  app/controllers/
      exists  app/helpers/
      create  app/views/expenses
      exists  test/functional/
      create  app/controllers/expenses_controller.rb
      create  test/functional/expenses_controller_test.rb
      create  app/helpers/expenses_helper.rb
Once again, using the generator simplified the process of adding new functionality to the project. The controller generator not only automatically creates the controller file requested, but also creates the view folder and functional test stub for the controller.
The show() action simply finds the Project
object from the value associated with the key :id in
the params Hash. Edit
app/controllers/projects_controller.rb and add the
following code to the skeleton that the generator created for us.
class ProjectsController < ApplicationController
  def show
    @project = Project.find(params[:id])
  end
end
Next, edit
app/controllers/expenses_controller.rb and add the
code to create a new Expense object.
class ExpensesController < ApplicationController
  before_filter :find_project

  def new
    @expense = @project.expenses.create(params[:expense])
  end

  private
  def find_project
    @project = Project.find(params[:project])
  end
end
The ExpensesController is a bit more complex
than the ProjectsController. Since every
Expense object belongs to a
Project we can save a lot of effort and duplicate
code by using a before_filter. The
before_filter executes before each controller action.
The filter we've defined automatically finds the
Project based on the value associated with the
:project key in the params
Hash and stores it in the instance variable
@project.
The new action, as the name indicates, adds a
new Expense object to a Project.
Rails follows the same convention for RJS templates as for RHTML and
RXML templates. Rails looks for a template with the same name as the
controller action with the corresponding file extension. So in the case
of the new action, the controller automatically
discovers the view app/views/expenses/new.rjs.
One more step is needed to wire up the
before_filter and create nice-looking URLs. The
controller looks up the project using the value stored in
params[:project]. We need to add a simple route to
catch this and produce nice URL paths like
/projects/1/expenses/new.
Open up config/routes.rb and add the following
line above the default route at the bottom of the file:
map.expenses 'projects/:project/expenses/:action/:id', :controller => 'expenses'
The change to the routing should be picked up right away if you're running your application in development mode. Moving right along, we're going to create a layout for all of our application templates.
We need a layout to put our content in.
ActionController::Base descendants automatically look
for a layout based on the name of the controller's class name, with
Controller removed. This means that
ApplicationController will automatically use a layout
named application.rhtml. Our controllers are all
descendants of ApplicationController, so the layout
will inherit as well, unless overridden. Create
app/views/layouts/application.rhtml and add the
following code with your favorite text editor:
<!DOCTYPE html PUBLIC "-//W3C//DTD XHTML 1.0 Transitional//EN"
        "http://www.w3.org/TR/xhtml1/DTD/xhtml1-transitional.dtd">
<html xmlns="http://www.w3.org/1999/xhtml">
  <head>
    <meta http-equiv="Content-type" content="text/html; charset=utf-8" />
    <title>Expense Tracker</title>
    <%= stylesheet_link_tag "screen.css" %>
    <%= javascript_include_tag :defaults %>
  </head>
  <body>
    <div id="content">
      <%= yield %>
    </div>
  </body>
</html>
Notice that we are also using the Rails helper
stylesheet_link_tag() to include the stylesheet
screen.css, which is found in
public/stylesheets/screen.css. The stylesheet I'm
using is very basic and looks like the following:
th { text-align: left; }
#content { margin: 10px; }
#content p { margin-bottom: 10px; }
#expenses,#summary { border: none; border-collapse: collapse; width: 600px;}
.amount { width: 40%; }
.amount, .total { text-align: right; }
#new-expense { margin-top: 2em; background-color: #eeede5; padding: 1em; }
#new-expense h3 { margin-top: 0.5em; }
#total { border: none; border-collapse: collapse; width: 600px;}
#total-amount, .total { font-weight: bold; background-color: #eeede5; }
#total-amount { border-top: 2px solid black; }
.total { width: 90%; padding-right: 10px; }
Just because my stylesheet is basic and boring doesn't mean that yours has to be. Dress up your Expense Tracker to your heart's content.
We need some data to display on our page, so I'll enter a few expenses that I incurred while writing this document. Start up the console.
expenses> ruby script/console
>> rjs_book = Project.create(:name => 'RJS Templates for Rails')
=> #<Project:0xb72e444c8 ...>
>> rjs_book.expenses.create(:description => 'Americano at Bridgehead', :amount => 1.93)
=> #<Expense:0xb72cb84c ...>
>> rjs_book.expenses.create(:description => 'Sandwich at La Bottega', :amount => 4.27)
=> #<Expense:0xb72c3b24 ...>
>> quit
I don't think I'll get away with writing off expenses like those, but at least I'll be able to get a better idea about where my money is being spent. Now we need some views to present this sample data.
There isn't yet a way for us to view our expenses for this
Project. We need to create a view that shows the
Expense objects for the sample
Project that was just created. The views are
separated into one template and two partial templates. We specifically
separate out the _expense.rhtml partial so that we
can render an individual row when updating the table with RJS.
Create the view app/views/projects/show.rhtml
and add the following:
<h1><%= @project.name %></h1>

<h2>Expenses</h2>
<table id="expenses">
  <tr><th>Description</th><th class="amount">Amount</th></tr>
  <%= render :partial => 'expenses/expense', :collection => @project.expenses %>
</table>

<%= render :partial => 'expenses/new' %>
This partial gives the table the id
expenses so that we can refer to it when updating the
page. We've also given a relative path to the partial, because we're
rendering show.rhtml from
ProjectsController, but we're keeping the expense
partials in the app/views/expenses view
folder.
Now we create partial
app/views/expenses/_expense.rhtml. This partial
renders the actual Expense within the
<table>.
<tr id="expense-<%= expense.id %>">
  <td><%=h expense.description %></td>
  <td class="amount"><%=h number_with_precision(expense.amount, 2) %></td>
</tr>
Notice how each row is given an id based on the
Expense object's id attribute.
We've done this for the same reason that we gave the
<table> an
id: it allows us to refer to the row in the future.
The method number_with_precision() is just a built-in
Rails helper method that displays the amount with the specified number
of decimal places. We also used the h() method, which
escapes the HTML rendered on the page. Escaping the HTML prevents a
malicious user from adding JavaScript scripts to the project's
title.
Last, but not least, we'll add the partial for the form. Place the
following code into
app/views/expenses/_new.rhtml:
<div id="new-expense">
  <h3>Add an expense</h3>
  <% form_remote_for :expense,
                     Expense.new,
                     :url => hash_for_expenses_url(:project => @project,
                                                   :action => 'new'
                                                  ),
                     :html => { :id => 'expense-form' } do |f| %>
    <label for="expense_description">Description:</label><br />
    <%= f.text_field 'description', :size => 60 %><br />

    <label for="expense_amount">Amount:</label><br />
    <%= f.text_field 'amount', :size => 10 %><br /><br />

    <%= submit_tag 'Add Expense' %>
  <% end %>
</div>
This isn't a regular form. We've used the
form_remote_for() method, which posts the data from
the form to our controller action in the background with an Ajax
request. The first parameter passed is the name of the object; it is the
key under which the form data will be located in the
params Hash. The second parameter
is the object that provides the form's initial values. Then we pass in
the :url option, which tells the form where to post
the form data. Notice we call the routing helper method
hash_for_expenses_url(), which is generated based on
our named route expenses in
config/routes.rb. Calling this method saves us from
the hassle of specifying the controller name in the :url
Hash. We also gave the form an id of
expense-form so that it can be referenced from our
RJS templates and other JavaScript code.
Finally, let's create the RJS template that updates our project's
expense page when we add a new expense. Create
app/views/expenses/new.rjs and add the following code
to it:
page.insert_html :bottom, 'expenses', :partial => 'expense'
page.visual_effect :highlight, "expense-#{@expense.id}"
page.form.reset 'expense-form'
The first line inserts the HTML rendered by the partial,
_expense.html, into the DOM element with id
expenses. The option :bottom specifies that
the HTML from the partial template will be inserted inside the element,
but after the element's existing content. Since there is an instance
variable @expense and the partial template is also
named expense, @expense automatically becomes
available within the partial as the local variable
expense, as though we passed in the option
:object => @expense.
The second line applies the Scriptaculous visual effect Highlight
to the new Expense object. Finally, the third line
resets the expense form using an RJS class proxy. Next, we'll give the
Expense Tracker a test drive and see what happens.
Now that everything is ready, let's try out what we have so far. Go ahead and add a new expense to the project. I added the new keyboard I bought this morning and captured the output (see Figure 3).
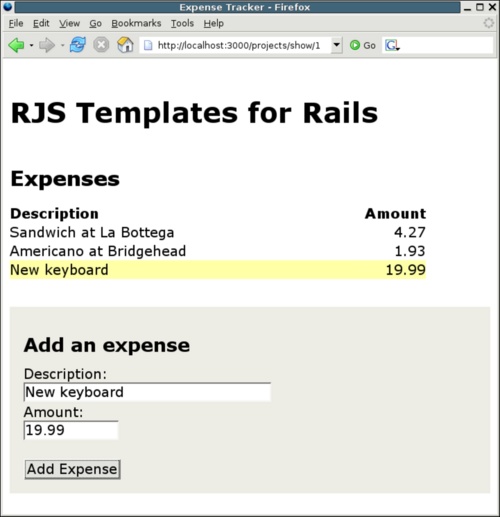
Wow, that was so easy. All of that functionality and we didn't even have to write a single line of JavaScript. The exciting part is that this is just beginning! The new expense form is pretty cool, but it would be great to improve the form to show the total expenses or some other interesting summary information. The form could also provide some sort of feedback when a remote request is being processed. It would also be nice to disable the form so that the user doesn't accidentally click the Add Expense button more than once.
So far we've done a lot of standard Rails tasks and just added a sprinkle of RJS in for flavor. Next, we're going to take a look at FireBug. FireBug is an invaluable tool in any Ajax developer's toolkit. Getting familiar with it will allow you to see exactly what is going in every Ajax request made throughout the rest of the document.