The Expense Tracker currently uses an Ajax call in the background to
add Expense objects to a Project.
Although the form works and successfully adds expenses to a project, it
could really use some enhancements. Next we're going to add an activity
indicator to the page and later on we'll add a summary section that shows
some statistics about the project.
One problem with Ajax is that it break a user's assumptions about how his web browser works. The user is used to having the entire page reload after performing an action that interacts with the server. With no indication that the page is busy, the user is left wondering what is going on. The user may also think that nothing is happening and repeatedly click the link or button, causing undesired effects.
One solution to this problem is to place some kind of indicator on the page that lets the user know that a remote call is in progress. In this example we'll use an animated GIF, but some descriptive text is also used. We can also disable the form while the request is in progress to prevent the user from accidentally clicking the submit button more than once.
We can do all of this by hooking into the JavaScript callbacks
offered by the Ajax request. Rails lets you hook into the callbacks by
passing in options to the remote call. The available callbacks are:
:uninitialized, :loading,
:loaded, :interactive,
:complete, :failure, and
:success. See the Rails documentation for more
information regarding these callbacks.
Create the file
public/javascripts/application.js if it doesn't
already exist and add the following code to it:
var ExpenseTracker = {}

ExpenseTracker = {
  disableExpenseForm: function() {
    Element.show('form-indicator'),
    Form.disable('expense-form'),
  },

  enableExpenseForm: function(form) {
    Element.hide('form-indicator'),
    Form.enable('expense-form'),
  }
}
We've created a new JavaScript object
ExpenseTracker that will be available from our page.
We then added a simple method, disableExpenseForm(),
that shows a spinning indicator and disables the form while the Ajax
request is loading. We also added
enableExpenseForm(), which hides the indicator and
enables the form when the request is complete. We could have called
these methods directly without the ExpenseTracker
object, but we'll be adding more functionality to each method in the
future and it is nice to keep the functionality encapsulated in one
place. I also like the fact that the code that manages the form won't be
cluttering up the RJS templates.
Since we used javascript_include_tag :defaults
in our layout, Rails is smart enough to include
public/javascripts/application.js along with the
Rails JavaScript libraries. Now that our simple JavaScript functions are
ready to go, we can hook them into the callbacks offered by the remote
request. Open up app/views/expenses/_new.rhtml and
modify it to include the callbacks. The
form_remote_for() method call should look like this
when you've finished:
<% form_remote_for :expense,
                   Expense.new,
                   :url => hash_for_expenses_url(:project => @project, :action => 'new'),
                   :loading => 'ExpenseTracker.disableExpenseForm()',
                   :complete => 'ExpenseTracker.enableExpenseForm()',
                   :html => { :id => 'expense-form' } do |f| %>
The form is given the id
expense-form so that we can refer to it within the
JavaScript function. We could achieve the same results that we get from
the enableExpenseForm() method by calling the
equivalent methods in the RJS template, but it is nice to keep all of
the callback code in the ExpenseTracker object. This
also keeps the mechanics of managing the form from cluttering up the RJS
templates. We could also reset the form in the
enableExpenseForm() method, but this would always
reset the form. We want to be able control when the form is reset so
that the user doesn't have to re-enter the data in the case of failing
validations or other problems.
Next, add the indicator image after the
submit_tag() call in
app/views/expenses/_new.rhtml. Set the initial style
to display:none so that the indicator isn't visible
when the page is first loaded. My indicator is just a simple animated
GIF that mimics Mozilla Firefox's spinning indicator. I placed the image
in public/images folder so that it is available to
our project.
<%= image_tag 'indicator.gif', :id => 'form-indicator', :style => 'display:none;' %>
Now when submitting the form, the browser displays the spinning
indicator image and disables the form (see Figure 5). This technique
offers a visual cue that an Ajax request is in progress and prevents the
user from submitting the new expense multiple times. The indicator is
hidden and the form re-enabled when the request has completed. Since the
entire process occurs very quickly in the normal case, it can be very
hard to see that the form is being disabled and the indicator shown. You
can slow things down a bit by putting a call to
sleep() in the new() action of the
ExpenseController. Obviously you'd only want to do
this in development to test that the process is actually working. The
controller code with a call to sleep() is shown in
the following sample:
class ExpensesController < ApplicationController
  before_filter :find_project

  def new
    @expense = @project.expenses.create(params[:expense])
    # Sleep for 3 seconds
    sleep 3
  end

  private
  def find_project
    @project = Project.find(params[:project])
  end
end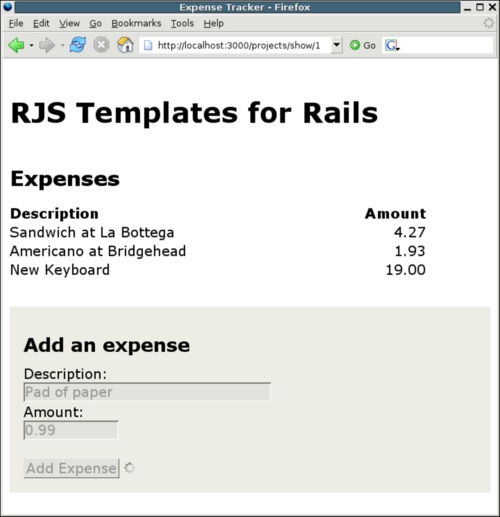
The :loading and :complete
callbacks of the form_remote_tag() worked very well for showing and
hiding the form indicator. The only problem is that if you have a lot of
Ajax functionality built into your page, it can be tedious to add the
image and wire up the :loading and
:complete callbacks for every remote operation. This
is where the Ajax global responders come in handy.
The Prototype Global Ajax Responders are a great place to register
JavaScript functions that you would like to have executed on every Ajax
request. The Ajax global responders are provided by the Prototype
library; they allow you to hook functions into the various callbacks of
all Ajax requests. Let's move code that shows and hides the indicator
image out of the :loading and
:complete callbacks and instead use the Ajax global
responders.
Instead of placing an indicator image beside every form or element that makes Ajax calls, the Ajax Global Responders allow you to set up a single indicator on the page that will be shown during any Ajax request made from the page.
Setting up the Global Responders is really simple. You can add the
code to wire up a global response in
public/javascripts/application.js:
Ajax.Responders.register({
 onCreate: function() {
   if (Ajax.activeRequestCount > 0)
     Element.show('form-indicator'),
 },
 onComplete: function() {
   if (Ajax.activeRequestCount == 0)
     Element.hide('form-indicator'),
 }
 });
The code is straightforward.
Ajax.Responders.register() takes an anonymous
JavaScript object, where the property name is the name of the Ajax
callback and the value is a JavaScript function. We are wiring up a
function that will be executed on every onCreate()
callback and another function that will be executed on every
onComplete() callback. The first function shows the
DOM element with idform-indicator when there is one or more active Ajax
Request. The second function hides the indicator when there are no
active Ajax requests processing.
We can now either remove the lines that show and hide the form
indicator image from the ExpenseTracker object in
public/javascripts/application.js or we can remove
the ExpenseTracker JavaScript code altogether and
just write the code inline in the callback. This is what the
form_remote_for call in
app/views/expenses/_new.rhtml would look like if we
eliminated the ExpenseTracker JavaScript object and
simply wrote the code inline:
<% form_remote_for :expense,
                   Expense.new,
                   :url => hash_for_expenses_url(:project => @project, :action => 'new'),
                   :loading => 'Form.disable("expense-form")',
                   :complete => 'Form.enable("expense-form")',
                   :html => { :id => 'expense-form' } do |f| %>
Now the callbacks only enable and disable the form. The code to show and hide the indicator image is being executed by the Ajax Global Responders. The indicator appears whenever there is any Ajax activity and is hidden when all requests have completed. When we add more features, it is a good idea to move the indicator image to another part of the screen, or use an animated LightBox image. For now, we'll just leave the image in the same location.
Ajax Global Responders offer a great way to perform actions during the life cycle of every Ajax request. This not only cuts down on code duplication, which makes our templates more easily understandable, but also saves a whole lot of typing.
In its current state, the Expense Tracker will accept any input
and try to create Expense objects. The problem is
that the application chokes on invalid input. The most likely case is
ActiveRecord throwing an exception that isn't caught
by our code. Our newly-added Ajax indicator will just keep spinning away
and the user won't know what happened. Lucky for us, Rails has wonderful
support model validations. We can validate the new
Expense objects and return a nice alert box to the
user showing any problems. Let's add some validations to the
Expense model in
app/models/expense.rb:
class Expense < ActiveRecord::Base
  belongs_to :project

  validates_presence_of :description
  validates_numericality_of :amount

  protected
  def validate
    errors.add(:amount, "must be greater than 0") unless amount.nil? || amount >= 0.01
  end
end
This validation code will ensure that the
description is not blank and that the amount of the
Expense is a number greater than 0. Now we just have
to modify our RJS template slightly to display the errors. Open up
app/views/expenses/new.rjs and modify the template to
look like the following:
if @expense.new_record?
  page.alert "The Expense could not be added for the following reasons:
" +
             @expense.errors.full_messages.join("
")
else
  page.insert_html :bottom, 'expenses', :partial => 'expense'
  page.visual_effect :highlight, "expense-#{@expense.id}"
  page.form.reset 'expense-form'
end
The code checks to see if the Expense object is
still a new record. If it is still a new object, then there must have
been a problem saving it and the errors are shown. Otherwise, the normal
action of inserting and highlighting the new Expense
is performed. Notice that the form is only reset when the operation was
successful. This way the user doesn't have to retype the
description and amount when there
are errors.
In this case we just used a simple JavaScript alert box to show
the errors. This is the simplest method of displaying the errors with
RJS. Another solution would be to replace the entire form and insert the
rendered output of error_messages_for() into the
page. This would take advantage the built-in Rails helpers, but also has
more overhead in the RJS templates, as you would have to remove or hide
the rendered error section after the Expense object
was successfully added.
Since the Expense form is disabled when a request is being processed, it is a lot more usable. But there's a long way to go. I still don't know what my total expenses for the project are. Also, while we're at it, let's add some code that displays other interesting data, such as the minimum expense, maximum expense, and the average expense of the project. We'll have to make sure that all this additional information gets updated as we add expenses to the project.
First, we need to add these calculation methods to our Project
model. Open up app/models/project.rb and add the
calculation methods. Your model should look something like the
this:
class Project < ActiveRecord::Base
  has_many :expenses, :dependent => :delete_all

  def total_expenses
    expenses.sum(:amount)
  end

  def min_expense
    expenses.minimum(:amount)
  end

  def max_expense
    expenses.maximum(:amount)
  end

  def avg_expense
    expenses.average(:amount)
  end
end
These methods are all ridiculously simple. We use the power of the
new Active Record Calculations (added in Rails 1.1) to do all of the
dirty work. Notice that the calculation methods are being called from
the expenses collection. Calling each calculation
from the collection instead of from the Expense class
causes the calculation to be scoped to the current
Project, which is what we want in this case. We pass
in the Symbol :amount to each
calculation because that is the Expense attribute on
which we want to perform the calculation.
We might as well display all of this information on the page that
shows the project's expenses. We can show the total expenses using a
partial that we'll render directly under the list of expenses. Create
app/views/expenses/_total.rhtml, which will look like
this:
<table id="total">
  <tr>
    <td></td>
    <td class="total">Total</td>
    <td id="total-amount" class="amount"><%= number_to_currency(total) %></td>
  </tr>
</table>
number_to_currency() is another Rails numerical
helper method. It formats the amount passed to it with two decimal
places and places a dollar sign before the number. What about the other
calculations? We can place them in a table above the list of expenses.
Create another partial named
app/views/expenses/_summary.rhtml, and add the
summary table.
<table id="summary">
  <tr>
    <td>Min expense</td><td class="amount"><%= number_to_currency(min) %></td>
  </tr>
  <tr>
    <td>Max expense</td><td class="amount"><%= number_to_currency(max) %></td>
  </tr>
  <tr>
    <td>Ave expense</td><td class="amount"><%= number_to_currency(average) %></td>
  </tr>
</table>
Now we need to render the partials we just created. Open up
app/views/projects/show.rhtml and add the lines that
render the new partials. The view should look like this:
<h1><%= @project.name %></h1>

<h2>Summary</h2>
<%= render :partial => 'expenses/summary',
           :locals => { :min => @project.min_expense,
                        :max => @project.max_expense,
                        :average => @project.avg_expense } %>

<h2>Expenses</h2>
<table id="expenses">
  <tr><th>Description</th><th>Amount</th></tr>
  <%= render :partial => 'expenses/expense', :collection => @project.expenses %>
</table>
<%= render :partial => 'expenses/total', :object => @project.total_expenses %>
<%= render :partial => 'expenses/new' %>
We added an <h2>
header tag for the summary and rendered the summary partial underneath
it. We pass the minimum, maximum, and average expense values into the
partial as local variables in the locals
Hash. Then, after the list of expenses, we render the
total@project.total_expenses into the
_total.rhtml partial as the value of the
:object key. This makes the value
@project.total_expenses available in the partial as
the local variable total, which is also the name of
the partial template.
At this point, we just need to add the code that updates the total
expenses and the new summary table. Let's edit the RJS template
app/views/expenses/new.rjs again and add the
following code:
if @expense.new_record?
  page.alert "The Expense could not be added for the following reasons:
" +
             @expense.errors.full_messages.join("
")
else
  page.replace 'summary', :partial => 'summary',
                          :locals => { :min => @project.min_expense,
                          :max => @project.max_expense,
                          :average => @project.avg_expense }
  page.insert_html :bottom, 'expenses', :partial => 'expense'
  page.visual_effect :highlight, "expense-#{@expense.id}"
  page.replace_html 'total-amount', number_to_currency(@project.total_expenses)
  page.form.reset 'expense-form'
end
First we are replacing the summary table with the rendered
_summary.rhtml partial. Since we're using
replace, the entire summary
element is replaced and not just its contents. Again, like in
show.rhtml, we pass in the :locals
Hash that contains the calculations. Then we apply a
Highlight effect to the summary. Next, we replace the contents of the
total-amount element with the updated total amount.
This time we call replace_html, which replaces the
innerHTML of the of the DOM element whose
id is specified as the first parameter.
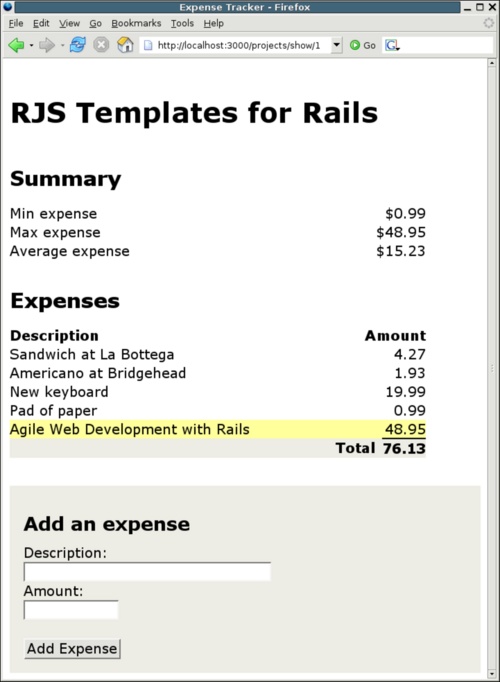
Now we have much more functionality in our page. It is great to have summary calculations and total expenses update automatically. It is amazing that all of this can be done with so little code (see Figure 6).
Now that the new expenses are being correctly inserted and the
total is properly updated, we can go ahead and refactor the RJS template
using the RJS helper methods. The separate tasks are displaying the
errors to the user, updating the summary, inserting and highlighting a
new expense, and updating the total amount. Let's create helpers for
these. Open up app/helpers/expenses_helper.rb and add
the following code:
module ExpensesHelper
  def display_errors(expense)
    page.alert "The Expense could not be added for the following reasons:
" +
               expense.errors.full_messages.join("
")
  end

  def update_summary(project)
    page.replace 'summary', :partial => 'summary',
                            :locals => { :min => project.min_expense,
                                         :max => project.max_expense,
                                         :average => project.avg_expense }
  end

  def insert_expense(expense)
    page.insert_html :bottom, 'expenses', :partial => 'expense', :object => expense
    page.visual_effect :highlight, "expense-#{expense.id}"
  end

  def update_total(amount)
    page.replace_html 'total-amount', amount
  end
end
Now edit app/views/expenses/new.rjs to look
like this:
if @expense.new_record?
  page.display_errors @expense
else
  page.update_summary @project
  page.insert_expense @expense
  page.update_total number_to_currency(@project.total_expenses)
  page.form.reset 'expense-form'
end
That certainly makes the code a lot cleaner. I placed the call to
number_to_currency() outside the helper because the
ActionView::Helpers modules are not included in the
context in which the RJS helper executes. To move the
number_to_currency call into the helper, you have to
include ActionView::Helpers::NumberHelper in the
helper module.
module ExpensesHelper
  include ActionView::Helpers::NumberHelper

  def display_errors(expense)
    page.alert "The Expense could not be added for the following reasons:
" +
               expense.errors.full_messages.join("
")
  end

  def update_summary(project)
    page.replace 'summary', :partial => 'summary',
                            :locals => { :min => project.min_expense,
                                         :max => project.max_expense,
                                         :average => project.avg_expense }
  end

  def insert_expense(expense)
    page.insert_html :bottom, 'expenses', :partial => 'expense', :object => expense
    page.visual_effect :highlight, 'expense-#{expense.id}'
  end

  def update_total(amount)
    page.replace_html 'total-amount', number_to_currency(amount)
  end
end
The RJS helpers really help make the code in our RJS template a
lot simpler. Obviously, there isn't a lot of value in extracting the
method calls into helpers if the code is only called in one place.
However, the helpers are great when the code in your RJS templates is
being duplicated in several different templates. The helpers methods are
also available to inline RJS calls from your controllers when you are
using render :update. If you are duplicating code in
your RJS templates and inline RJS calls, you can probably benefit from
extracting that functionality into helpers.
As you can see from the Expense Tracker, it is almost too easy to implement complex Ajax features with Rails and RJS templates. The Expense Tracker just barely scratches the surface of what is possible. The RJS Reference section has examples of usage so you can master all aspects of RJS for your own projects. Have fun!