
Let's take a look at the following example of how to create a React component:
var React = require('react'),
var ReactDOM = require('react-dom'),

var ReactClass = React.createClass({
  render: function () {
    return React.createElement('h1', { className: 'header' }, 'React Component'),
  }
});
var reactComponentElement = React.createElement(ReactClass);
var reactComponent = ReactDOM.render(reactComponentElement, document.getElementById('react-application'));
Some of the preceding code should already look familiar to you, and the rest can be broken down into three simple steps:
- Creating a React class.
- Creating a React component element.
- Creating a React component.
Let's take a closer look at how we can create a React component:
- Create a
ReactClassby calling theReact.createClass()function and providing a specification object as its parameter. In this chapter, we'll focus on learning about the specification objects in more detail. - Create a
ReactComponentElementby calling theReact.createElement()function and providing ourReactClassas itstypeparameter. In Chapter 2, Create Your First React Element, we learned that thetypeparameter can be either a string or aReactClass. In this chapter, you'll learn more about the latter one. - Create a
ReactComponentby calling theReactDOM.render()function and providing ourReactComponentElementas itselementparameter.
The specification object that you pass as a parameter to React.createClass() is where your component's look and feel is defined. Specification is the definition of your React component. From now on, in this chapter, we'll refer to a specification object as a React component, and in the rest of the chapter we will learn about this very important concept.
The specification object encapsulates a component's state and describes how a component is rendered. At the very minimum, the React component needs to have a render() method so that it returns at least null or false. Here is an example of a specification object in its simplest form:
{
  render: function () {
    return null;
  }
}
As you can guess, the render() function is responsible for telling React how to render your React component. It can return null, as in the preceding example, and nothing will be rendered. Or it can return a ReactElement that we learned how to create in Chapter 2, Create Your First React Element:
{
  render: function () {
    return React.createElement('h1', { className: 'header' }, 'React Component'),
  }
}
This example shows how we can encapsulate our React element inside our React component. We create a ReactElement of type h1 with the properties object and a ReactText as its only child. Then, we return it when the render()method of our React component is called. The fact that we encapsulated our React element inside a React component doesn't affect how it will be rendered:
<h1 class="header" data-reactid=".0">React Component</h1>
As you can see, the produced HTML markup is identical to the one we created in Chapter 2, Create Your First React Element, without using the React component. In this case, you might be wondering what's the benefit of having a render() function if we can render the exact same markup without it?
The advantage of having a render() function is that, as with any other function, before it returns a value, it can choose what value to return. So far, you've seen two examples of the render() function: one that returns null and one that returns a React element. We can merge the two and add a condition that decides what to render:
{
  render: function () {
    var elementState = {
      isHidden: true
    };

    if (elementState.isHidden) {
      return null;
    }

    return React.createElement('h1', { className: 'header' }, 'React Component'),
  }
}
In this example, we created the elementState variable that references an object with a single isHidden property. This object acts as a state for our React element. If we want to hide our React element, then we need to set the value of elementState.isHidden to true, and our render function will return null. In this case, React will render nothing. Logically, by setting elementState.isHidden to false, will return our React element and the expected HTML markup will be rendered. The question you might ask is: how do we set the value of elementState.isHidden to false? Or to true? Or how do we change it in general?
Let's think of scenarios in which we might want to change that state. One of them is when a user interacts with our user interface. Another one is when a server sends data. Or when a certain amount of time passes and then we want to render something else. Our render() function is not aware of all these events and it shouldn't be because its sole purpose is to return a React element based on the data that we pass to it. How do we pass data to it?
There are two ways to pass data to a render() function using the React API:
this.propsthis.state
this.props should look familiar to you. In Chapter 2, Create Your First React Element, we learned that the React.createElement() function accepts the props parameter. We used it to pass attributes to our HTML elements, but we didn't discuss what happens behind the scene and why attributes passed to the props object get rendered.
Any data that you put in the props object and pass to the React.createElement() function can be accessed inside the render() function of ReactComponent via this.props. Once you have accessed data from this.props, you can render it:
{
  render: function () {
    var elementState = {
      isHidden: true
    };

    if (elementState.isHidden) {
      return null;
    }

    return React.createElement('h1', { className: 'header' }, this.props.header);
  }
}
In this example, we're using this.props inside our render() function to access the header property. We're then passing this.props.header directly to the React.createElement() function as a child string element.
In the preceding example, we can pass the value of isHidden as another property of the this.props object:
{
  render: function () {
    if (this.props.isHidden) {
      return null;
    }

    return React.createElement('h1', { className: 'header' }, this.props.header);
  }
}
We can also use this.props to compute data that needs to be rendered:
{
  render: function () {
    if (this.props.isHidden) {
      return null;
    }

    var header = this.props.tweets.length + ' Latest Tweets';
    return React.createElement('h1', { className: 'header' }, header);
  }
}
As you can see, we're accessing an array of tweets via this.props.tweets and getting its length property. Then, we're concatenating a string ' Latest Tweets' to it. The resulting string is stored in a header variable, and this is our computed child string element that we're passing to the React.createElement() function.
Notice that in our previous example, instead of storing isHidden in a render() function, we're passing it via this.props. We removed our elementState object from it because we don't need to worry about the state in our render() function. It's a pure function, which means that it shouldn't mutate the state or access the real DOM, or otherwise interact with a web browser. Remember that we might want to use React on a server, where we have no web browser, and we should expect the render() function to produce the same result regardless of the environment.
If our render() function doesn't manage the state, then how do we manage it? How do we set the state, and how do we update it while handling user or browser events in React?
Earlier in this chapter, we learned that in React we can represent a user interface with React components. There are two types of React components:
- With a state
- Without a state
Hold on, didn't we say that React components are state machines? Surely, every state machine needs to have a state. You're correct; however, it's a good practice to keep as many React components stateless as possible.
React components are composable. As a result, we can have a hierarchy of React components. Imagine that we have a parent React component that has two child components, and each of them in turn has another two child components. All the components are stateful and they can manage their own state:
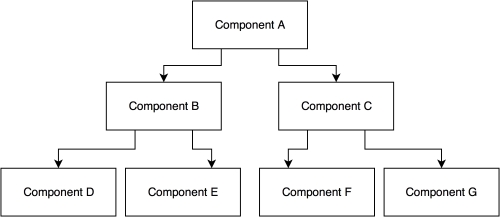
How easy will it be to figure out what the last child component in the hierarchy will render if the top component in the hierarchy updates its state? Not easy. There is a design pattern that removes this unnecessary complexity. The idea is to separate your components into two concerns: how to handle the user interface interaction logic and how to render data.
- The minority of your React components are stateful. They should be at the top of your components' hierarchy. They encapsulate all of the interaction logic, manage the user interface state, and pass that state down the hierarchy to stateless components, using
props. - The majority of your React components are stateless. They receive the state data from their parent components via
this.propsand render that data accordingly.
In our previous example, we received the isHidden state data via this.props and then we rendered that data. Our component was stateless.
Next, let's create our first stateful component.