
Chapter 9. Accessing data reactively
In Chapter 5, we explained the scalability and robustness problems in the use of blocking I/O for applications. This chapter will focus on interacting with databases and how Quarkus ensures that the data layers of an application stack can be asynchronous and utilize non-blocking I/O too.
The problem with data access
Accessing relational data previously involved blocking I/O while communicating with a database. As already discussed in Chapter 5, we want to avoid blocking I/O in our applications, at any level of the stack. Interacting with a database often takes a non-trivial amount of time to complete, depending on the number of records involved, creating an even larger impact on our application with blocking I/O to access a database!
What do we mean by this? Let’s say we developed a small database application, we’ve all developed many of those over the years. We often refer to them as CRUD applications because they provide Create, Read, Update, and Delete operations for records in a database.
Every exposed endpoint in our API needs to interact with the database. We will ignore caches and how they reduce the number of requests made to a database in certain situations. With each endpoint method calling the database, every execution performs blocking I/O, reducing concurrency.
Why are we forced to use blocking I/O when interacting with databases? APIs for interacting with databases, such as Open Database Connectivity (ODBC) and Java Database Connectivity (JDBC), were designed with a synchronous and blocking approach. The Java Persistence API (JPA), which came many years later, though coalescing the Object-Relational Mapping (ORM) landscape around a common API, was still designed on the existing synchronous and blocking behavior of JDBC.
Without a reactive programming approach to data access, the entirety of an application stack can never be truly reactive. An application would only ever be reactive up to a point. Though still beneficial, concurrency and throughput are still prevented from reaching their full potential concurrency.
That’s a lot of words explaining how database access with JDBC and JPA is not reactive, and therefore blocking, but what does it look like? As we saw in “The imperative model” with application logic, it’s a similar problem for the database interaction as illustrated in Figure 9-1.
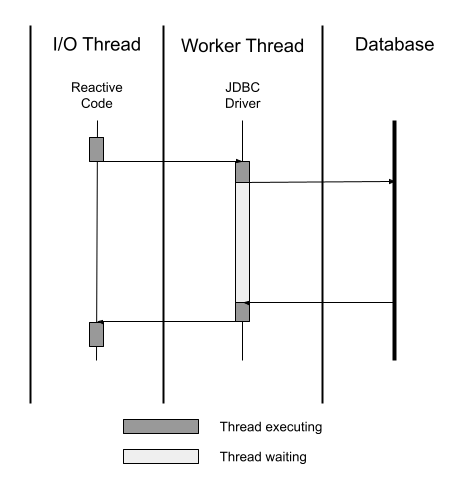
Figure 9-1. Blocking database client
When we’re communicating with a database over JDBC, or the higher abstraction JPA, the JDBC driver uses a request and response interaction. However, as seen in Figure 9-1, the JDBC driver blocks the thread until any response is received. This blocking approach occupies an entire thread for each database interaction. Depending on how you’ve configured database connection pooling, it’s possible to run out of threads for an application before reaching the maximum number of database connections.
When dealing with a large amount of database records to search or retrieve, and network latency between our application and the database. A problem with thread starvation or resource utilization will likely occur.
Non-blocking interactions with relational database
With recent work by various projects, such as Vert.x client APIs for PostgreSQL, MySQL, Db2, Oracle, and SQL Server, Java applications are now able to interact with databases in an asynchronous manner with non-blocking I/O.
How are things different with these new clients compared to JDBC?
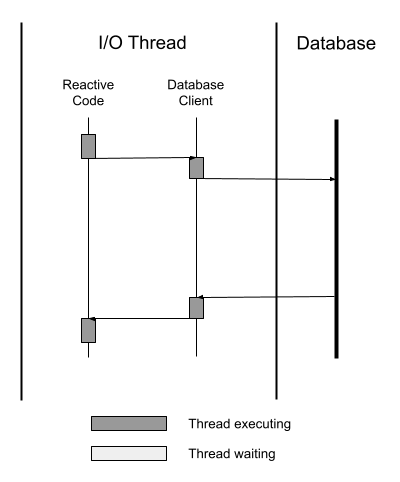
Figure 9-2. Non-blocking database client
When using non-blocking database clients, we’re able to avoid a blocked thread, as seen in Figure 9-2. In addition, it’s now possible for the database client to execute on the I/O thread instead of a worker. There is now a compounded benefit of these new non-blocking clients, by reducing the number of worker threads an application might need as database communication with these new clients can occur on the same thread as any reactive application code!
In Figure 9-2, we see a single database connection being used for the database client to communicate. However, when a client API and database supports it, we can utilize pipelining to share a single database connection for several requests.
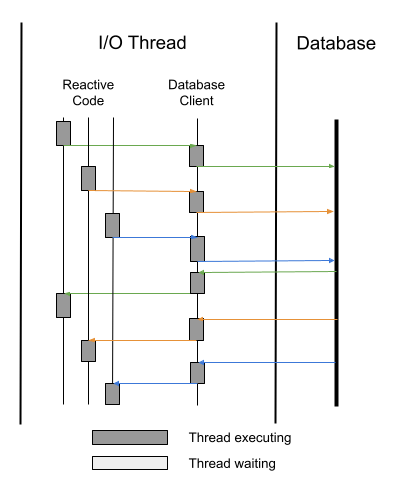
Figure 9-3. Non-blocking database client with pipelining
Figure 9-3 shows how pipelining in the database client works. Each color in Figure 9-3 is a separate database request. Though we have different reactive handlers calling the database, the database client is able to utilize a single connection to the database instead of, in this case, three. We want to take advantage of non-blocking advancements such as this whenever we can, to squeeze more and more out of the same amount of resources for an application.
Using a reactive ORM: Hibernate Reactive
Hibernate ORM enables developers to more easily write applications whose data outlives the application process. As an Object/Relational Mapping (ORM) framework, Hibernate is concerned with data persistence as it applies to relational databases. Hibernate provides both imperative and reactive APIs.
These APIs support two facets: non-blocking database clients, covered in the previous section, and reactive programming as a means of interacting with relational databases. Most of the existing Hibernate internals are still utilized, but it introduces a new layer for utilizing reactive and non-blocking APIs to communicate with database clients. The reactive APIs work in concert with JPA annotations, Hibernate annotations, and bean validation as well.
Time to dive in and use Hibernate with reactive APIs!
With Quarkus, it’s even better,
because we have the option to use Hibernate Reactive with Panache.
Panache is a thin layer simplifying the use of the Hibernate ORM.
It provides two models.
Your entities can be managed as active records where the entity class provides methods to retrieve, update, and query instances of that entity class.
You can also use a repository model, where a repository class provides these functions keeping the entity structure pure.
See the chapter-9/hibernate-reactive directory for all Hibernate Reactive project code.
First we need the dependency for Hibernate Reactive (Example 9-1)
Example 9-1. Hibernate Reactive dependency (chapter-9/hibernate-reactive/pom.xml)
<dependency>
    <groupId>io.quarkus</groupId>
    <artifactId>quarkus-hibernate-reactive-panache</artifactId>
</dependency>
Notice we used the Panache version of Hibernate Reactive.
If we didn’t want to use Panache,
we could have used the quarkus-hibernate-reactive dependency instead.
As mentioned previously,
we need a reactive database client too.
For this example we will use the PostgreSQL client (Example 9-2):
Example 9-2. PostgreSQL database client dependency (chapter-9/hibernate-reactive/pom.xml)
<dependency>
    <groupId>io.quarkus</groupId>
    <artifactId>quarkus-reactive-pg-client</artifactId>
</dependency>
With Dev Services, a Quarkus feature starting the required pieces of infrastructure automatically,
we don’t need the Docker Maven plugin to start a database for running tests.
Quarkus will automatically start the database for us!
To take advantage of Dev Services, we need a database driver, which we just added in Example 9-2,
and to set db.kind for informing Quarkus of the database type being used.
Let’s set that up now in application.properties:
Example 9-3. PostgreSQL database client config (chapter-9/hibernate-reactive/src/main/resources/application.properties)
quarkus.datasource.db-kind=postgresql
%prod.quarkus.datasource.username=quarkus_test
%prod.quarkus.datasource.password=quarkus_test
%prod.quarkus.datasource.reactive.url=vertx-reactive:postgresql://localhost/quarkus_test
With Dev Services,
all the properties except db.kind are specified with the prod configuration profile.
We could also remove the properties from the prod profile completely,
preferring to set them with environment variables, or a ConfigMap in Kubernetes.
We have a Customer entity that extends PanacheEntity.
We won’t cover Customer in detail here,
as it utilizes the usual annotations from JPA, Bean Validation, and Hibernate Validator.
The full source can be viewed at: chapter-9/hibernate-reactive/src/main/java/org/acme/data/Customer.
Let’s take a look at the implementation of a CRUD (create, retrieve, update, delete) application using Hibernate Reactive and RESTEasy Reactive to expose a REST API. First up is a method to retrieve all customers from the database.
Example 9-4. Retrieve all customers (chapter-9/hibernate-reactive/src/main/java/org/acme/data/CustomerResource.java)
public Multi<Customer> findAll() {
  return Customer.streamAll(Sort.by("name"));
}
We use streamAll() on Customer, from Panache, to retrieve all instances into Multi.
Each customer can have orders associated with them,
and when we retrieve a single customer, we also want to retrieve their orders.
Though we have a single application,
we will consider the orders to be coming from an external service.
First we define a Uni to retrieve a Customer and throw an exception if one was not found:
Example 9-5. Find a customer (chapter-9/hibernate-reactive/src/main/java/org/acme/data/CustomerResource.java)
Uni<Customer> customerUni = Customer.<Customer>findById(id)
    .onItem().ifNull().failWith(
        new WebApplicationException("Failed to find customer", Response.Status.NOT_FOUND)
    );
Next the orders of a customer are retrieved as a List into a separate Uni:
Example 9-6. Retrieve customer orders (chapter-9/hibernate-reactive/src/main/java/org/acme/data/CustomerResource.java)
Uni<List<Order>> customerOrdersUni = orderService.getOrdersForCustomer(id);
Lastly, the two are combined by a mapper, taking the results of each Uni to set the orders on the customer.
The resulting Uni is transformed into a JAX-RS Response to complete the endpoint execution:
Example 9-7. Combine Customer and Orders (chapter-9/hibernate-reactive/src/main/java/org/acme/data/CustomerResource.java)
return Uni.combine()
    .all().unis(customerUni, customerOrdersUni)
    .combinedWith((customer, orders) -> {
      customer.orders = orders;
      return customer;
    })
    .onItem().transform(customer -> Response.ok(customer).build());
So far everything we’ve done hasn’t required a transaction, as we’ve only been reading database records. Let’s look at how we can use transactions to store a new customer:
Example 9-8. Create a customer (chapter-9/hibernate-reactive/src/main/java/org/acme/data/CustomerResource.java)
return Panache
    .withTransaction(customer::persist)
    .replaceWith(Response.ok(customer).status(Response.Status.CREATED).build());
We use Panache.withTransaction() to inform Panache that we want a transaction to wrap the
Uni Supplier we pass into it.
In this instance,
we use customer.persist() as the code to be wrapped with a transaction.
Though Uni<Void> is returned on success,
we can use replaceWith() to create the necessary Uni<Response>.
Next we use withTransaction() to update the customer name.
First we retrieve a customer by id,
then when we receive an item which is not null we invoke a runnable to update the name on the retrieved entity:
Example 9-9. Update a customer (chapter-9/hibernate-reactive/src/main/java/org/acme/data/CustomerResource.java)
return Panache
    .withTransaction(
        () -> Customer.<Customer>findById(id)
            .onItem().ifNotNull().invoke(entity -> entity.name = customer.name)
    )
We then utilize onItem() to generate an outcome of a successful response or return
a not found response if the item is null.
The last method we need for a CRUD application with Hibernate Reactive is the ability to delete a customer.
Again we use withTransaction, passing it the Panache method to delete a customer by its id.
Deleting an entity returns Uni<Boolean> we need to use map() to convert it to a JAX-RS response
based on its success:
Example 9-10. Delete a customer (chapter-9/hibernate-reactive/src/main/java/org/acme/data/CustomerResource.java)
return Panache
    .withTransaction(() -> Customer.deleteById(id))
    .map(deleted -> deleted
        ? Response.ok().status(Response.Status.NO_CONTENT).build()
        : Response.ok().status(Response.Status.NOT_FOUND).build());
We’ve now seen how to create, retrieve, update, and delete entities with Panache and Hibernate Reactive! To see how the endpoints can be tested, take a look at /chapter-9/hibernate-reactive/src/test/java/org/acme/data/CustomerEndpointTest in the book’s source code.
What about noSQL?
We’ve shown how we can have reactive APIs with a traditional ORM such as Hibernate, but what about noSQL? Are we able to take advantage of reactive APIs when an application needs a noSQL database instead of a relational one? Yes, we can!
Quarkus has several extensions for communicating with noSQL databases, including MongoDB, Redis, and Cassandra. Do all these extensions support reactive APIs? Currently, the MongoDB, Redis, and Cassandra clients have support for reactive APIs.
In the next section we will develop a CRUD application with the same functionality as the Hibernate Reactive example in the previous section.
Interacting with Redis
Let’s develop a customer CRUD application with Redis! For this example, we will extract interactions into a separate service we can inject into a REST Resource. Check out /chapter-9/redis/src/main/java/org/acme/data/CustomerResource in the source code to see how the service is used.
Firstly we need the Redis client dependency for the project:
Example 9-11. Redis client dependency (chapter-9/redis/pom.xml)
<dependency>
    <groupId>io.quarkus</groupId>
    <artifactId>quarkus-redis-client</artifactId>
</dependency>
As we did with the Hibernate Reactive example,
we will utilize the docker-maven-plugin to run a Redis container for test execution.
Check out chapter-9/redis/pom.xml in the book source for the details.
Next we configure the Redis client as to where the host of the server is located.
Include the following config in application.properties:
Example 9-12. Redis client config (chapter-9/redis/src/main/resources/application.properties)
quarkus.redis.hosts=redis://localhost:6379
To be able to use the Redis client, we need to @Inject it:
Example 9-13. Inject Redis client (chapter-9/redis/src/main/java/org/acme/data/CustomerService.java)
@Inject
ReactiveRedisClient reactiveRedisClient;
So we don’t create an unintentional key clash in Redis, we will prefix a customer id with:
Example 9-14. Key Prefix (chapter-9/redis/src/main/java/org/acme/data/CustomerService.java)
private static final String CUSTOMER_HASH_PREFIX = "cust:";
Let’s start out with retrieving a list of all the customers from Redis:
Example 9-15. Retrieve all customers (chapter-9/redis/src/main/java/org/acme/data/CustomerService.java)
public Multi<Customer> allCustomers() {
  return reactiveRedisClient.keys("*")
      .onItem().transformToMulti(response -> {
        return Multi.createFrom().iterable(response).map(Response::toString);
      })
      .onItem().transformToUniAndMerge(key ->
          reactiveRedisClient.hgetall(key)
              .map(resp ->
                  constructCustomer(
                      Long.parseLong(
                          key.substring(CUSTOMER_HASH_PREFIX.length())),
                      resp)
              )
      );
}
The ReactiveRedisClient provides an API aligned with the commands available with Redis,
making it easier to use in Java if you are already familiar with using Redis commands.
In Example 9-15, we use keys() with a wildcard to retrieve all keys,
which returns an Uni<Response>.
This particular Response class is represents the response from Redis.
On receiving the response from Redis,
the item,
we use transformToMulti() to separate the single response into individual keys.
In the lambda we create a Multi from the response directly,
as it’s an Iterable,
and map the value to the string of the key.
The result of the execution is a Multi<String>.
We’re not done just yet; we need to convert the stream of keys into a stream of customers.
Reading the code provides a good idea of what happens.
Starting with Multi<String>,
on each item produced we call transformToUniAndMerge().
We use their key, or item, with the Redis client to retrieve all the fields and values matching the key,
or hash.
The response from hgetall() is mapped to a Customer instance using constructCustomer.
Finally, the customer Unis are merged into a Multi for returning.
To retrieve a single customer,
we call hgetall() and depending on the size of the response either return null or use constructCustomer to create a customer.
We need to check the size of the response to find out whether any fields and values were returned.
If the size is zero,
the response was empty because the key could not be found.
Example 9-16. Retrieve customer (chapter-9/redis/src/main/java/org/acme/data/CustomerService.java)
public Uni<Customer> getCustomer(Long id) {
  return reactiveRedisClient.hgetall(CUSTOMER_HASH_PREFIX + id)
      .map(resp -> resp.size() > 0
          ? constructCustomer(id, resp)
          : null
      );
}
To store a customer record into Redis,
we use hmset() to store multiple fields and values for a single key.
From a Redis perspective,
it doesn’t matter whether we’re storing a new customer,
or updating an existing one, we use hmset() for both.
We should split the behavior into a separate method to reuse it in both places:
Example 9-17. Store customer (chapter-9/redis/src/main/java/org/acme/data/CustomerService.java)
return reactiveRedisClient.hmset(
    Arrays.asList(CUSTOMER_HASH_PREFIX + customer.id, "name", customer.name)
)
    .onItem().transform(resp -> {
      if (resp.toString().equals("OK")) {
        return customer;
      } else {
        throw new NoSuchElementException();
      }
    });
Using hmset() we need to ensure an odd number of arguments are passed to it.
The first argument is the hash for the record,
followed by matching pairs of field and value for as many fields to be set.
We get a simple reply of OK if it succeeds,
using transform() to return the customer on success or throw an exception.
With storeCustomer() in place, let’s look at createCustomer():
Example 9-18. Create customer (chapter-9/redis/src/main/java/org/acme/data/CustomerService.java)
public Uni<Customer> createCustomer(Customer customer) {
  return storeCustomer(customer);
}
We’ve got a nice clean method for createCustomer() for responding with a Uni<Customer>!
There wasn’t much to that one,
so let’s look at updateCustomer():
Example 9-19. Update customer (chapter-9/redis/src/main/java/org/acme/data/CustomerService.java)
public Uni<Customer> updateCustomer(Customer customer) {
  return getCustomer(customer.id)
      .onItem().transformToUni((cust) -> {
        if (cust == null) {
          return Uni.createFrom().failure(new NotFoundException());
        }
        cust.name = customer.name;
        return storeCustomer(cust);
      });
}
First we reuse getCustomer() from the service to retrieve the existing customer from Redis.
When an item is returned from getCustomer(),
we transform it into another Uni with a mapper.
The mapper first checks whether the item we received, the customer,
is null, returning a Uni failure containing an exception if it is.
Then we set the new name onto the customer before calling storeCustomer(),
creating the Uni the mapper returns.
Lastly, we need a way to delete a customer.
For this we use hdel() on the Redis client,
which returns the number of removed fields or 0 if the key could not be found.
We map Uni<Response> to Uni<Boolean>,
checking whether one field was removed, the customer name, to return true,
or null if there were none.
On the produced item, we fail with a NotFoundException if the item is null,
or succeed and transform the item into a null item.
Example 9-20. Delete customer (chapter-9/redis/src/main/java/org/acme/data/CustomerService.java)
public Uni<Void> deleteCustomer(Long id) {
  return reactiveRedisClient.hdel(Arrays.asList(CUSTOMER_HASH_PREFIX + id, "name"))
      .map(resp -> resp.toInteger() == 1 ? true : null)
      .onItem().ifNull().failWith(new NotFoundException())
      .onItem().ifNotNull().transformToUni(r -> Uni.createFrom().nullItem());
}
This section gave a brief look into utilizing some methods of the reactive client for Redis. There are many more methods we didn’t cover, but the section provided some guidance on how they can be generally used.
Data related events and change data capture
Change Data Capture, or CDC, is an integration pattern for extracting events from sources that don’t typically operate with events and messaging, such as databases. There are many benefits to CDC, including being able to produce change events from a legacy application without modifying the application.
Another benefit is CDC doesn’t care about what languages an application is developed in, as it interacts with the database. This approach can greatly simplify the effort to produce a consistent looking change event from a database that has polyglot applications writing to it. Having to update possibly dozens of applications written in different languages to produce a consistent looking change event from them all can be challenging and time-consuming.
Writing to a database involves transactions, or usually should, and poses an additional complexity when also writing an event to a messaging system.

Figure 9-4. Writing to a database and message broker
In Figure 9-4, we need to make sure if either the database update fails or producing a message fails, everything rolls back and undoes any changes. Such a situation can be particularly complex when transaction rollback can occur outside our application code because of a failure to return an HTTP response, for instance. With CDC, this concern goes away because we only worry about writing to the database itself.
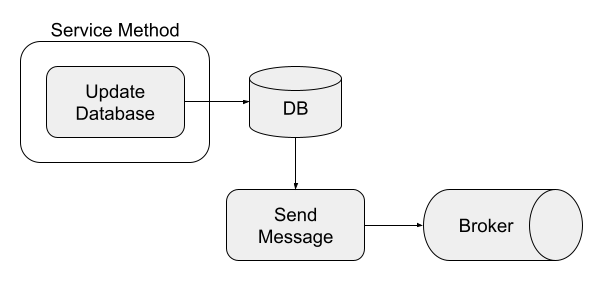
Figure 9-5. Writing to a database, with CDC triggering message creation
Any change events can flow from the updated database with CDC, ensuring we’re never sending an event we shouldn’t because the transaction has been committed before CDC sees the change, as seen in Figure 9-5.
One impact for developers to be aware of is that CDC does not provide strong consistency. Strong consistency means that any data viewed immediately after an update is consistent for all observers of the data, irrespective of whether the viewers are in parallel processes or distributed processes. For relational databases this is guaranteed as it’s part of the design of the database. With CDC, there is a period of time between the update happening in the database, and when the message of the update is received and processed by the furthest downstream system consuming the messages.
The lack of strong consistency, or eventual consistency, is not a deterrent for the use of CDC. We want developers to be aware of the consistency guarantees of the CDC pattern, to bear it in mind during application design.
Using Debezium to capture change
Debezium is a distributed platform for CDC. Debezium is durable and fast, enabling applications to respond promptly and never miss an event!

Figure 9-6. CDC with Debezium
Figure 9-6 shows where Debezium fits in an application architecture using CDC. Debezium provides Kafka Connect source connectors for several databases, including MySQL, MongoDB, PostgreSQL, Oracle, Db2, and SQL Server.
We will briefly show how we can enhance the Hibernate Reactive example, from the previous section, with Debezium. Full details can be found in the source code for the book here: https://github.com/cescoffier/reactive-systems-in-java/tree/master/chapter-9/debezium
Though this example includes a copy of the code from Hibernate Reactive, it would also work by using the example directly as the application code is not impacted by the introduction of Debezium. The main piece to understand is docker-compose.yml, starting containers for Kafka, it’s dependent Zookeeper, PostgreSQL database, and Kafka Connect. We will use the container images from the Debezium project to simplify the deployment process. For example, the PostgreSQL container image already includes the logical decoding plugins necessary to communicate the change events to Kafka Connect.
Start all the containers with docker compose up, and then build and start the application with java -jar target/quarkus-app/quarkus-run.jar.
Once all containers have started,
we install the Debezium source connector for PostgreSQL into Kafka Connect:
Example 9-21.
curl -i -X POST -H "Accept:application/json" -H "Content-Type:application/json"
    http://localhost:8083/connectors/ -d @register.json
In Example 9-21, register.json is the data we’re passing to the Kafka Connector endpoint.
The file provides the details of the database to connect to, and the Debezium connector to use:
Example 9-22. Debezium source connector definition
{
  "name": "customer-connector",
  "config": {
    "connector.class": "io.debezium.connector.postgresql.PostgresConnector",
    "tasks.max": "1",
    "database.hostname": "postgres",
    "database.port": "5432",
    "database.user": "quarkus_test",
    "database.password": "quarkus_test",
    "database.dbname": "quarkus_test",
    "database.server.name": "quarkus-db-server"
  }
}
The installation of the source connector will trigger the creation of Kafka topics for the tables discovered by the connector.
We can verify what topics were created by running docker exec -ti kafka bin/kafka-topics.sh --list --zookeeper zookeeper:2181.
Next we run an exec shell in the Kafka container to consume messages from the topic for the customer database,
quarkus-db-server.public.customer:
Example 9-23.
docker-compose exec kafka /kafka/bin/kafka-console-consumer.sh
    --bootstrap-server kafka:9092
    --from-beginning
    --property print.key=true
    --topic quarkus-db-server.public.customer
--property print.key=true
--topic quarkus-db-server.public.customerRemove this setting to skip the messages for the initial four messages created when the application started.
When it’s done, create a new customer in a separate terminal window:
Example 9-24.
curl -X POST -H "Content-Type:application/json" http://localhost:8080/customer
    -d '{"name" : "Harry Houdini"}'
In the terminal running Example 9-23, we see the json message created by the connector:
Example 9-25.
{
  "schema": {
    "type":"struct",
    "fields": [{
      "type":"int64",
      "optional":false,
      "field":"id"
    }],
    "optional":false,
    "name":"quarkus_db_server.public.customer.Key"
  },
  "payload": {
    "id":9
  }
}
{
  "schema": {
    // JSON defining the schema of the payload removed for brevity

    "optional": false,
    "name": "quarkus_db_server.public.customer.Envelope"
  },
  "payload": {
    "before": null,
    "after": {
      "id": 9,
      "name": "Harry Houdini"
    },
    "source": {
      "version": "1.5.0.Final",
      "connector": "postgresql",
      "name": "quarkus-db-server",
      "ts_ms": 1627865571265,
      "snapshot": "false",
      "db": "quarkus_test",
      "sequence": "[null,"23870800"]",
      "schema": "public",
      "table": "customer",
      "txId": 499,
      "lsn": 23871232,
      "xmin": null
    },
    "op": "c",
    "ts_ms": 1627865571454,
    "transaction": null
  }
}
},
"source": {
"version": "1.5.0.Final",
"connector": "postgresql",
"name": "quarkus-db-server",
"ts_ms": 1627865571265,
"snapshot": "false",
"db": "quarkus_test",
"sequence": "[null,"23870800"]",
"schema": "public",
"table": "customer",
"txId": 499,
"lsn": 23871232,
"xmin": null
},
"op": "c",
"ts_ms": 1627865571454,
"transaction": null
}
}The ID of the record created with the POST.
Name of the created customer.
Experiment with some other HTTP commands, such as updating a customer name, to compare the JSON received in the Kafka topic.
Summary
Data with reactive applications has been limited until recently as there weren’t reactive database clients available. With the introduction of Vert.x client APIs for database such as PostgreSQL, we can now create a reactive application that is reactive for the entirety of the stack.
We don’t always want to utilize database client APIs directly, we like simplified APIs such as that provided by Hibernate ORM. Hibernate Reactive gives us such an ability, building on the maturity of Hibernate ORM to add reactive specific APIs.
Relational databases aren’t the only option either. We also have reactive clients for Redis and MongoDB. With event-driven architecture, we want to have the ability to create events from database interactions. This is where CDC shines with its ability to extract changes from database tables and create change events to feed into Kafka.
We’ve now reached the end of Part III!
We dived deeper into Quarkus and saw it unifies the imperative and
reactive programming models, offering greater flexibility for developers in choosing their application stack.
We then journeyed through Uni and Multi to learn about the preferred reactive programming library in Quarkus, Mutiny.
Continuing with newer innovation in Quarkus,
we explored RESTEasy Reactive to develop JAX-RS resources in completely non-blocking manner while still providing the ability to block when needed,
before finishing up with reactive database clients with Hibernate Reactive and Redis.
In the next part, Part IV, we focus on some typical patterns we need when developing reactive applications, such as Messaging with Kafka and AMQP, then we delve into aspects of the systems underlying messaging to better appreciate the trade-offs and their abilities. We take a look at communicating with external services with HTTP Clients, while still utilizing non-blocking I/O. Lastly, though not necessarily an application pattern per se, we will look at observability, as it is critical to understand and implement it for distributed systems.